
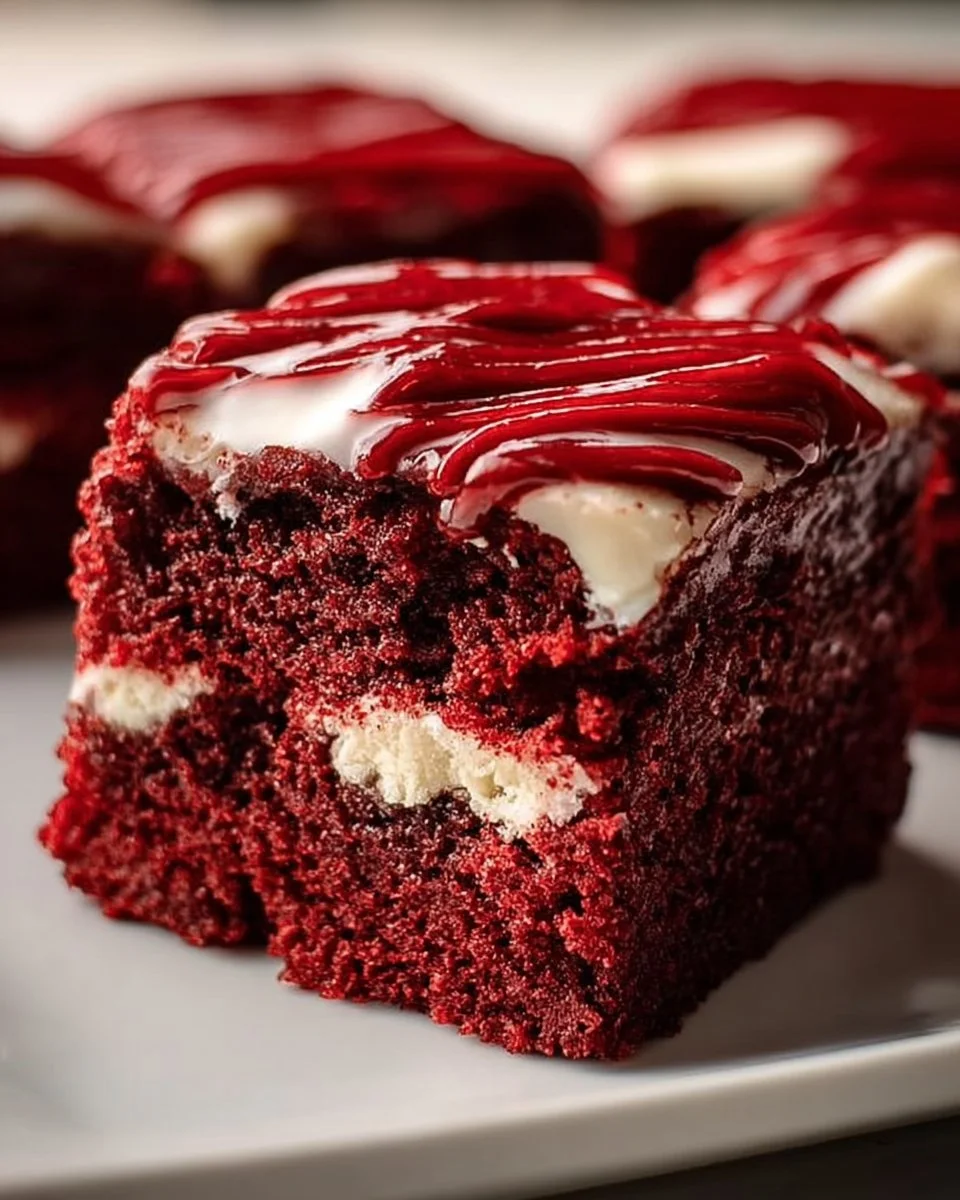
Red Velvet Brownies
The rich, inviting aroma of fresh-baked Red Velvet Brownies wafts through the kitchen, wrapping you in an embrace of warmth and sweetness. As you draw closer, the vibrant crimson hue draws your eye, promising an exquisite treat that’s as indulgent as it is playful. The moment you slip a piece from the pan, the dense, fudgy texture effortlessly breaks apart, revealing a glossy top layer that beckons for your taste buds. Each bite delivers a delightful experience, where the lush chocolate flavor intertwines with a subtle tanginess, wrapped in the luxurious embrace of a cream cheese frosting that complements the richness with its smooth creaminess. It’s not just a dessert, but a festive celebration on your palate.
These Red Velvet Brownies not only satisfy your sweet tooth, but they also evoke a sense of nostalgia and joy. Perfect for birthdays, romantic evenings, or even a cozy gathering with friends, they undoubtedly leave a lasting impression. With their eye-catching appearance and decadent flavor, these brownies easily transition from a simple home bake to a stunning treat worthy of any occasion. Your dessert table will shine as brightly as the smiles on your loved ones’ faces when they dive into these velvety squares of pleasure.
Why You’ll Love This Red Velvet Brownies Recipe
Here’s what makes these Red Velvet Brownies stand out:
-
Irresistible Flavor: The marriage of rich cocoa with the unique taste of red velvet creates an exciting twist on the classic brownie. The slight tang from buttermilk harmonizes beautifully with the sweetness, ensuring each bite captivates your senses.
-
Showstopper Appearance: Their striking red color, offset by the creamy white frosting, makes these brownies an absolute showstopper at any gathering. You’ll savor not just the flavor but the visual wonder they bring, creating a feast for the eyes as well as the palate.
-
Perfect for Any Occasion: Whether it’s a holiday celebration, a casual get-together, or simply a comforting dessert after a long day, these brownies fit right in. They add a touch of magic and warmth to every table.
Preparation Phase & Tools to Use
Gear up for an effortless baking adventure with the right tools to create your masterpiece. Here’s what you’ll need:
- 9×9 Inch Baking Dish: A classic choice for perfectly sized brownies, allowing for even baking and easy serving. The nonstick feature makes cleanup a breeze!
- Mixing Bowls: Use at least two: one for dry ingredients and one for the wet ones. This technique helps to maintain the brownies’ luscious texture.
- Whisk and Spatula: A whisk for blending your ingredients seamlessly and a rubber spatula for folding in your mixtures gently works wonders in keeping the batter airy.
- Measuring Cups & Spoons: Precision matters, especially when you’re adding beautiful ingredients like cocoa powder and flour.
Practical Preparation Tips:
- Ensure your butter is melted and slightly cooled before mixing. This helps in achieving that perfect fudgy consistency.
- Bring your eggs and buttermilk to room temperature to ensure an even batter.
- Grease your baking dish generously, or consider lining it with parchment paper to make removal effortless.
Ingredients for Red Velvet Brownies
Creating these delightful brownies requires a handful of key ingredients, most of which you might already have in your pantry:
- 1 cup all-purpose flour: The foundation of your brownies, providing structure. You can substitute with a gluten-free flour blend for a gluten-free option.
- 1 cup sugar: Sweetness is essential; feel free to reduce slightly for a less sweet treat or use coconut sugar for a healthier twist.
- 1/3 cup unsweetened cocoa powder: The source of that beautiful chocolatey flavor. Use high-quality cocoa for the best results.
- 1/2 cup unsalted butter, melted: Fat enriches the brownies, yielding a moist, fudgy texture.
- 1/4 cup buttermilk: Adds a delightful tang and moisture. You can mix milk with a splash of vinegar if you’re out of buttermilk.
- 1 large egg: Acts as the binder and adds richness.
- 1 tablespoon red food coloring: This brings your brownies to life with their signature hue. You can use natural alternatives like beet juice if you prefer.
- 1 teaspoon vanilla extract: Sweet and aromatic, enhancing overall flavor.
- 1/2 teaspoon baking powder: For a little lift.
- 1/4 teaspoon salt: Balances sweetness perfectly.
For the frosting:
- 1/2 cup cream cheese, softened: The star of your luscious frosting, adding richness and creaminess.
- 1 cup powdered sugar: For a sweet, smooth texture.
- 1 tablespoon milk: To reach that perfect spreading consistency.
- 1/2 teaspoon vanilla extract: Enhances the flavor of your frosting.
How to Make Red Velvet Brownies
Let’s transform these beautiful ingredients into decadent joy, step-by-step:
-
Preheat your oven to 350°F (175°C) and lovingly grease a 9×9-inch baking dish. You want to make sure every bite can slip out with ease.
-
In a large bowl, whisk together the flour, sugar, cocoa powder, baking powder, and salt. Feel the silky texture and see the rich chocolate color come together.
-
In another bowl, combine the melted butter, buttermilk, egg, red food coloring, and vanilla extract. Mix until you achieve a smooth, vibrant mixture that looks like a rich sunset.
-
Pour the wet mixture into the dry ingredients and stir gently. Blend just until combined—overmixing will lead to tough brownies, and we want a tender, velvety result!
-
Spread the batter evenly in your prepared baking dish and watch as it fills the corners, ready to transform under heat.
-
Bake for 20-25 minutes or until a toothpick inserted in the center comes out clean. The aroma will sweep through your space, teasing your anticipation.
-
Once baked, let cool completely in the pan. Patience pays off here, allowing those gorgeous squares to set properly.
-
Meanwhile, in a separate bowl, beat the cream cheese with powdered sugar, milk, and vanilla extract until smooth and fluffy. The mixture should be light and inviting, perfect for topping your brownies.
-
Spread the cream cheese frosting generously over the cooled brownies. Revel in the contrast of textures as you layer this dreamy frosting on top.
-
Slice into squares and serve! Each piece holds a promise of bliss, ready to surprise and delight everyone who tries them.
Chef’s Notes & Helpful Tips
Planning ahead? Here are some notes to keep in mind:
- Make-ahead Tips: Prepare the brownie batter a day in advance and keep it stored in the fridge. Just mix and bake when you’re ready for a sweet treat.
- Cooking Alternatives: If you’re using an air fryer, adjust the temperature to 320°F (160°C) and check for doneness around the 15-minute mark.
- Customization Ideas: Want to jazz them up? Add in chopped nuts, chocolate chips, or even a swirl of nut butter before baking for an extra layer of flavor.
Common Mistakes to Avoid
To achieve brownie perfection, steer clear of these pitfalls:
- Overmixing the Batter: This will create dense, rubbery brownies. Mix until just combined to preserve that fudginess.
- Not Measuring Ingredients Accurately: Baking is science—precision is key to getting the right texture and flavor.
- Skipping the Cooling Time: Cutting into warm brownies may lead to a crumbly, messy situation. Be patient; they’re worth the wait.
What to Serve With Red Velvet Brownies
Elevate your dessert experience by pairing these brownies with delightful accompaniments:
- Vanilla Ice Cream: The cold creaminess balances the rich warmth of the brownies beautifully.
- Fresh Berries: Strawberries or raspberries add a refreshing zing that cuts through the sweetness.
- Whipped Cream: Lighter than frosting, it brings a fluffy touch that complements the dense brownies perfectly.
- Coffee or Espresso: A rich cup of coffee enhances the chocolate charm and deepens flavors.
- Milk or Chocolate Milk: A classic, nostalgic choice that pairs harmoniously with any chocolate dessert.
- Dark Chocolate Sauce: Drizzle that extra layer of indulgence over each square for a decadent treat.
Storage & Reheating Instructions
To keep your brownies fresh and delectable:
- Fridge: Store in an airtight container for up to one week. They become even more luscious as they sit.
- Freezer: Wrap individual squares in plastic wrap and place in a freezer-safe bag. They freeze beautifully for up to three months.
- Reheating: Warm briefly in the microwave (about 10-15 seconds) for a gooey, melt-in-your-mouth experience when you’re ready to enjoy.
Estimated Nutrition Information
Each brownie (based on 16 servings) contains approximately:
- Calories: 210
- Fat: 10g
- Carbohydrates: 28g
- Protein: 2g
Note: Nutritional information may vary based on specific brands and quantities.
FAQs
1. Can I use cocoa powder instead of red food coloring?
While you can play around with cocoa, it won’t achieve the signature red shade. Use natural colorants or stick with food coloring for that classic look.
2. What if I don’t have buttermilk?
No worries! Simply mix a tablespoon of vinegar or lemon juice with a cup of milk. Let it sit for five minutes for a perfect substitute.
3. Can I add chocolate chips to the brownie batter?
Absolutely! Fold in dark or white chocolate chips for an added layer of gooey goodness.
4. How long do these brownies last?
In an airtight container in the fridge, your brownies will stay fresh for about one week. They actually taste better as they sit!
5. Can I make these brownies gluten-free?
Yes! Substitute regular flour with a gluten-free blend (ensure it includes a binding agent). The texture might vary slightly, but they’ll still be delicious.
Conclusion
Now it’s time to savor the magic of baking with a heartfelt twist—create your very own batch of Red Velvet Brownies. This recipe captures the fun and romance of baking, turning a simple dessert into a memorable experience filled with flavor and joy. As you indulge in each luscious bite, remember to share the warmth and excitement with loved ones. After all, the best moments are the ones shared over something sweet and delightful. Whether it’s a celebration or just a moment of self-care, these brownies promise to bring smiles and satisfaction to every occasion. So don your apron, roll up your sleeves, and dive into the delicious world of Red Velvet Brownies!
Print
Red Velvet Brownies
- Total Time: 40 minutes
- Yield: 16 servings 1x
- Diet: Vegetarian
Description
Delicious red velvet brownies topped with creamy cream cheese frosting, perfect for any occasion.
Ingredients
- 1 cup all-purpose flour
- 1 cup sugar
- 1/3 cup unsweetened cocoa powder
- 1/2 cup unsalted butter, melted
- 1/4 cup buttermilk
- 1 large egg
- 1 tablespoon red food coloring
- 1 teaspoon vanilla extract
- 1/2 teaspoon baking powder
- 1/4 teaspoon salt
- For the frosting:
- 1/2 cup cream cheese, softened
- 1 cup powdered sugar
- 1 tablespoon milk
- 1/2 teaspoon vanilla extract
Instructions
- Preheat your oven to 350°F (175°C) and grease a 9×9-inch baking dish.
- Whisk together the flour, sugar, cocoa powder, baking powder, and salt in a large bowl.
- Combine melted butter, buttermilk, egg, red food coloring, and vanilla extract in another bowl until smooth.
- Pour the wet mixture into the dry ingredients and stir gently until just combined.
- Spread the batter evenly in the prepared baking dish.
- Bake for 20-25 minutes or until a toothpick inserted in the center comes out clean.
- Cool completely in the pan.
- Beat cream cheese with powdered sugar, milk, and vanilla until smooth and fluffy.
- Spread cream cheese frosting over the cooled brownies.
- Slice into squares and serve.
Notes
Allow brownies to cool completely before cutting to avoid crumbling. You can store in an airtight container for up to one week.
- Prep Time: 15 minutes
- Cook Time: 25 minutes
- Category: Dessert
- Method: Baking
- Cuisine: American
Nutrition
- Serving Size: 1 serving
- Calories: 210
- Sugar: 20g
- Sodium: 150mg
- Fat: 10g
- Saturated Fat: 5g
- Unsaturated Fat: 5g
- Trans Fat: 0g
- Carbohydrates: 28g
- Fiber: 1g
- Protein: 2g
- Cholesterol: 30mg
Keywords: red velvet, brownies, dessert, cream cheese frosting, baking