
Cherry Cheesecake Chocolate Tart: A Delicious Delight!

Introduction to Cherry Cheesecake Chocolate Tart
As a busy mom, I know how precious time can be, especially when it comes to whipping up something special for my family. That’s why I absolutely adore this Cherry Cheesecake Chocolate Tart! It’s a delightful blend of rich chocolate and creamy cherry cheesecake that’s sure to impress. Whether you’re celebrating a birthday or just want to treat your loved ones, this tart is the perfect solution. With simple ingredients and easy steps, you can create a dessert that feels luxurious without spending hours in the kitchen. Trust me, your taste buds will thank you!
Why You’ll Love This Cherry Cheesecake Chocolate Tart
This Cherry Cheesecake Chocolate Tart is a dream come true for busy cooks like us! It’s quick to prepare, taking just 30 minutes of hands-on time. The combination of chocolate and cherries creates a flavor explosion that’s simply irresistible. Plus, it can be made ahead of time, allowing you to enjoy the moment with your family. Who wouldn’t love a dessert that’s both easy and delicious?
Ingredients for Cherry Cheesecake Chocolate Tart
Gathering the right ingredients is key to making this Cherry Cheesecake Chocolate Tart a success. Here’s what you’ll need:
- Chocolate cookie crumbs: These form the base of your tart, providing a rich, chocolatey flavor. You can use store-bought or crush your favorite chocolate cookies at home.
- Unsalted butter: This helps bind the cookie crumbs together, creating a deliciously firm crust. Make sure it’s melted for easy mixing.
- Cream cheese: The star of the show! Softened cream cheese gives the filling its creamy texture. Let it sit at room temperature for easier blending.
- Powdered sugar: This sweetens the cream cheese filling without the graininess of granulated sugar. It dissolves beautifully, ensuring a smooth mixture.
- Vanilla extract: A splash of vanilla adds depth and warmth to the filling, enhancing the overall flavor.
- Heavy cream: Whipped to perfection, it lightens the cream cheese mixture, making it airy and luscious. Look for heavy cream with a high fat content for the best results.
- Cherry pie filling: This adds a burst of fruity flavor and a pop of color. You can use store-bought or make your own if you’re feeling adventurous!
- Chocolate shavings: These are optional but make for a beautiful garnish, adding a touch of elegance to your tart.
For exact measurements, check the bottom of the article where you can find everything listed for easy printing. Happy baking!
How to Make Cherry Cheesecake Chocolate Tart
Now that you have all your ingredients ready, let’s dive into the fun part—making this Cherry Cheesecake Chocolate Tart! Follow these simple steps, and you’ll have a stunning dessert that’s sure to wow your family and friends.
Step 1: Preheat the Oven
First things first, preheat your oven to 350°F (175°C). Preheating is crucial because it ensures that your tart crust bakes evenly. A hot oven helps the crust set perfectly, giving you that delightful crunch we all love.
Step 2: Prepare the Crust
In a mixing bowl, combine your chocolate cookie crumbs with the melted butter. Stir until the crumbs are fully coated and the mixture resembles wet sand. Next, press this mixture firmly into the bottom of your tart pan. Make sure it’s even and compact; this will create a sturdy base for your creamy filling.
Step 3: Bake the Crust
Pop the crust into your preheated oven and bake for about 10 minutes. This step helps to set the crust, making it easier to slice later. Once baked, remove it from the oven and let it cool completely. Patience is key here; a cool crust will hold up better when you add the filling.
Step 4: Make the Cream Cheese Filling
In a large mixing bowl, beat the softened cream cheese until it’s smooth and creamy. This usually takes about 2-3 minutes. Then, add in the powdered sugar and vanilla extract, mixing until everything is well combined. The mixture should be silky and sweet, making your taste buds dance with anticipation!
Step 5: Whip the Heavy Cream
In a separate bowl, whip the heavy cream until stiff peaks form. This means that when you lift the whisk, the cream should hold its shape. This step is crucial because it adds lightness to your filling, making it airy and delightful. Just be careful not to over-whip, or you’ll end up with butter!
Step 6: Combine the Mixtures
Now, gently fold the whipped cream into the cream cheese mixture. Use a spatula and be careful not to deflate the whipped cream. This folding technique keeps the filling light and fluffy, which is exactly what you want in a cheesecake tart.
Step 7: Assemble the Tart
Spread the cream cheese mixture evenly over the cooled crust. Take your time to make it smooth and even. Then, top it off with the cherry pie filling, spreading it out to cover the entire surface. The vibrant red cherries will make your tart look irresistible!
Step 8: Chill the Tart
Now comes the hard part—waiting! Chill the tart in the refrigerator for at least 4 hours. This chilling time allows the flavors to meld beautifully and helps the filling set. Trust me, the wait will be worth it!
Step 9: Garnish and Serve
Before serving, sprinkle some chocolate shavings on top for that extra touch of elegance. It’s like putting a cherry on top, but even better! Slice your tart, serve it up, and watch as everyone’s eyes light up with delight.
Tips for Success
- Make sure your cream cheese is at room temperature for easy mixing.
- Use a spatula to gently fold in the whipped cream; this keeps the filling light.
- Chill the tart overnight for the best flavor and texture.
- For a gluten-free option, swap regular cookies for gluten-free chocolate cookies.
- Don’t skip the chocolate shavings—they add a lovely finishing touch!
Equipment Needed
- Tart pan: A standard tart pan works well, but a pie dish can be a great alternative.
- Mixing bowls: Use medium and large bowls for mixing ingredients.
- Electric mixer: A hand mixer is perfect, but a whisk will do in a pinch.
- Spatula: A rubber spatula is ideal for folding and spreading.
- Whisk: Essential for whipping cream to those perfect stiff peaks.
Variations
- Fruit Toppings: Swap out the cherry pie filling for other fruits like blueberries, strawberries, or raspberries for a different flavor profile.
- Chocolate Crust: For an extra chocolatey experience, use chocolate graham crackers instead of regular chocolate cookies for the crust.
- Nutty Twist: Add crushed nuts like almonds or walnuts to the crust for added texture and flavor.
- Vegan Option: Substitute cream cheese with a vegan cream cheese alternative and use coconut cream instead of heavy cream for a dairy-free version.
- Low-Sugar Version: Use a sugar substitute in place of powdered sugar to reduce the sweetness while still enjoying the tart.
Serving Suggestions
- Pair your Cherry Cheesecake Chocolate Tart with a dollop of whipped cream for extra creaminess.
- Serve alongside a scoop of vanilla ice cream to balance the tartness of the cherries.
- For drinks, consider a light sparkling wine or a refreshing iced tea.
- Garnish with fresh cherries or mint leaves for a pop of color.
FAQs about Cherry Cheesecake Chocolate Tart
Can I make this Cherry Cheesecake Chocolate Tart ahead of time?
Absolutely! In fact, making it a day in advance enhances the flavors. Just keep it covered in the refrigerator until you’re ready to serve.
What can I use instead of cherry pie filling?
If cherries aren’t your thing, feel free to swap in other fruit fillings like blueberry or strawberry. Fresh fruit can also work beautifully!
How do I store leftovers?
Store any leftover tart in an airtight container in the refrigerator. It should stay fresh for up to 3 days, but I doubt it will last that long!
Can I freeze the Cherry Cheesecake Chocolate Tart?
Yes, you can freeze it! Just wrap it tightly in plastic wrap and then foil. Thaw it in the fridge before serving for the best texture.
Is this tart suitable for special diets?
It can be! You can easily make a gluten-free version by using gluten-free cookies for the crust. There are also vegan alternatives for the cream cheese and heavy cream.
Final Thoughts
Creating this Cherry Cheesecake Chocolate Tart is more than just baking; it’s about bringing joy to your family and friends. The moment you slice into that creamy, chocolatey goodness, you’ll see smiles all around. It’s a dessert that sparks conversation and creates memories, whether it’s a special occasion or a simple weeknight treat. Plus, the ease of preparation means you can focus on what truly matters—spending time with your loved ones. So, roll up your sleeves, embrace the process, and enjoy every delicious bite of this delightful tart. You deserve it!
Print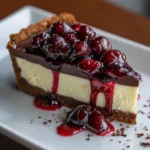
Cherry Cheesecake Chocolate Tart: A Delicious Delight!
- Total Time: 4 hours 40 minutes
- Yield: 8 servings 1x
- Diet: Vegetarian
Description
A rich and creamy cherry cheesecake chocolate tart that combines the flavors of chocolate and cherries for a delightful dessert experience.
Ingredients
- 1 1/2 cups chocolate cookie crumbs
- 1/2 cup unsalted butter, melted
- 2 cups cream cheese, softened
- 1 cup powdered sugar
- 1 teaspoon vanilla extract
- 1 cup heavy cream
- 1 cup cherry pie filling
- Chocolate shavings for garnish
Instructions
- Preheat the oven to 350°F (175°C).
- In a bowl, mix chocolate cookie crumbs with melted butter until well combined.
- Press the mixture into the bottom of a tart pan to form the crust.
- Bake the crust for 10 minutes, then let it cool.
- In a large mixing bowl, beat the cream cheese until smooth.
- Add powdered sugar and vanilla extract, mixing until well combined.
- In a separate bowl, whip the heavy cream until stiff peaks form.
- Gently fold the whipped cream into the cream cheese mixture until fully incorporated.
- Spread the cream cheese mixture over the cooled crust.
- Top with cherry pie filling, spreading it evenly.
- Chill the tart in the refrigerator for at least 4 hours before serving.
- Garnish with chocolate shavings before serving.
Notes
- For a gluten-free version, use gluten-free chocolate cookies for the crust.
- Make sure the cream cheese is at room temperature for easier mixing.
- This tart can be made a day in advance for better flavor.
- Prep Time: 30 minutes
- Cook Time: 10 minutes
- Category: Dessert
- Method: Baking and Chilling
- Cuisine: American
Nutrition
- Serving Size: 1 slice
- Calories: 350
- Sugar: 25g
- Sodium: 200mg
- Fat: 22g
- Saturated Fat: 12g
- Unsaturated Fat: 8g
- Trans Fat: 0g
- Carbohydrates: 30g
- Fiber: 2g
- Protein: 4g
- Cholesterol: 60mg
Keywords: Cherry Cheesecake, Chocolate Tart, Dessert, Cheesecake Tart