Ingredients
This recipe makes one loaf of 10 to 12 slices:
- 3 cups (375 g) all-purpose or bread flour
- 2¼ teaspoons (7 g) instant yeast
- 1½ teaspoons salt
- 1 tablespoon sugar or honey
- 1¼ cups (300 ml) warm water
- 2 tablespoons olive oil
- 1 tablespoon melted butter, for brushing
Ingredient Notes and Smart Swaps
Flour. Bread flour has more protein, which builds more gluten and gives a taller, chewier loaf. All-purpose flour produces a slightly softer, more tender crumb. Either works well. Weigh the flour if you can, because scooping a cup straight from the bag can add 20 to 30 grams extra and lead to dry, dense bread. With measuring cups, spoon the flour in and level it off.
Instant yeast. Instant yeast (also sold as rapid-rise or bread machine yeast) mixes straight into the dry ingredients. If you only have active dry yeast, use the same amount, dissolve it in the warm water for 5 to 10 minutes until foamy, and expect the rises to take a little longer.
Salt. Salt adds flavor, strengthens gluten, and keeps yeast activity in check. Leaving it out makes the loaf taste flat.
Sugar or honey. One tablespoon feeds the yeast, supports browning, and adds a hint of sweetness. Honey brings a gentle floral note and helps keep the crumb moist.
Warm water. Aim for about 105°F to 115°F (40°C to 46°C), which feels comfortably warm to the touch. Water that is too hot can kill the yeast, and water that is too cold slows the rise.
Olive oil. Oil softens the crumb, adds flavor, and helps the bread stay fresh longer. You can substitute another neutral oil or melted butter.
Melted butter. Brushed on the hot loaf, butter softens the crust and adds richness and shine. Skip it if you prefer a crunchier crust.
Instructions
- A large mixing bowl
- A wooden spoon or dough whisk
- A clean work surface for kneading
- A lightly greased bowl for the first rise
- A parchment-lined baking tray or a 9×5-inch loaf pan
- A sharp knife or razor blade for scoring
- A pastry brush for the butter
- A wire cooling rack
- A heat-safe metal tray for steam (optional)
- A kitchen scale (optional)
- An instant-read thermometer (optional)
How to Make Easy Homemade Bread (Step by Step)
Step 1: Mix the Ingredients
In a large bowl, combine the flour, instant yeast, salt, and sugar. Whisk briefly so everything is evenly distributed. Add the warm water and olive oil, then stir until a soft, slightly sticky dough forms and no dry flour remains.
Step 2: Knead the Dough
Turn the dough onto a lightly floured surface and knead by hand for 8 to 10 minutes. Push the dough away from you with the heel of your hand, fold it back over itself, rotate it a quarter turn, and repeat. The dough starts out shaggy and sticky, then gradually becomes smooth, elastic, and slightly tacky.
Add only a little extra flour if the dough is extremely sticky. Too much flour is the most common cause of dry, dense bread.
The windowpane test: Pinch off a small piece and gently stretch it between your fingers. If it forms a thin, translucent sheet without tearing, the gluten is well developed. If it tears quickly, knead a few minutes longer.
If you use a stand mixer, knead with the dough hook on medium-low speed for about 6 to 8 minutes.
Step 3: Let the Dough Rise
Place the dough in a lightly greased bowl, turning it once to coat the surface. Cover and let it rise in a warm place for 60 to 75 minutes, or until doubled in size.
Good rising spots include an oven with only the light on, a spot near (not on) a warm appliance, or a draft-free corner. In a cool kitchen the rise takes longer, so judge by the dough rather than the clock.
The poke test: Gently press a floured fingertip into the dough. If the dent springs back slowly and only partway, it’s ready. If it springs back immediately, give it more time. If it stays put and the dough sags, it may be over-proofed.
Step 4: Shape the Loaf
Gently press out the excess air. On a lightly floured surface, pat the dough into a rectangle, fold the sides toward the center, then roll it up tightly from the short end and pinch the seam closed. Shape it into an oval loaf and place it seam-side down on a parchment-lined baking tray, or in a greased loaf pan.
Step 5: Rest and Score
Cover and let the loaf rise again for 25 to 30 minutes, until puffy. While it rests, preheat the oven to 400°F (200°C).
If you want a crispier crust, place a heat-safe metal tray on the lower rack while the oven preheats. Just before baking, make 2 to 3 shallow cuts across the top with a sharp knife, about ¼ inch deep. Scoring lets the loaf expand evenly instead of bursting in random places.
Step 6: Bake to Golden Perfection
For extra crunch, carefully pour about 1 cup of hot water into the preheated tray as you slide the bread in, then close the door quickly. Keep your face and hands away from the steam, and use oven mitts. Use a metal tray, not glass, which can shatter.
Bake for 30 to 35 minutes, until the crust is golden brown and the loaf sounds hollow when you tap the bottom. An instant-read thermometer should read about 190°F to 200°F (88°C to 93°C) in the center. If the top browns too fast, tent it loosely with foil for the last 10 minutes.
Step 7: Brush and Cool
As soon as the loaf comes out of the oven, brush the hot crust with melted butter for a softer, more flavorful finish. Transfer it to a wire rack and let it cool before slicing, ideally for at least 30 minutes.
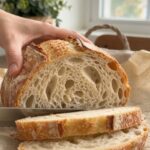
It’s tempting to cut in right away, but the interior is still setting as it cools. Slicing too early can leave the crumb gummy and squash the slices.