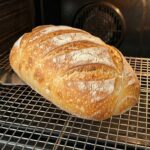
Ingredients
- 3 cups (375 g) bread flour or all-purpose flour
- 1 cup (240 ml) warm water
- 2¼ teaspoons (7 g) instant yeast
- 1 tablespoon sugar
- 1½ teaspoons salt
- 2 tablespoons olive oil
For the crust
- 1 tablespoon water or milk, for brushing (optional)
- 1 teaspoon sesame seeds (optional)
- A little flour, for dusting
🧂 Ingredient Notes and Smart Substitutions
Bread flour vs. all-purpose flour
Both flours work in this recipe. Bread flour has a higher protein content (about 12 to 14 percent), which develops more gluten and creates a chewier, taller loaf with a slightly more bakery-style texture. All-purpose flour (about 10 to 12 percent protein) makes a slightly softer, more tender loaf. Use whichever you have on hand.
Warm water
The water should be warm, not hot. Aim for approximately 100 to 110°F (38 to 43°C). Water that is too cool makes the yeast sluggish, and water that is too hot can kill it. If you do not have a thermometer, the water should feel comfortably warm on your wrist, like a warm bath.
Instant yeast
Instant yeast is reliable and easy to use. In this recipe, it is first stirred into the warm water with the sugar, so you can see it turn foamy and confirm that it is active. If you use active dry yeast instead, use the same amount and allow a few extra minutes for it to foam.
Sugar
A tablespoon of sugar feeds the yeast, adds a touch of flavor, and helps the crust turn a lovely golden brown. It does not make the bread sweet.
Salt
Salt flavors the bread, strengthens the gluten, and controls the yeast. Do not leave it out, or the loaf will taste bland and may over-rise and collapse.
Olive oil
Two tablespoons of olive oil make the crumb softer and more tender, and add a subtle, fruity richness. A mild extra-virgin olive oil works well.
Water or milk for brushing
Brushing the loaf with water gives a crisper, shinier crust. Milk gives a softer, more golden crust. Both are optional, so choose based on the crust you like.
Sesame seeds
Sesame seeds add a nutty flavor, a pretty look, and a bit of crunch. They are optional, and you can swap them for poppy seeds, or leave the top plain for a classic loaf.
Flour for dusting
A light dusting of flour on top before slashing gives the loaf a rustic, bakery-style appearance.
Instructions
In a large mixing bowl, combine the warm water, sugar, and instant yeast. Stir gently and let stand for about 5 minutes, until the mixture is slightly foamy. This shows that the yeast is alive and ready to work.
If nothing happens: If there are no bubbles or foam after 10 minutes, the yeast may be old or the water may have been too hot or too cold. Start again with fresh yeast.
Add the olive oil, flour, and salt to the bowl. Mix with a wooden spoon until a rough, shaggy dough forms and no dry flour remains.
Transfer the dough to a lightly floured surface. Knead for 8 to 10 minutes, until the dough is smooth, elastic, and slightly tacky. Add flour sparingly if the dough is too sticky, a teaspoon at a time.
How to knead: Push the dough away from you with the heel of your hand, fold it back over itself, give it a quarter turn, and repeat. The dough will start out rough and sticky, then gradually become smooth and stretchy.
How to know it is ready: Press a finger into the dough. It should spring back slowly. For a more precise check, try the windowpane test. Pinch off a small piece and stretch it gently between your fingers. If it forms a thin, translucent membrane without tearing right away, the gluten is well developed.
Stand mixer option: Use the dough hook on medium-low speed for about 6 to 8 minutes.
Place the dough in a lightly oiled bowl and turn it once to coat. Cover with a clean kitchen towel or plastic wrap. Let it rise in a warm place for 1 to 1½ hours, or until doubled in size.
Warm spot ideas: Place the bowl in an oven that is turned off with the light on, near a sunny window, or on top of the refrigerator. If your kitchen is cool, the rise may take longer. Watch the dough, not the clock.
Gently press the dough to release excess air. Shape it into a rectangle, then roll it tightly into a loaf, pinching the seam closed. Taper the ends slightly for a traditional Italian bread shape.
Shaping tip: Roll the dough from the short side, pressing with your fingertips as you go to create tension on the surface. A tight roll helps the loaf rise upward rather than spread out. Then roll the loaf gently under your palms to lengthen it and taper the ends.
Place the loaf seam-side down on a parchment-lined baking sheet. Cover loosely and let it rise for 30 to 45 minutes, until puffy.
The poke test: Gently press a fingertip into the dough. If the indentation springs back slowly and only partially, it is ready. If it springs back immediately, give it more time. If it does not spring back at all, bake right away, because it may be over-proofed.
Preheat your oven to 400°F (200°C). Place an empty metal baking pan on the bottom oven rack if you plan to create steam. Use a sturdy metal pan, not glass or ceramic, which can crack from the sudden temperature change.
Lightly dust the loaf with flour. Using a sharp knife or bread lame, make 3 to 4 shallow diagonal slashes across the top. Each slash should be about ¼ to ½ inch (6 to 12 mm) deep.
Optional crust upgrade: If you would like a shinier crust or a seeded top, brush the loaf with the water or milk before slashing, and sprinkle with the sesame seeds, pressing them in gently. If you brush the loaf, skip the flour dusting, or dust only lightly.
Scoring tip: Use quick, confident motions with a sharp blade. A hesitant cut drags and tears the dough. Cut just before the loaf goes into the oven so it expands properly.
Place the bread in the oven. Carefully pour about ½ cup of hot water into the preheated metal pan to create steam, avoiding splashes. Close the oven door immediately. Bake for 25 to 30 minutes, until deeply golden and crisp.
Safety note: Steam can burn. Use oven mitts, keep your face and hands back, and pour from a pitcher with a spout. Never pour water directly onto the oven’s glass door or the oven floor.
Doneness check: The loaf should sound hollow when you tap the bottom. If you have an instant-read thermometer, the center should reach about 195 to 205°F (90 to 96°C).
Transfer the loaf to a wire rack and let it cool for at least 30 to 45 minutes before slicing. This allows the inside to finish setting and keeps the slices from becoming gummy. It is hard to wait, but it makes a real difference to the texture.