
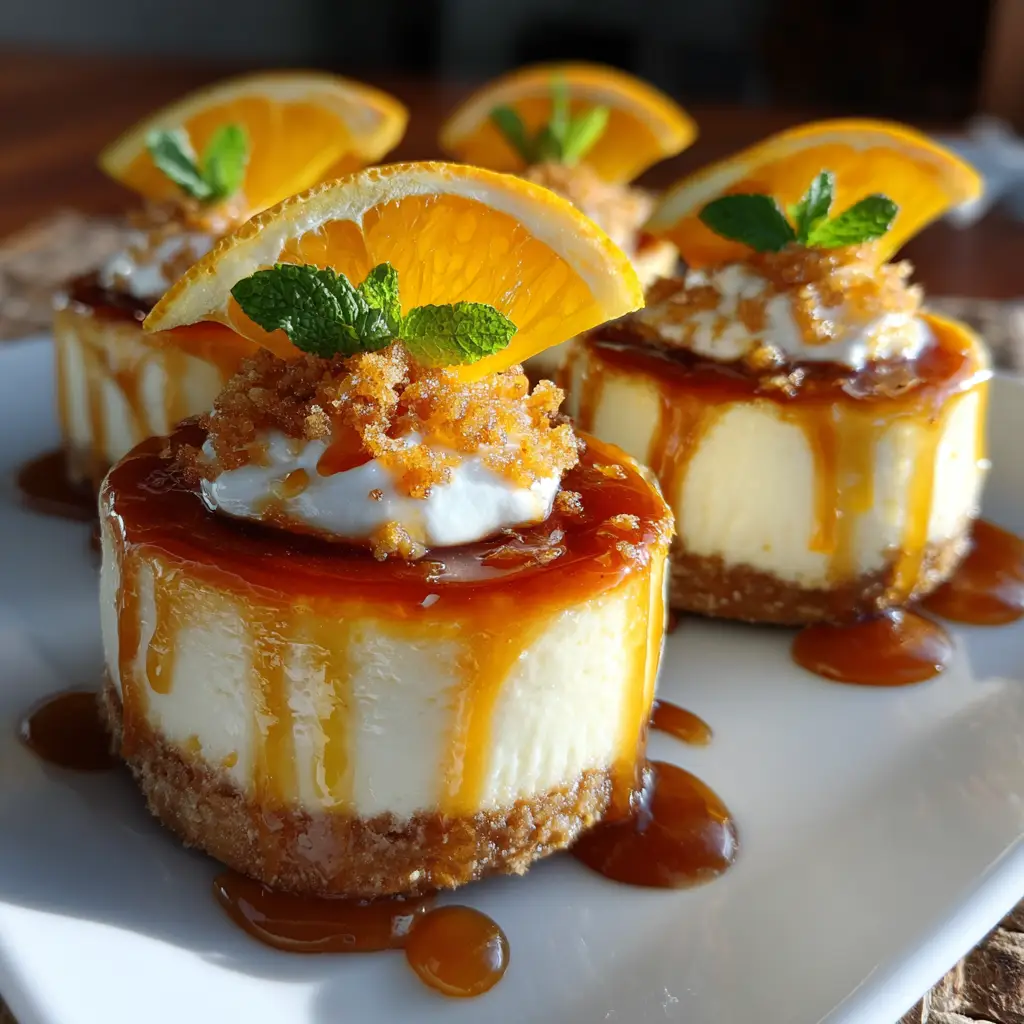
Lemon Mini Cheesecakes: A Delightful Treat to Try!
Introduction to Lemon Mini Cheesecakes
As a busy mom, I know how precious time can be, especially when it comes to whipping up something sweet. That’s why I absolutely adore these Lemon Mini Cheesecakes! They’re not just a treat; they’re a delightful escape into a world of creamy, zesty goodness. Perfect for any occasion, these little gems are quick to make and sure to impress your loved ones. Whether it’s a family gathering or a simple weeknight dessert, these mini cheesecakes are a refreshing solution that brings a burst of sunshine to your table. Trust me, you’ll want to keep this recipe close!
Why You’ll Love This Lemon Mini Cheesecakes
These Lemon Mini Cheesecakes are a dream come true for busy lives! They’re incredibly easy to make, taking just a little over two hours from start to finish. The taste? Oh, it’s a perfect balance of creamy and tangy, making each bite a refreshing delight. Plus, they’re portioned just right, so you can indulge without the guilt. Trust me, once you try them, they’ll become a staple in your dessert rotation!
Ingredients for Lemon Mini Cheesecakes
Gathering the right ingredients is the first step to creating these delightful Lemon Mini Cheesecakes. Here’s what you’ll need:
- Graham cracker crumbs: These form the base of your crust, providing a sweet and crunchy texture.
- Sugar: A little sweetness to balance the tangy lemon flavor in the cheesecake.
- Unsalted butter: This adds richness to the crust and helps it hold together. Make sure it’s melted for easy mixing.
- Cream cheese: The star of the show! It gives the cheesecake its creamy texture. Be sure to soften it for a smooth blend.
- Powdered sugar: This sweetener dissolves easily, ensuring a silky filling without any graininess.
- Fresh lemon juice: The zesty kick that brightens up the cheesecake. Fresh is best for that vibrant flavor!
- Lemon zest: Adds an extra layer of lemony goodness. It’s like sunshine in your dessert!
- Eggs: These help bind everything together, giving the cheesecake its structure.
For those who want to experiment, consider adding a touch more lemon juice or zest for a stronger flavor. You can also top your mini cheesecakes with whipped cream or fresh berries for a beautiful presentation. If you’re looking for a gluten-free option, try using gluten-free graham crackers. The exact quantities for each ingredient are listed at the bottom of the article, ready for you to print out!
How to Make Lemon Mini Cheesecakes
Now that you have your ingredients ready, let’s dive into the fun part—making these Lemon Mini Cheesecakes! Follow these simple steps, and you’ll be on your way to a delicious dessert that will wow your family and friends.
Step 1: Preheat the Oven
First things first, preheat your oven to 325°F (160°C). Preheating is crucial because it ensures that your cheesecakes bake evenly. If you skip this step, you might end up with a soggy crust or unevenly cooked filling. So, let that oven warm up while you prepare the crust!
Step 2: Prepare the Crust
In a mixing bowl, combine your graham cracker crumbs, sugar, and melted butter. Stir until everything is well mixed and resembles wet sand. This mixture is the foundation of your mini cheesecakes, so make sure it’s combined well. Now, press this mixture firmly into the bottom of a muffin tin lined with cupcake liners. Pressing it down helps create a sturdy crust that holds up beautifully when you take a bite!
Step 3: Make the Cheesecake Filling
In a separate bowl, beat the softened cream cheese until it’s smooth and creamy. This step is key for a velvety texture. Gradually add in the powdered sugar, fresh lemon juice, and lemon zest. Mix until everything is well combined. The mixture should be light and fluffy. Now, add the eggs one at a time, mixing well after each addition. This helps incorporate air, making your cheesecakes light and airy!
Step 4: Combine and Pour
Once your filling is smooth, it’s time to pour it over the crust in your muffin tin. Use a spoon or a small ladle to distribute the filling evenly. Fill each cup about three-quarters full, leaving a little room for the cheesecakes to rise. This step is where the magic happens, as the filling transforms into a creamy delight while baking!
Step 5: Bake to Perfection
Now, pop your muffin tin into the preheated oven and bake for 20-25 minutes. You’ll know they’re done when the edges are set, but the centers still have a slight jiggle. This jiggle means they’ll firm up perfectly as they cool. Keep an eye on them, as every oven is a little different!
Step 6: Cooling and Refrigeration
After baking, remove the cheesecakes from the oven and let them cool in the tin for about 10 minutes. Then, transfer them to a wire rack to cool completely. Once they’re at room temperature, refrigerate them for at least 2 hours. This chilling time is essential for achieving that perfect cheesecake texture. Trust me, the wait will be worth it!
Tips for Success
- Use room temperature cream cheese for a smoother filling.
- Don’t skip the chilling time; it enhances the flavor and texture.
- For a cleaner cut, use a hot knife when slicing.
- Experiment with different toppings like fruit or chocolate drizzle.
- Keep an eye on baking time; every oven is unique!
Equipment Needed
- Muffin tin: A standard muffin tin works perfectly, but you can also use a silicone mold for easy removal.
- Mixing bowls: A medium bowl for the crust and a larger one for the filling will do the trick.
- Electric mixer: A hand mixer is great, but a whisk can work if you’re feeling adventurous!
- Measuring cups and spoons: Essential for accuracy, but you can eyeball it if you’re confident.
- Wire rack: This helps cool the cheesecakes evenly, but a plate can work in a pinch.
Variations
- Berry Bliss: Top your mini cheesecakes with fresh berries like strawberries, blueberries, or raspberries for a fruity twist.
- Chocolate Lovers: Drizzle melted chocolate over the cooled cheesecakes for a rich, decadent flavor.
- Gluten-Free Option: Substitute regular graham crackers with gluten-free ones to make these cheesecakes suitable for gluten-sensitive friends.
- Key Lime Cheesecakes: Swap out the lemon juice for key lime juice for a tropical variation that’s equally refreshing.
- Mini Meringue Topping: Add a light meringue topping for a delightful contrast in texture and a touch of elegance.
Serving Suggestions for Lemon Mini Cheesecakes
- Pair with a dollop of whipped cream for added creaminess.
- Serve alongside fresh berries for a pop of color and flavor.
- Drizzle with a lemon glaze for an extra zesty kick.
- Enjoy with a refreshing iced tea or lemonade.
- Garnish with mint leaves for a beautiful presentation.
FAQs about Lemon Mini Cheesecakes
Can I make Lemon Mini Cheesecakes ahead of time?
Absolutely! These mini cheesecakes can be made a day in advance. Just store them in the refrigerator until you’re ready to serve. This actually enhances the flavor!
What can I use instead of cream cheese?
If you’re looking for a lighter option, you can substitute cream cheese with Greek yogurt or mascarpone cheese. Just keep in mind that the texture and flavor will vary slightly.
How do I know when the cheesecakes are done baking?
Look for the edges to be set while the center still has a slight jiggle. They will firm up as they cool, so don’t worry if they seem a bit soft when you take them out!
Can I freeze Lemon Mini Cheesecakes?
Yes, you can freeze them! Just wrap each cheesecake tightly in plastic wrap and store them in an airtight container. They’ll keep well for up to three months. Thaw in the fridge before serving.
What toppings pair well with Lemon Mini Cheesecakes?
These cheesecakes are versatile! You can top them with whipped cream, fresh berries, or even a drizzle of chocolate. Each adds a delightful twist to the zesty flavor!
Final Thoughts
Making Lemon Mini Cheesecakes is more than just baking; it’s about creating sweet memories in the kitchen. The joy of watching your loved ones savor each bite is truly priceless. These little treats are perfect for any occasion, bringing a burst of sunshine to your table. Plus, they’re simple enough to whip up even on the busiest days. So, whether you’re celebrating a special moment or just treating yourself, these mini cheesecakes are sure to bring smiles all around. Trust me, once you make them, they’ll become a cherished recipe in your home!
Print
Lemon Mini Cheesecakes: A Delightful Treat to Try!
- Total Time: 2 hours 40 minutes
- Yield: 12 mini cheesecakes 1x
- Diet: Vegetarian
Description
Lemon Mini Cheesecakes are a delightful and refreshing dessert that combines the creamy texture of cheesecake with a zesty lemon flavor, perfect for any occasion.
Ingredients
- 1 cup graham cracker crumbs
- 1/4 cup sugar
- 1/2 cup unsalted butter, melted
- 16 oz cream cheese, softened
- 1 cup powdered sugar
- 1/4 cup fresh lemon juice
- 1 tablespoon lemon zest
- 2 large eggs
Instructions
- Preheat the oven to 325°F (160°C).
- In a bowl, mix graham cracker crumbs, sugar, and melted butter until combined.
- Press the mixture into the bottom of a muffin tin lined with cupcake liners.
- In a separate bowl, beat the cream cheese until smooth.
- Add powdered sugar, lemon juice, and lemon zest, and mix until well combined.
- Add eggs one at a time, mixing well after each addition.
- Pour the cheesecake mixture over the crust in the muffin tin.
- Bake for 20-25 minutes or until set.
- Let cool, then refrigerate for at least 2 hours before serving.
Notes
- For a stronger lemon flavor, increase the lemon juice and zest.
- These cheesecakes can be topped with whipped cream or fresh berries.
- Store leftovers in the refrigerator for up to 3 days.
- Prep Time: 15 minutes
- Cook Time: 25 minutes
- Category: Dessert
- Method: Baking
- Cuisine: American
Nutrition
- Serving Size: 1 mini cheesecake
- Calories: 180
- Sugar: 10g
- Sodium: 150mg
- Fat: 10g
- Saturated Fat: 6g
- Unsaturated Fat: 3g
- Trans Fat: 0g
- Carbohydrates: 18g
- Fiber: 1g
- Protein: 3g
- Cholesterol: 40mg
Keywords: Lemon Mini Cheesecakes, Cheesecake, Dessert, Lemon Dessert