Ingredients
For the Shrimp
- 1½ lbs large raw shrimp, peeled and deveined
- 1 teaspoon salt
- 1 lemon, cut into wedges
For the Pickling Brine
- 1 cup white vinegar
- ½ cup apple cider vinegar
- ½ cup water
- ¼ cup honey
- 1 tablespoon sugar
- 1 tablespoon pickling salt
- 3 garlic cloves, thinly sliced
- 2 to 3 fresh jalapeños, sliced into rings
- ½ red onion, thinly sliced
- 1 teaspoon whole black peppercorns
- 1 teaspoon mustard seeds
- ½ teaspoon celery seeds
- ½ teaspoon red pepper flakes (optional)
- 2 tablespoons fresh lemon juice
- 1 tablespoon chopped fresh dill
🔍 A Closer Look at the Key Ingredients
Understanding why each ingredient matters helps you make this recipe even better.
Shrimp. Large raw shrimp are the best choice because they stay plump and juicy after cooking and pickling. Smaller shrimp can overcook quickly, so look for sizes labeled 21/25 or 16/20 per pound. Peeled and deveined shrimp save time, and fresh or thawed frozen shrimp both work beautifully. Just make sure they are fully thawed and patted dry.
White vinegar and apple cider vinegar. Using two vinegars creates a more complex flavor. White vinegar provides a clean, sharp tang, while apple cider vinegar adds a slightly fruity, mellow depth.
Honey and sugar. These sweeteners are what make this recipe “sweet heat.” They balance the acidity and soften the heat of the jalapeños without making the shrimp taste dessert-like.
Pickling salt. Pickling salt dissolves cleanly and does not contain anti-caking agents that can cloud the brine. If you do not have it, fine sea salt can work in a pinch, though you may want to measure carefully because the grain size differs.
Fresh jalapeños. The jalapeño rings add heat, crunch, and gorgeous color. For milder shrimp, remove the seeds and membranes. For more fire, leave them in or add an extra pepper.
Red onion. Thinly sliced red onion softens in the brine and becomes tangy, slightly sweet, and wonderfully pink. Many people love the pickled onions as much as the shrimp!
Garlic. Thin slices release their savory flavor into the brine without overpowering the dish.
Whole spices. Black peppercorns, mustard seeds, and celery seeds bring the classic pickling flavor that makes this recipe taste authentic.
Lemon juice and dill. These two fresh finishing touches brighten everything and give the shrimp a lovely, summery aroma.
Instructions
Bring a pot of salted water to a gentle boil and add the lemon wedges. The lemon infuses the water with a fresh, citrusy aroma that flavors the shrimp. Add the shrimp and cook for approximately 2 to 3 minutes, just until they turn opaque and pink. Avoid overcooking, because shrimp go from tender to rubbery very quickly.
Transfer the shrimp to an ice-water bath right away to stop the cooking. Once they are completely chilled, drain them thoroughly and pat them dry. Dry shrimp help the brine cling better and keep the flavor concentrated.
In a saucepan, combine the white vinegar, apple cider vinegar, water, honey, sugar, and pickling salt. Bring the mixture to a gentle simmer, stirring until the salt and sugar dissolve completely.
Stir in the sliced garlic, jalapeños, red onion, peppercorns, mustard seeds, celery seeds, and the optional red pepper flakes. Simmer gently for 2 minutes, then remove the pan from the heat. This short simmer softens the onions slightly and wakes up the spices.
Stir the fresh lemon juice and chopped dill into the warm brine. Then allow the brine to cool completely before adding the shrimp. This step is important, because pouring warm brine over cooked shrimp can make them tough.
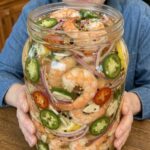
Place the chilled shrimp in a clean glass container, layering them with the jalapeños, onions, and garlic. Layering evenly makes sure every serving has a perfect mix of shrimp and pickled vegetables.
Pour the completely cooled brine over the shrimp, making sure everything is fully submerged. Cover and refrigerate for 2 to 4 hours so the flavors can develop.
Arrange the shrimp on a platter with plenty of jalapeño rings and pickled onions. Add fresh lemon wedges and a sprinkle of dill for a beautiful finishing touch.
Do not overcook the shrimp. Two to three minutes is all you need. They will keep absorbing flavor in the brine, and they should stay tender and snappy.
Use an ice bath. It stops the cooking instantly and gives the shrimp that pleasantly firm, juicy bite.
Let the brine cool completely. Warm brine can continue cooking the shrimp and change their texture. Patience pays off here.
Slice the vegetables thinly. Thin onion slices and jalapeño rings soften evenly and soak up flavor quickly.
Choose a glass container. Glass will not absorb odors or react with the vinegar, which keeps the flavor clean and fresh.
Make sure everything is submerged. Shrimp that sit above the brine will not pickle evenly. Press them down gently or use a smaller container so the liquid covers everything.
Adjust the heat to your taste. Remove the jalapeño seeds for a mild version, or add extra red pepper flakes for a fiery one.
Taste the brine. Before pouring it over the shrimp, you can taste a tiny spoonful once it has cooled. If you prefer it sweeter, add a little more honey. If you want more tang, add a splash more vinegar.