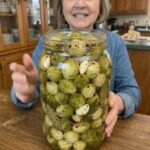
Ingredients
- 1½ lbs fresh Brussels sprouts, trimmed
- 5 garlic cloves, peeled
- 2 cups white vinegar
- 2 cups water
- 2 tablespoons pickling salt
- 2 tablespoons granulated sugar
- 1 teaspoon black peppercorns
- 1 teaspoon mustard seeds
- 1 teaspoon celery seeds
- 1 teaspoon red pepper flakes
- 2 bay leaves
- ½ teaspoon coriander seeds (optional)
- 2 fresh dill sprigs (optional)
Ingredient Notes
Brussels sprouts
Choose small to medium sprouts that are firm, bright green and tightly closed, with no yellowing leaves or black spots. Sprouts of similar size pickle evenly and fit neatly in jars. Very large sprouts can be halved so the brine penetrates.
Garlic
Fresh garlic gives the brine savory depth. Choose firm, plump cloves and discard any that are soft, sprouting or discolored. Lightly crushing the cloves releases their flavor into the brine.
White vinegar
White vinegar supplies the clean, sharp acidity that defines a pickle. Use plain white vinegar with 5% acidity, and do not dilute the brine more than the recipe states.
Pickling salt
Pickling salt has no anti-caking agents or additives, so it dissolves cleanly and keeps the brine clear. If you substitute another salt, measure carefully, since fine and coarse salts differ in volume.
Sugar
Two tablespoons of sugar soften the vinegar’s edge and balance the heat. It will not make the pickles sweet.
Pickling spices
Black peppercorns, mustard seeds, celery seeds, red pepper flakes, bay leaves and optional coriander give the brine its classic pickle flavor. The red pepper flakes add the gentle heat that builds as you eat.
Fresh dill (optional)
Dill sprigs add a bright, herbal aroma that pairs beautifully with the garlic and spices.
Instructions
Step 1: Prepare the Brussels sprouts
Wash thoroughly, remove damaged outer leaves and trim the tough stem ends. Make a small shallow X in the bottom of each sprout to help the brine penetrate.
Step 2: Blanch the sprouts
Bring a large pot of water to a boil. Add the Brussels sprouts and blanch for 3 to 4 minutes. Drain and immediately transfer them to an ice bath to stop the cooking.
Step 3: Prepare the garlic
Peel the garlic cloves and lightly crush them to release their flavor.
Step 4: Pack the jars
Arrange the Brussels sprouts tightly in clean glass jars. Add the garlic, black peppercorns, mustard seeds, celery seeds, red pepper flakes, bay leaves, coriander seeds and fresh dill.
Step 5: Make the brine
In a saucepan, combine white vinegar, water, pickling salt and sugar.
Step 6: Heat the mixture
Bring the brine to a gentle boil, stirring until the salt and sugar dissolve completely.
Step 7: Pour over the sprouts
Carefully pour the hot brine into the jars until the Brussels sprouts are completely submerged.
Step 8: Cool
Allow the jars to cool to room temperature before sealing.
Step 9: Refrigerate
Place the sealed jars in the refrigerator for at least 5 to 7 days to allow the flavors to develop. For a stronger pickle flavor, wait 1 to 2 weeks.
Step 10: Serve
Enjoy these tangy Frog Balls straight from the jar or add them to Bloody Marys, charcuterie boards, antipasto platters, sandwiches and BBQ spreads.
Important Food Safety Information
These are refrigerator pickles, not shelf-stable canned pickles. A few simple rules keep them safe and delicious:
- Keep them refrigerated at or below 40°F (4°C). Once the jars have cooled to room temperature, move them to the refrigerator promptly, and do not leave them out.
- Enjoy within 2 weeks. Plan to finish the jars within that window for the best quality and safety.
- Do not store at room temperature or treat as shelf-stable. Sealing the lid does not make these pickles safe for the pantry.
- Do not can or water-bath process this recipe. It was not designed or tested for canning. If you want shelf-stable pickled vegetables, use a tested home-canning recipe from a trusted food preservation source.
- Garlic needs care. Garlic is a low-acid vegetable that can carry spores of Clostridium botulinum, the bacterium that causes botulism. Garlic stored in liquid at room temperature can create conditions where harmful bacteria grow, so refrigeration is essential.
- Cool before sealing, then refrigerate. The recipe has you let the jars cool to room temperature before sealing. Do not let them sit out for a long time. Refrigerate them as soon as they have cooled, ideally within about 2 hours.
- Keep the sprouts submerged. Sprouts above the brine can discolor or spoil. Pack them snugly and make sure they are fully covered.
- Use clean jars and utensils. Wash jars, lids, tools and hands in hot, soapy water, and use a clean fork or tongs each time you take sprouts from the jar.
- Do not reduce the vinegar or salt significantly. The acid and salt are part of what keeps the pickles safe and flavorful.
- Discard if there are signs of spoilage. These include a bulging lid, spurting liquid when opened, an off or rotten smell, mold, sliminess, unusual fizzing or a very mushy texture. When in doubt, throw it out without tasting.
- Take extra care when serving vulnerable people. If you are serving someone pregnant, elderly, very young or with a weakened immune system, follow your local food safety guidance.
A note on timing. The recipe suggests waiting 5 to 7 days for the flavor to develop, and up to 1 to 2 weeks for a stronger pickle flavor, while also recommending that you enjoy the pickles within 2 weeks. That means the strongest-flavor window overlaps the end of the recommended storage time. If you like very tangy sprouts, plan to finish them promptly rather than keeping them past the 2-week mark.
Tips for the Crunchiest Frog Balls
1. Choose fresh, firm sprouts
Fresh sprouts are crisper and sweeter. Avoid any that are soft, yellowing or have dark spots.
2. Pick sprouts of similar size
Similar sizes pickle evenly. If some sprouts are much larger than others, halve the big ones.
3. Cut the X in the base
The small X at the stem end helps the brine penetrate the dense core. Make it shallow and neat, not deep enough to make the sprout fall apart.
4. Do not skip the ice bath
Blanching tenderizes the sprouts slightly and sets their green color. The ice bath stops the cooking so they stay crunchy. Leave them in the ice water until fully cool, then drain well.
5. Do not over-blanch
Three to four minutes is enough. Longer blanching makes the sprouts soft and dulls their color.
6. Dry the sprouts well
After the ice bath, drain thoroughly and pat dry so extra water does not dilute the brine.
7. Pack the jars snugly
Tightly packed sprouts stay submerged and do not float. Use a spoon handle or chopstick to nudge sprouts into gaps.
8. Use hot brine
Pouring hot brine helps the flavors penetrate. The hot brine goes over the sprouts in the jar, so do not boil them in the brine.
9. Be patient
Frog Balls improve with time. After 5 to 7 days, they are tangy and balanced. After 1 to 2 weeks, they are stronger and more pickle-like.
10. Adjust the heat
For more spice, add extra red pepper flakes, a few slices of fresh chili or a dried chili. For milder pickles, reduce the flakes.
11. Taste a test sprout
After 5 to 7 days, try one sprout. If it is not tangy enough, wait a few more days within the 2-week window.
12. Wear gloves if handling fresh chilies
If you add fresh hot peppers, gloves protect your skin from capsaicin.
Serving Ideas
Frog Balls bring tang and crunch to nearly everything:
In cocktails
- Bloody Marys. Skewer a few Frog Balls as a garnish, alongside celery, olives and bacon.
- Martinis and gin cocktails. Use a sprout in place of an olive for a savory twist.
- Michelada or beer cocktails. Drop a couple into the glass for a tangy kick.