
Garlic Pepperoncini Pickles
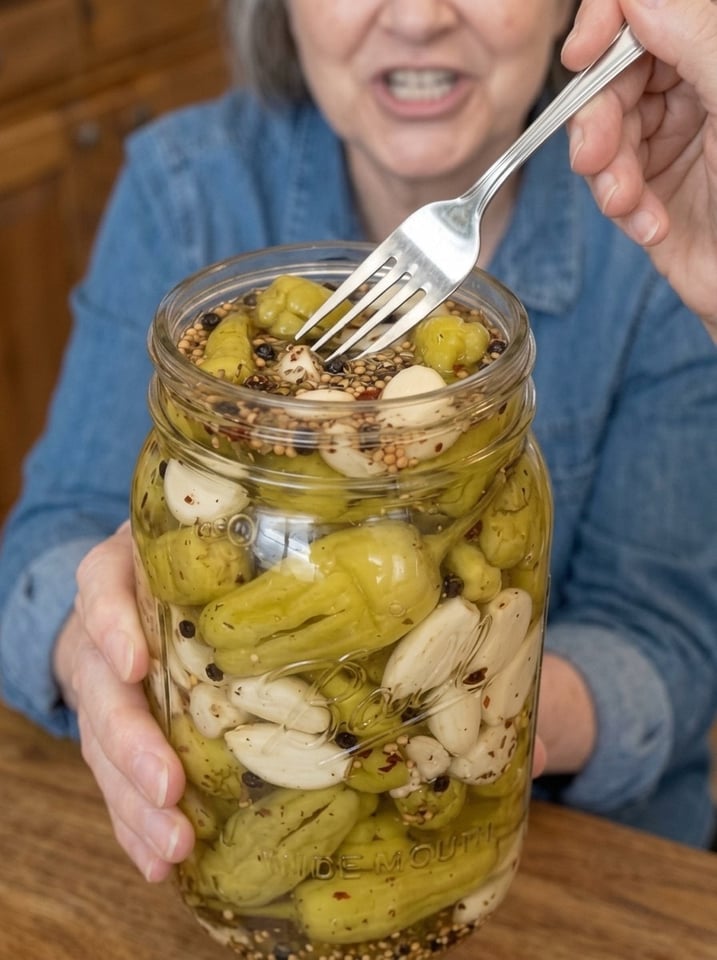
Garlic Pepperoncini Pickles: Tangy, Crunchy, and Full of Zesty Flavor
SEO title: Garlic Pepperoncini Pickles – Easy Homemade Refrigerator Pickled Peppers
Meta description: Make crunchy garlic pepperoncini pickles with fresh peppers, garlic, mustard seeds, oregano, and a tangy vinegar brine. An easy refrigerator pickle for Italian sandwiches, burgers, antipasto platters, salads, and charcuterie boards.
Focus keywords: pickled pepperoncini, homemade pepperoncini, garlic pepperoncini pickles, refrigerator pickled peppers, quick pickled peppers, pepperoncini recipe, antipasto peppers
Tangy, crunchy, garlicky, and bursting with zesty pepper flavor! 😍🔥 These Garlic Pepperoncini Pickles combine crisp pepperoncini peppers with fresh garlic, aromatic herbs, black peppercorns, and a bold vinegar brine for an irresistible savory bite. Every pepper delivers a delicious balance of tangy acidity, mellow garlic, and gentle heat, making these pickles perfect for Italian sandwiches, burgers, wraps, antipasto platters, salads, and charcuterie boards!
Anyone who has ever ordered an Italian sub or a deli salad knows the tangy snap of a pepperoncini. These small, pale golden-green peppers have a mild-to-medium heat and a slightly sweet, tangy flavor that brightens almost anything they touch. Store-bought jars are convenient, but making them at home is surprisingly easy and gives you much more control over flavor. You choose the garlic, you choose the spices, and you decide how much heat to add. Best of all, homemade pepperoncini stay wonderfully crunchy and taste fresher than most jarred versions. 🌶️
This recipe uses fresh pepperoncini peppers, a generous amount of crushed garlic, mustard seeds, black peppercorns, dried oregano, and optional dill and red pepper flakes. A simple brine of vinegar, water, and salt is heated just enough to dissolve the salt, then poured over the peppers in a jar. After a couple of days in the refrigerator, the peppers are tangy, garlicky, and ready to pile onto sandwiches, salads, and antipasto platters.
In this guide, you will find the complete recipe, a step-by-step walkthrough, a closer look at each ingredient, tips for the crunchiest pickles, important storage and food safety guidance, common problems and fixes, variations, serving ideas, and answers to frequently asked questions. Let’s get pickling! 👩🍳
⏱️ Recipe Details
- ⏱️ Prep Time: 15 minutes
- 🔥 Cook Time: 5 minutes
- ❄️ Pickling Time: 48 hours to 7 days
- ⏰ Total Time: About 2 days and 20 minutes for the first taste
- 🫙 Yield: 1 large jar (approximately 1 quart / 1 liter)
- 🍽 Servings: 6 to 8
- 🎯 Difficulty: Easy
🤔 Why You Will Love These Garlic Pepperoncini Pickles
- Crunchy and tangy. Quick refrigerator pickling keeps the peppers crisp and bright. 🌶️
- Bold garlic flavor. Six to eight crushed garlic cloves give the brine a savory, mellow depth.
- Mild to medium heat. Pepperoncini are gently spicy, so they are enjoyable for most people, and you can add chili flakes for more kick.
- Easy to make. Wash, pack, heat the brine, and pour. The whole process takes about 20 minutes.
- Better than store-bought. You control the flavor, freshness, and crunch.
- Customizable. Add dill, oregano, extra garlic, or chili to suit your taste.
- Versatile. Use them on sandwiches, burgers, wraps, pizza, salads, pasta, and antipasto boards.
- Beautiful in a jar. Golden-green peppers, white garlic cloves, and flecks of herbs and spices look gorgeous on a shelf in the refrigerator.
- Budget friendly. A pound of fresh peppers and a few pantry staples make a big jar.
- Great for gifting. A labeled jar is a thoughtful homemade gift for sandwich lovers, as long as it is kept refrigerated.
🛒 Ingredients
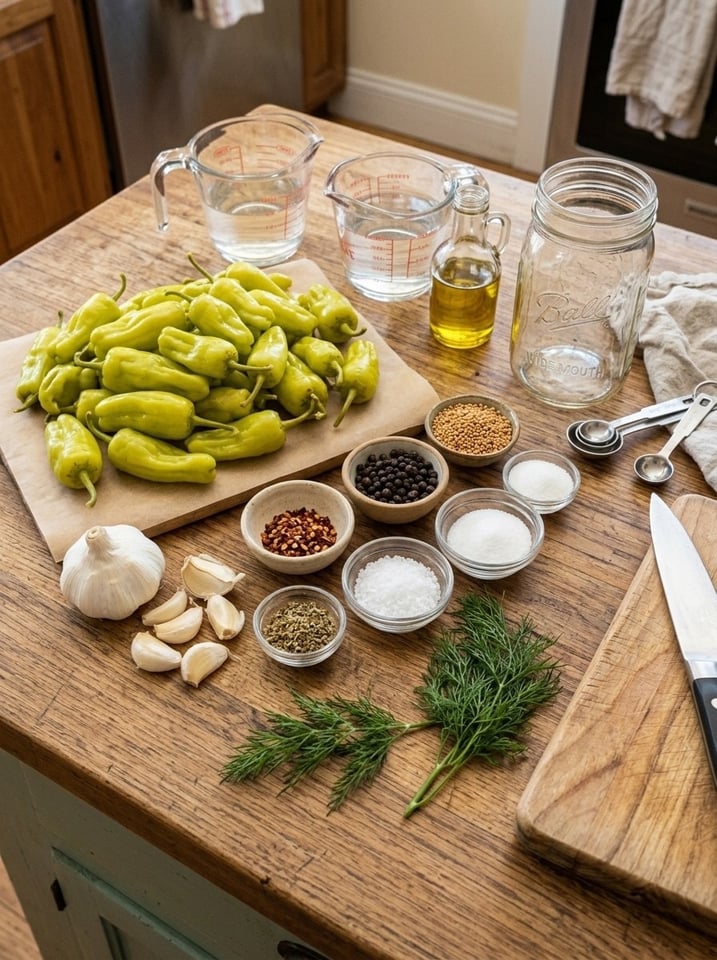
For the Pickles
- 1 lb (450 g) fresh pepperoncini peppers
- 6 to 8 garlic cloves, peeled and lightly crushed
- 1 tsp mustard seeds
- 1 tsp black peppercorns
- ½ tsp red pepper flakes, optional
- 1 tsp dried oregano
- 2 sprigs fresh dill, optional
For the Pickling Brine
- 1 cup white vinegar (5% acidity)
- 1 cup water
- 1 tbsp kosher salt or pickling salt
- 1 tsp granulated sugar, optional
- 1 tbsp olive oil, optional, for serving only
🧐 A Closer Look at the Ingredients
Fresh pepperoncini peppers. Pepperoncini, sometimes called Tuscan peppers or sweet Italian peppers, are small, slender, wrinkled peppers that ripen from pale green to yellow to red. They have a tangy, slightly sweet flavor with only mild heat. Look for firm, glossy peppers without soft spots or blemishes. Fresh pepperoncini are available at farmers markets, specialty grocery stores, and some supermarkets in late summer and early fall. If you cannot find pepperoncini, small banana peppers or Hungarian wax peppers make a similar pickle.
Garlic. Peel the garlic and crush the cloves lightly with the flat of a knife. Crushing releases flavor into the brine while keeping the cloves whole and easy to remove or eat. The garlic will mellow as it sits in the brine and become tender and tangy.
Mustard seeds and black peppercorns. Classic pickling spices that add warmth, aroma, and a subtle bite.
Red pepper flakes. Optional. A little extra heat for those who like their pickles spicier.
Dried oregano. Gives the peppers an Italian flavor that pairs well with sandwiches, pizza, and antipasto platters.
Fresh dill. Optional. Adds a bright, herbal taste reminiscent of classic dill pickles.
White vinegar (5% acidity). The backbone of the brine. It provides the tangy flavor and the acidity that helps protect the pickles. Check the label for 5% acidity, and do not reduce the vinegar or dilute the brine more than the recipe calls for.
Water. Balances the vinegar so the pickles are tangy but not harsh.
Kosher salt or pickling salt. Both dissolve cleanly and keep the brine clear. Avoid iodized table salt, which can make the brine cloudy. If you use table salt, use a little less, since fine salt is denser than kosher salt.
Granulated sugar. Optional. A small pinch softens the sharpness of the vinegar and balances the brine.
Olive oil. For serving only. A small drizzle on the drained peppers just before eating adds richness and flavor. Do not add oil to the storage jar, since oil can create low-oxygen conditions that are risky with garlic.
👩🍳 Step-by-Step Instructions
1️⃣ Prepare the Peppers
Wash the pepperoncini thoroughly and trim the stems if desired. Leave the peppers whole, or make a small slit in each pepper to help the brine penetrate. Slitting the peppers allows the brine to flow inside and prevents them from floating. Pat them dry with a clean towel.
Tip: Wear gloves if you are sensitive to peppers, and avoid touching your eyes.
2️⃣ Prepare the Jar
Place the garlic cloves, mustard seeds, black peppercorns, oregano, red pepper flakes, and dill into a clean glass jar. Wash the jar and lid in hot, soapy water and rinse well before use. Clean equipment is essential for any refrigerator pickle.
3️⃣ Pack the Peppers
Arrange the pepperoncini snugly in the jar, leaving a little space at the top. Pack them tightly enough that they stay submerged, but do not crush them. Tuck the garlic and spices between the peppers so they are evenly distributed.
4️⃣ Make the Brine
Combine the vinegar, water, salt, and sugar in a small saucepan. Heat gently, stirring until the salt and sugar dissolve. Bring to a brief simmer, then remove from the heat. Do not simmer the peppers in the brine, which can soften them and reduce their crunch.
5️⃣ Add the Brine
Carefully pour the warm brine over the peppers until they are completely covered. Gently tap the jar to release trapped air bubbles. Use a clean utensil to press down any peppers that float above the surface. All of the peppers, garlic, and spices should be below the brine line.
6️⃣ Cool and Refrigerate
Let the jar cool until it is no longer hot, then cover and refrigerate promptly. Do not leave the jar out at room temperature for long periods, and never store it in a pantry.
7️⃣ Allow the Flavors to Develop
Refrigerate for at least 48 hours before serving. For a stronger garlic flavor, let the peppers pickle for 4 to 7 days. Tilt the jar gently once a day so the flavors distribute evenly.
8️⃣ Serve and Enjoy
Drain a few peppers and serve them with sandwiches, burgers, grilled meats, salads, or an Italian antipasto platter. Use a clean fork or tongs every time. A small drizzle of olive oil and a sprinkle of oregano over the drained peppers just before serving gives them an even more Italian flavor. 🫒
💡 Tips for the Best Pepperoncini Pickles
- For extra garlic flavor. Add a couple of additional crushed garlic cloves.
- For more heat. Increase the red pepper flakes or add a sliced fresh chili.
- For a milder taste. Skip the chili flakes and use sweet pepperoncini.
- For maximum crunch. Choose firm, fresh peppers and avoid simmering them in the brine.
- For serving. A small drizzle of olive oil and a sprinkle of oregano can enhance their flavor just before serving.
- Storage and safety. These are refrigerator pickles, not shelf-stable canned peppers. Keep them submerged in the brine in a covered jar at or below 40°F (4°C), use clean utensils, and enjoy within about 2 weeks for best quality. Do not store homemade garlic pickles at room temperature.
- Slit the peppers. A small cut lets the brine flow inside for even flavor and keeps the peppers from floating.
- Use fresh peppers. Firm, fresh peppers stay crunchier.
- Chill the peppers first. Cold peppers help preserve the crunch.
- Taste after 48 hours. Taste a pepper and decide whether to let the jar rest longer.
- Label the jar. Write the date so you know when to finish it.
- Keep all ingredients submerged. Peppers or garlic above the brine can spoil.
🛡️ Storage and Food Safety
- Refrigerator only. These are refrigerator pickles, not shelf-stable canned peppers. Keep them at or below 40°F (4°C).
- Use within about 2 weeks. This is for best quality and safety.
- Do not store at room temperature. Homemade garlic pickles should never be kept on a counter or pantry shelf.
- Keep everything submerged. Peppers and garlic above the brine can spoil.
- Use clean utensils. Always use a clean fork or tongs.
- Do not add oil to the jar. Add olive oil only to the portion you plan to serve.
- Do not reduce the vinegar. The acidity of the brine is important.
- Discard if in doubt. Throw out the jar if you notice mold, sliminess, bubbling, spurting liquid when opened, or an off smell.
- Not tested for canning. If you want shelf-stable pepperoncini, follow a tested canning recipe from a trusted source.
- Blue or green garlic. Garlic can turn blue or green in an acidic brine. This is harmless, but also check for other signs of spoilage.
⚠️ Common Problems and How to Fix Them
The peppers are soft. The peppers may not have been fresh, or the brine may have been too hot or simmered too long. Use firm, fresh peppers and avoid cooking them in the brine.
The peppers are floating. Slit them, pack the jar more tightly, or press them down with a clean utensil.
The pickles are too sour. Let them rest a few more days, or add a pinch more sugar next time.
The pickles are too salty. Reduce the salt slightly, and measure carefully. Remember that different salts have different densities.
The pickles are not spicy enough. Add red pepper flakes, sliced fresh chilies, or a few hot peppers to the jar.
The pickles are too spicy. Choose sweet pepperoncini, skip the chili flakes, and remove the seeds.
The brine is cloudy. Spices, garlic, and oregano can make the brine cloudy. If the cloudiness increases, or you notice an off smell or sliminess, discard the jar.
The garlic turned blue or green. This is a harmless reaction between garlic compounds and acid.
The peppers are bitter. Bitterness can come from older peppers or from too many seeds. Choose fresh, firm peppers and remove some seeds if needed.
The flavor is flat. Add a little more garlic, oregano, or vinegar next time, or give the pickles more time to rest.
🌶️ Delicious Variations
- 🌶 Extra spicy. Add sliced serrano, jalapeño, or fresno peppers.
- 🧅 With onions. Add thin slices of red onion for color and sweetness.
- 🥕 Giardiniera style. Add carrot slices, cauliflower florets, and celery for a mixed pickle.
- 🍋 Lemony. Add strips of lemon zest.
- 🌿 Herb garden. Add thyme, rosemary, or basil.
- 🍯 Sweet and tangy. Add a tablespoon of honey for a sweeter brine.
- 🍎 Apple cider vinegar. Use 5% acidity apple cider vinegar for a fruitier flavor.
- 🫒 Mediterranean. Add a bay leaf, coriander seeds, and a strip of orange peel.
- 🧂 Everything pickle. Add a pinch of celery seeds and a few allspice berries.
- 🍕 Pizza topping. Slice the pickled peppers and add them to pizzas after baking.
🍽 How to Serve Garlic Pepperoncini Pickles
- Italian sandwiches and subs. Layer them with salami, ham, provolone, and lettuce. 🥪
- Burgers. Add tangy, spicy bites on top of burgers and sliders. 🍔
- Antipasto platters. Serve with olives, cheeses, cured meats, and marinated vegetables. 🧀
- Charcuterie boards. Add alongside crackers, nuts, and fruit.
- Salads. Slice into green salads, pasta salads, Greek salads, and chopped salads. 🥗
- Pizza. Add on top of pizza after baking. 🍕
- Pasta. Toss with warm pasta, olive oil, and Parmesan. 🍝
- Roast beef sandwiches. Italian beef sandwiches are traditionally served with pepperoncini.
- Grilled meats. Serve as a tangy side with steak, sausage, or grilled chicken.
- Dips and spreads. Chop and stir into cream cheese, hummus, or tuna salad.
- Bloody Marys. Use as a garnish for a spicy, savory cocktail. 🍹
- Snacking. Enjoy straight from the jar with cheese cubes.
📝 Nutrition Notes
Pepperoncini are very low in calories and add tangy flavor without fat. Garlic adds savory depth, and the pickling brine adds sodium, so enjoy these as a condiment or side, especially if you watch your salt intake. Rinsing the peppers briefly before serving can reduce the saltiness. Exact nutrition values vary with portion size, so use a nutrition calculator for precise numbers.
❓ Frequently Asked Questions
How long should I wait before eating them? Refrigerate for at least 48 hours. For a stronger garlic flavor, let them pickle for 4 to 7 days.
How long do they last? Enjoy within about 2 weeks for best quality, keeping them refrigerated at or below 40°F (4°C).
Can I store them at room temperature? No. These are refrigerator pickles, and garlic stored in liquid should always be kept cold.
Can I can this recipe? This recipe has not been tested for canning. Use a tested canning recipe from a trusted source for shelf-stable pickles.
Can I use jarred pepperoncini? This recipe is designed for fresh peppers. Jarred pepperoncini are already pickled and do not need this process.
What if I cannot find pepperoncini? Small banana peppers, Hungarian wax peppers, or mild chilies can be used as a substitute.
Do I need to slit the peppers? It is optional, but it helps the brine flow inside and prevents the peppers from floating.
Are pepperoncini spicy? They are mild to medium, with a gentle heat and a lot of tang. Adding chili flakes makes them spicier.
Can I reuse the brine? It is best to use the brine only once.
Why add olive oil only when serving? Oil in the storage jar can create low-oxygen conditions that are not safe with garlic. Add it only to the portion you plan to eat.
🏁 Final Thoughts
These Garlic Pepperoncini Pickles are tangy, crunchy, and full of savory garlic flavor. 🧄🌶️ With just a pound of fresh peppers, a handful of spices, and a simple brine, you can make a jar that elevates sandwiches, burgers, salads, and antipasto platters. They are easy to make, easy to customize, and so much more flavorful than most store-bought versions.
Make a jar, keep it cold, and enjoy it within about two weeks for the best flavor and crunch. Your next Italian sub will never be the same. 🥪🔥
📌 Save this garlic pepperoncini pickles recipe for your next sandwich night, antipasto platter, or charcuterie board! Leave a comment and tell us how you served yours. 🧄🌶️🫙
📋 Quick Recipe Card
Garlic Pepperoncini Pickles
⏱️ Prep: 15 minutes | 🔥 Cook: 5 minutes | ❄️ Pickling: 48 hours to 7 days | ⏰ Total: About 2 days and 20 minutes for the first taste | 🫙 Yield: 1 large jar (about 1 quart / 1 liter) | 🍽 Servings: 6 to 8
Pickles: 1 lb (450 g) fresh pepperoncini peppers, 6 to 8 garlic cloves (peeled and lightly crushed), 1 tsp mustard seeds, 1 tsp black peppercorns, ½ tsp red pepper flakes (optional), 1 tsp dried oregano, 2 sprigs fresh dill (optional).
Brine: 1 cup white vinegar (5% acidity), 1 cup water, 1 tbsp kosher salt or pickling salt, 1 tsp granulated sugar (optional), 1 tbsp olive oil (optional, for serving only).
Instructions:
- Wash the pepperoncini and trim the stems if desired. Leave them whole, or make a small slit in each.
- Place the garlic, mustard seeds, peppercorns, oregano, red pepper flakes, and dill in a clean glass jar.
- Pack the peppers snugly, leaving a little space at the top.
- Combine the vinegar, water, salt, and sugar in a small saucepan. Heat gently, stirring until dissolved. Bring to a brief simmer, then remove from the heat.
- Pour the warm brine over the peppers until completely covered and tap the jar to release air bubbles.
- Cool until no longer hot, then cover and refrigerate promptly.
- Refrigerate at least 48 hours. For stronger garlic flavor, pickle 4 to 7 days.
- Drain a few peppers and serve with sandwiches, burgers, grilled meats, salads, or an antipasto platter.
Garlic Pepperoncini Pickles
Ingredients
For the Pickles
- 1 lb (450 g) fresh pepperoncini peppers
- 6 to 8 garlic cloves, peeled and lightly crushed
- 1 tsp mustard seeds
- 1 tsp black peppercorns
- ½ tsp red pepper flakes, optional
- 1 tsp dried oregano
- 2 sprigs fresh dill, optional
For the Pickling Brine
- 1 cup white vinegar (5% acidity)
- 1 cup water
- 1 tbsp kosher salt or pickling salt
- 1 tsp granulated sugar, optional
- 1 tbsp olive oil, optional, for serving only
Instructions
1️⃣ Prepare the Peppers
Wash the pepperoncini thoroughly and trim the stems if desired. Leave the peppers whole, or make a small slit in each pepper to help the brine penetrate. Slitting the peppers allows the brine to flow inside and prevents them from floating. Pat them dry with a clean towel.
Tip: Wear gloves if you are sensitive to peppers, and avoid touching your eyes.
2️⃣ Prepare the Jar
Place the garlic cloves, mustard seeds, black peppercorns, oregano, red pepper flakes, and dill into a clean glass jar. Wash the jar and lid in hot, soapy water and rinse well before use. Clean equipment is essential for any refrigerator pickle.
3️⃣ Pack the Peppers
Arrange the pepperoncini snugly in the jar, leaving a little space at the top. Pack them tightly enough that they stay submerged, but do not crush them. Tuck the garlic and spices between the peppers so they are evenly distributed.
4️⃣ Make the Brine
Combine the vinegar, water, salt, and sugar in a small saucepan. Heat gently, stirring until the salt and sugar dissolve. Bring to a brief simmer, then remove from the heat. Do not simmer the peppers in the brine, which can soften them and reduce their crunch.
5️⃣ Add the Brine
Carefully pour the warm brine over the peppers until they are completely covered. Gently tap the jar to release trapped air bubbles. Use a clean utensil to press down any peppers that float above the surface. All of the peppers, garlic, and spices should be below the brine line.
6️⃣ Cool and Refrigerate
Let the jar cool until it is no longer hot, then cover and refrigerate promptly. Do not leave the jar out at room temperature for long periods, and never store it in a pantry.
7️⃣ Allow the Flavors to Develop
Refrigerate for at least 48 hours before serving. For a stronger garlic flavor, let the peppers pickle for 4 to 7 days. Tilt the jar gently once a day so the flavors distribute evenly.
8️⃣ Serve and Enjoy
Drain a few peppers and serve them with sandwiches, burgers, grilled meats, salads, or an Italian antipasto platter. Use a clean fork or tongs every time. A small drizzle of olive oil and a sprinkle of oregano over the drained peppers just before serving gives them an even more Italian flavor. 🫒
💡 Tips for the Best Pepperoncini Pickles
- For extra garlic flavor. Add a couple of additional crushed garlic cloves.
- For more heat. Increase the red pepper flakes or add a sliced fresh chili.
- For a milder taste. Skip the chili flakes and use sweet pepperoncini.
- For maximum crunch. Choose firm, fresh peppers and avoid simmering them in the brine.
- For serving. A small drizzle of olive oil and a sprinkle of oregano can enhance their flavor just before serving.
- Storage and safety. These are refrigerator pickles, not shelf-stable canned peppers. Keep them submerged in the brine in a covered jar at or below 40°F (4°C), use clean utensils, and enjoy within about 2 weeks for best quality. Do not store homemade garlic pickles at room temperature.
- Slit the peppers. A small cut lets the brine flow inside for even flavor and keeps the peppers from floating.
- Use fresh peppers. Firm, fresh peppers stay crunchier.
- Chill the peppers first. Cold peppers help preserve the crunch.
- Taste after 48 hours. Taste a pepper and decide whether to let the jar rest longer.
- Label the jar. Write the date so you know when to finish it.
- Keep all ingredients submerged. Peppers or garlic above the brine can spoil.