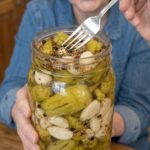
Ingredients
For the Pickles
- 1 lb (450 g) fresh pepperoncini peppers
- 6 to 8 garlic cloves, peeled and lightly crushed
- 1 tsp mustard seeds
- 1 tsp black peppercorns
- ½ tsp red pepper flakes, optional
- 1 tsp dried oregano
- 2 sprigs fresh dill, optional
For the Pickling Brine
- 1 cup white vinegar (5% acidity)
- 1 cup water
- 1 tbsp kosher salt or pickling salt
- 1 tsp granulated sugar, optional
- 1 tbsp olive oil, optional, for serving only
Instructions
1️⃣ Prepare the Peppers
Wash the pepperoncini thoroughly and trim the stems if desired. Leave the peppers whole, or make a small slit in each pepper to help the brine penetrate. Slitting the peppers allows the brine to flow inside and prevents them from floating. Pat them dry with a clean towel.
Tip: Wear gloves if you are sensitive to peppers, and avoid touching your eyes.
2️⃣ Prepare the Jar
Place the garlic cloves, mustard seeds, black peppercorns, oregano, red pepper flakes, and dill into a clean glass jar. Wash the jar and lid in hot, soapy water and rinse well before use. Clean equipment is essential for any refrigerator pickle.
3️⃣ Pack the Peppers
Arrange the pepperoncini snugly in the jar, leaving a little space at the top. Pack them tightly enough that they stay submerged, but do not crush them. Tuck the garlic and spices between the peppers so they are evenly distributed.
4️⃣ Make the Brine
Combine the vinegar, water, salt, and sugar in a small saucepan. Heat gently, stirring until the salt and sugar dissolve. Bring to a brief simmer, then remove from the heat. Do not simmer the peppers in the brine, which can soften them and reduce their crunch.
5️⃣ Add the Brine
Carefully pour the warm brine over the peppers until they are completely covered. Gently tap the jar to release trapped air bubbles. Use a clean utensil to press down any peppers that float above the surface. All of the peppers, garlic, and spices should be below the brine line.
6️⃣ Cool and Refrigerate
Let the jar cool until it is no longer hot, then cover and refrigerate promptly. Do not leave the jar out at room temperature for long periods, and never store it in a pantry.
7️⃣ Allow the Flavors to Develop
Refrigerate for at least 48 hours before serving. For a stronger garlic flavor, let the peppers pickle for 4 to 7 days. Tilt the jar gently once a day so the flavors distribute evenly.
8️⃣ Serve and Enjoy
Drain a few peppers and serve them with sandwiches, burgers, grilled meats, salads, or an Italian antipasto platter. Use a clean fork or tongs every time. A small drizzle of olive oil and a sprinkle of oregano over the drained peppers just before serving gives them an even more Italian flavor. 🫒
💡 Tips for the Best Pepperoncini Pickles
- For extra garlic flavor. Add a couple of additional crushed garlic cloves.
- For more heat. Increase the red pepper flakes or add a sliced fresh chili.
- For a milder taste. Skip the chili flakes and use sweet pepperoncini.
- For maximum crunch. Choose firm, fresh peppers and avoid simmering them in the brine.
- For serving. A small drizzle of olive oil and a sprinkle of oregano can enhance their flavor just before serving.
- Storage and safety. These are refrigerator pickles, not shelf-stable canned peppers. Keep them submerged in the brine in a covered jar at or below 40°F (4°C), use clean utensils, and enjoy within about 2 weeks for best quality. Do not store homemade garlic pickles at room temperature.
- Slit the peppers. A small cut lets the brine flow inside for even flavor and keeps the peppers from floating.
- Use fresh peppers. Firm, fresh peppers stay crunchier.
- Chill the peppers first. Cold peppers help preserve the crunch.
- Taste after 48 hours. Taste a pepper and decide whether to let the jar rest longer.
- Label the jar. Write the date so you know when to finish it.
- Keep all ingredients submerged. Peppers or garlic above the brine can spoil.