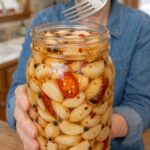
Ingredients
- 2 cups peeled garlic cloves
- 1 cup white vinegar (5% acidity)
- ½ cup water
- ¼ cup honey
- 1 tablespoon granulated sugar (optional)
- 1 tablespoon pickling salt
- 1 to 2 teaspoons crushed red pepper flakes
- 1 teaspoon black peppercorns
- ½ teaspoon mustard seeds
- ½ teaspoon smoked paprika (optional)
- 1 small fresh red chili, sliced (optional)
Ingredient Notes and Smart Swaps
Garlic. Choose firm, fresh heads with tight, papery skins and no soft spots, sprouting, or mold. Avoid garlic that feels spongy or has dark blemishes. Pre-peeled cloves save time, though freshly peeled cloves usually taste best. Remove any damaged pieces before pickling.
White vinegar (5% acidity). The acidity matters for safety and flavor. Check the label and use vinegar that is at least 5% acidity. Apple cider vinegar (also 5%) gives a fruitier, slightly mellower result. Rice vinegar is usually milder, so check that the label confirms enough acidity before substituting.
Water. Plain water dilutes the vinegar slightly to balance the flavor. Do not increase the water or reduce the vinegar, as that lowers the acidity of the brine.
Honey. Honey gives the brine floral sweetness and the “hot honey” character. Any liquid honey works. Mild clover or wildflower honey keeps the flavor balanced, while a darker honey adds a deeper, more robust taste. Maple syrup or agave can be used as flavor swaps, though the taste will change.
Sugar. Optional. It rounds the sweetness and softens the vinegar’s edge. Skip it if you prefer less sweet pickles.
Pickling salt. Pickling salt has no additives, so it keeps the brine clear. Kosher salt works, though crystal sizes vary, so measure carefully. Avoid iodized table salt, which can cloud the brine.
Crushed red pepper flakes. These deliver the heat. Start with 1 teaspoon for a medium-spicy jar and use 2 teaspoons if you like a serious kick.
Black peppercorns and mustard seeds. These classic pickling spices add warmth and a subtle tang.
Smoked paprika. A pinch adds smoky depth and a rosy color. It’s optional.
Fresh red chili. Fresno, red jalapeño, or a small Thai chili adds fresh, fruity heat and looks stunning in the jar.
Instructions
- A clean glass jar with a tight-fitting lid (a pint or quart jar, heat-safe)
- A small saucepan (stainless steel or enamel, not reactive metals like aluminum)
- A sharp paring knife for trimming
- A measuring cup and spoons
- A funnel or ladle (optional, for neat pouring)
- A clean fork or spoon for serving
How to Make Hot Honey Pickled Garlic (Step by Step)
Step 1: Prepare the Garlic
Peel the garlic cloves and trim off any hard root ends or damaged spots. Discard any cloves that are soft, discolored, or moldy. Rinse and drain thoroughly.
Peeling shortcut: Separate the cloves and soak them in warm water for a few minutes, or trim the ends and give them a gentle smash with the flat side of a knife. Another popular method is shaking the cloves vigorously in two metal bowls pressed rim to rim, which loosens the skins quickly.
Step 2: Make the Hot Honey Brine
In a saucepan, combine the vinegar, water, honey, sugar if using, salt, red pepper flakes, black peppercorns, mustard seeds, and smoked paprika. Heat gently over medium heat, stirring until the honey and salt completely dissolve.
Step 3: Add the Chili
If you want extra heat, stir in the sliced fresh chili. Let the brine simmer gently for 1 to 2 minutes to release the aromatic flavors. Avoid a hard, rolling boil, which can evaporate liquid and change the balance of the brine.
Step 4: Fill the Jar
Place the garlic cloves in a clean, heat-safe glass jar. Carefully pour the warm hot honey brine over the garlic, including the spices and chili slices, until the cloves are completely submerged. Tap the jar gently on the counter to release air bubbles, and press the garlic down with a clean spoon if needed.
Step 5: Cool and Refrigerate
Allow the jar to cool slightly, then cover it and refrigerate promptly. Let the flavors develop for at least 3 to 5 days before tasting. The cloves are safe to eat sooner, but they taste sharper and less balanced early on. The flavor continues to improve over the first couple of weeks.
Why Does Pickled Garlic Sometimes Turn Blue or Green?
Don’t panic if your garlic changes color. Garlic naturally contains sulfur compounds and amino acids that can react with the acid in the brine, sometimes producing a blue, teal, or green tint. This is especially common with fresh garlic or garlic stored in cold conditions.
The color change is harmless, and the garlic is still safe to eat. The flavor is not affected. If the color bothers you, you can reduce it by using fresher or older (well-cured) garlic, by using less acidic brine ratios within safe limits, or simply by embracing it. Many people think blue-tinged garlic looks striking.
Note that color change from the natural reaction is different from mold, sliminess, or a foul smell, which signal spoilage.