
Hot Honey Pickled Garlic
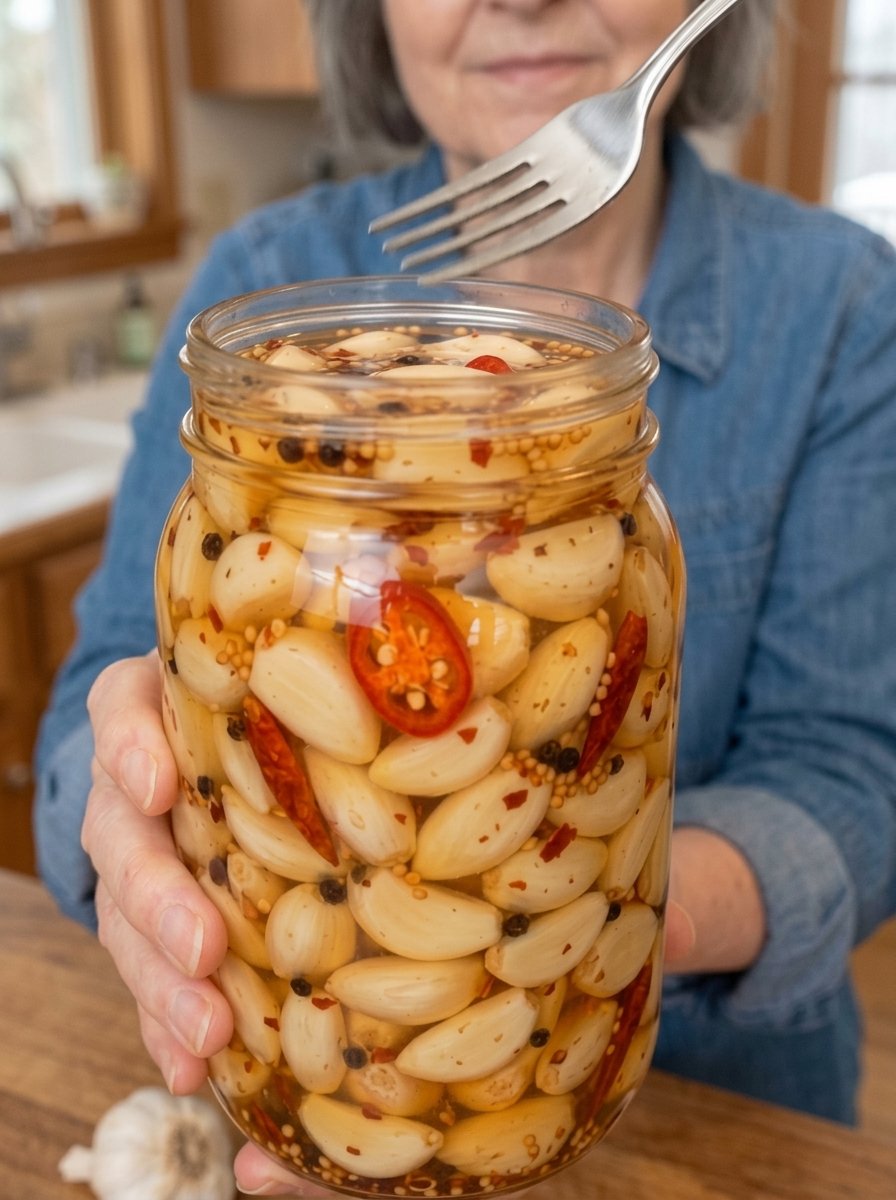
Hot Honey Pickled Garlic: A Sweet, Spicy, and Tangy Refrigerator Pickle
Garlic is already one of the most powerful flavors in the kitchen. Now imagine whole cloves that have soaked for days in a brine of golden honey, fiery chili flakes, and bright vinegar, until each one turns mellow, tangy, sweet, and gently fiery. That is hot honey pickled garlic, and once you have a jar in your refrigerator, you will find excuses to put it on everything.
Pickling tames raw garlic’s harsh bite and turns it into something almost snackable. The cloves stay firm and savory, and they pick up the sweet heat of the brine. The brine itself becomes a bonus ingredient, perfect for drizzling, marinating, and whisking into dressings.
This guide covers the full recipe, step-by-step instructions, important food safety notes, ingredient swaps, troubleshooting, variations, serving ideas, storage, and answers to common questions.
Recipe at a Glance
- Prep time: 20 to 30 minutes (mostly peeling)
- Cook time: 5 minutes
- Resting time: At least 3 to 5 days in the refrigerator
- Yield: About 1 pint to 1 quart jar
- Difficulty: Easy
- Storage: Refrigerator only
Why You’ll Love Hot Honey Pickled Garlic
The flavor balance is addictive. Sweet honey, sharp vinegar, savory garlic, and chili heat all land in the same bite. Nothing overpowers anything else.
It’s a pantry-to-fridge upgrade. If you keep garlic, vinegar, honey, and a few spices on hand, you can make a jar without a special shopping trip.
It’s incredibly versatile. Use the cloves on pizza, burgers, charcuterie boards, roasted vegetables, grilled meats, sandwiches, and grain bowls.
The brine is useful too. Splash it into vinaigrettes, marinades, and sauces, or use it to add sweet heat to cooked dishes.
It makes a great gift or party addition. A jar of pickled garlic looks beautiful and tastes even better, though remember that it needs to stay refrigerated.
It’s mostly hands-off. After a quick simmer and pour, the refrigerator does the work.
What Is Pickled Garlic?
Pickled garlic is garlic preserved in an acidic brine, usually made from vinegar, water, salt, and seasonings. The acid softens the garlic’s sharp, sulfurous bite while preserving its savory depth. Over time, the cloves become tender-crisp and mellow.
Hot honey pickled garlic adds sweetness and heat to that tradition. The honey rounds off the vinegar, and the chili flakes add a slow, warming burn. The result sits somewhere between a pickle, a condiment, and a snack.
Pickled garlic has long been a staple in many cuisines, from Asian pickles to Mediterranean antipasto spreads. Here, the hot honey twist makes it especially good with rich, salty, and fatty foods.
Ingredients for Hot Honey Pickled Garlic
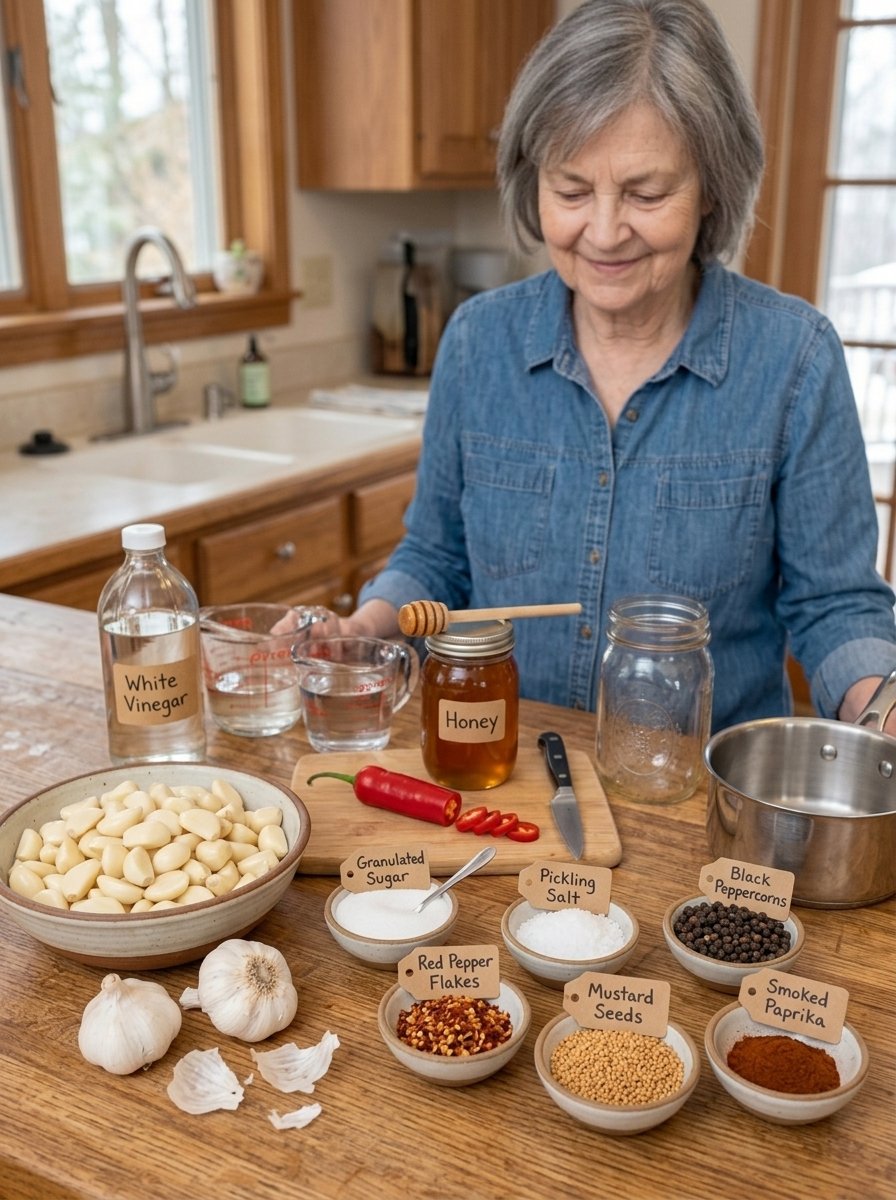
- 2 cups peeled garlic cloves
- 1 cup white vinegar (5% acidity)
- ½ cup water
- ¼ cup honey
- 1 tablespoon granulated sugar (optional)
- 1 tablespoon pickling salt
- 1 to 2 teaspoons crushed red pepper flakes
- 1 teaspoon black peppercorns
- ½ teaspoon mustard seeds
- ½ teaspoon smoked paprika (optional)
- 1 small fresh red chili, sliced (optional)
Ingredient Notes and Smart Swaps
Garlic. Choose firm, fresh heads with tight, papery skins and no soft spots, sprouting, or mold. Avoid garlic that feels spongy or has dark blemishes. Pre-peeled cloves save time, though freshly peeled cloves usually taste best. Remove any damaged pieces before pickling.
White vinegar (5% acidity). The acidity matters for safety and flavor. Check the label and use vinegar that is at least 5% acidity. Apple cider vinegar (also 5%) gives a fruitier, slightly mellower result. Rice vinegar is usually milder, so check that the label confirms enough acidity before substituting.
Water. Plain water dilutes the vinegar slightly to balance the flavor. Do not increase the water or reduce the vinegar, as that lowers the acidity of the brine.
Honey. Honey gives the brine floral sweetness and the “hot honey” character. Any liquid honey works. Mild clover or wildflower honey keeps the flavor balanced, while a darker honey adds a deeper, more robust taste. Maple syrup or agave can be used as flavor swaps, though the taste will change.
Sugar. Optional. It rounds the sweetness and softens the vinegar’s edge. Skip it if you prefer less sweet pickles.
Pickling salt. Pickling salt has no additives, so it keeps the brine clear. Kosher salt works, though crystal sizes vary, so measure carefully. Avoid iodized table salt, which can cloud the brine.
Crushed red pepper flakes. These deliver the heat. Start with 1 teaspoon for a medium-spicy jar and use 2 teaspoons if you like a serious kick.
Black peppercorns and mustard seeds. These classic pickling spices add warmth and a subtle tang.
Smoked paprika. A pinch adds smoky depth and a rosy color. It’s optional.
Fresh red chili. Fresno, red jalapeño, or a small Thai chili adds fresh, fruity heat and looks stunning in the jar.
Food Safety: Read This Before You Start
Pickling garlic is safe when done carefully, but garlic deserves a few extra precautions.
Keep it refrigerated. This is a refrigerator pickle, not a shelf-stable canned recipe. Garlic is a low-acid vegetable, and storing garlic in a low-acid or insufficiently acidic liquid at room temperature carries a risk of botulism, a serious illness caused by toxin-producing bacteria. Keeping the jar refrigerated at 40°F (4°C) or below is an essential safety step. Do not store this jar at room temperature, and do not attempt to can it for shelf storage unless you are following a tested canning recipe designed for that purpose.
Use properly acidic vinegar. Always use vinegar with 5% acidity, and keep the vinegar-to-water-to-honey proportions in this recipe. Do not dilute the brine further.
Keep the cloves submerged. Garlic that sits above the liquid is more likely to spoil.
Use clean jars and utensils. Wash jars in hot, soapy water, and use a clean fork or spoon each time you remove garlic.
Refrigerate promptly. Cool the jar briefly, then refrigerate. Don’t leave it sitting out for hours.
Know when to discard. If you notice mold, a foul or off smell, a slimy texture, bubbling or fizzing that wasn’t there before, or a bulging lid, throw the jar away. When in doubt, throw it out.
Equipment You’ll Need
- A clean glass jar with a tight-fitting lid (a pint or quart jar, heat-safe)
- A small saucepan (stainless steel or enamel, not reactive metals like aluminum)
- A sharp paring knife for trimming
- A measuring cup and spoons
- A funnel or ladle (optional, for neat pouring)
- A clean fork or spoon for serving
How to Make Hot Honey Pickled Garlic (Step by Step)
Step 1: Prepare the Garlic
Peel the garlic cloves and trim off any hard root ends or damaged spots. Discard any cloves that are soft, discolored, or moldy. Rinse and drain thoroughly.
Peeling shortcut: Separate the cloves and soak them in warm water for a few minutes, or trim the ends and give them a gentle smash with the flat side of a knife. Another popular method is shaking the cloves vigorously in two metal bowls pressed rim to rim, which loosens the skins quickly.
Step 2: Make the Hot Honey Brine
In a saucepan, combine the vinegar, water, honey, sugar if using, salt, red pepper flakes, black peppercorns, mustard seeds, and smoked paprika. Heat gently over medium heat, stirring until the honey and salt completely dissolve.
Step 3: Add the Chili
If you want extra heat, stir in the sliced fresh chili. Let the brine simmer gently for 1 to 2 minutes to release the aromatic flavors. Avoid a hard, rolling boil, which can evaporate liquid and change the balance of the brine.
Step 4: Fill the Jar
Place the garlic cloves in a clean, heat-safe glass jar. Carefully pour the warm hot honey brine over the garlic, including the spices and chili slices, until the cloves are completely submerged. Tap the jar gently on the counter to release air bubbles, and press the garlic down with a clean spoon if needed.
Step 5: Cool and Refrigerate
Allow the jar to cool slightly, then cover it and refrigerate promptly. Let the flavors develop for at least 3 to 5 days before tasting. The cloves are safe to eat sooner, but they taste sharper and less balanced early on. The flavor continues to improve over the first couple of weeks.
Why Does Pickled Garlic Sometimes Turn Blue or Green?
Don’t panic if your garlic changes color. Garlic naturally contains sulfur compounds and amino acids that can react with the acid in the brine, sometimes producing a blue, teal, or green tint. This is especially common with fresh garlic or garlic stored in cold conditions.
The color change is harmless, and the garlic is still safe to eat. The flavor is not affected. If the color bothers you, you can reduce it by using fresher or older (well-cured) garlic, by using less acidic brine ratios within safe limits, or simply by embracing it. Many people think blue-tinged garlic looks striking.
Note that color change from the natural reaction is different from mold, sliminess, or a foul smell, which signal spoilage.
Tips for the Best Hot Honey Pickled Garlic
- Choose firm, fresh garlic. Soft or sprouted cloves make mushy pickles.
- Trim the root ends. They can be bitter and tough.
- Don’t skimp on the acid. Keep the vinegar ratio exactly as written.
- Be patient. Three to five days gives noticeably better flavor than one day.
- Taste early, then wait. Sample a clove after a few days, and again after a week.
- Adjust the heat next time. If you like it hotter, add more chili flakes or a second fresh chili.
- Use a glass jar. Glass doesn’t absorb flavors or react with acidic liquids.
- Stir the honey in fully. Undissolved honey sinks and makes the brine uneven.
- Shake or tilt the jar occasionally. This redistributes the spices.
- Label the jar with the date. It helps you track freshness.
Troubleshooting Common Problems
The garlic turned blue or green. This is a harmless chemical reaction and doesn’t affect safety or flavor.
The garlic is too sharp or harsh. Give it more time. Pickled garlic mellows significantly over the first week or two.
The garlic is too soft. The cloves may have been old or overcooked. Use firm, fresh garlic, and don’t boil the cloves in the brine.
The brine is cloudy. Cloudiness can come from iodized salt, hard water, or spices. A little cloudiness from honey and spices is normal. If cloudiness comes with a bad smell, sliminess, or bubbling, discard the jar.
The honey crystallized or settled. Honey may thicken in the cold. Warm the jar slightly in your hands or let it sit at room temperature for a few minutes, then shake gently. Don’t leave it out for extended periods.
It’s too spicy. Next time, reduce the chili flakes and skip the fresh chili. To tone down an existing jar, serve the garlic with creamy or fatty foods such as cheese or yogurt.
It’s too sweet. Reduce the honey slightly next time and skip the optional sugar, but keep the vinegar proportions the same.
It’s too tangy. Add a small amount more honey after chilling, or serve with rich foods like cheese and cured meats to balance it.
The garlic floats. This is normal. Press it down gently or use a clean fermentation weight or small piece of parchment to keep it submerged.
Variations to Try
- Extra hot: Add a sliced habanero, serrano, or an extra teaspoon of chili flakes.
- Smoky chipotle: Add a dried chipotle pepper and extra smoked paprika.
- Herbal: Add a sprig of thyme, rosemary, or a bay leaf to the jar.
- Citrus zing: Add a strip of lemon or orange peel.
- Peppercorn blend: Use a mix of pink, green, and black peppercorns.
- Ginger kick: Add a few thin slices of fresh ginger.
- Apple cider version: Swap the white vinegar for apple cider vinegar for a fruitier, rounder flavor.
- Spiced honey: Add a cinnamon stick or a few allspice berries to the brine.
- Mixed pickle jar: Add thin carrot rounds, small pearl onions, or sliced shallots alongside the garlic.
- Less sweet: Reduce the honey a little and omit the sugar.
How to Serve Hot Honey Pickled Garlic
On charcuterie boards. Pair the cloves with sharp cheddar, crackers, cured meats, olives, and nuts.
On burgers and sandwiches. Chop the cloves and use them as a sweet, spicy topping.
On pizza. Slice the garlic and scatter it over pizza just before serving.
With roasted vegetables. Toss with roasted carrots, potatoes, Brussels sprouts, or cauliflower.
In glazes. Chop and mix into a glaze or finishing sauce for grilled chicken, pork, or salmon.
With cheese and crackers. Serve whole cloves with creamy goat cheese or brie.
In pasta. Stir chopped cloves into olive oil pasta, along with a splash of the brine.
On toast. Mash a few cloves on toast with ricotta, avocado, or butter.
In dressings. Blend a few cloves and a spoonful of brine into vinaigrettes.
In marinades. Use the brine to marinate chicken, pork, or tofu.
In cocktails and snacks. Use a clove as a savory garnish in a Bloody Mary or martini.
On grain bowls and noodles. Add chopped cloves for a punchy flavor boost.
How to Store Hot Honey Pickled Garlic
- Refrigerator only: Store the jar in an airtight container in the refrigerator at 40°F (4°C) or below.
- Best quality: Use within approximately 2 weeks for the best flavor and safety margin.
- Keep it submerged: Cloves should stay under the brine.
- Use clean utensils: Always use a clean fork or spoon.
- Do not store at room temperature: This is a refrigerator pickle, not a shelf-stable canned recipe.
- Do not freeze: Freezing changes the texture of the cloves and brine.
If you want to make a larger batch, make several smaller jars rather than one huge one, so you open fewer jars at a time and keep the rest sealed.
Frequently Asked Questions
How long does hot honey pickled garlic last?
For the best quality and safety, use it within about 2 weeks when stored in the refrigerator at 40°F (4°C) or below.
Do I need to refrigerate it?
Yes. This recipe is a refrigerator pickle. Garlic is a low-acid food, so it should not be stored at room temperature in a jar of liquid.
Can I can this recipe for shelf storage?
No. This recipe is not designed or tested for shelf-stable canning. If you want to can pickled garlic, follow a tested recipe from a trusted source, such as the National Center for Home Food Preservation.
How long should I wait before eating it?
Wait at least 3 to 5 days. The longer it sits, the more the flavors develop.
Why did my garlic turn blue?
A harmless reaction between garlic’s compounds and the acid in the brine. It does not affect safety.
Can I use pre-peeled garlic?
Yes, as long as it’s fresh and firm. Rinse it and check for soft spots.
Can I reduce the honey?
You can, but keep the vinegar-to-water ratio intact. Honey adds flavor and balance, not the main acidity.
Can I use apple cider vinegar?
Yes, as long as it’s labeled 5% acidity. The flavor will be fruitier.
Can I use less spice?
Absolutely. Use 1 teaspoon of chili flakes or skip the fresh chili.
Can I reuse the brine?
You can use the leftover brine in dressings, marinades, and cooking. For another batch of pickling, make a fresh brine for the best safety and flavor.
Is this good for you?
Garlic is a flavorful ingredient used in many healthy diets, but this recipe contains salt, honey, and sugar. Enjoy it as a condiment in moderation.
Is it safe for children under one year old?
No. Honey should not be given to infants under 12 months old. Keep this jar away from babies.
What does it taste like?
Savory, mellow garlic, floral honey sweetness, a tangy vinegar edge, and a lingering chili warmth.
Can I double the recipe?
Yes, but keep the ingredient ratios the same, and use clean jars sized for the batch. Refrigerate all jars.
Final Thoughts
Hot honey pickled garlic is one of those small-batch kitchen projects that quickly becomes a staple. With a little peeling, a quick simmer, and some patience in the refrigerator, you end up with a jar of sweet, spicy, tangy, deeply savory cloves that make cheese boards, sandwiches, pizzas, and roasted vegetables taste more interesting.
Just remember the golden rule: keep it refrigerated, keep the cloves submerged, and use it within about two weeks. Follow those simple steps, and you’ll have a jar that is as safe as it is delicious.
Quick Recipe Recap:
- Peel 2 cups of garlic cloves and trim any damaged pieces.
- Simmer vinegar, water, honey, sugar, salt, chili flakes, peppercorns, mustard seeds, and paprika until dissolved.
- Add sliced fresh chili if you want extra heat and simmer 1 to 2 minutes.
- Pack the garlic in a clean jar and pour in the warm brine until submerged.
- Cool, cover, and refrigerate promptly.
- Wait 3 to 5 days before tasting, and use within about 2 weeks.
Hot Honey Pickled Garlic
Ingredients
- 2 cups peeled garlic cloves
- 1 cup white vinegar (5% acidity)
- ½ cup water
- ¼ cup honey
- 1 tablespoon granulated sugar (optional)
- 1 tablespoon pickling salt
- 1 to 2 teaspoons crushed red pepper flakes
- 1 teaspoon black peppercorns
- ½ teaspoon mustard seeds
- ½ teaspoon smoked paprika (optional)
- 1 small fresh red chili, sliced (optional)
Ingredient Notes and Smart Swaps
Garlic. Choose firm, fresh heads with tight, papery skins and no soft spots, sprouting, or mold. Avoid garlic that feels spongy or has dark blemishes. Pre-peeled cloves save time, though freshly peeled cloves usually taste best. Remove any damaged pieces before pickling.
White vinegar (5% acidity). The acidity matters for safety and flavor. Check the label and use vinegar that is at least 5% acidity. Apple cider vinegar (also 5%) gives a fruitier, slightly mellower result. Rice vinegar is usually milder, so check that the label confirms enough acidity before substituting.
Water. Plain water dilutes the vinegar slightly to balance the flavor. Do not increase the water or reduce the vinegar, as that lowers the acidity of the brine.
Honey. Honey gives the brine floral sweetness and the “hot honey” character. Any liquid honey works. Mild clover or wildflower honey keeps the flavor balanced, while a darker honey adds a deeper, more robust taste. Maple syrup or agave can be used as flavor swaps, though the taste will change.
Sugar. Optional. It rounds the sweetness and softens the vinegar’s edge. Skip it if you prefer less sweet pickles.
Pickling salt. Pickling salt has no additives, so it keeps the brine clear. Kosher salt works, though crystal sizes vary, so measure carefully. Avoid iodized table salt, which can cloud the brine.
Crushed red pepper flakes. These deliver the heat. Start with 1 teaspoon for a medium-spicy jar and use 2 teaspoons if you like a serious kick.
Black peppercorns and mustard seeds. These classic pickling spices add warmth and a subtle tang.
Smoked paprika. A pinch adds smoky depth and a rosy color. It’s optional.
Fresh red chili. Fresno, red jalapeño, or a small Thai chili adds fresh, fruity heat and looks stunning in the jar.
Instructions
- A clean glass jar with a tight-fitting lid (a pint or quart jar, heat-safe)
- A small saucepan (stainless steel or enamel, not reactive metals like aluminum)
- A sharp paring knife for trimming
- A measuring cup and spoons
- A funnel or ladle (optional, for neat pouring)
- A clean fork or spoon for serving
How to Make Hot Honey Pickled Garlic (Step by Step)
Step 1: Prepare the Garlic
Peel the garlic cloves and trim off any hard root ends or damaged spots. Discard any cloves that are soft, discolored, or moldy. Rinse and drain thoroughly.
Peeling shortcut: Separate the cloves and soak them in warm water for a few minutes, or trim the ends and give them a gentle smash with the flat side of a knife. Another popular method is shaking the cloves vigorously in two metal bowls pressed rim to rim, which loosens the skins quickly.
Step 2: Make the Hot Honey Brine
In a saucepan, combine the vinegar, water, honey, sugar if using, salt, red pepper flakes, black peppercorns, mustard seeds, and smoked paprika. Heat gently over medium heat, stirring until the honey and salt completely dissolve.
Step 3: Add the Chili
If you want extra heat, stir in the sliced fresh chili. Let the brine simmer gently for 1 to 2 minutes to release the aromatic flavors. Avoid a hard, rolling boil, which can evaporate liquid and change the balance of the brine.
Step 4: Fill the Jar
Place the garlic cloves in a clean, heat-safe glass jar. Carefully pour the warm hot honey brine over the garlic, including the spices and chili slices, until the cloves are completely submerged. Tap the jar gently on the counter to release air bubbles, and press the garlic down with a clean spoon if needed.
Step 5: Cool and Refrigerate
Allow the jar to cool slightly, then cover it and refrigerate promptly. Let the flavors develop for at least 3 to 5 days before tasting. The cloves are safe to eat sooner, but they taste sharper and less balanced early on. The flavor continues to improve over the first couple of weeks.
Why Does Pickled Garlic Sometimes Turn Blue or Green?
Don’t panic if your garlic changes color. Garlic naturally contains sulfur compounds and amino acids that can react with the acid in the brine, sometimes producing a blue, teal, or green tint. This is especially common with fresh garlic or garlic stored in cold conditions.
The color change is harmless, and the garlic is still safe to eat. The flavor is not affected. If the color bothers you, you can reduce it by using fresher or older (well-cured) garlic, by using less acidic brine ratios within safe limits, or simply by embracing it. Many people think blue-tinged garlic looks striking.
Note that color change from the natural reaction is different from mold, sliminess, or a foul smell, which signal spoilage.