
Fiery Cayenne Pickled Garlic Recipe
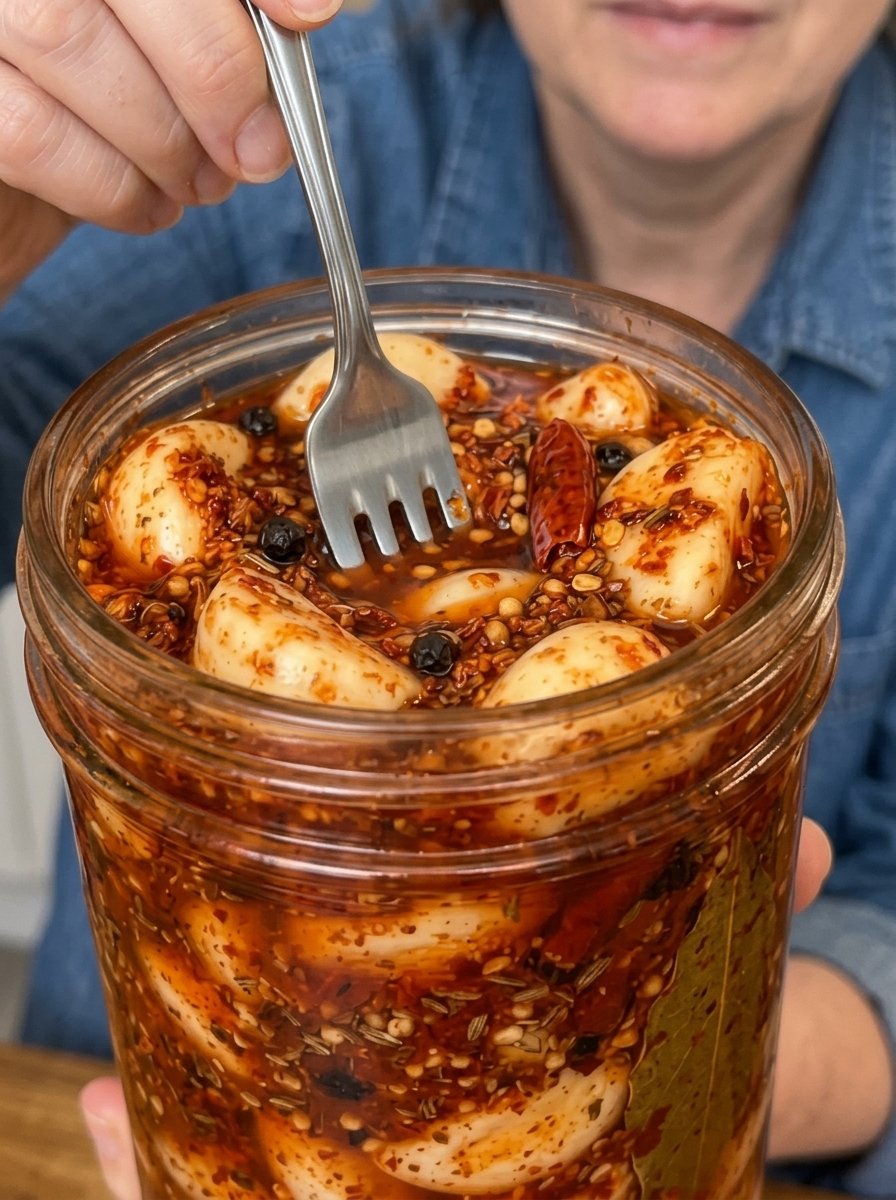
Fiery Cayenne Pickled Garlic Recipe: Spicy, Tangy Refrigerator Pickles in 5 Easy Steps
If you love bold flavors, fiery cayenne pickled garlic belongs in your fridge. Whole garlic cloves soak in a zesty vinegar brine packed with cayenne pepper, red pepper flakes, black peppercorns, and mustard seeds. The result is a snack that is savory, sharp, and seriously hot. The raw bite of garlic mellows into something rich and addictive, while the chili heat builds with every clove.
This easy refrigerator pickled garlic recipe takes about 15 minutes of hands-on time. It needs no special canning equipment. Whether you are building a spicy snack board, topping a pizza, or whisking a punchy marinade, these pickled cloves add instant flavor.
Why You’ll Love This Spicy Pickled Garlic
There are plenty of reasons this recipe earns a permanent spot in your kitchen:
- Big flavor, minimal effort. Peel, simmer the brine, pour, and chill.
- Customizable heat. Use 1 teaspoon of cayenne for a pleasant kick or 2 teaspoons for real fire.
- Versatile. Use the cloves whole, sliced, chopped, or blended into sauces.
- Great for gifting. A jar of spicy pickled garlic makes a thoughtful gift for food lovers (just remind them to keep it refrigerated).
- Pantry-friendly ingredients. Everything you need is likely already in your spice cabinet.
What Is Pickled Garlic?
Pickled garlic is garlic cloves preserved in an acidic brine, usually made from vinegar, water, salt, and sugar. The vinegar softens the garlic’s sharp, sulfurous edge and gives it a tangy, slightly sweet character. Over time, the cloves absorb the flavors of the spices in the brine.
This version adds a serious chili punch. Cayenne pepper provides clean, bright heat. Crushed red pepper flakes add texture and extra spice. Black peppercorns and mustard seeds bring warm, aromatic depth, and optional smoked paprika adds a subtle smoky note.
Ingredients for Fiery Cayenne Pickled Garlic
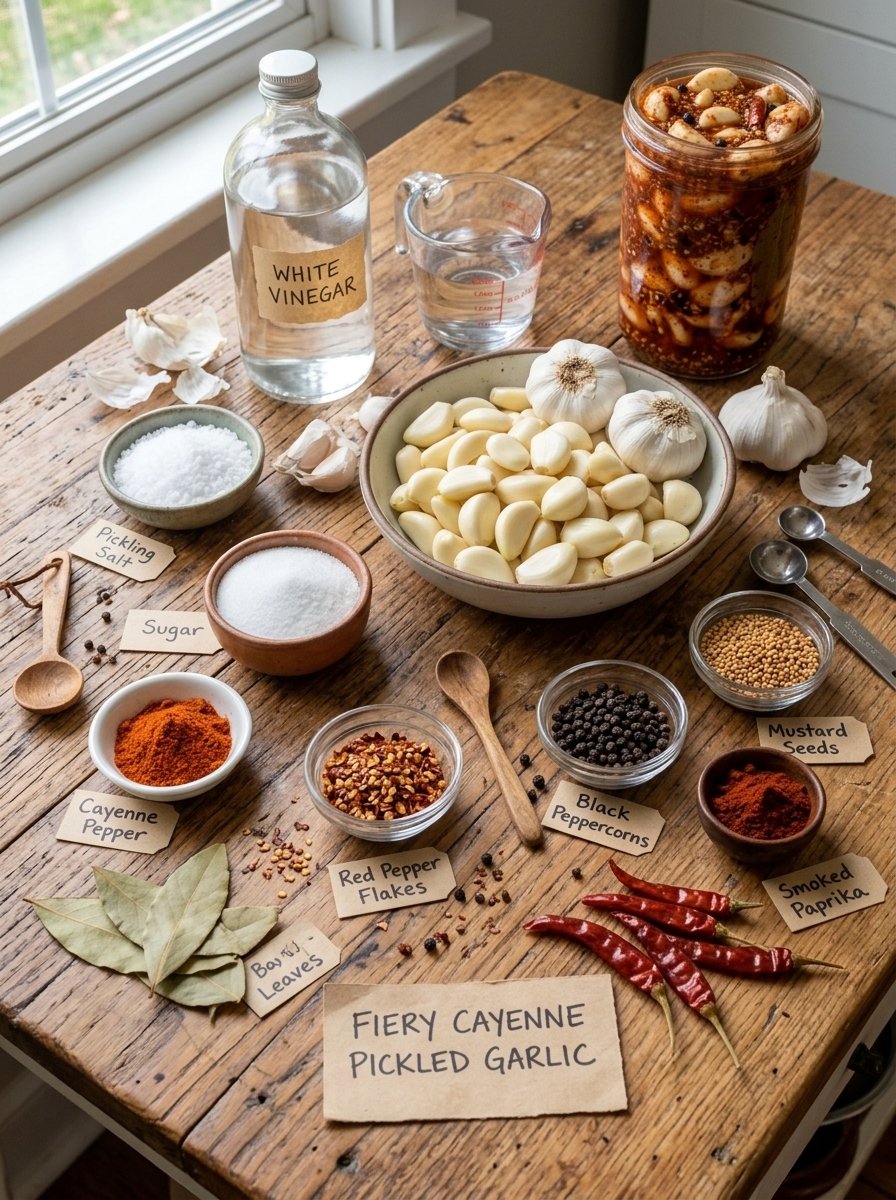
Here is everything you need to make about one large jar (roughly a quart):
- 2 cups peeled garlic cloves 🧄
- 1 cup white vinegar (5% acidity)
- ½ cup water
- 1 tablespoon pickling salt
- 1 tablespoon granulated sugar
- 1–2 teaspoons cayenne pepper 🌶️
- 1 teaspoon crushed red pepper flakes
- 1 teaspoon black peppercorns
- ½ teaspoon mustard seeds
- 2–3 dried cayenne peppers (optional)
- 1 bay leaf
- ½ teaspoon smoked paprika (optional)
Ingredient Notes and Smart Substitutions
Garlic: Choose firm, plump heads with tight, papery skins. Avoid cloves that are soft, sprouting heavily, or bruised. Pre-peeled garlic from the store saves a lot of time, but fresh garlic usually has a better flavor.
Vinegar: White vinegar with 5% acidity gives a clean, sharp tang that lets the spices shine. Apple cider vinegar (also 5%) works for a fruitier, slightly mellow result. Always check the label to confirm the acidity level.
Salt: Pickling salt dissolves cleanly and keeps the brine clear. Kosher salt can work if it has no additives, though it is less dense, so measure carefully. Avoid iodized table salt, which can cloud the brine and affect color.
Cayenne pepper: This is the main source of heat. Start with 1 teaspoon if you are heat-cautious. Go to 2 teaspoons if you like your pickles to bite back.
Dried cayenne peppers: These are optional, but they add visual appeal and an extra heat boost as they steep in the jar.
Equipment You’ll Need
- A medium saucepan
- A clean, heat-safe glass jar (a 1-quart jar works well) with a lid
- A cutting board and small paring knife
- A measuring spoon set
- A ladle or small pitcher for pouring the brine
How to Make Fiery Cayenne Pickled Garlic (Step by Step)
Step 1: Prepare the Garlic
Peel your garlic cloves and trim the root ends. Discard any cloves that are damaged, soft, or discolored. Keep the cloves whole for the boldest garlic flavor and the most attractive presentation in the jar.
Quick peeling tip: Break the heads into individual cloves, then place them in a lidded container and shake vigorously for 30 seconds. Many of the skins will loosen and fall away. Alternatively, trim the root ends and use the flat side of a knife to gently press each clove so the skin slips off.
Step 2: Make the Fiery Brine
In a saucepan, combine the vinegar, water, salt, sugar, cayenne pepper, red pepper flakes, black peppercorns, mustard seeds, bay leaf, and the optional smoked paprika. Heat gently over medium heat, stirring until the salt and sugar have completely dissolved.
Step 3: Add Extra Heat
Let the brine simmer gently for 1 to 2 minutes so the spices release their aroma. For maximum heat, add the dried cayenne peppers at this stage. Keep the heat at a gentle simmer rather than a hard boil, which can drive off some of the vinegar’s sharpness.
Step 4: Fill the Jar
Place the garlic cloves in a clean, heat-safe glass jar. Carefully pour the warm brine and spices over the garlic until every clove is completely submerged. Tap the jar gently on the counter to release trapped air bubbles, and top off with a little more brine if needed.
Step 5: Cool and Refrigerate
Let the jar cool at the counter, then cover and refrigerate promptly. Do not leave it sitting out for long periods. Let the flavors develop for 3 to 5 days before tasting. The longer it rests, the more intense the spicy, tangy flavor becomes.
Why Does Pickled Garlic Sometimes Turn Blue or Green?
This surprises many first-time pickle makers, but it is harmless. Garlic contains sulfur compounds and amino acids that can react with the acid in the brine, sometimes producing a blue or green tint. This is more common with very fresh garlic or garlic grown in certain soils, and it can also be influenced by trace minerals in water or by cooking in some metal pans.
The color change does not affect flavor or safety on its own. To minimize it, use a non-reactive saucepan (stainless steel or enamel), use fresh but not freshly harvested garlic if possible, and use filtered water if your tap water is very hard.
If the garlic smells spoiled, looks slimy, or the brine becomes cloudy with an off odor, discard the entire jar. When in doubt, throw it out.
Fiery Flavor Profile: What Does It Taste Like?
Every bite delivers layers of flavor:
- 🧄 Savory: Rich, pungent garlic that mellows beautifully during pickling
- 🌶️ Fiery: Bold cayenne heat that builds as you eat
- 🥒 Tangy: A sharp vinegar bite that cuts through rich foods
- 🌿 Aromatic: Warm peppercorns and mustard seeds for depth
- 🔥 Smoky: Optional smoked paprika adds a subtle campfire note
The garlic becomes tender-crisp, and the brine itself turns into a flavorful, spicy liquid you can use in dressings and marinades.
Serving Ideas: How to Use Spicy Pickled Garlic
Once your garlic has had time to mature, the possibilities are endless.
🍕 Pizza
Slice the spicy garlic cloves thinly and scatter them over pizza before or after baking. They pair especially well with pepperoni, sausage, mushrooms, and extra cheese.
🍔 Burgers and Sandwiches
Chop the cloves finely and mix them into mayonnaise, aioli, or sandwich spreads. A spoonful of spicy garlic mayo transforms a simple burger or grilled chicken sandwich.
🥩 Grilled Meats
Serve whole cloves alongside steak, chicken, kebabs, or ribs. The tangy heat cuts through rich, smoky meat and refreshes the palate.
🍝 Pasta
Toss chopped cloves into olive oil with fresh herbs and cooked pasta for a quick, spicy aglio e olio-style dish. A splash of the brine adds acidity and heat.
🧀 Charcuterie Boards
Pair the cloves with sharp cheddar, salty crackers, olives, cured meats, and nuts. They add a bold, spicy accent that guests love.
🌶️ Spicy Sauces and Marinades
Blend a few cloves into marinades, vinaigrettes, dressings, or homemade chili sauces. They add garlic depth and acidity in one step.
More Creative Ideas
- Stir chopped pickled garlic into scrambled eggs or omelets
- Add to Bloody Mary garnishes for a spicy kick
- Mix into hummus or bean dips
- Toss with roasted vegetables just before serving
- Add to tacos, grain bowls, or noodle dishes
- Use a spoonful of the brine to liven up salad dressings
Storage Tips: Keep Your Pickled Garlic Safe and Delicious
Proper storage matters, especially with garlic.
- Refrigerate at 40°F (4°C) or below. Keep the jar in the fridge at all times.
- Use within about 2 weeks for the best quality and flavor.
- Always use a clean utensil when removing garlic, so you do not introduce bacteria.
- Keep the garlic submerged in the brine.
Important Safety Note
This is a refrigerator pickle, not a shelf-stable canning recipe. Do not store it at room temperature. Garlic is a low-acid vegetable, and improperly preserved garlic in jars at room temperature can pose serious food-safety risks, including the potential for botulism. This recipe is designed strictly for refrigerator storage. If you want a shelf-stable version, follow a tested, approved home-canning recipe from a trusted source such as the USDA or the National Center for Home Food Preservation.
Tips for the Best Fiery Pickled Garlic
- Use fresh, firm garlic. Quality starts with the cloves.
- Keep the cloves whole. Whole cloves look beautiful and hold their texture.
- Don’t skip the resting time. Three to five days makes a big difference in flavor.
- Adjust the heat. Start with 1 teaspoon of cayenne and increase next time if you want more.
- Use a non-reactive pot. Stainless steel or enamel helps keep the color and flavor clean.
- Make sure the jar is clean. Wash it thoroughly with hot, soapy water and rinse well.
- Keep everything submerged. Garlic exposed above the brine should be pushed back down or the jar topped off.
- Label your jar. Write the date on it so you know when it is time to use it up.
Variations to Try
- Extra smoky: Increase the smoked paprika to 1 teaspoon, or add a pinch of chipotle powder.
- Sweet heat: Add an extra teaspoon of sugar, or a spoonful of honey.
- Herby: Add a sprig of fresh dill, thyme, or oregano to the jar.
- Super hot: Add a sliced fresh chili such as serrano or habanero.
- Mellow and fruity: Swap the white vinegar for apple cider vinegar.
- Citrus twist: Add a few strips of lemon zest to the jar.
Health Benefits of Garlic
Garlic has been valued for centuries in kitchens around the world. It is low in calories and contains compounds such as allicin, which forms when garlic is crushed or chopped. Garlic also provides small amounts of manganese, vitamin B6, and vitamin C. Cayenne pepper contains capsaicin, the compound responsible for its heat. While pickled garlic is best enjoyed as a flavorful condiment rather than a health remedy, it is a tasty way to add more flavor to your meals without much added fat or many calories.
Frequently Asked Questions
How long does fiery cayenne pickled garlic last in the fridge?
For best quality, use it within approximately 2 weeks. Keep it refrigerated at 40°F (4°C) or below, and always use a clean utensil.
Can I store this pickled garlic at room temperature?
No. This is a refrigerator pickle, not a shelf-stable canned product. Always store it in the refrigerator.
How long should I wait before eating it?
Wait at least 3 to 5 days for the flavors to develop. The garlic gets spicier and tangier as it rests.
Can I make it less spicy?
Yes. Use just 1 teaspoon of cayenne, reduce or omit the red pepper flakes, and skip the dried cayenne peppers.
Can I make it even hotter?
Absolutely. Use 2 teaspoons of cayenne, add all three dried cayenne peppers, and consider adding a sliced fresh chili.
Why did my garlic turn blue or green?
A harmless reaction between garlic’s natural compounds and the acid in the brine. It does not mean the garlic is spoiled, but discard it if you notice slime, off smells, or cloudy brine.
Can I use the leftover brine?
Yes. Use it in salad dressings, marinades, bloody marys, or to add tang and heat to soups and sauces while it is still fresh.
Can I use pre-peeled garlic?
Yes. Pre-peeled garlic works well. Just check that the cloves are fresh and firm, with no soft spots or discoloration.
Can I double the recipe?
Yes. Double all ingredients and use larger jars or multiple jars, keeping all the garlic submerged in the brine.
What type of jar should I use?
Use a clean, heat-safe glass jar with a tight-fitting lid. Avoid metal lids that may corrode from contact with the vinegar, or use a lid with a protective lining.
Final Thoughts
Fiery Cayenne Pickled Garlic is an easy, high-reward recipe for anyone who loves spicy, tangy, bold flavors. With just a handful of ingredients, a few minutes on the stove, and a little patience in the refrigerator, you can turn humble garlic cloves into a fiery condiment that elevates everything from pizza to pasta to grilled meats.
Make a jar this weekend, let it rest for a few days, and get ready to enjoy the heat. Once you taste how the garlic mellows and absorbs the cayenne, you will want to keep a jar on hand all year long. 🧄🌶️🔥
Print
Fiery Cayenne Pickled Garlic Recipe
Ingredients
Here is everything you need to make about one large jar (roughly a quart):
- 2 cups peeled garlic cloves 🧄
- 1 cup white vinegar (5% acidity)
- ½ cup water
- 1 tablespoon pickling salt
- 1 tablespoon granulated sugar
- 1–2 teaspoons cayenne pepper 🌶️
- 1 teaspoon crushed red pepper flakes
- 1 teaspoon black peppercorns
- ½ teaspoon mustard seeds
- 2–3 dried cayenne peppers (optional)
- 1 bay leaf
- ½ teaspoon smoked paprika (optional)
Ingredient Notes and Smart Substitutions
Garlic: Choose firm, plump heads with tight, papery skins. Avoid cloves that are soft, sprouting heavily, or bruised. Pre-peeled garlic from the store saves a lot of time, but fresh garlic usually has a better flavor.
Vinegar: White vinegar with 5% acidity gives a clean, sharp tang that lets the spices shine. Apple cider vinegar (also 5%) works for a fruitier, slightly mellow result. Always check the label to confirm the acidity level.
Salt: Pickling salt dissolves cleanly and keeps the brine clear. Kosher salt can work if it has no additives, though it is less dense, so measure carefully. Avoid iodized table salt, which can cloud the brine and affect color.
Cayenne pepper: This is the main source of heat. Start with 1 teaspoon if you are heat-cautious. Go to 2 teaspoons if you like your pickles to bite back.
Dried cayenne peppers: These are optional, but they add visual appeal and an extra heat boost as they steep in the jar.
Instructions
- A medium saucepan
- A clean, heat-safe glass jar (a 1-quart jar works well) with a lid
- A cutting board and small paring knife
- A measuring spoon set
- A ladle or small pitcher for pouring the brine
How to Make Fiery Cayenne Pickled Garlic (Step by Step)
Step 1: Prepare the Garlic
Peel your garlic cloves and trim the root ends. Discard any cloves that are damaged, soft, or discolored. Keep the cloves whole for the boldest garlic flavor and the most attractive presentation in the jar.
Quick peeling tip: Break the heads into individual cloves, then place them in a lidded container and shake vigorously for 30 seconds. Many of the skins will loosen and fall away. Alternatively, trim the root ends and use the flat side of a knife to gently press each clove so the skin slips off.
Step 2: Make the Fiery Brine
In a saucepan, combine the vinegar, water, salt, sugar, cayenne pepper, red pepper flakes, black peppercorns, mustard seeds, bay leaf, and the optional smoked paprika. Heat gently over medium heat, stirring until the salt and sugar have completely dissolved.
Step 3: Add Extra Heat
Let the brine simmer gently for 1 to 2 minutes so the spices release their aroma. For maximum heat, add the dried cayenne peppers at this stage. Keep the heat at a gentle simmer rather than a hard boil, which can drive off some of the vinegar’s sharpness.
Step 4: Fill the Jar
Place the garlic cloves in a clean, heat-safe glass jar. Carefully pour the warm brine and spices over the garlic until every clove is completely submerged. Tap the jar gently on the counter to release trapped air bubbles, and top off with a little more brine if needed.
Step 5: Cool and Refrigerate
Let the jar cool at the counter, then cover and refrigerate promptly. Do not leave it sitting out for long periods. Let the flavors develop for 3 to 5 days before tasting. The longer it rests, the more intense the spicy, tangy flavor becomes.
Why Does Pickled Garlic Sometimes Turn Blue or Green?
This surprises many first-time pickle makers, but it is harmless. Garlic contains sulfur compounds and amino acids that can react with the acid in the brine, sometimes producing a blue or green tint. This is more common with very fresh garlic or garlic grown in certain soils, and it can also be influenced by trace minerals in water or by cooking in some metal pans.
The color change does not affect flavor or safety on its own. To minimize it, use a non-reactive saucepan (stainless steel or enamel), use fresh but not freshly harvested garlic if possible, and use filtered water if your tap water is very hard.
If the garlic smells spoiled, looks slimy, or the brine becomes cloudy with an off odor, discard the entire jar. When in doubt, throw it out.