
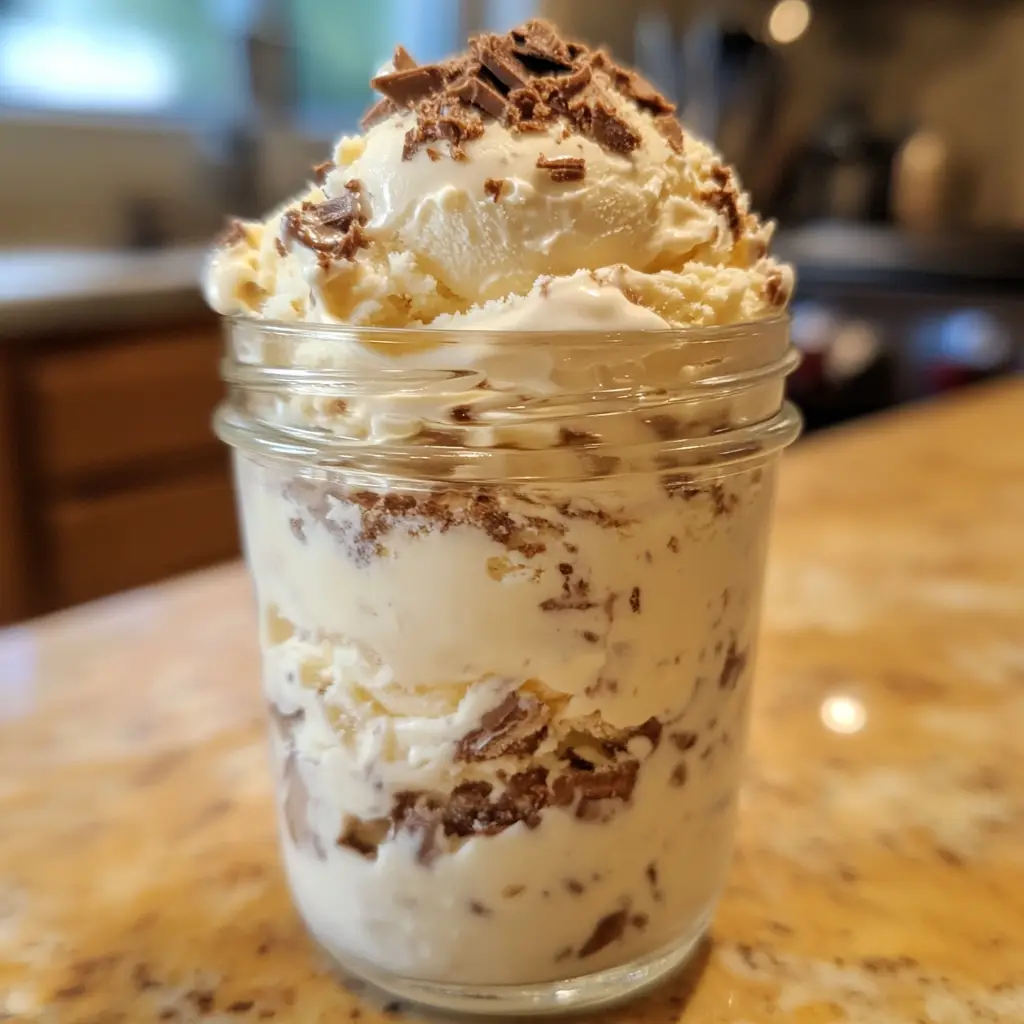
Mason Jar Homemade Ice Cream: Discover Easy Recipes!
Introduction to Mason Jar Homemade Ice Cream
As a busy mom, I know how precious those little moments of joy can be. That’s why I absolutely love making Mason Jar Homemade Ice Cream. It’s not just a treat; it’s a delightful experience that brings smiles to my family’s faces. This simple recipe is perfect for those hectic days when you crave something sweet but don’t have hours to spare. With just a few ingredients and a little shaking, you can whip up a creamy, dreamy dessert that’s sure to impress your loved ones. Trust me, this is a quick solution for a busy day!
Why You’ll Love This Mason Jar Homemade Ice Cream
This Mason Jar Homemade Ice Cream is a game-changer for busy families. It’s incredibly easy to make, requiring minimal effort and time. In just 10 minutes of prep, you can create a delicious dessert that rivals any ice cream shop. Plus, the customizable mix-ins mean everyone can enjoy their favorite flavors. It’s a fun activity to do with the kids, making it a sweet memory as well as a treat!
Ingredients for Mason Jar Homemade Ice Cream
Gathering the right ingredients is the first step to creating your Mason Jar Homemade Ice Cream. Here’s what you’ll need:
- Heavy Cream: This is the star of the show! It gives your ice cream that rich, creamy texture we all love.
- Whole Milk: Adds a smooth consistency and balances the richness of the heavy cream.
- Granulated Sugar: Sweetens the mixture and enhances the overall flavor. You can adjust the amount based on your sweetness preference.
- Vanilla Extract: A splash of this classic flavor elevates your ice cream, making it taste homemade and delightful.
- Mix-Ins: This is where the fun begins! Think chocolate chips, fresh fruit, or nuts. Get creative and personalize your ice cream!
For those looking to switch things up, consider using half-and-half instead of whole milk for a creamier texture. You can also substitute maple syrup or honey for sugar if you prefer a natural sweetener. The exact quantities for these ingredients are listed at the bottom of the article, ready for you to print and take to the kitchen!
How to Make Mason Jar Homemade Ice Cream
Making Mason Jar Homemade Ice Cream is a delightful adventure! Follow these simple steps, and you’ll have a creamy treat ready to enjoy in no time.
Step 1: Combine the Base Ingredients
Start by grabbing a large mason jar. Pour in the heavy cream, whole milk, granulated sugar, and vanilla extract.
These ingredients are the foundation of your ice cream.
Make sure to leave a little space at the top of the jar to allow for shaking.
Once everything is in, secure the lid tightly. This is crucial to avoid any spills during the next step!
Step 2: Shake It Up
Now comes the fun part! Shake the jar vigorously for about 5 minutes.
This is where the magic happens.
The mixture will thicken as you shake, transforming into a creamy base.
Don’t be shy—get the kids involved! It’s a great way to bond and burn off some energy.
Just remember, the jar needs to be sealed tightly to prevent any leaks.
Step 3: Add Your Mix-Ins
After shaking, it’s time to get creative! Open the jar and add your favorite mix-ins.
Chocolate chips, fresh fruit, or nuts are all fantastic choices.
Gently stir them in with a spoon.
Be careful not to overmix; you want those delightful surprises throughout your ice cream!
Step 4: Freeze the Mixture
Seal the jar again and place it in the freezer.
Let it freeze for at least 4 hours, or until it’s firm.
This waiting period is the hardest part, but trust me, it’s worth it!
If you can, try to resist the temptation to peek too often.
The longer it freezes, the creamier it will be.
Step 5: Serve and Enjoy
Once your ice cream is frozen to perfection, it’s time to scoop it out!
Use a spoon or an ice cream scoop to serve it into bowls.
You can top it with extra mix-ins or a drizzle of chocolate sauce for an extra treat.
Sit back, relax, and enjoy the fruits of your labor.
This Mason Jar Homemade Ice Cream is sure to bring smiles all around!
Tips for Success
- Make sure your mason jar is clean and dry before use to avoid any unwanted flavors.
- For a smoother texture, chill your heavy cream and milk before mixing.
- Don’t skip the shaking! It’s essential for achieving that creamy consistency.
- Experiment with different mix-ins to find your family’s favorite combinations.
- Store any leftovers in an airtight container to keep it fresh and delicious.
Equipment Needed
- Mason Jar: A large mason jar is essential. You can also use any airtight container if you don’t have one.
- Mixing Spoon: A sturdy spoon for stirring in your mix-ins. A spatula works well too!
- Freezer: A reliable freezer is crucial for setting your ice cream.
Variations of Mason Jar Homemade Ice Cream
- Chocolate Lovers: Swap half of the heavy cream for chocolate milk to create a rich chocolate ice cream.
- Fruit Fusion: Blend in pureed fruits like strawberries or mangoes for a refreshing fruity twist.
- Nutty Delight: Add crushed nuts and a swirl of peanut butter for a nutty flavor explosion.
- Mint Chocolate Chip: Incorporate a few drops of mint extract and chocolate chips for a classic favorite.
- Dairy-Free Option: Use coconut cream and almond milk for a delicious dairy-free version.
- Spiced Pumpkin: Mix in pumpkin puree and pumpkin spice for a seasonal treat that’s perfect for fall.
Serving Suggestions for Mason Jar Homemade Ice Cream
- Serve with a sprinkle of crushed nuts for added crunch.
- Pair with fresh fruit like berries or banana slices for a refreshing contrast.
- Drizzle with chocolate or caramel sauce for an indulgent touch.
- Top with whipped cream and a cherry for a classic sundae look.
- Enjoy with a glass of cold milk or a warm brownie for a delightful combo.
FAQs about Mason Jar Homemade Ice Cream
As you embark on your Mason Jar Homemade Ice Cream journey, you might have a few questions. Here are some common queries that can help you along the way:
Can I use a smaller mason jar? Yes, you can! Just adjust the ingredient quantities accordingly. A smaller jar is perfect for single servings.
How long does it take to freeze? For the best results, freeze your ice cream for at least 4 hours. This allows it to firm up nicely.
Can I make this ice cream without a mason jar? Absolutely! Any airtight container will work just fine. Just ensure it’s sealed tightly to prevent ice crystals.
What if my ice cream is too hard after freezing? If your ice cream is too hard, let it sit at room temperature for a few minutes before scooping. This will soften it up.
Can I make this recipe dairy-free? Yes! Substitute heavy cream with coconut cream and whole milk with almond milk for a delicious dairy-free version.
Final Thoughts
Making Mason Jar Homemade Ice Cream is more than just a recipe; it’s a joyful experience that brings families together. The laughter shared while shaking the jar and the excitement of choosing mix-ins create lasting memories. Each scoop is a reminder that simple pleasures can be the sweetest. Whether it’s a hot summer day or a cozy evening, this delightful treat is sure to brighten your mood. So, gather your loved ones, unleash your creativity, and enjoy the delicious rewards of your efforts. Trust me, you’ll find that this homemade ice cream is a true labor of love!
Print
Mason Jar Homemade Ice Cream: Discover Easy Recipes!
- Total Time: 4 hours 10 minutes
- Yield: 4 servings 1x
- Diet: Vegetarian
Description
A simple and fun way to make homemade ice cream using a mason jar, perfect for a quick treat.
Ingredients
- 2 cups heavy cream
- 1 cup whole milk
- 3/4 cup granulated sugar
- 1 teaspoon vanilla extract
- 1/2 cup mix-ins (chocolate chips, fruit, nuts, etc.)
Instructions
- In a large mason jar, combine heavy cream, whole milk, sugar, and vanilla extract.
- Seal the jar tightly and shake vigorously for about 5 minutes until the mixture thickens.
- Add your desired mix-ins and stir gently with a spoon.
- Seal the jar again and place it in the freezer for at least 4 hours or until firm.
- Once frozen, scoop out the ice cream and enjoy!
Notes
- For a richer flavor, use more heavy cream.
- Experiment with different mix-ins for unique flavors.
- Make sure the jar is sealed tightly to prevent ice crystals from forming.
- Prep Time: 10 minutes
- Cook Time: 0 minutes
- Category: Dessert
- Method: No-Churn
- Cuisine: American
Nutrition
- Serving Size: 1/2 cup
- Calories: 300
- Sugar: 25g
- Sodium: 50mg
- Fat: 20g
- Saturated Fat: 12g
- Unsaturated Fat: 8g
- Trans Fat: 0g
- Carbohydrates: 30g
- Fiber: 0g
- Protein: 3g
- Cholesterol: 80mg
Keywords: Mason Jar, Homemade Ice Cream, Easy Recipes, No-Churn Ice Cream