
Mini Sourdough Boules in a Cupcake Pan
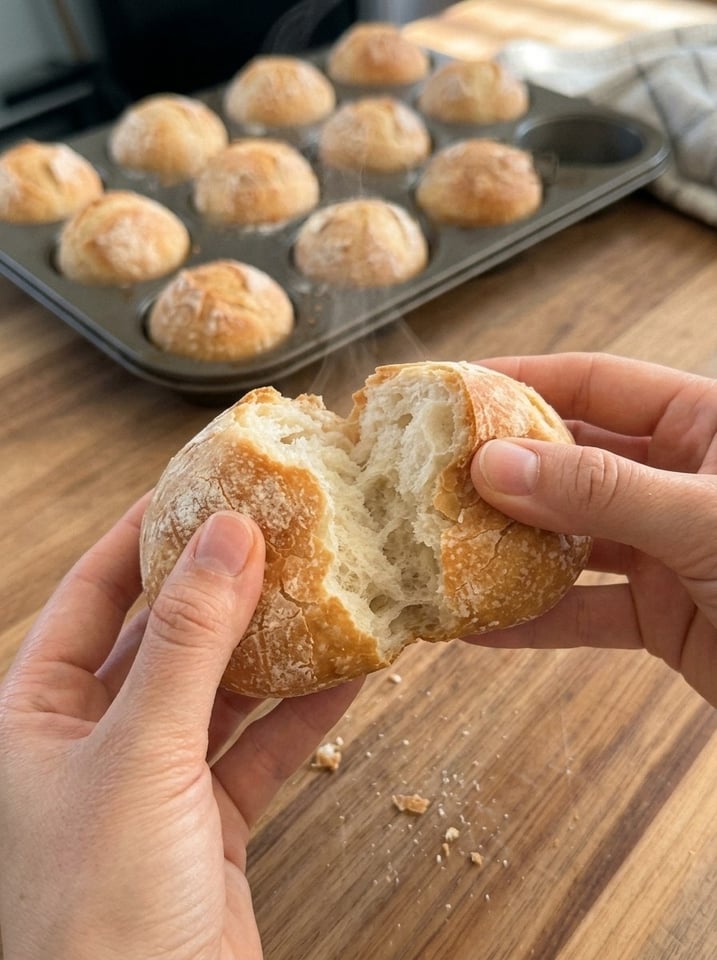
Mini Sourdough Boules in a Cupcake Pan: Adorable Artisan Rolls with a Crispy Crust ✨
SEO title: Mini Sourdough Boules in a Cupcake Pan – Easy Artisan Sourdough Rolls
Meta description: Bake adorable mini sourdough boules in a cupcake pan with a golden crispy crust and a soft, chewy crumb. Made with active sourdough starter, perfect for dinner rolls, mini sandwiches, and soup. Makes 12.
Focus keywords: mini sourdough boules, sourdough rolls in a muffin tin, cupcake pan sourdough, sourdough dinner rolls, easy sourdough rolls, artisan sourdough rolls, individual sourdough loaves
These Mini Sourdough Boules are adorable little artisan bread rolls with a golden, crispy crust and a soft, chewy interior! 🥖 Baked in a cupcake pan, they are perfectly portioned for individual servings, dinner rolls, mini sandwiches, or dipping into warm soups. Made with an active sourdough starter and simple ingredients, these little loaves bring bakery-style charm right to your kitchen. 🤎🍞
If you love the flavor of sourdough but find a full-size boule a bit intimidating, or you simply want bread that is easier to serve, this recipe is a wonderful solution. The cupcake pan acts as a mold that supports each dough ball as it rises and bakes, so you get beautifully round, evenly sized rolls without needing a Dutch oven, bannetons, or special equipment. Each roll has a thin, crackly crust and a tender, slightly tangy crumb, just like a miniature artisan loaf.
In this guide, you will find the full recipe, a clear step-by-step walkthrough, an explanation of how sourdough fermentation works, tips for getting the best rise and crust, common problems and how to fix them, flavor variations, ideas for serving, storage tips, and answers to common sourdough questions. Let’s bake! 👩🍳
⏱ Recipe Overview
- ⏱ Prep Time: 25 minutes
- ⏳ Rise Time: 6 to 10 hours, depending on temperature
- 🔥 Cook Time: 20 to 25 minutes
- ⏰ Total Time: About 7 to 11 hours
- 🍽️ Yield: 12 mini boules
- 🎯 Difficulty: Easy to moderate, great for beginners with an active starter
🤔 Why You Will Love These Mini Sourdough Boules
- Perfect portion size. Each boule is a single serving, ideal for dinner rolls, lunchbox bread, or sliders.
- No special equipment. A standard 12-cup cupcake pan, a bowl, and an oven are all you need. No Dutch oven, no banneton.
- Crispy crust, chewy crumb. The small size means a higher ratio of crust to crumb, which gives these rolls their irresistible texture.
- Simple ingredients. Bread flour, water, sourdough starter, and salt. That is all.
- Mostly hands-off. The long rise does most of the work while you go about your day.
- Make-ahead friendly. You can shape the rolls and refrigerate them overnight, then bake fresh in the morning.
- Great for entertaining. Individual rolls look charming on a bread basket or a dinner table, and guests do not need to slice anything.
- Naturally flavorful. The long fermentation develops that signature mild tang and complex flavor that commercial yeast breads cannot match.
🛒 Ingredients
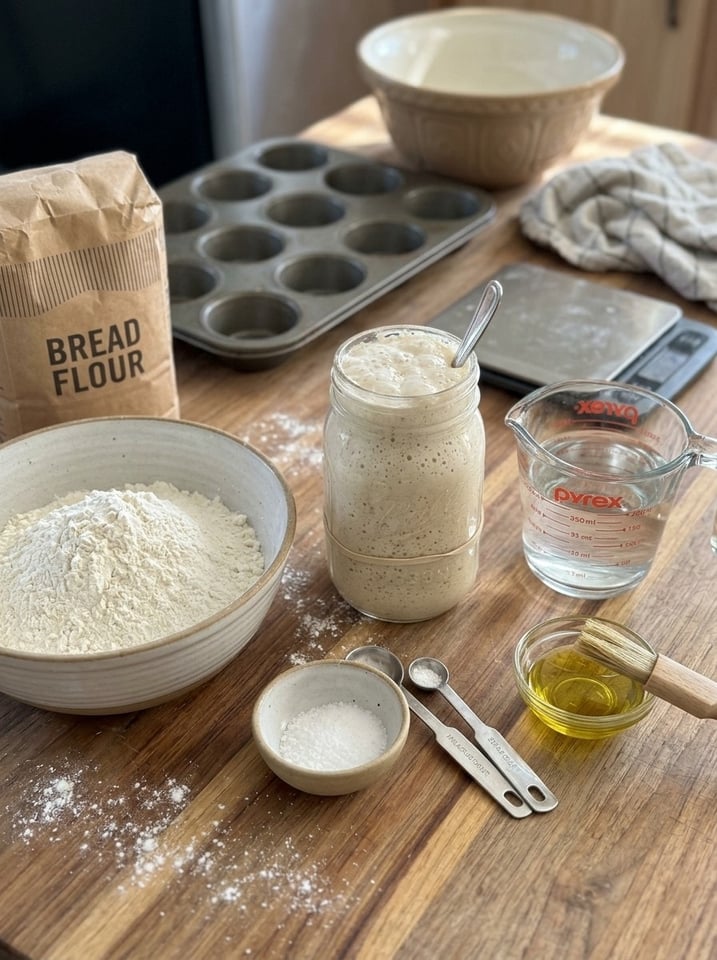
- 500 g bread flour (about 4 cups)
- 350 g lukewarm water (about 1½ cups)
- 100 g active sourdough starter (about ½ cup, loosely measured)
- 10 g salt (about 1¾ tsp)
- A little flour for shaping
- Olive oil or butter for greasing the cupcake pan, if needed
🧐 A Closer Look at the Ingredients
Bread flour. Bread flour has a higher protein content than all-purpose flour, which means it forms a stronger gluten network. This gives the rolls their chewy texture and helps them hold their round shape. All-purpose flour can work in a pinch, but the rolls may be a bit softer and slightly less tall.
Lukewarm water. Water that feels just barely warm to the touch, around 80 to 90°F (27 to 32°C), helps wake up the starter and encourages steady fermentation. Water that is too hot can harm the wild yeast and bacteria in your starter.
Active sourdough starter. The heart of the recipe. An active starter is one that has been fed within the last 4 to 12 hours and has doubled in size, with a bubbly, airy texture. It should smell pleasantly tangy and yeasty. A weak or sluggish starter will lead to a slow or insufficient rise.
Salt. Salt adds flavor, strengthens the dough, and controls fermentation speed. Weighing it (10 g) is more accurate than measuring by spoon, since different salts vary in crystal size.
Flour for shaping. A light dusting prevents sticking during shaping. Use as little as you can, since extra flour can make the surface dry and affect the final texture.
Olive oil or butter. A light coating in each cup prevents sticking. If you are using a well-seasoned nonstick cupcake pan, you may need very little.
👩🍳 Step-by-Step Instructions
1️⃣ Mix the Dough
In a large bowl, combine the lukewarm water and active sourdough starter, stirring until the starter mostly dissolves. Add the flour and salt, mixing with a spatula or your hand until no dry flour remains. The dough will look shaggy and rough, which is completely normal. Cover and let the dough rest for 30 minutes. This rest, called an autolyse-style rest, allows the flour to fully hydrate and begins gluten development with no kneading.
2️⃣ Stretch and Fold
With damp hands, grab one side of the dough, stretch it upward, and fold it toward the center. Rotate the bowl a quarter turn and repeat on all four sides. Cover and rest for 30 minutes. Repeat this process 3 to 4 times over approximately 2 hours. Each round of stretch and folds builds strength and structure into the dough. By the end, the dough should feel smoother, more elastic, and noticeably more cohesive.
Tip: Wet hands prevent the dough from sticking. Keep a small bowl of water nearby to dip your fingers into as you work.
3️⃣ Let the Dough Ferment
Cover the bowl and leave the dough at room temperature until it becomes airy and noticeably increases in volume, usually another 3 to 6 hours. The exact timing depends on your starter and kitchen temperature. Look for these signs that the dough is ready: it has grown by roughly 50 to 75 percent, the surface looks domed and slightly jiggly, you can see bubbles along the edges or through the side of a clear bowl, and the dough feels light and airy when you gently shake the bowl.
Temperature matters. In a warm kitchen (around 78 to 80°F or 25 to 27°C), fermentation may finish closer to the 6-hour total mark. In a cooler kitchen, it can take 10 hours or longer. Judge the dough, not the clock.
4️⃣ Divide into Mini Boules
Turn the dough onto a lightly floured surface and divide it into 12 equal portions. For consistent results, use a kitchen scale. Each piece should weigh roughly 70 to 75 g. Gently shape each piece into a small, tight ball without squeezing out too much air. To shape, flatten a piece slightly, fold the edges toward the center, flip it seam-side down, and gently drag it across the surface with cupped hands to create surface tension.
5️⃣ Prepare the Cupcake Pan
Lightly grease the cups of a standard 12-cup cupcake pan, or use a well-seasoned nonstick pan. Place one dough ball into each cup, seam-side down. The balls will fill the cups loosely at first and expand as they proof.
6️⃣ Give the Dough a Final Rise
Cover the pan loosely with a clean towel, reusable cover, or lightly oiled plastic wrap, and let the dough rise until the balls look puffy and slightly expanded, about 1 to 2 hours at room temperature. Alternatively, refrigerate overnight after shaping, then allow the dough to warm and become puffy before baking. The cold rest slows fermentation and deepens the tangy flavor.
The poke test: Gently press a floured finger into one roll. If the dent slowly springs back about halfway, the dough is ready. If it springs back immediately, it needs more time. If it does not spring back at all, bake right away.
7️⃣ Preheat the Oven
Preheat your oven to 425°F (220°C). Lightly dust the tops with flour and score each boule with a small, shallow cut using a sharp blade, such as a razor blade, a lame, or a very sharp paring knife. Scoring helps the rolls expand in a controlled way and gives them a pretty, bakery-style look. A simple cross, a single slash, or a small X all work well.
8️⃣ Bake Until Golden
Bake for 20 to 25 minutes, until the mini boules are golden brown and sound hollow when tapped. If needed, rotate the pan halfway through baking for even browning. If your rolls are browning too quickly, tent the pan loosely with foil for the last few minutes.
9️⃣ Cool and Serve
Carefully remove the boules from the pan and let them cool on a wire rack for at least 30 minutes. This resting time lets the crumb finish setting, so the inside is not gummy. Serve warm or at room temperature with butter, cheese, soup, or your favorite spreads. 🧈🧀
💡 Tips for Perfect Mini Sourdough Boules
- Use an active starter. A bubbly, recently fed starter helps the dough rise reliably. A good test is to drop a spoonful into a glass of water: if it floats, it is likely ready to use.
- Shape gently but firmly. Creating surface tension helps the mini loaves hold their round shape.
- Avoid overfilling. Divide the dough evenly so each boule has room to expand and does not spill over the cups.
- For a crispier crust. Place a separate oven-safe pan of hot water on the lower oven rack during the first 10 minutes of baking, taking care to avoid steam burns.
- Let them cool before cutting. This helps the crumb finish setting.
- Weigh your ingredients. Sourdough is sensitive to hydration, so a kitchen scale gives more consistent results than measuring cups.
- Watch the dough, not the clock. Fermentation times vary widely, and dough that is underproofed or overproofed will not bake as well.
- Grease generously if unsure. If your pan is not nonstick, a thorough coating of oil or butter prevents the rolls from sticking.
- Use the fridge for flexibility. A cold overnight proof lets you fit baking into your schedule and adds extra flavor.
⚠️ Common Problems and How to Fix Them
The dough did not rise. The starter may not have been active enough, or the room may have been too cold. Make sure your starter doubles within 4 to 8 hours of feeding, and move the dough to a warmer spot.
The rolls are flat. Overproofed dough loses its structure. Next time, shorten the final rise or use the fridge to slow things down.
The crumb is dense and gummy. The dough may have been underproofed, or the rolls were cut before they cooled. Allow more fermentation time and let the bread cool fully.
The rolls stuck to the pan. Grease the cups more thoroughly, or use a silicone baking cup or a parchment liner for easy release.
The crust is too pale. Make sure your oven is fully preheated and consider baking a few extra minutes. Steam in the first stage of baking also helps the crust brown.
The crust is too hard. Reduce the baking time slightly or skip the steam. Brushing the baked rolls lightly with butter softens the crust.
The flavor is too sour. A longer, colder fermentation tends to increase sourness. For a milder flavor, ferment at room temperature and use a very active, young starter.
The flavor is too bland. A longer ferment, a bit of cold retarding, or a pinch more salt can help. Make sure your starter is healthy and fed regularly.
🥖 Delicious Variations
- 🧀 Cheese boules. Fold in a half cup of shredded cheddar, Gruyère, or Parmesan during the final stretch and fold.
- 🧄 Garlic and herb. Add roasted garlic and chopped rosemary or thyme to the dough.
- 🫒 Olive boules. Mix in chopped olives for a Mediterranean flavor.
- 🌾 Whole wheat. Replace 100 g of bread flour with whole wheat flour for a nuttier, heartier roll. You may need a bit more water.
- 🌱 Seeded tops. Brush the tops with water and sprinkle with sesame, poppy, or sunflower seeds before baking.
- 🍯 Honey oat. Add a tablespoon of honey and roll the shaped boules in rolled oats before the final rise.
- 🌶 Jalapeño cheddar. Fold in diced pickled jalapeños and sharp cheddar for a spicy kick.
- 🍇 Sweet version. Add raisins or dried cranberries and a pinch of cinnamon for a breakfast roll.
- 🧈 Buttery finish. Brush the baked boules with melted butter and flaky salt for a softer crust.
🍽 What to Serve with Mini Sourdough Boules
- Soups and stews. Tomato soup, potato leek soup, chicken noodle soup, or beef stew all pair perfectly with the crusty little rolls. 🍲
- Mini sandwiches. Slice them in half and fill with turkey, cheese, and greens, or use them as sliders for burgers. 🥪
- Cheese and charcuterie boards. Offer them alongside cured meats, cheeses, olives, and fruit.
- Breakfast and brunch. Serve with butter and jam, or slice and fill with a fried egg and bacon.
- Dinner rolls. They are an elegant addition to any holiday or family meal.
- Dipping. Pair with olive oil and balsamic vinegar, hummus, or whipped butter.
- Salads. Use as a hearty side with a fresh salad. 🥗
📦 Storage and Reheating
- Room temperature: Once completely cool, store in a paper bag or breadbox for 1 to 2 days to keep the crust crisp. For a softer crust, use an airtight bag or container.
- Refrigerator: Not recommended for storing baked rolls, since the cold dries out the bread and speeds up staling.
- Freezing: Freeze cooled boules in a freezer bag for up to 3 months. Thaw at room temperature, then refresh in the oven.
- Reheating: Warm in a 350°F (175°C) oven for 5 to 8 minutes to revive the crust and soften the crumb.
- Freezing unbaked dough: For best results, bake before freezing. If freezing shaped dough, allow extra proofing time after thawing.
🧑🍳 Make-Ahead Schedule
Sourdough works well with a flexible schedule. Here is an easy way to fit this recipe into a typical day:
- Morning (8:00 AM): Mix the dough and begin the rest and stretch-and-fold sessions.
- Late morning (10:00 AM): Finish the folds and let the dough ferment at room temperature.
- Afternoon (2:00 PM to 4:00 PM): Divide, shape, and place the dough in the cupcake pan.
- Evening (5:00 PM): Final rise, then preheat and bake in time for dinner.
For a morning bake, shape the rolls in the evening, refrigerate overnight, and bake straight from the fridge after letting them sit for about 30 to 60 minutes while the oven preheats.
📝 Nutrition Notes
Sourdough fermentation partly breaks down compounds in flour, and many people find sourdough easier to digest than bread made with commercial yeast. The mini size makes portion control easy, and the rolls contain only flour, water, starter, and salt, with no added sugar or fat in the base recipe. For extra fiber and nutrients, replace part of the bread flour with whole wheat flour or add seeds. Exact nutrition values vary with ingredients and roll size, so use a nutrition calculator for precise numbers.
❓ Frequently Asked Questions
Can I use a muffin tin instead of a cupcake pan? Yes. A standard 12-cup muffin tin and a cupcake pan are the same size. A jumbo muffin tin will produce fewer, larger rolls and need a longer bake.
How do I know if my sourdough starter is active enough? It should have doubled in size after feeding, be full of bubbles, and smell pleasantly tangy. The float test, where a small spoonful floats in water, is also a good sign.
Can I use all-purpose flour instead of bread flour? You can, but the rolls will be slightly softer and less chewy. Reduce the water by 10 to 20 g, since all-purpose flour absorbs less water.
What if I do not have a scale? A scale is strongly recommended for sourdough. If you must use cups, measure by spooning flour into the cup and leveling it off, but expect some variation in the dough.
Can I make these without scoring? Yes. Scoring helps control expansion and looks pretty, but unscored rolls will still bake nicely and simply burst naturally in places.
Why are my rolls sticking together? They may have expanded too much and merged. Shape them tightly, leave room between cups, and avoid overproofing.
Can I bake these in a regular loaf pan or on a sheet? Yes. On a sheet, they will spread slightly more and be less tall. A cupcake pan helps them rise upward and hold their round shape.
Can I proof them in the refrigerator? Absolutely. Overnight proofing in the refrigerator develops more flavor and is a convenient way to schedule your baking.
How do I get a more open crumb? Use a very active starter, ferment fully, and handle the dough gently during shaping to avoid knocking out air.
What can I do with leftover rolls? Slice and toast them, turn them into croutons, or use them as bowls for soup or dip. Stale rolls also make great breadcrumbs.
🏁 Final Thoughts
These Mini Sourdough Boules in a Cupcake Pan prove that artisan-style bread can be simple, charming, and approachable. With only four ingredients, a bit of patience, and a basic cupcake pan, you can bake a dozen perfectly portioned rolls with a golden, crispy crust and a soft, chewy interior. 🥖✨ They are lovely for weeknight soup dinners, special occasions, and everything in between.
If you have been looking for a fun way to use your sourdough starter, this is the recipe to try. Set aside a day, let the dough do its slow, magical work, and enjoy the satisfaction of pulling a tray of little golden boules from your own oven. 🤎
📌 Save this adorable mini sourdough bread recipe for your next homemade baking day! Leave a comment to tell us how yours turned out. 🥖🧁✨
📋 Quick Recipe Card
Mini Sourdough Boules in a Cupcake Pan
⏱ Prep: 25 minutes | ⏳ Rise: 6 to 10 hours | 🔥 Cook: 20 to 25 minutes | ⏰ Total: About 7 to 11 hours | 🍽️ Yield: 12 mini boules
Ingredients: 500 g bread flour (about 4 cups), 350 g lukewarm water (about 1½ cups), 100 g active sourdough starter (about ½ cup, loosely measured), 10 g salt (about 1¾ tsp), a little flour for shaping, olive oil or butter for greasing the cupcake pan if needed.
Instructions:
- Mix the water and starter, add the flour and salt, and mix until no dry flour remains. Cover and rest 30 minutes.
- With damp hands, stretch and fold the dough on all four sides. Cover and rest 30 minutes. Repeat 3 to 4 times over about 2 hours.
- Cover and ferment at room temperature until airy and noticeably larger, usually another 3 to 6 hours.
- Turn onto a lightly floured surface, divide into 12 equal portions, and shape each into a small, tight ball.
- Grease a 12-cup cupcake pan and place one ball in each cup, seam-side down.
- Cover loosely and let rise 1 to 2 hours until puffy, or refrigerate overnight and let warm until puffy.
- Preheat the oven to 425°F (220°C). Dust the tops with flour and score each boule with a shallow cut.
- Bake 20 to 25 minutes until golden and hollow-sounding, rotating the pan halfway if needed.
- Cool on a wire rack for at least 30 minutes, then serve warm or at room temperature.
Mini Sourdough Boules in a Cupcake Pan
Ingredients
- 500 g bread flour (about 4 cups)
- 350 g lukewarm water (about 1½ cups)
- 100 g active sourdough starter (about ½ cup, loosely measured)
- 10 g salt (about 1¾ tsp)
- A little flour for shaping
- Olive oil or butter for greasing the cupcake pan, if needed
🧐 A Closer Look at the Ingredients
Bread flour. Bread flour has a higher protein content than all-purpose flour, which means it forms a stronger gluten network. This gives the rolls their chewy texture and helps them hold their round shape. All-purpose flour can work in a pinch, but the rolls may be a bit softer and slightly less tall.
Lukewarm water. Water that feels just barely warm to the touch, around 80 to 90°F (27 to 32°C), helps wake up the starter and encourages steady fermentation. Water that is too hot can harm the wild yeast and bacteria in your starter.
Active sourdough starter. The heart of the recipe. An active starter is one that has been fed within the last 4 to 12 hours and has doubled in size, with a bubbly, airy texture. It should smell pleasantly tangy and yeasty. A weak or sluggish starter will lead to a slow or insufficient rise.
Salt. Salt adds flavor, strengthens the dough, and controls fermentation speed. Weighing it (10 g) is more accurate than measuring by spoon, since different salts vary in crystal size.
Flour for shaping. A light dusting prevents sticking during shaping. Use as little as you can, since extra flour can make the surface dry and affect the final texture.
Olive oil or butter. A light coating in each cup prevents sticking. If you are using a well-seasoned nonstick cupcake pan, you may need very little.
Instructions
In a large bowl, combine the lukewarm water and active sourdough starter, stirring until the starter mostly dissolves. Add the flour and salt, mixing with a spatula or your hand until no dry flour remains. The dough will look shaggy and rough, which is completely normal. Cover and let the dough rest for 30 minutes. This rest, called an autolyse-style rest, allows the flour to fully hydrate and begins gluten development with no kneading.
2️⃣ Stretch and Fold
With damp hands, grab one side of the dough, stretch it upward, and fold it toward the center. Rotate the bowl a quarter turn and repeat on all four sides. Cover and rest for 30 minutes. Repeat this process 3 to 4 times over approximately 2 hours. Each round of stretch and folds builds strength and structure into the dough. By the end, the dough should feel smoother, more elastic, and noticeably more cohesive.
Tip: Wet hands prevent the dough from sticking. Keep a small bowl of water nearby to dip your fingers into as you work.
3️⃣ Let the Dough Ferment
Cover the bowl and leave the dough at room temperature until it becomes airy and noticeably increases in volume, usually another 3 to 6 hours. The exact timing depends on your starter and kitchen temperature. Look for these signs that the dough is ready: it has grown by roughly 50 to 75 percent, the surface looks domed and slightly jiggly, you can see bubbles along the edges or through the side of a clear bowl, and the dough feels light and airy when you gently shake the bowl.
Temperature matters. In a warm kitchen (around 78 to 80°F or 25 to 27°C), fermentation may finish closer to the 6-hour total mark. In a cooler kitchen, it can take 10 hours or longer. Judge the dough, not the clock.
4️⃣ Divide into Mini Boules
Turn the dough onto a lightly floured surface and divide it into 12 equal portions. For consistent results, use a kitchen scale. Each piece should weigh roughly 70 to 75 g. Gently shape each piece into a small, tight ball without squeezing out too much air. To shape, flatten a piece slightly, fold the edges toward the center, flip it seam-side down, and gently drag it across the surface with cupped hands to create surface tension.
5️⃣ Prepare the Cupcake Pan
Lightly grease the cups of a standard 12-cup cupcake pan, or use a well-seasoned nonstick pan. Place one dough ball into each cup, seam-side down. The balls will fill the cups loosely at first and expand as they proof.
6️⃣ Give the Dough a Final Rise
Cover the pan loosely with a clean towel, reusable cover, or lightly oiled plastic wrap, and let the dough rise until the balls look puffy and slightly expanded, about 1 to 2 hours at room temperature. Alternatively, refrigerate overnight after shaping, then allow the dough to warm and become puffy before baking. The cold rest slows fermentation and deepens the tangy flavor.
The poke test: Gently press a floured finger into one roll. If the dent slowly springs back about halfway, the dough is ready. If it springs back immediately, it needs more time. If it does not spring back at all, bake right away.
7️⃣ Preheat the Oven
Preheat your oven to 425°F (220°C). Lightly dust the tops with flour and score each boule with a small, shallow cut using a sharp blade, such as a razor blade, a lame, or a very sharp paring knife. Scoring helps the rolls expand in a controlled way and gives them a pretty, bakery-style look. A simple cross, a single slash, or a small X all work well.
8️⃣ Bake Until Golden
Bake for 20 to 25 minutes, until the mini boules are golden brown and sound hollow when tapped. If needed, rotate the pan halfway through baking for even browning. If your rolls are browning too quickly, tent the pan loosely with foil for the last few minutes.
9️⃣ Cool and Serve
Carefully remove the boules from the pan and let them cool on a wire rack for at least 30 minutes. This resting time lets the crumb finish setting, so the inside is not gummy. Serve warm or at room temperature with butter, cheese, soup, or your favorite spreads. 🧈🧀
💡 Tips for Perfect Mini Sourdough Boules
- Use an active starter. A bubbly, recently fed starter helps the dough rise reliably. A good test is to drop a spoonful into a glass of water: if it floats, it is likely ready to use.
- Shape gently but firmly. Creating surface tension helps the mini loaves hold their round shape.
- Avoid overfilling. Divide the dough evenly so each boule has room to expand and does not spill over the cups.
- For a crispier crust. Place a separate oven-safe pan of hot water on the lower oven rack during the first 10 minutes of baking, taking care to avoid steam burns.
- Let them cool before cutting. This helps the crumb finish setting.
- Weigh your ingredients. Sourdough is sensitive to hydration, so a kitchen scale gives more consistent results than measuring cups.
- Watch the dough, not the clock. Fermentation times vary widely, and dough that is underproofed or overproofed will not bake as well.
- Grease generously if unsure. If your pan is not nonstick, a thorough coating of oil or butter prevents the rolls from sticking.
- Use the fridge for flexibility. A cold overnight proof lets you fit baking into your schedule and adds extra flavor.