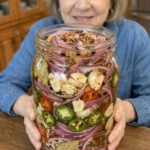
Ingredients
Understanding what each ingredient does helps you make the recipe your own and troubleshoot with confidence.
🧅 Red Onions (2 large, thinly sliced)
Red onions are the classic choice for quick pickling. They have a milder, slightly sweet bite compared to yellow onions, and their purple skin turns brilliant pink once it meets acidity. Slice them thinly and evenly, about 1/8 inch (3 mm) thick, so they soak up the brine quickly and stay crisp-tender. A mandoline makes this effortless, but a sharp knife works perfectly well.
🧄 Garlic (8–10 cloves, peeled and lightly crushed)
Lightly crushing the cloves with the flat side of a knife cracks the surface so the brine and the garlic flavor can travel in both directions. The garlic mellows in vinegar, losing its raw harshness while staying savory and bold. Many people end up loving the pickled garlic cloves just as much as the onions.
🌶️ Fresh Jalapeños (2, sliced into rings)
Jalapeños are the backbone of the heat. Slice them into rings about 1/8 to 1/4 inch thick. The seeds carry a good portion of the spice, so keep them in for a hot batch or scrape most of them out for a gentler one.
🔥 Red Chili Peppers (1–2, optional)
Red chilies such as Fresno or red serrano add color and a sharper, brighter heat. Skip them if you prefer a medium level of spice, or add both for a truly fiery jar.
🍶 White Vinegar (1½ cups) and Apple Cider Vinegar (½ cup)
This combination is the secret to a well-rounded brine. White vinegar is clean, sharp and neutral, so it lets the garlic and spices shine. Apple cider vinegar adds a subtle fruity roundness and a touch of depth. For safe, tangy pickles, use vinegars with at least 5% acidity.
💧 Water (1 cup)
Water softens the vinegar so the brine is tangy without being harsh. Together with the vinegars, it creates roughly a 3:1 ratio of vinegar to water, which gives a bold, lively pickle.
🧂 Pickling Salt (2 tablespoons)
Pickling salt dissolves cleanly and has no anti-caking agents, so the brine stays clear. If you do not have it, use fine sea salt or kosher salt, but note that coarse salts are lighter by volume. Fine salt in equal measure is the safest swap; with coarse kosher salt you may want slightly more by volume to match the same saltiness.
🍬 Granulated Sugar (2 tablespoons)
Sugar is not there to make the pickles sweet. It rounds off the sharp edge of the vinegar and balances the heat. Two tablespoons across the whole batch keeps the flavor bright and tangy with just a gentle softness.
🌿 The Spices
- Black peppercorns (1 tsp): Warm, woody heat that builds slowly.
- Mustard seeds (1 tsp): Classic pickle flavor with a faint, pleasant pungency.
- Red pepper flakes (½ tsp): Extra heat and tiny flecks of red throughout the brine.
- Coriander seeds (½ tsp): Citrusy, floral and slightly sweet, the secret to that “deli pickle” aroma.
- Bay leaves (2): A subtle herbal depth in the background.
🍋 Fresh Lime Juice (1 tablespoon, optional)
A splash of lime juice at the end brightens everything and adds a fresh, zesty note that pairs beautifully with the jalapeños and makes tacos taste even better. It is optional, but highly recommended.
Instructions
Step 1: Prepare the Vegetables 🔪
Peel the red onions and slice them thinly and evenly, about 1/8 inch thick. Peel the garlic cloves and lightly crush each one with the flat side of a knife so it cracks but stays mostly whole. Slice the jalapeños, and the optional red chilies, into rings.
Tip: Wear gloves when slicing hot peppers, or wash your hands thoroughly with soap afterward. Avoid touching your eyes. 🧤
Step 2: Pack the Jars 🫙
Use clean glass jars. Wash them in hot soapy water and rinse well; they do not need to be sterilized for refrigerator pickles, but they should be spotless. Layer the red onion slices, garlic cloves, jalapeños and chili peppers into the jars. Distribute everything evenly so that every jar gets plenty of garlic and spice. Pack the vegetables snugly, but do not crush them.
Step 3: Add the Spices 🌿
Divide the black peppercorns, mustard seeds, red pepper flakes, coriander seeds and bay leaves among the jars. Tuck the bay leaves along the side of the glass so they look pretty and stay submerged.
Step 4: Make the Brine 🍶
In a saucepan, combine the white vinegar, apple cider vinegar, water, pickling salt and sugar. Use a non-reactive pan such as stainless steel or enamel-coated, since aluminum and cast iron can react with the vinegar and give the brine a metallic taste.
Step 5: Heat the Brine 🔥
Bring the mixture to a gentle simmer over medium heat, stirring until the salt and sugar dissolve completely. This only takes a few minutes. You do not need a hard boil. Remove the pan from the heat and stir in the optional fresh lime juice.
Step 6: Pour Over the Vegetables 🥄
Carefully pour the warm brine into the jars, using a funnel if you have one. Make sure the onions and garlic are completely submerged. Tap the jars gently on the counter and slide a clean chopstick or butter knife around the edges to release trapped air bubbles. Top off with a little extra brine if needed.
Step 7: Cool and Refrigerate ❄️
Allow the jars to cool to room temperature on the counter, then seal them with lids and place them in the refrigerator.
Step 8: Let the Flavors Develop ⏳
Chill for at least 24 hours before serving. For a deeper garlic and pepper flavor, let the pickles sit for 2 to 3 days. The longer they rest, the more the heat and spices spread through the onions.
Step 9: Serve and Enjoy 🌮
Give the jar a gentle shake and serve these spicy pickles straight from the refrigerator. Pile them onto tacos, burgers, sandwiches, salads, grilled meats or snack boards.
💡 Pro Tips for the Best Spicy Pickled Red Onions
- Slice evenly. Uniform slices pickle at the same rate and give you a consistent texture in every bite.
- Do not overcook the brine. The brine only needs to be hot enough to dissolve the salt and sugar. Pouring it warm, not boiling, helps the onions stay crisp.
- Keep everything submerged. Anything poking above the liquid can discolor or spoil. If needed, press the vegetables down gently or add a small fermentation weight or a folded piece of parchment paper.
- Use fresh peppers. Firm, shiny jalapeños give the crunchiest result. Soft or wrinkled ones turn limp in the brine.
- Taste the brine before pouring. It should taste noticeably salty and tangy, a little stronger than you would want to drink. The vegetables will dilute it as they release their own moisture.
- Be patient. At 24 hours the pickles are tasty. At 3 days they are fantastic.
- Use the brine again. After the jar is empty, you can pour the leftover brine over fresh sliced onions for a quick second batch, although it will be a little milder.