
Spicy Garlic & Red Onion Pickles
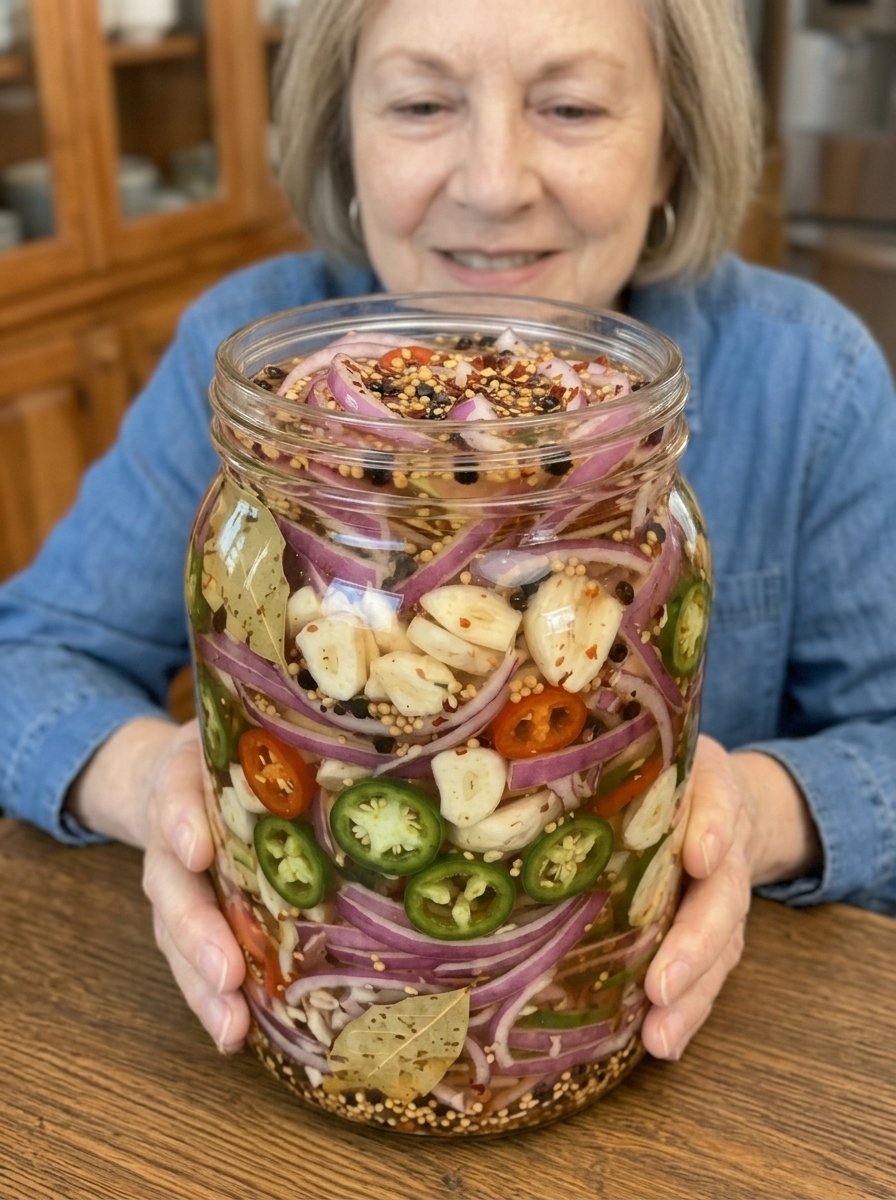
Spicy Garlic & Red Onion Pickles: Tangy, Crunchy & Packed With Fire
Spicy Garlic & Red Onion Pickles Recipe: Easy Refrigerator Pickles 🌶️
Meta Description: Make crunchy Spicy Garlic & Red Onion Pickles with jalapeños, fresh garlic and aromatic spices. Easy refrigerator recipe, ready in 24 hours, perfect for tacos, burgers and BBQ.
Focus Keyword: spicy garlic and red onion pickles
Secondary Keywords: spicy pickled red onions, refrigerator pickles recipe, pickled garlic and jalapeños, quick pickled onions, spicy pickles for tacos, easy pickling brine, pickled red onions with jalapeño
Some condiments are nice to have. Others change the whole meal. These Spicy Garlic & Red Onion Pickles belong firmly in the second group. 😍🔥 They are tangy, crunchy, garlicky and fiery, and a single spoonful can turn a plain taco, a simple sandwich or a basic salad into something people ask about.
This recipe brings together thinly sliced red onions, whole crushed garlic cloves, fresh jalapeño rings and an aromatic spice mix of black peppercorns, mustard seeds, coriander seeds, red pepper flakes and bay leaves, all sitting in a zesty brine made from white vinegar and apple cider vinegar. The result is a jar of bright pink, glossy, punchy pickles that keep getting better over a few days in the refrigerator.
The best part is how easy they are. There is no canning equipment, no water bath and no special skill. You slice, pack, heat a quick brine, pour and chill. Then you wait, which is honestly the hardest step. 🧊
In this complete guide you will learn how to make the recipe step by step, why each ingredient matters, how to adjust the heat, how to keep the onions crisp, how to store the jars safely, what to serve them with, and how to fix the most common problems. Let’s get pickling! 🥒
📝 A quick note on estimates: the recipe card does not state a jar size, a yield or exact prep time. The numbers above are realistic estimates based on the quantities listed (2 large onions plus 3 cups of brine). Your yield will vary slightly depending on how thinly you slice and how tightly you pack the jars.
🌟 Why You Will Love These Spicy Pickles
- Big flavor, tiny effort. About 25 minutes of hands-on time gives you a condiment that lasts for two weeks.
- Balanced heat. Jalapeños bring fresh green heat, red chilies add a sharper kick, and red pepper flakes add lingering warmth. You decide how many to use.
- Crisp and colorful. Red onions turn a gorgeous magenta in vinegar, so the jars look as good as they taste.
- Garlic lovers rejoice. Eight to ten whole cloves mean every jar is loaded with mellow, tangy, pickled garlic you can eat straight from the jar.
- Incredibly versatile. They work on almost anything: tacos, burgers, hot dogs, grain bowls, eggs, grilled chicken, steak, sausages, and snack boards.
- Naturally simple ingredients. No preservatives, no artificial colors, no mystery flavorings.
🛒 Ingredients Explained
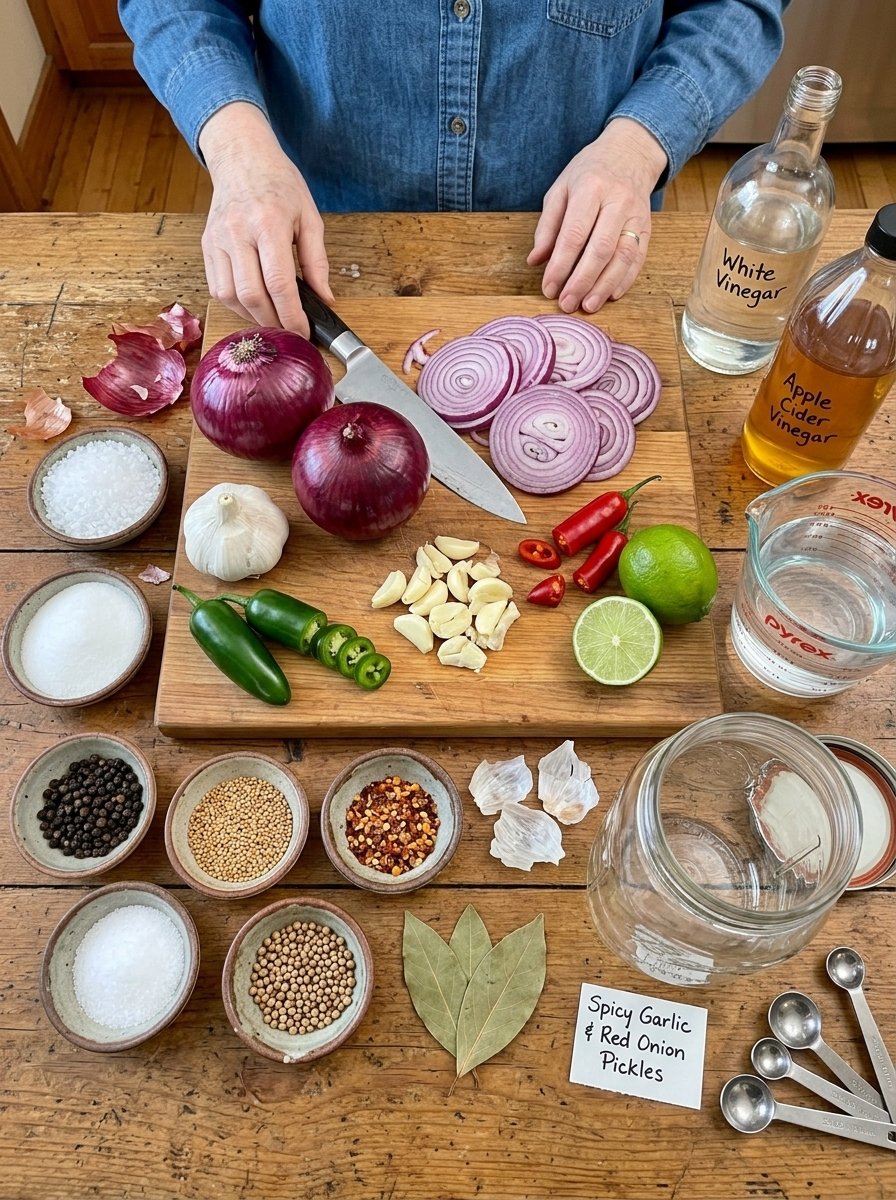
Understanding what each ingredient does helps you make the recipe your own and troubleshoot with confidence.
🧅 Red Onions (2 large, thinly sliced)
Red onions are the classic choice for quick pickling. They have a milder, slightly sweet bite compared to yellow onions, and their purple skin turns brilliant pink once it meets acidity. Slice them thinly and evenly, about 1/8 inch (3 mm) thick, so they soak up the brine quickly and stay crisp-tender. A mandoline makes this effortless, but a sharp knife works perfectly well.
🧄 Garlic (8–10 cloves, peeled and lightly crushed)
Lightly crushing the cloves with the flat side of a knife cracks the surface so the brine and the garlic flavor can travel in both directions. The garlic mellows in vinegar, losing its raw harshness while staying savory and bold. Many people end up loving the pickled garlic cloves just as much as the onions.
🌶️ Fresh Jalapeños (2, sliced into rings)
Jalapeños are the backbone of the heat. Slice them into rings about 1/8 to 1/4 inch thick. The seeds carry a good portion of the spice, so keep them in for a hot batch or scrape most of them out for a gentler one.
🔥 Red Chili Peppers (1–2, optional)
Red chilies such as Fresno or red serrano add color and a sharper, brighter heat. Skip them if you prefer a medium level of spice, or add both for a truly fiery jar.
🍶 White Vinegar (1½ cups) and Apple Cider Vinegar (½ cup)
This combination is the secret to a well-rounded brine. White vinegar is clean, sharp and neutral, so it lets the garlic and spices shine. Apple cider vinegar adds a subtle fruity roundness and a touch of depth. For safe, tangy pickles, use vinegars with at least 5% acidity.
💧 Water (1 cup)
Water softens the vinegar so the brine is tangy without being harsh. Together with the vinegars, it creates roughly a 3:1 ratio of vinegar to water, which gives a bold, lively pickle.
🧂 Pickling Salt (2 tablespoons)
Pickling salt dissolves cleanly and has no anti-caking agents, so the brine stays clear. If you do not have it, use fine sea salt or kosher salt, but note that coarse salts are lighter by volume. Fine salt in equal measure is the safest swap; with coarse kosher salt you may want slightly more by volume to match the same saltiness.
🍬 Granulated Sugar (2 tablespoons)
Sugar is not there to make the pickles sweet. It rounds off the sharp edge of the vinegar and balances the heat. Two tablespoons across the whole batch keeps the flavor bright and tangy with just a gentle softness.
🌿 The Spices
- Black peppercorns (1 tsp): Warm, woody heat that builds slowly.
- Mustard seeds (1 tsp): Classic pickle flavor with a faint, pleasant pungency.
- Red pepper flakes (½ tsp): Extra heat and tiny flecks of red throughout the brine.
- Coriander seeds (½ tsp): Citrusy, floral and slightly sweet, the secret to that “deli pickle” aroma.
- Bay leaves (2): A subtle herbal depth in the background.
🍋 Fresh Lime Juice (1 tablespoon, optional)
A splash of lime juice at the end brightens everything and adds a fresh, zesty note that pairs beautifully with the jalapeños and makes tacos taste even better. It is optional, but highly recommended.
👩🍳 Step-by-Step Instructions
Step 1: Prepare the Vegetables 🔪
Peel the red onions and slice them thinly and evenly, about 1/8 inch thick. Peel the garlic cloves and lightly crush each one with the flat side of a knife so it cracks but stays mostly whole. Slice the jalapeños, and the optional red chilies, into rings.
Tip: Wear gloves when slicing hot peppers, or wash your hands thoroughly with soap afterward. Avoid touching your eyes. 🧤
Step 2: Pack the Jars 🫙
Use clean glass jars. Wash them in hot soapy water and rinse well; they do not need to be sterilized for refrigerator pickles, but they should be spotless. Layer the red onion slices, garlic cloves, jalapeños and chili peppers into the jars. Distribute everything evenly so that every jar gets plenty of garlic and spice. Pack the vegetables snugly, but do not crush them.
Step 3: Add the Spices 🌿
Divide the black peppercorns, mustard seeds, red pepper flakes, coriander seeds and bay leaves among the jars. Tuck the bay leaves along the side of the glass so they look pretty and stay submerged.
Step 4: Make the Brine 🍶
In a saucepan, combine the white vinegar, apple cider vinegar, water, pickling salt and sugar. Use a non-reactive pan such as stainless steel or enamel-coated, since aluminum and cast iron can react with the vinegar and give the brine a metallic taste.
Step 5: Heat the Brine 🔥
Bring the mixture to a gentle simmer over medium heat, stirring until the salt and sugar dissolve completely. This only takes a few minutes. You do not need a hard boil. Remove the pan from the heat and stir in the optional fresh lime juice.
Step 6: Pour Over the Vegetables 🥄
Carefully pour the warm brine into the jars, using a funnel if you have one. Make sure the onions and garlic are completely submerged. Tap the jars gently on the counter and slide a clean chopstick or butter knife around the edges to release trapped air bubbles. Top off with a little extra brine if needed.
Step 7: Cool and Refrigerate ❄️
Allow the jars to cool to room temperature on the counter, then seal them with lids and place them in the refrigerator.
Step 8: Let the Flavors Develop ⏳
Chill for at least 24 hours before serving. For a deeper garlic and pepper flavor, let the pickles sit for 2 to 3 days. The longer they rest, the more the heat and spices spread through the onions.
Step 9: Serve and Enjoy 🌮
Give the jar a gentle shake and serve these spicy pickles straight from the refrigerator. Pile them onto tacos, burgers, sandwiches, salads, grilled meats or snack boards.
💡 Pro Tips for the Best Spicy Pickled Red Onions
- Slice evenly. Uniform slices pickle at the same rate and give you a consistent texture in every bite.
- Do not overcook the brine. The brine only needs to be hot enough to dissolve the salt and sugar. Pouring it warm, not boiling, helps the onions stay crisp.
- Keep everything submerged. Anything poking above the liquid can discolor or spoil. If needed, press the vegetables down gently or add a small fermentation weight or a folded piece of parchment paper.
- Use fresh peppers. Firm, shiny jalapeños give the crunchiest result. Soft or wrinkled ones turn limp in the brine.
- Taste the brine before pouring. It should taste noticeably salty and tangy, a little stronger than you would want to drink. The vegetables will dilute it as they release their own moisture.
- Be patient. At 24 hours the pickles are tasty. At 3 days they are fantastic.
- Use the brine again. After the jar is empty, you can pour the leftover brine over fresh sliced onions for a quick second batch, although it will be a little milder.
🌶️ How to Adjust the Heat
One of the best things about this recipe is that the spice level is completely in your hands.
| Heat level | What to do |
|---|---|
| Mild | Remove the jalapeño seeds and membranes, skip the red chilies, and reduce the red pepper flakes to ¼ tsp |
| Medium | Follow the recipe as written with 2 jalapeños and 1 red chili |
| Hot | Keep the jalapeño seeds, use 2 red chilies, and add an extra ¼ tsp red pepper flakes |
| Extra fiery | Swap one jalapeño for a serrano or add a sliced habanero (use gloves!) |
Remember that heat intensifies over time. A jar that tastes medium on day one may taste hotter by day three, so start conservatively if you are cooking for a mixed crowd.
🧰 Troubleshooting Common Problems
My onions are soft and limp. The brine may have been too hot, the slices too thin, or the pickles may have sat for too long. Pour the brine when it is warm rather than boiling, slice a little thicker, and enjoy the pickles within the recommended two weeks.
The brine looks cloudy. Cloudiness can come from table salt with anti-caking agents, ground spices, or garlic. Pickling salt and whole spices keep the brine clearer. A slightly cloudy brine from garlic is normal, but if it looks slimy, smells off, or has fuzzy growth, throw it out.
My garlic turned blue or green. This is harmless. Garlic contains sulfur compounds that can react with trace minerals or acid, creating a blue-green tint. It does not affect safety and usually does not change the taste.
The pickles taste too sharp or too sour. Add a little more sugar next time, or dilute the brine with an extra splash of water. You can also let the jar rest a few more days, as the flavors mellow and blend.
The pickles are not spicy enough. Next time keep the seeds in the jalapeños, add a red chili, or increase the red pepper flakes. For an immediate fix, add a few extra pepper slices to the jar and let them sit for a day.
The pickles are too spicy. Serve them with creamy foods such as sour cream, avocado, guacamole, cheese or yogurt sauce, which cool the heat. Next time, remove the seeds.
The onions are floating above the brine. Use a smaller jar or pack the vegetables tighter, then top the jar off with extra brine. A small piece of parchment pressed on top works as a quick weight.
🍽️ How to Serve Spicy Garlic & Red Onion Pickles
These pickles are a flavor multiplier. Here are the best ways to use them:
- 🌮 On tacos: Perfect over carne asada, carnitas, chicken, fish or shrimp tacos. The acidity cuts through rich meat.
- 🍔 On burgers: Tuck a handful under the bun for crunch and zing.
- 🥪 In sandwiches and wraps: Great with grilled chicken, roast beef, pulled pork, falafel or a simple turkey and cheese sandwich.
- 🥗 In salads: Scatter over green salads, grain bowls, potato salad or pasta salad.
- 🍖 With grilled meats: Serve alongside steak, sausages, ribs, brisket or grilled chicken.
- 🧀 On charcuterie boards: They pair wonderfully with cheeses, cured meats, olives and crackers.
- 🍳 With eggs: Spoon them over avocado toast, scrambled eggs, omelets or breakfast burritos.
- 🌭 On hot dogs and bratwurst: A fiery, tangy topping that beats plain relish.
- 🍚 On rice bowls and noodles: Add a bright, sharp contrast to savory dishes.
- 🥑 On nachos and loaded fries: Chop them roughly and sprinkle them over the top for extra punch.
- 🍹 As a snack: The garlic cloves and jalapeño rings are delicious straight from the jar.
🔄 Delicious Variations
🍯 Sweet & Spicy
Increase the sugar to 3 tablespoons and add a tablespoon of honey for a sweet-heat balance that works wonderfully on pulled pork and fried chicken.
🌿 Fresh Herb Pickles
Add a few sprigs of fresh dill, oregano or cilantro to the jars before pouring the brine.
🍊 Citrus Kick
Add a few strips of orange or lime zest, and swap the lime juice for orange juice for a sunny, citrusy flavor.
🌶️ Smoky Version
Add a small pinch of smoked paprika or a dried chipotle pepper to each jar for a smoky depth that pairs perfectly with BBQ.
🥕 Mixed Veggie Jar
Add thin carrot coins, cauliflower florets, radish slices or sweet bell pepper strips alongside the onions for a colorful giardiniera-style mix.
🧂 Extra Garlic
Double the garlic if you are a true garlic fan. Whole cloves become mellow, tangy and addictive.
🍎 Milder Everyday Version
Use only 1 jalapeño with the seeds removed, skip the chilies and cut the pepper flakes in half for a family-friendly jar.
🧊 Storage Guidelines
These are refrigerator pickles, not shelf-stable canned pickles. That means they must always be kept cold.
- Temperature: Store in the refrigerator at or below 40°F (4°C).
- Submerged: Keep the vegetables fully covered by the brine.
- Container: Use a clean glass jar with a tight lid. Avoid metal lids that can rust if left in direct contact with the brine for long periods; use plastic-lined lids if possible.
- Shelf life: For best quality, enjoy within 2 weeks.
- Use clean utensils: Always use a clean fork or tongs to remove pickles, never fingers or a used spoon.
- Do not store at room temperature: These pickles have not been processed for shelf stability, so they should not be kept in the pantry or given as canned gifts without proper canning methods.
- When in doubt, throw it out: Discard the jar if you see mold, a slimy texture, bubbling, a foul odor or any unusual cloudiness that was not there before.
If you want shelf-stable pickles, you need a tested canning recipe and proper water-bath processing. This recipe is designed for the refrigerator only.
🥗 Nutrition Note
Pickled vegetables are generally low in calories and fat, and onions and garlic bring naturally occurring plant compounds and flavor without adding much to a meal. However, quick pickles do contain salt, and sodium content depends on how much brine you actually consume. The brine is not meant to be drunk. Because values vary with the amount of pickles eaten, the size of your slices and the exact ingredients you use, this recipe does not include a precise nutrition label. If you track calories or sodium closely, use a nutrition calculator with your exact quantities. 💚
People who are on a sodium-restricted diet or have a health condition affecting salt intake should talk to a healthcare professional before eating pickles regularly.
❓ Frequently Asked Questions
1. How long do Spicy Garlic & Red Onion Pickles last?
Kept refrigerated at or below 40°F (4°C) with the vegetables submerged in brine, they are best enjoyed within 2 weeks.
2. How long should I wait before eating them?
Chill them for at least 24 hours. For a deeper garlic and pepper flavor, wait 2 to 3 days.
3. Are these pickles shelf-stable?
No. They are refrigerator pickles and must be kept cold at all times. They are not processed for canning.
4. Can I use only white vinegar?
Yes. Replace the apple cider vinegar with more white vinegar. The flavor will be a little sharper and less rounded, but still delicious.
5. Can I use only apple cider vinegar?
Yes, though the flavor will be fruitier and the brine will have a slight amber color, which can dull the bright pink of the onions a little.
6. Do I have to heat the brine?
Heating helps the salt and sugar dissolve completely and speeds up flavor absorption. You could use a cold-brine method, but the flavor will take longer to develop and the result may be less consistent.
7. Can I reuse the brine?
You can reuse it once for a fresh batch of sliced onions, stored in the refrigerator, but the second batch will be milder. Do not reuse it for more than one extra round.
8. Why are my onions turning pink?
That is the natural reaction between the anthocyanin pigments in red onions and the acidic brine. It is completely normal and makes the pickles beautiful.
9. Can I make this recipe with yellow or white onions?
Yes, but the flavor and color will be different. Red onions are sweeter and prettier, while yellow and white onions are stronger and will not turn pink.
10. How do I make them less spicy?
Remove the jalapeño seeds and membranes, skip the red chilies and cut back on the red pepper flakes.
11. How do I make them extra spicy?
Keep the seeds, add both red chilies, and consider adding serrano or habanero peppers. Increase the red pepper flakes to ¾ teaspoon.
12. Is the garlic safe to eat?
Yes. The pickled garlic cloves are meant to be eaten. They are soft, tangy and mellow, and delicious on sandwiches and boards.
13. Why did my garlic turn blue?
This is a harmless chemical reaction between garlic compounds and acid or trace minerals. It is safe to eat.
14. Can I add other vegetables?
Absolutely. Carrots, cauliflower, radishes, bell peppers and cucumbers all work well in the same brine.
15. Do I need to use pickling salt?
It is the best choice because it dissolves clearly, but fine sea salt works too. Avoid iodized table salt, which can cloud the brine.
16. Can I leave out the sugar?
Yes, but the flavor will be sharper. Two tablespoons is a small amount that balances the vinegar without making the pickles sweet.
17. What jar size should I use?
Two quart-size jars or three pint-size jars should hold this batch comfortably, but any clean glass jars that keep the vegetables submerged will work.
18. Why are my pickles floating?
Air trapped between the slices can make them float. Pack them snugly, release air bubbles with a knife and keep everything covered with brine.
19. Can I freeze these pickles?
Freezing is not recommended. It makes the onions and peppers soft and mushy once thawed.
20. Are they good for meal prep?
Definitely. Make a jar on Sunday and use it all week to brighten tacos, bowls, salads and sandwiches.
✨ Final Thoughts
If you have never made pickles at home, this is the perfect place to start. Spicy Garlic & Red Onion Pickles need only a handful of pantry staples, a few minutes of chopping and a quick simmer, yet they deliver big, bold, restaurant-style flavor that makes everyday meals feel exciting. 🔥
They are crunchy, tangy, garlicky and spicy all at once, they look stunning in a glass jar, and they work with almost everything you cook. Keep a jar in the refrigerator and you will find yourself reaching for it again and again, from weekday tacos to weekend BBQ platters and last-minute snack boards.
Make a batch today, let the flavors develop for a day or two, and get ready to add a little fire to every meal. 🧄🌶️🧅
🧾 Quick Recipe Card
🧄🌶️🧅 Spicy Garlic & Red Onion Pickles
Yield: About 2 quart jars or 3 pint jars (estimate) | Prep: about 20 minutes (estimate) | Chill: 24 hours minimum
Ingredients
- 2 large red onions, thinly sliced
- 8–10 garlic cloves, peeled and lightly crushed
- 2 fresh jalapeños, sliced into rings
- 1–2 red chili peppers, sliced (optional)
- 1½ cups white vinegar
- ½ cup apple cider vinegar
- 1 cup water
- 2 tbsp pickling salt
- 2 tbsp granulated sugar
- 1 tsp whole black peppercorns
- 1 tsp mustard seeds
- ½ tsp red pepper flakes
- ½ tsp coriander seeds
- 2 bay leaves
- 1 tbsp fresh lime juice (optional)
Instructions
- Slice the onions, crush the garlic and slice the jalapeños and chilies.
- Pack the vegetables into clean glass jars.
- Add peppercorns, mustard seeds, red pepper flakes, coriander seeds and bay leaves.
- Combine both vinegars, water, salt and sugar in a saucepan.
- Simmer gently, stirring until dissolved. Remove from heat and stir in the lime juice.
- Pour the warm brine over the vegetables so everything is submerged.
- Cool to room temperature, then seal and refrigerate.
- Chill at least 24 hours, or 2 to 3 days for the deepest flavor.
- Shake gently and serve cold.
Storage: Keep refrigerated at or below 40°F (4°C) with the vegetables submerged. Best within 2 weeks. Refrigerator pickles only, not shelf-stable.
Print
Spicy Garlic & Red Onion Pickles
Ingredients
Understanding what each ingredient does helps you make the recipe your own and troubleshoot with confidence.
🧅 Red Onions (2 large, thinly sliced)
Red onions are the classic choice for quick pickling. They have a milder, slightly sweet bite compared to yellow onions, and their purple skin turns brilliant pink once it meets acidity. Slice them thinly and evenly, about 1/8 inch (3 mm) thick, so they soak up the brine quickly and stay crisp-tender. A mandoline makes this effortless, but a sharp knife works perfectly well.
🧄 Garlic (8–10 cloves, peeled and lightly crushed)
Lightly crushing the cloves with the flat side of a knife cracks the surface so the brine and the garlic flavor can travel in both directions. The garlic mellows in vinegar, losing its raw harshness while staying savory and bold. Many people end up loving the pickled garlic cloves just as much as the onions.
🌶️ Fresh Jalapeños (2, sliced into rings)
Jalapeños are the backbone of the heat. Slice them into rings about 1/8 to 1/4 inch thick. The seeds carry a good portion of the spice, so keep them in for a hot batch or scrape most of them out for a gentler one.
🔥 Red Chili Peppers (1–2, optional)
Red chilies such as Fresno or red serrano add color and a sharper, brighter heat. Skip them if you prefer a medium level of spice, or add both for a truly fiery jar.
🍶 White Vinegar (1½ cups) and Apple Cider Vinegar (½ cup)
This combination is the secret to a well-rounded brine. White vinegar is clean, sharp and neutral, so it lets the garlic and spices shine. Apple cider vinegar adds a subtle fruity roundness and a touch of depth. For safe, tangy pickles, use vinegars with at least 5% acidity.
💧 Water (1 cup)
Water softens the vinegar so the brine is tangy without being harsh. Together with the vinegars, it creates roughly a 3:1 ratio of vinegar to water, which gives a bold, lively pickle.
🧂 Pickling Salt (2 tablespoons)
Pickling salt dissolves cleanly and has no anti-caking agents, so the brine stays clear. If you do not have it, use fine sea salt or kosher salt, but note that coarse salts are lighter by volume. Fine salt in equal measure is the safest swap; with coarse kosher salt you may want slightly more by volume to match the same saltiness.
🍬 Granulated Sugar (2 tablespoons)
Sugar is not there to make the pickles sweet. It rounds off the sharp edge of the vinegar and balances the heat. Two tablespoons across the whole batch keeps the flavor bright and tangy with just a gentle softness.
🌿 The Spices
- Black peppercorns (1 tsp): Warm, woody heat that builds slowly.
- Mustard seeds (1 tsp): Classic pickle flavor with a faint, pleasant pungency.
- Red pepper flakes (½ tsp): Extra heat and tiny flecks of red throughout the brine.
- Coriander seeds (½ tsp): Citrusy, floral and slightly sweet, the secret to that “deli pickle” aroma.
- Bay leaves (2): A subtle herbal depth in the background.
🍋 Fresh Lime Juice (1 tablespoon, optional)
A splash of lime juice at the end brightens everything and adds a fresh, zesty note that pairs beautifully with the jalapeños and makes tacos taste even better. It is optional, but highly recommended.
Instructions
Step 1: Prepare the Vegetables 🔪
Peel the red onions and slice them thinly and evenly, about 1/8 inch thick. Peel the garlic cloves and lightly crush each one with the flat side of a knife so it cracks but stays mostly whole. Slice the jalapeños, and the optional red chilies, into rings.
Tip: Wear gloves when slicing hot peppers, or wash your hands thoroughly with soap afterward. Avoid touching your eyes. 🧤
Step 2: Pack the Jars 🫙
Use clean glass jars. Wash them in hot soapy water and rinse well; they do not need to be sterilized for refrigerator pickles, but they should be spotless. Layer the red onion slices, garlic cloves, jalapeños and chili peppers into the jars. Distribute everything evenly so that every jar gets plenty of garlic and spice. Pack the vegetables snugly, but do not crush them.
Step 3: Add the Spices 🌿
Divide the black peppercorns, mustard seeds, red pepper flakes, coriander seeds and bay leaves among the jars. Tuck the bay leaves along the side of the glass so they look pretty and stay submerged.
Step 4: Make the Brine 🍶
In a saucepan, combine the white vinegar, apple cider vinegar, water, pickling salt and sugar. Use a non-reactive pan such as stainless steel or enamel-coated, since aluminum and cast iron can react with the vinegar and give the brine a metallic taste.
Step 5: Heat the Brine 🔥
Bring the mixture to a gentle simmer over medium heat, stirring until the salt and sugar dissolve completely. This only takes a few minutes. You do not need a hard boil. Remove the pan from the heat and stir in the optional fresh lime juice.
Step 6: Pour Over the Vegetables 🥄
Carefully pour the warm brine into the jars, using a funnel if you have one. Make sure the onions and garlic are completely submerged. Tap the jars gently on the counter and slide a clean chopstick or butter knife around the edges to release trapped air bubbles. Top off with a little extra brine if needed.
Step 7: Cool and Refrigerate ❄️
Allow the jars to cool to room temperature on the counter, then seal them with lids and place them in the refrigerator.
Step 8: Let the Flavors Develop ⏳
Chill for at least 24 hours before serving. For a deeper garlic and pepper flavor, let the pickles sit for 2 to 3 days. The longer they rest, the more the heat and spices spread through the onions.
Step 9: Serve and Enjoy 🌮
Give the jar a gentle shake and serve these spicy pickles straight from the refrigerator. Pile them onto tacos, burgers, sandwiches, salads, grilled meats or snack boards.
💡 Pro Tips for the Best Spicy Pickled Red Onions
- Slice evenly. Uniform slices pickle at the same rate and give you a consistent texture in every bite.
- Do not overcook the brine. The brine only needs to be hot enough to dissolve the salt and sugar. Pouring it warm, not boiling, helps the onions stay crisp.
- Keep everything submerged. Anything poking above the liquid can discolor or spoil. If needed, press the vegetables down gently or add a small fermentation weight or a folded piece of parchment paper.
- Use fresh peppers. Firm, shiny jalapeños give the crunchiest result. Soft or wrinkled ones turn limp in the brine.
- Taste the brine before pouring. It should taste noticeably salty and tangy, a little stronger than you would want to drink. The vegetables will dilute it as they release their own moisture.
- Be patient. At 24 hours the pickles are tasty. At 3 days they are fantastic.
- Use the brine again. After the jar is empty, you can pour the leftover brine over fresh sliced onions for a quick second batch, although it will be a little milder.