
Soft & Fluffy No-Knead Bread Loaf Recipe
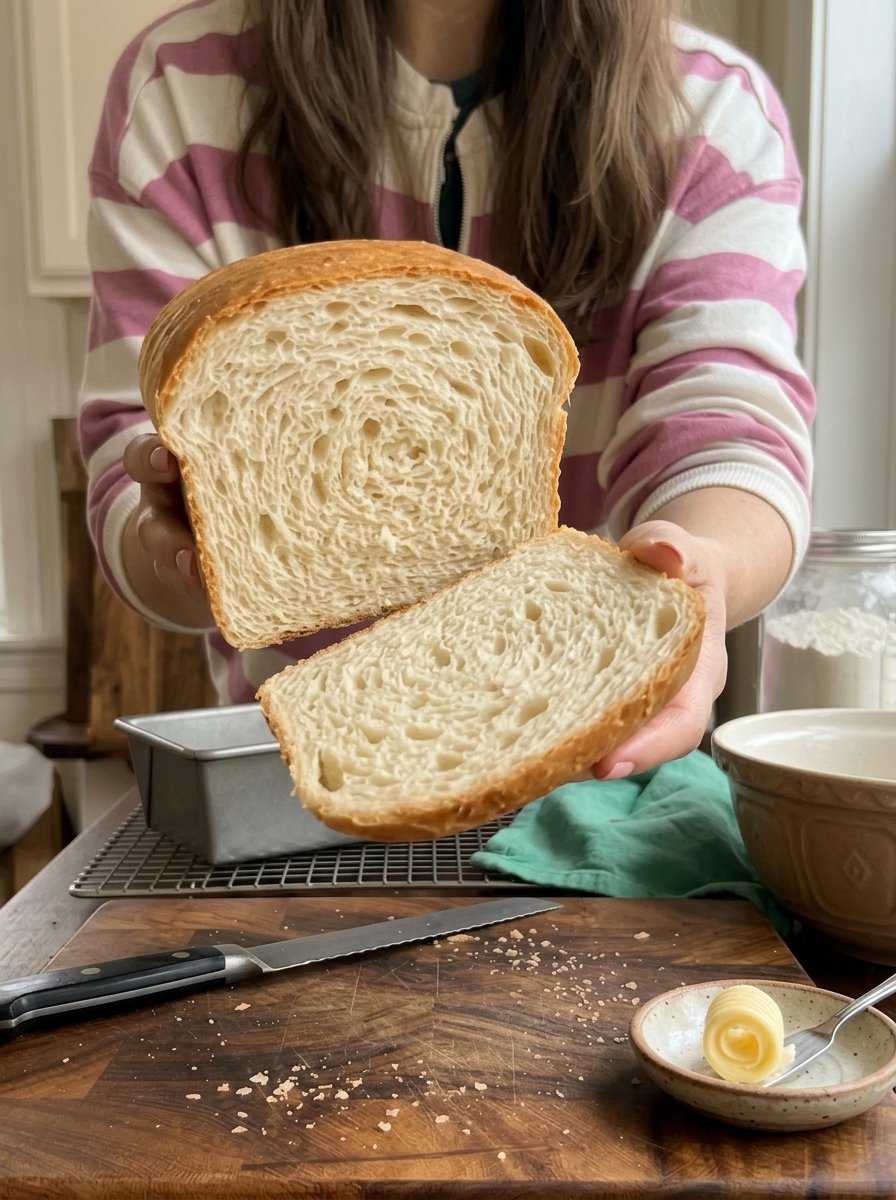
Soft & Fluffy No-Knead Bread Loaf Recipe: Easy, Tender & Delicious 🍞✨
Soft, fluffy, tender and wonderfully simple, this no-knead bread loaf is the perfect everyday homemade bread. It has a beautiful golden crust and a light, pillowy center, and every slice is ideal for breakfast, sandwiches, toast, or enjoying warm with a little butter.
The best part? There is no kneading at all. You simply mix, let the dough rise, shape and bake. With only six basic ingredients and one bowl, this easy homemade bread recipe brings fresh, bakery-style goodness straight to your kitchen, no stand mixer or bread machine required.
If you have ever felt intimidated by yeast bread, this is the recipe to start with. Below you will find the full recipe, an explanation of how no-knead bread works, ingredient notes, detailed step-by-step instructions, troubleshooting help, flavor variations, storage and freezing tips, and answers to the most common questions bakers ask.
Table of Contents
- Why You’ll Love This Recipe
- Recipe Overview
- How Does No-Knead Bread Work?
- Ingredients (and Why Each One Matters)
- Step-by-Step Instructions
- Tips for Perfect No-Knead Bread
- Common Problems (and How to Fix Them)
- Variations and Flavor Ideas
- Ways to Enjoy Your Homemade Bread
- Storage, Freezing and Reheating
- Frequently Asked Questions
- Final Thoughts
Why You’ll Love This Recipe
- No kneading required. Stir the dough together with a wooden spoon and let time do the hard work.
- Only six simple ingredients. Flour, water, yeast, sugar, salt and olive oil or butter. You likely have everything in your pantry already.
- Soft and fluffy texture. The sticky, high-moisture dough bakes into a tender, airy crumb with a golden crust.
- Beginner friendly. The dough is very forgiving, and there are no complicated folding or shaping techniques to master.
- Perfect for everyday use. Slices are sturdy enough for sandwiches yet soft enough for a simple piece of toast with butter.
- Budget friendly. A homemade loaf costs a fraction of artisan bakery bread and has no preservatives.
- Minimal cleanup. One bowl, one spoon and one loaf pan.
- Freezer friendly. Slice the loaf and freeze it for quick breakfasts and lunches.
How Does No-Knead Bread Work?
Traditional bread recipes ask you to knead the dough for 10 minutes or more. Kneading stretches and aligns the gluten, which are the protein strands that give bread its structure and chew. No-knead bread achieves the same thing through time and hydration instead of muscle.
When flour and water meet, gluten begins to form on its own. A wetter, stickier dough gives the gluten strands more freedom to link up and strengthen during a long rise. As the yeast ferments, it produces gas bubbles, and the dough slowly stretches and develops structure without any kneading.
The result is a loaf with a soft, open crumb and good flavor. Because this recipe is baked in a loaf pan, you also get a uniform shape that slices beautifully for sandwiches, unlike free-form no-knead boules that bake in a hot Dutch oven.
Ingredients (and Why Each One Matters)
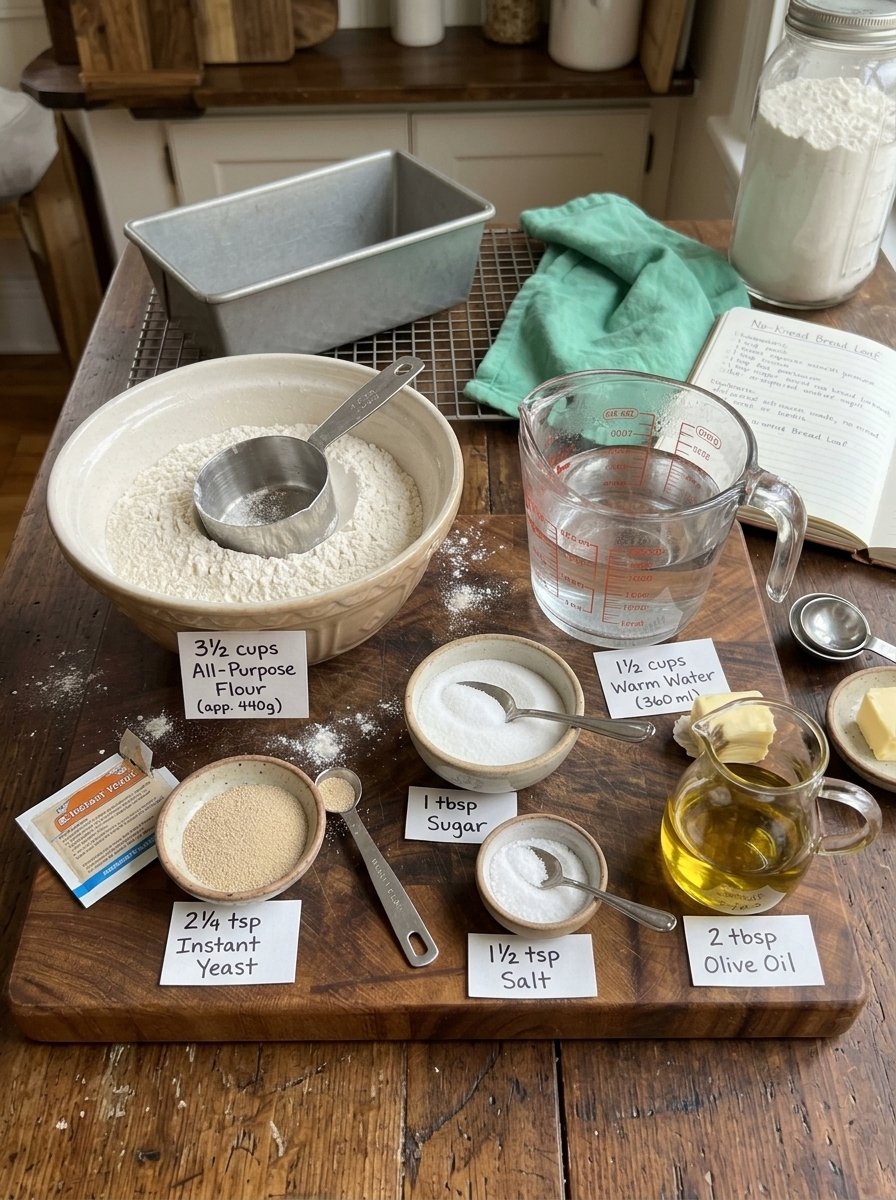
- 3½ cups all-purpose flour (about 440 g)
- 1½ cups warm water (360 ml)
- 2¼ teaspoons instant yeast (1 packet)
- 1 tablespoon granulated sugar
- 1½ teaspoons salt
- 2 tablespoons olive oil or melted butter
- Melted butter for brushing (optional)
Ingredient Notes
All-purpose flour. This everyday flour makes a soft, tender loaf. If you prefer a chewier, taller loaf, you can use bread flour, which has more protein. Whichever you choose, try to weigh your flour. Measuring by cup can vary a lot, and too much flour makes the loaf dry and dense. If you use cups, spoon the flour into the measuring cup and level it off rather than scooping directly from the bag.
Warm water. Water temperature matters more than you might think. Aim for about 105–110°F (40–43°C), which feels comfortably warm but not hot. Water that is too cold slows the yeast, and water that is too hot can kill it, leaving you with a loaf that will not rise.
Instant yeast. One standard packet is about 2¼ teaspoons. Instant yeast can be mixed directly into the dough. If you only have active dry yeast, use the same amount, but dissolve it in the warm water with the sugar and let it sit for 5–10 minutes until foamy before adding the flour.
Sugar. Just one tablespoon feeds the yeast, helps the crust brown and adds a very subtle softness. This is not a sweet bread.
Salt. Salt strengthens the gluten, controls the yeast and gives the bread its flavor. Never skip it. A loaf without salt tastes bland and can rise unevenly.
Olive oil or melted butter. Fat tenderizes the crumb, adds flavor and helps the bread stay softer for longer. Olive oil gives a lightly fruity, rustic note, while melted butter gives a richer, more classic sandwich-loaf flavor. Both work wonderfully.
Step-by-Step Instructions
Step 1: Combine the Water, Yeast and Sugar
In a large mixing bowl, combine the warm water, yeast and sugar. Stir gently. If you are using active dry yeast, let it rest for 5–10 minutes until it looks foamy. With instant yeast, you can continue right away.
Step 2: Add the Flour, Salt and Oil
Add the flour, salt and olive oil (or melted butter) to the bowl. Use a large bowl so that the dough has room to rise later.
Step 3: Mix the Dough
Mix with a wooden spoon or sturdy spatula until a sticky, rough dough forms and there are no dry patches of flour. The dough will look shaggy and wet. That is perfect. No kneading is necessary.
Step 4: First Rise
Cover the bowl with plastic wrap, a clean kitchen towel or a plate. Let the dough rise in a warm place for 1 to 1½ hours, or until it has doubled in size and is full of bubbles. A turned-off oven with the light on is a wonderful warm spot. In a cooler kitchen, the dough may need closer to 2 hours.
Step 5: Turn Out the Dough
Lightly flour your work surface and your hands. Gently scrape the dough out of the bowl. Use as little flour as possible, because extra flour will make the final loaf drier and denser.
Step 6: Shape the Loaf
Gently shape the dough into a rectangle or log, about the length of your loaf pan. Fold the sides toward the center, roll it up and pinch the seam closed. Do not overwork the dough, because you want to keep as many of those air bubbles as possible.
Step 7: Second Rise
Place the dough seam-side down in a greased loaf pan (about 9 × 5 inches). Cover and let it rise for another 30 to 45 minutes, until puffy and rising just above the rim of the pan.
Step 8: Preheat the Oven
While the dough finishes rising, preheat your oven to 375°F (190°C). Make sure the rack is in the center of the oven.
Step 9: Bake
Bake for 30 to 40 minutes, until the loaf is beautifully golden brown and cooked through. It should sound hollow when you tap the bottom, and an instant-read thermometer inserted in the center should read about 190–200°F (88–93°C). If the top is browning too fast, loosely cover it with aluminum foil for the remaining bake time.
Step 10: Remove and Brush
Carefully remove the bread from the pan and place it on a wire rack. Brush the top with melted butter if you like. This gives a soft, shiny crust and a rich flavor.
Step 11: Cool and Slice
Let the loaf cool for at least 30–45 minutes before slicing. This step is hard but important. Bread continues to set as it cools, and slicing too early can make the inside gummy. Use a serrated bread knife for clean, easy slices, then enjoy that soft, fluffy interior!
Tips for Perfect No-Knead Bread
💡 Use warm water, not hot. It should feel like a comfortable bath. Hot water can kill the yeast before it ever gets started.
💡 Keep the dough slightly sticky. A wet dough produces a softer, airier loaf. Resist adding extra flour unless the dough is truly unmanageable.
💡 Give the dough enough time. The rise is where the magic happens. Judge by the dough, not the clock. It should double in size, look puffy and be dotted with bubbles.
💡 Avoid too much flour when shaping. A light dusting is all you need. Too much will dry out the crumb and make the bread dense.
💡 Use the poke test for the second rise. Gently press a floured fingertip into the dough. If the dent springs back slowly and only partially, it is ready to bake.
💡 Grease the pan well. Use butter, oil or non-stick spray so the loaf releases easily. Lining the pan with parchment paper also helps.
💡 Cover the top if it browns too quickly. Foil protects the crust while the inside finishes baking.
💡 Cool before slicing. For the best texture, wait until the loaf has cooled before cutting.
💡 Weigh your ingredients. A kitchen scale is the easiest way to get consistent results every time you bake.
Common Problems (and How to Fix Them)
Problem: My dough did not rise. The yeast may be expired, the water may have been too hot or too cold, or the room may be too cool. Check the date on your yeast, use water at about 105–110°F, and place the dough in a warmer spot. Test doubtful yeast by mixing it with warm water and sugar. It should foam within 10 minutes.
Problem: My loaf is dense and heavy. Too much flour, too little rise time or old yeast are the usual causes. Measure the flour carefully, keep the dough sticky and let it double in size.
Problem: The top collapsed or sank. The dough likely overproofed during the second rise. Bake as soon as the dough has risen just above the pan rim, and watch it a little closer next time.
Problem: The crust is too hard. Brush the loaf with melted butter right after baking and cover it loosely with a clean towel while it cools. This traps steam and softens the crust.
Problem: The inside is gummy. The bread may be underbaked or was sliced too soon. Check that the center reaches at least 190°F (88°C) and let the loaf cool fully before cutting.
Problem: The bread stuck to the pan. Grease the pan generously or line it with parchment paper. Running a thin knife around the edges also helps release it.
Problem: The dough is too sticky to handle. This is normal for no-knead dough. Use lightly floured or lightly oiled hands, a bench scraper or a flexible spatula. Avoid adding large amounts of extra flour.
Problem: The bread is pale on top. Make sure your oven is preheated fully and consider using an oven thermometer. A quick brush of melted butter or an egg wash before baking will also help it brown.
Problem: The bread tastes bland. Check that you included the full amount of salt. A longer, slower rise, such as overnight in the refrigerator, also develops deeper flavor.
Variations and Flavor Ideas
Once you are comfortable with the basic recipe, it is easy to make it your own.
Herb and garlic loaf. Mix 1–2 teaspoons of dried Italian herbs and ½ teaspoon garlic powder into the dough. Brush the baked loaf with garlic butter.
Cheese loaf. Fold in ¾ cup of shredded cheddar, mozzarella or parmesan. Sprinkle a little more cheese on top before baking.
Seeded loaf. Brush the top with water or egg wash and sprinkle with sesame seeds, sunflower seeds, poppy seeds or oats.
Whole wheat loaf. Replace up to 1 cup of the all-purpose flour with whole wheat flour. Add an extra tablespoon or two of water, since whole wheat absorbs more liquid.
Honey loaf. Replace the sugar with 1 tablespoon of honey for a slightly softer crumb and gentle sweetness.
Cinnamon raisin loaf. Add 1 teaspoon of cinnamon and ½ cup of raisins to the dough for a sweet breakfast loaf.
Rosemary olive oil loaf. Use olive oil in the dough, add a tablespoon of chopped fresh rosemary and finish with flaky sea salt on top.
Dinner rolls. Divide the dough into 10–12 pieces after the first rise, shape into balls and bake in a greased baking dish at 375°F (190°C) for about 18–22 minutes.
Overnight loaf. For deeper flavor, mix the dough in the evening, cover it and refrigerate it overnight. In the morning, let it warm up slightly, shape it and complete the second rise before baking.
Ways to Enjoy Your Homemade Bread
A soft, fluffy loaf like this is incredibly versatile. Here are some favorite ways to use it:
For breakfast
- Warm slices with butter and jam
- Toast with honey or peanut butter
- Avocado toast topped with a fried egg
- French toast or egg-in-a-hole
For sandwiches
- Classic turkey and cheese
- Chicken salad or egg salad sandwiches
- Grilled cheese with a golden, crisp crust
- Fresh veggie and hummus sandwiches
With soups and meals
- Dunked in tomato soup or creamy chowders
- Served alongside stews and chili
- Used to mop up pasta sauce and olive oil
For using leftovers
- Homemade croutons and breadcrumbs
- Bread pudding
- Savory strata or breakfast casserole
- Garlic bread
Storage, Freezing and Reheating
Room Temperature
Once fully cooled, store the loaf in an airtight container or bread bag at room temperature for up to 3 days. Keep it away from heat and direct sunlight. Avoid refrigerating bread, since the cold makes it go stale faster.
Freezing
For the longest shelf life, slice the cooled loaf and freeze it for up to 2 to 3 months. Place the slices in a freezer-safe bag with as much air removed as possible. You can pull out one slice at a time whenever you need it.
Reheating
- From frozen slices: Put them straight into the toaster.
- Whole loaf: Thaw at room temperature, then warm in a 300°F (150°C) oven for 8–10 minutes to refresh the crust and soften the crumb.
- Stale bread: Turn it into croutons, breadcrumbs, French toast or bread pudding.
Frequently Asked Questions
Do I really not need to knead this bread? Correct. The wet dough and long rise allow gluten to develop on its own. Simply mix until combined and let time do the work.
Can I use bread flour instead of all-purpose flour? Yes. Bread flour gives a taller, chewier loaf. You may need an extra tablespoon or two of water, since bread flour absorbs a little more liquid.
Can I use active dry yeast instead of instant yeast? Yes. Use the same amount, but first dissolve it in the warm water with the sugar and let it foam for 5–10 minutes.
What if my dough is too wet? No-knead dough is meant to be sticky. If it is too wet to shape, lightly flour your hands and the surface, or use a bench scraper. Try not to add more than a tablespoon or two of extra flour.
Can I let the dough rise overnight? Yes. A slow, cold rise in the refrigerator for 8–12 hours develops more flavor. Bring the dough to room temperature before shaping and allow time for the second rise.
Can I bake this bread without a loaf pan? Yes. Shape the dough into a round or oval and bake it on a parchment-lined baking sheet or in a preheated Dutch oven. Baking time may vary slightly, and the loaf will be flatter without the support of a pan.
What size loaf pan should I use? A standard 9 × 5-inch loaf pan works best. A smaller pan makes a taller loaf, while a larger pan makes a flatter one.
Should I use olive oil or butter? Either is wonderful. Olive oil gives a lightly fruity, rustic flavor, and butter gives a richer, classic sandwich-bread flavor.
Why is my bread not as fluffy as expected? Too much flour, not enough rise time, cold water or old yeast are the most common culprits. Keep the dough sticky and let it double in size.
How do I know when my bread is done? The crust should be deep golden brown, the bottom should sound hollow when tapped, and the center should register 190–200°F (88–93°C).
Can I make this recipe vegan? Yes. This recipe is naturally dairy- and egg-free when you use olive oil, which makes it vegan as written. Just skip the melted butter brush or use a plant-based butter.
Can I double the recipe? Yes. Double the ingredients and bake in two pans. Rise and baking times remain about the same.
How can I make the crust softer? Brush with melted butter right after baking and cover with a clean towel as it cools.
Can I add sugar for a slightly sweeter loaf? You can increase the sugar to 2 tablespoons, or use honey, for a softer, slightly sweeter loaf.
Final Thoughts
This soft and fluffy no-knead bread loaf shows just how rewarding and approachable homemade bread can be. With a handful of pantry staples, a wooden spoon and a little patience, you can create a beautiful golden loaf with a tender, pillowy crumb that rivals any bakery.
It is the kind of recipe you will return to again and again: simple enough for a busy weekday, delicious enough to share, and flexible enough to flavor however you like. Make it for sandwiches, slice it for toast, or enjoy a warm piece straight from the oven with a swipe of butter. Your kitchen will smell wonderful, and your family will be asking for more. ❤️
Love homemade bread? Save this recipe and share it with your family and friends!
💬 Tell me in the comments: do you prefer homemade bread with butter, jam or your favorite sandwich filling? 😍🍞
Quick Recipe Card
Soft & Fluffy No-Knead Bread Loaf Rise: 1½–2¼ hours total | Bake: 30–40 min | Yield: 10–12 slices
Ingredients: 3½ cups (about 440 g) all-purpose flour · 1½ cups (360 ml) warm water · 2¼ tsp (1 packet) instant yeast · 1 tbsp granulated sugar · 1½ tsp salt · 2 tbsp olive oil or melted butter
Method: Combine warm water, yeast and sugar. Add flour, salt and oil; mix with a wooden spoon into a sticky, rough dough. Cover and rise 1–1½ hours until doubled. Gently turn out onto a lightly floured surface and shape into a loaf. Place in a greased loaf pan, cover and rise 30–45 minutes. Preheat oven to 375°F (190°C). Bake 30–40 minutes until golden and cooked through. Brush with melted butter if desired and cool before slicing.
Storage: Airtight at room temperature up to 3 days; freeze sliced bread for up to 2–3 months.
Print
Soft & Fluffy No-Knead Bread Loaf Recipe
Ingredients
- 3½ cups all-purpose flour (about 440 g)
- 1½ cups warm water (360 ml)
- 2¼ teaspoons instant yeast (1 packet)
- 1 tablespoon granulated sugar
- 1½ teaspoons salt
- 2 tablespoons olive oil or melted butter
- Melted butter for brushing (optional)
Ingredient Notes
All-purpose flour. This everyday flour makes a soft, tender loaf. If you prefer a chewier, taller loaf, you can use bread flour, which has more protein. Whichever you choose, try to weigh your flour. Measuring by cup can vary a lot, and too much flour makes the loaf dry and dense. If you use cups, spoon the flour into the measuring cup and level it off rather than scooping directly from the bag.
Warm water. Water temperature matters more than you might think. Aim for about 105–110°F (40–43°C), which feels comfortably warm but not hot. Water that is too cold slows the yeast, and water that is too hot can kill it, leaving you with a loaf that will not rise.
Instant yeast. One standard packet is about 2¼ teaspoons. Instant yeast can be mixed directly into the dough. If you only have active dry yeast, use the same amount, but dissolve it in the warm water with the sugar and let it sit for 5–10 minutes until foamy before adding the flour.
Sugar. Just one tablespoon feeds the yeast, helps the crust brown and adds a very subtle softness. This is not a sweet bread.
Salt. Salt strengthens the gluten, controls the yeast and gives the bread its flavor. Never skip it. A loaf without salt tastes bland and can rise unevenly.
Olive oil or melted butter. Fat tenderizes the crumb, adds flavor and helps the bread stay softer for longer. Olive oil gives a lightly fruity, rustic note, while melted butter gives a richer, more classic sandwich-loaf flavor. Both work wonderfully.
Instructions
In a large mixing bowl, combine the warm water, yeast and sugar. Stir gently. If you are using active dry yeast, let it rest for 5–10 minutes until it looks foamy. With instant yeast, you can continue right away.
Add the flour, salt and olive oil (or melted butter) to the bowl. Use a large bowl so that the dough has room to rise later.
Mix with a wooden spoon or sturdy spatula until a sticky, rough dough forms and there are no dry patches of flour. The dough will look shaggy and wet. That is perfect. No kneading is necessary.
Cover the bowl with plastic wrap, a clean kitchen towel or a plate. Let the dough rise in a warm place for 1 to 1½ hours, or until it has doubled in size and is full of bubbles. A turned-off oven with the light on is a wonderful warm spot. In a cooler kitchen, the dough may need closer to 2 hours.
Lightly flour your work surface and your hands. Gently scrape the dough out of the bowl. Use as little flour as possible, because extra flour will make the final loaf drier and denser.
Gently shape the dough into a rectangle or log, about the length of your loaf pan. Fold the sides toward the center, roll it up and pinch the seam closed. Do not overwork the dough, because you want to keep as many of those air bubbles as possible.
Place the dough seam-side down in a greased loaf pan (about 9 × 5 inches). Cover and let it rise for another 30 to 45 minutes, until puffy and rising just above the rim of the pan.
While the dough finishes rising, preheat your oven to 375°F (190°C). Make sure the rack is in the center of the oven.
Bake for 30 to 40 minutes, until the loaf is beautifully golden brown and cooked through. It should sound hollow when you tap the bottom, and an instant-read thermometer inserted in the center should read about 190–200°F (88–93°C). If the top is browning too fast, loosely cover it with aluminum foil for the remaining bake time.
Carefully remove the bread from the pan and place it on a wire rack. Brush the top with melted butter if you like. This gives a soft, shiny crust and a rich flavor.
Let the loaf cool for at least 30–45 minutes before slicing. This step is hard but important. Bread continues to set as it cools, and slicing too early can make the inside gummy. Use a serrated bread knife for clean, easy slices, then enjoy that soft, fluffy interior!