Black Forest Cream Pie: A Decadent Delight to Savor!

Introduction to Black Forest Cream Pie
As a busy mom, I know how precious time can be, especially when it comes to whipping up something special for my family. That’s why I absolutely adore this Black Forest Cream Pie! It’s a delightful blend of rich chocolate, fluffy whipped cream, and sweet cherries, all layered in a no-bake pie that’s as easy to make as it is to devour. Whether you’re celebrating a birthday, hosting a gathering, or just want to treat yourself, this dessert is sure to impress your loved ones and satisfy your sweet tooth without taking hours in the kitchen.
Why You’ll Love This Black Forest Cream Pie
This Black Forest Cream Pie is a dream come true for busy moms and professionals alike. It’s incredibly easy to make, requiring no baking at all! In just 30 minutes, you can create a dessert that looks and tastes like it came from a fancy bakery. The combination of chocolate, cream, and cherries is simply irresistible, making it a crowd-pleaser for any occasion. Plus, it’s a delightful way to indulge without the fuss!
Ingredients for Black Forest Cream Pie
Gathering the right ingredients is the first step to creating this luscious Black Forest Cream Pie. Here’s what you’ll need:
- Pre-made chocolate pie crust: This saves time and adds a rich chocolatey base. You can find it in the baking aisle of your grocery store.
- Heavy whipping cream: This is the star of your whipped topping. It adds a light, airy texture that balances the richness of the chocolate.
- Powdered sugar: A touch of sweetness for the whipped cream. It dissolves easily, giving you that smooth finish.
- Vanilla extract: Just a teaspoon enhances the flavors beautifully. It’s like a warm hug for your taste buds!
- Chocolate pudding mix: This is where the chocolate magic happens! It creates a creamy layer that’s both decadent and satisfying.
- Milk: Essential for mixing with the pudding. You can use whole, 2%, or even a non-dairy alternative if you prefer.
- Cherry pie filling: This adds a burst of fruity flavor and a pop of color. You can use store-bought or make your own if you’re feeling adventurous.
- Chocolate shavings: For garnish, these add a touch of elegance. You can easily make them by shaving a chocolate bar with a vegetable peeler.
For exact measurements, check the bottom of the article where you can find everything listed for easy printing. Feel free to get creative with your ingredients! You can swap in dark chocolate pudding for a richer flavor or add extra cherries for a more fruity twist. The possibilities are endless!
How to Make Black Forest Cream Pie
Now that you have all your ingredients ready, let’s dive into the fun part—making this delightful Black Forest Cream Pie! Follow these simple steps, and you’ll have a show-stopping dessert in no time.
Step 1: Prepare the Chocolate Pie Crust
Start by preparing your pre-made chocolate pie crust according to the package instructions. It’s usually as simple as unwrapping and placing it in a pie dish. Once it’s ready, let it cool completely. This step is crucial because a warm crust can melt your creamy layers!
Step 2: Whip the Cream
In a mixing bowl, pour in the heavy whipping cream. Add the powdered sugar and vanilla extract. Using a hand mixer or a whisk, whip the mixture until soft peaks form. This means when you lift the whisk, the cream should hold its shape but still be fluffy. It’s like creating a cloud of sweetness!
Step 3: Make the Chocolate Pudding
In another bowl, whisk together the chocolate pudding mix and milk. Keep whisking until the mixture thickens up nicely. This should take just a couple of minutes. The chocolate pudding is the heart of this pie, so make sure it’s smooth and creamy!
Step 4: Layer the Ingredients
Now comes the fun part—layering! Start by spreading half of the chocolate pudding over the cooled pie crust. Then, gently layer half of the whipped cream on top of the pudding. Finally, add half of the cherry pie filling. The colors and textures will start to come together beautifully!
Step 5: Repeat the Layers
Repeat the layering process with the remaining pudding, whipped cream, and cherry filling. This creates a stunning visual effect and ensures every bite is packed with flavor. Don’t worry about being perfect; a little mess adds to the charm!
Step 6: Garnish and Chill
To finish, sprinkle chocolate shavings on top for that extra touch of elegance. Then, cover the pie and refrigerate it for at least 2 hours before serving. This chilling time allows the flavors to meld together, making each slice even more delicious!
Tips for Success
- Make sure your heavy cream is cold for better whipping results.
- Use a whisk or hand mixer to achieve the perfect fluffy texture.
- Let the pie chill overnight for even richer flavors.
- For a fun twist, add a splash of cherry liqueur to the cherry filling.
- Keep extra chocolate shavings on hand for serving—everyone loves a little extra chocolate!
Equipment Needed
- Mixing bowls: A set of various sizes is handy. You can use any large bowl you have.
- Hand mixer or whisk: A hand mixer makes whipping cream easier, but a whisk works just fine.
- Measuring cups: Essential for accuracy, but you can use any cup for rough estimates.
- Pie dish: A standard pie dish is perfect, but a glass or ceramic dish works too.
Variations
- Dark Chocolate Delight: Swap the chocolate pudding mix for dark chocolate pudding for a richer, more intense flavor.
- Fruit Medley: Add layers of fresh berries like raspberries or strawberries along with the cherries for a colorful twist.
- Gluten-Free Option: Use a gluten-free chocolate pie crust to make this dessert suitable for gluten-sensitive guests.
- Vegan Version: Substitute heavy cream with coconut cream and use a dairy-free chocolate pudding mix for a vegan-friendly treat.
- Nutty Crunch: Sprinkle crushed nuts, like almonds or hazelnuts, between the layers for added texture and flavor.
Serving Suggestions
- Pair with a scoop of vanilla ice cream for a delightful contrast.
- Serve alongside a cup of freshly brewed coffee or a rich espresso.
- Garnish each slice with a sprig of mint for a pop of color.
- Present on a beautiful cake stand to impress your guests.
- Drizzle chocolate sauce over the top for an extra indulgent touch.
FAQs about Black Forest Cream Pie
As you embark on your journey to create this delightful Black Forest Cream Pie, you might have a few questions. Here are some common queries that can help you along the way:
Can I make Black Forest Cream Pie ahead of time?
Absolutely! This pie can be made a day in advance. Just keep it covered in the refrigerator. The flavors will meld beautifully overnight, making it even more delicious!
What can I use instead of cherry pie filling?
If cherries aren’t your thing, feel free to swap in other fruit fillings like raspberry or blueberry. You can even use fresh fruit for a lighter option!
How do I store leftovers?
Store any leftover pie in an airtight container in the refrigerator. It should stay fresh for up to three days, but I doubt it will last that long!
Can I freeze Black Forest Cream Pie?
While it’s best enjoyed fresh, you can freeze the pie. Just make sure to wrap it tightly. Thaw it in the fridge before serving for the best texture.
What’s the best way to serve this pie?
Serve chilled, and don’t forget to add extra chocolate shavings or a dollop of whipped cream on top for that extra touch of indulgence!
Final Thoughts
Creating this Black Forest Cream Pie is more than just making a dessert; it’s about bringing joy to your family and friends. Each layer tells a story of indulgence, from the rich chocolate to the sweet cherries. I love how this pie can transform an ordinary day into something special with minimal effort. It’s a reminder that even in our busy lives, we can carve out moments of sweetness. So, gather your loved ones, slice into this delightful treat, and savor the smiles it brings. Trust me, it’s a slice of happiness you won’t want to miss!
Print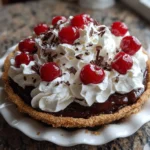
Black Forest Cream Pie: A Decadent Delight to Savor!
- Total Time: 2 hours 30 minutes
- Yield: 8 servings 1x
- Diet: Vegetarian
Description
A rich and indulgent dessert featuring layers of chocolate cream, whipped cream, and cherries, inspired by the classic Black Forest cake.
Ingredients
- 1 pre-made chocolate pie crust
- 1 cup heavy whipping cream
- 1/2 cup powdered sugar
- 1 teaspoon vanilla extract
- 1 cup chocolate pudding mix
- 2 cups milk
- 1 cup cherry pie filling
- Chocolate shavings for garnish
Instructions
- Prepare the chocolate pie crust according to package instructions and let it cool.
- In a mixing bowl, whip the heavy cream with powdered sugar and vanilla extract until soft peaks form.
- In another bowl, whisk together the chocolate pudding mix and milk until thickened.
- Spread half of the chocolate pudding over the cooled pie crust.
- Layer half of the whipped cream over the pudding.
- Add half of the cherry pie filling on top of the whipped cream.
- Repeat the layers with the remaining pudding, whipped cream, and cherry filling.
- Top with chocolate shavings for garnish.
- Refrigerate for at least 2 hours before serving.
Notes
- For a richer flavor, use dark chocolate pudding mix.
- Feel free to add more cherries or chocolate shavings for decoration.
- This pie can be made a day in advance for convenience.
- Prep Time: 30 minutes
- Cook Time: 0 minutes
- Category: Dessert
- Method: No-bake
- Cuisine: German
Nutrition
- Serving Size: 1 slice
- Calories: 350
- Sugar: 25g
- Sodium: 150mg
- Fat: 20g
- Saturated Fat: 10g
- Unsaturated Fat: 8g
- Trans Fat: 0g
- Carbohydrates: 40g
- Fiber: 2g
- Protein: 4g
- Cholesterol: 30mg
Keywords: Black Forest Cream Pie, dessert, chocolate pie, no-bake pie, cherry pie