
Cheesy Zucchini & Carrot Croquettes

Cheesy Zucchini & Carrot Croquettes: Crispy, Golden, and Irresistibly Cheesy
If you’re searching for a way to turn simple garden vegetables into something the whole family will actually fight over, these Cheesy Zucchini & Carrot Croquettes are about to become your new obsession. Golden and crispy on the outside, tender and cheesy on the inside, these little bites pack fresh zucchini, sweet carrots, and gooey melted mozzarella and Parmesan into every single mouthful. They’re the kind of recipe that makes vegetables genuinely exciting — even for the pickiest eaters at your table.
Whether you’re looking for a crowd-pleasing appetizer, a fun after-school snack, or a clever side dish to round out dinner, these croquettes deliver on all fronts. They come together with pantry staples and fresh produce, fry up in just minutes, and pair perfectly with a bright, tangy dipping sauce that takes them completely over the top.
Let’s talk about why this recipe deserves a permanent spot in your weekly rotation.
Why You’ll Love These Cheesy Zucchini & Carrot Croquettes
They’re a genius way to use up garden vegetables. If you’ve ever found yourself with an overflowing basket of zucchini and carrots and no idea what to do with them, this recipe is the answer. Grating and squeezing out the moisture transforms these humble vegetables into the perfect base for crispy, golden croquettes.
The texture contrast is absolutely perfect. A deeply golden, crispy exterior gives way to a soft, cheesy, tender interior. It’s the kind of textural contrast that makes a bite of food genuinely satisfying, and it’s what separates these croquettes from a bland vegetable patty.
They’re loaded with melty, gooey cheese. Both shredded mozzarella and grated Parmesan work together here — mozzarella brings that irresistible stretchy, melty quality, while Parmesan adds a salty, savory depth that ties the whole croquette together.
They come together quickly. With just 20 minutes of prep and 15 minutes of cooking, you can have a full batch of warm, crispy croquettes on the table in well under an hour — no complicated techniques required.
They’re incredibly versatile. Serve them as a party appetizer, a fun family snack, a lunchbox addition, or a savory side dish alongside grilled chicken, fish, or a simple soup. They fit seamlessly into almost any meal.
Kids genuinely love them. Vegetables hidden inside a crispy, cheesy, dippable croquette are an easy sell for even the most vegetable-resistant kids. This is a fantastic way to sneak extra veggies into a picky eater’s diet without any complaints.
The dipping sauce elevates everything. A simple, tangy sour cream or Greek yogurt sauce with fresh chives and a splash of lemon juice adds brightness that perfectly balances the richness of the fried, cheesy croquettes.
Ingredient Breakdown: What You’ll Need and Why
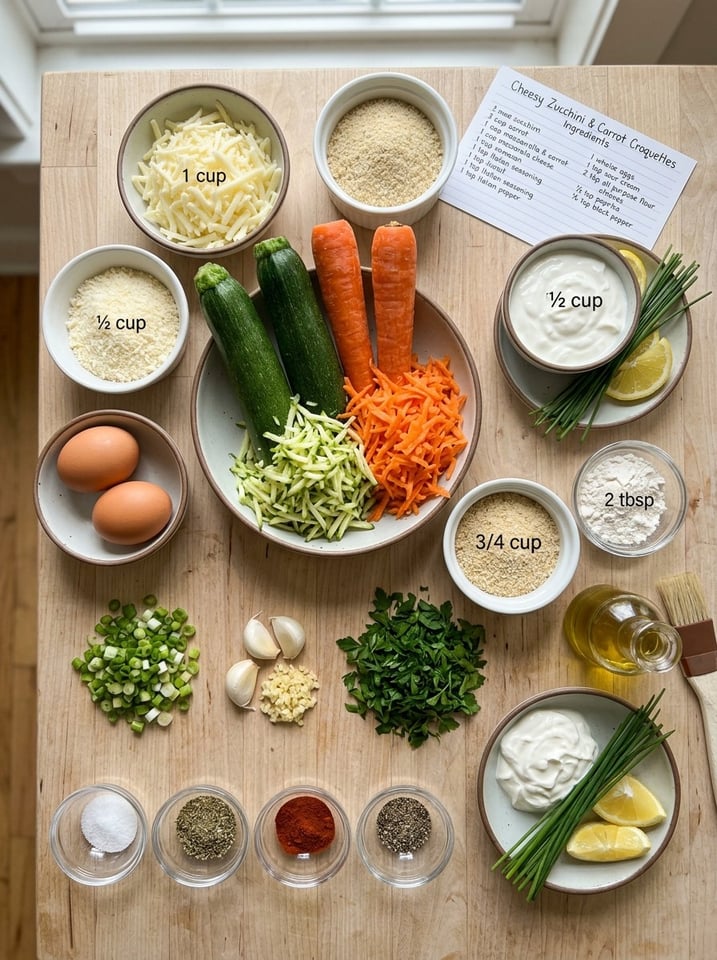
Understanding the role each ingredient plays will help you g et perfectly crispy, flavorful croquettes every single time.
The Vegetables
Zucchini and carrots, both grated, form the heart of this recipe. Zucchini contains a significant amount of water, which is why salting and squeezing out the excess moisture is such a crucial step — skipping it can lead to soggy, falling-apart croquettes that won’t crisp up properly. Carrots, on the other hand, add natural sweetness, vibrant color, and a slightly firmer texture that balances the softness of the zucchini.
The Cheese
Shredded mozzarella brings that classic gooey, melty pull that makes each bite so satisfying, while grated Parmesan contributes a nutty, salty, umami-rich flavor. Together, they create a cheese pull and depth of flavor that a single cheese alone simply couldn’t achieve.
The Binders
Eggs act as the primary binder, holding the grated vegetables and cheese together into a cohesive mixture. Breadcrumbs (Italian-style, for extra seasoning) absorb excess moisture and add structure, while a small amount of all-purpose flour helps firm up the mixture further, making it easier to shape and preventing the croquettes from falling apart during frying.
The Aromatics and Seasonings
Green onions and minced garlic infuse the mixture with fresh, savory flavor, while Italian seasoning, paprika, and black pepper build a warm, well-rounded seasoning base. Paprika in particular adds a subtle smoky note and helps enhance the golden color of the fried croquettes. Fresh parsley brightens the mixture and adds a fresh, herby finish.
The Frying Oil
Olive oil is used for pan-frying, providing a rich flavor while helping achieve that deeply golden, crispy crust. Using a moderate amount of oil in a large skillet allows the croquettes to fry evenly without becoming greasy.
The Dipping Sauce
A simple blend of sour cream or Greek yogurt, fresh chives, lemon juice, salt, and pepper creates a cool, tangy sauce that cuts through the richness of the fried croquettes beautifully. Greek yogurt offers a slightly tangier, protein-packed alternative to sour cream if you prefer a lighter option.
Step-by-Step Directions
Step 1: Prepare the Vegetables
Begin by grating the zucchini and carrots into a large mixing bowl. Sprinkle the grated zucchini with salt and let it sit for about 10 minutes. This step draws out excess moisture from the zucchini, which is essential for achieving crispy, well-formed croquettes rather than soggy ones.
After 10 minutes, transfer the salted zucchini to a clean kitchen towel or cheesecloth and squeeze out as much liquid as possible. Don’t skip this step — you’ll be surprised how much water comes out, and removing it is key to the final texture.
Step 2: Make the Mixture
In the same bowl, combine the squeezed zucchini with the grated carrots, shredded mozzarella, grated Parmesan, eggs, breadcrumbs, flour, chopped green onions, minced garlic, Italian seasoning, paprika, black pepper, and fresh parsley. Mix everything together thoroughly until well combined.
If the mixture feels too wet or loose to hold its shape, add a little extra breadcrumbs, a tablespoon at a time, until it firms up enough to form patties easily.
Step 3: Shape the Croquettes
Scoop out about 2 tablespoons of the mixture at a time and shape it into small patties or oval croquettes using your hands. Place each shaped croquette on a plate or tray as you work through the mixture, and set them aside while you heat the oil.
Step 4: Cook the Croquettes
Heat the olive oil in a large skillet over medium heat. Once the oil is shimmering, carefully add the croquettes in a single layer, working in batches if necessary to avoid overcrowding the pan.
Cook the croquettes for 3 to 4 minutes per side, until they’re deeply golden brown and crispy on the outside. Resist the urge to flip them too early — a good golden crust needs a few uninterrupted minutes of contact with the hot pan.
Once cooked, transfer the croquettes to a paper towel-lined plate to drain any excess oil.
Step 5: Make the Dipping Sauce
While the croquettes cook, whisk together the sour cream or Greek yogurt with chopped fresh chives, lemon juice, salt, and black pepper in a small bowl until smooth and well combined.
Step 6: Serve
Serve the croquettes warm, alongside the creamy dipping sauce. Garnish with a little extra chopped parsley if you’d like an extra pop of color and freshness.
Expert Tips for Perfect Cheesy Zucchini & Carrot Croquettes
Don’t skip salting and squeezing the zucchini. This is the single most important step in the entire recipe. Zucchini holds an enormous amount of water, and skipping this step will almost always result in mushy croquettes that fall apart in the pan.
Keep your oil at a steady medium heat. Too hot, and the outside will burn before the inside cooks through. Too low, and the croquettes will absorb excess oil and turn greasy instead of crispy. Medium heat allows for a slow, even golden crust to form.
Don’t overcrowd the pan. Frying too many croquettes at once lowers the oil temperature and leads to steaming rather than frying, which prevents that crispy exterior from forming properly. Work in batches if needed.
Chill the mixture if it’s too soft to shape. If your mixture feels too loose even after adding extra breadcrumbs, pop it in the refrigerator for 15-20 minutes before shaping. This helps firm everything up and makes shaping much easier.
Use a light hand when mixing. Overmixing can make the texture dense. Mix just until everything is evenly combined.
Try baking as a lighter alternative. If you prefer to avoid frying, these croquettes can be baked at 400°F (200°C) for about 20-25 minutes, flipping halfway through, until golden and crispy. Lightly brushing them with olive oil before baking helps achieve better browning.
Serving Suggestions
These croquettes are wonderfully versatile and can be served in a variety of ways:
- As an appetizer, arrange them on a platter with the dipping sauce in the center for a beautiful party spread.
- As a side dish, serve them alongside grilled chicken, baked fish, or a simple roasted protein for a well-rounded dinner.
- In a lunchbox, pack a few cooled croquettes with a small container of dipping sauce for a fun, kid-friendly lunch.
- As a light meal, pair them with a simple green salad dressed in a light vinaigrette for a satisfying vegetarian dinner.
- Alongside soup, these croquettes make a wonderful accompaniment to a bowl of tomato or vegetable soup, adding texture and heartiness to the meal.
Storage and Reheating Instructions
Refrigerator: Store any leftover croquettes in an airtight container in the refrigerator for up to 3-4 days.
Freezer: These croquettes freeze exceptionally well. Arrange cooked and cooled croquettes in a single layer on a baking sheet and freeze until solid, then transfer to a freezer-safe bag or container. They’ll keep well for up to 2 months. You can also freeze the shaped, uncooked croquettes and fry them straight from frozen, adding a couple of extra minutes to the cooking time.
Reheating in the oven: For the best texture, reheat croquettes in a preheated oven at 375°F (190°C) for about 10 minutes, or until warmed through and crispy again.
Reheating in an air fryer: Air fry at 375°F (190°C) for 5-6 minutes for perfectly re-crisped croquettes.
Reheating in the microwave: While convenient, microwaving will soften the crispy exterior. If time allows, the oven or air fryer method is strongly recommended for the best texture.
Frequently Asked Questions
Can I bake these croquettes instead of frying them? Yes. Bake at 400°F (200°C) for 20-25 minutes, flipping halfway through, until golden brown. Lightly brush with olive oil before baking to help them crisp up.
Why are my croquettes falling apart? This usually happens when too much moisture remains in the zucchini. Be sure to salt the zucchini and squeeze out as much liquid as possible before mixing. If the mixture still feels wet, add a bit more breadcrumbs to help it hold together.
Can I use different vegetables? Absolutely. Grated sweet potato, squash, or even finely chopped spinach can be swapped in or added alongside the zucchini and carrots for variation.
Can I make these ahead of time? Yes. You can prepare and shape the croquettes ahead of time, then refrigerate them for up to a day before frying, or freeze them for longer storage.
What other cheeses work well in this recipe? Cheddar, Monterey Jack, or a Mexican cheese blend can all be used in place of or alongside the mozzarella for a different flavor profile.
Can I make these gluten-free? Yes, simply substitute the breadcrumbs and flour with your favorite gluten-free alternatives.
Is there a dairy-free version of this recipe? You can substitute dairy-free shredded cheese alternatives, though the texture and melt may differ slightly from traditional mozzarella and Parmesan.
Recipe Card
Cheesy Zucchini & Carrot Croquettes
Prep Time: 20 minutes Cook Time: 15 minutes Total Time: 35 minutes Servings: 4–6
Ingredients:
- 2 medium zucchini, grated
- 2 medium carrots, grated
- 1 teaspoon salt
- 1 cup shredded mozzarella cheese
- ½ cup grated Parmesan cheese
- 2 large eggs
- ¾ cup Italian-style breadcrumbs
- 2 tablespoons all-purpose flour
- 2 green onions, finely chopped
- 2 garlic cloves, minced
- 1 teaspoon Italian seasoning
- ½ teaspoon paprika
- ¼ teaspoon black pepper
- 2 tablespoons chopped fresh parsley
- 2–3 tablespoons olive oil (for frying)
Optional Dipping Sauce:
- ½ cup sour cream or Greek yogurt
- 1 tablespoon chopped fresh chives
- 1 teaspoon lemon juice
- Salt and black pepper, to taste
Instructions:
- Grate the zucchini and carrots into a large bowl. Sprinkle the zucchini with salt and let sit for 10 minutes, then squeeze out excess moisture using a kitchen towel or cheesecloth.
- Add the carrots, mozzarella, Parmesan, eggs, breadcrumbs, flour, green onions, garlic, Italian seasoning, paprika, black pepper, and parsley. Mix until well combined, adding more breadcrumbs if the mixture feels too wet.
- Shape the mixture into small patties or oval croquettes using about 2 tablespoons per croquette.
- Heat olive oil in a large skillet over medium heat. Cook the croquettes 3–4 minutes per side until golden brown and crispy. Transfer to a paper towel-lined plate.
- Whisk together sour cream (or Greek yogurt), chives, lemon juice, salt, and pepper for the dipping sauce.
- Serve the croquettes warm with the dipping sauce, garnished with extra parsley if desired.
These Cheesy Zucchini & Carrot Croquettes prove that vegetables can be just as crave-worthy as any indulgent snack. Crispy, cheesy, and endlessly versatile, they’re bound to become a repeat request at your dinner table.