
Cranberry Orange Scones Recipe

Cranberry Orange Scones Recipe: Buttery, Tender & Topped with Orange Glaze 🍊❤️
These cranberry orange scones are buttery, tender and perfectly golden, with bright citrus flavor and bursts of sweet-tart cranberries in every bite. Finished with a delicate orange glaze, they are the kind of bakery-style treat that makes a cozy morning feel special. Best of all, you do not need any fancy equipment or pastry-school skills to make them. One bowl, a handful of pantry staples, and about 40 minutes are all it takes.
Whether you are planning a holiday brunch, hosting afternoon tea, looking for something to bring to a gathering, or simply craving a warm homemade snack with your coffee, this easy cranberry orange scones recipe delivers every time. Below you will find the full recipe, the science behind a flaky scone, ingredient notes, troubleshooting help, creative variations, make-ahead and freezing instructions, and answers to the most common questions.
Table of Contents
- Why You’ll Love This Recipe
- Recipe Overview
- Ingredients (and Why Each One Matters)
- Step-by-Step Instructions
- Pro Tips for Perfect Scones
- Common Scone Mistakes (and How to Fix Them)
- Fresh vs. Frozen Cranberries
- Variations and Flavor Ideas
- What to Serve with Cranberry Orange Scones
- Make-Ahead, Storage and Freezing
- Frequently Asked Questions
- Final Thoughts
Why You’ll Love This Recipe
There are countless scone recipes out there, so what makes this one worth saving? Here is what sets these cranberry orange scones apart:
- Truly buttery and tender. Cold butter and heavy cream create a rich crumb that is soft inside with a lightly crisp, golden exterior.
- A perfect sweet-tart balance. Fresh cranberries bring a pop of tartness that is softened by sugar, vanilla and the warm, floral brightness of orange zest.
- Simple ingredients. Everything is a pantry or grocery-store staple. No specialty flours or hard-to-find items.
- Ready in under 40 minutes. With 15 minutes of prep and about 20 minutes in the oven, you can have warm scones on the table faster than a bakery run.
- Beginner friendly. There is no yeast, no proofing and no rolling pin required. If you can mix, pat and cut, you can bake these.
- Perfect for any occasion. They shine at breakfast, brunch, afternoon tea, Thanksgiving and Christmas mornings, bridal and baby showers, and cozy weekends at home.
- Freezer friendly. Bake a batch now and enjoy them for weeks.
For the Scones
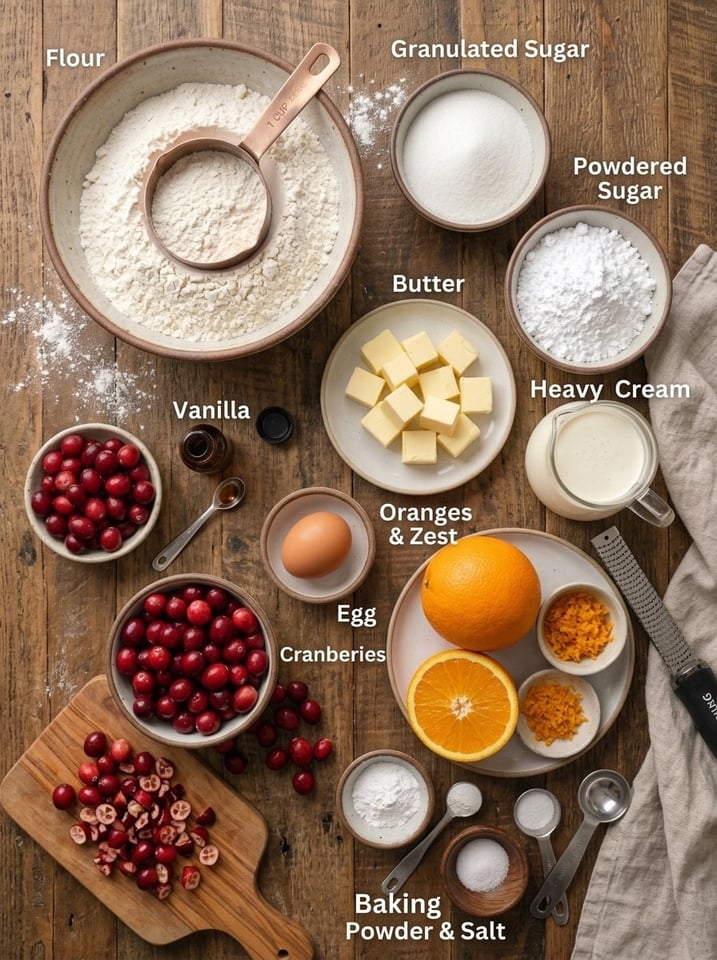
- 2 cups (250 g) all-purpose flour
- ⅓ cup (65 g) granulated sugar
- 2 tsp baking powder
- ¼ tsp salt
- ½ cup (113 g) cold unsalted butter, cubed
- ¾ cup (75 g) fresh or frozen cranberries, roughly chopped
- 1 tbsp orange zest
- ½ cup (120 ml) heavy cream, plus extra for brushing
- 1 large egg
- 1 tsp vanilla extract
For the Orange Glaze
- ½ cup (60 g) powdered sugar
- 1–2 tbsp fresh orange juice
Ingredient Notes
All-purpose flour. This is the backbone of the scone. All-purpose flour has the right protein level to give structure without making the scones tough. For best accuracy, weigh your flour with a kitchen scale. If you use measuring cups, spoon the flour into the cup and level it off instead of scooping straight from the bag, which packs in too much flour and leads to dry, dense scones.
Granulated sugar. Just enough sweetness to balance the tart cranberries. The scones are intentionally not overly sweet, because the glaze adds a second layer of sweetness on top.
Baking powder. This is your leavening agent and the reason these scones rise tall and fluffy. Check the date on your container. Baking powder loses strength over time, and old powder is one of the most common reasons scones turn out flat.
Salt. A small amount sharpens every other flavor, especially the citrus and butter.
Cold unsalted butter. The most important ingredient for texture. Small pieces of cold butter melt in the hot oven and release steam, creating tiny pockets that make the crumb tender and flaky. Using unsalted butter lets you control the saltiness of the final product.
Cranberries. Fresh or frozen both work beautifully. Chopping them roughly helps them distribute evenly and keeps whole berries from bursting and making the dough wet.
Orange zest. This is where the bright citrus flavor lives. The fragrant oils in the peel carry far more orange aroma than the juice. Use a fine grater or microplane and avoid the bitter white pith underneath.
Heavy cream. Cream adds fat and moisture, producing a richer, softer scone than milk would. Keep it cold until you are ready to use it.
Egg. Adds richness, helps bind the dough and contributes to the golden color.
Vanilla extract. A warm background note that rounds out the citrus and rounds off the tartness of the cranberries.
Powdered sugar and orange juice. These two ingredients make a simple, glossy glaze that sets into a delicate, sweet citrus finish.
Step-by-Step Instructions
Step 1: Preheat the Oven
Heat your oven to 400°F (200°C). Line a baking sheet with parchment paper. A hot oven is essential for scones. The high heat causes a fast burst of steam from the butter, which gives you that tall, flaky rise.
Step 2: Mix the Dry Ingredients
In a large bowl, whisk together the flour, sugar, baking powder and salt. Whisking ensures the baking powder is evenly distributed so every scone rises consistently.
Step 3: Cut in the Butter
Add the cold, cubed butter to the dry ingredients. Using your fingertips or a pastry cutter, rub the butter into the flour until the mixture resembles coarse crumbs, with some pea-sized pieces of butter remaining. Work quickly so the butter does not warm up and melt. Those little butter pieces are what create flaky layers.
Step 4: Add the Cranberries and Orange Zest
Stir in the chopped cranberries and orange zest until evenly distributed. Coating the cranberries in the flour mixture also helps keep them from sinking or bleeding too much color into the dough.
Step 5: Make the Dough
In a separate bowl, whisk together the heavy cream, egg and vanilla extract. Pour the wet mixture into the dry ingredients and gently mix with a spatula or fork until a shaggy dough forms. It should look a little rough and slightly crumbly. Avoid overmixing. Overworking develops gluten, which makes scones tough instead of tender.
Step 6: Shape the Scones
Transfer the dough to a lightly floured surface. With floured hands, gently pat and shape it into a circle about 1 inch (2.5 cm) thick. Use a sharp knife or bench scraper to cut the circle into 8 equal wedges. Press straight down when cutting rather than dragging or sawing the knife, which can seal the edges and limit the rise.
Step 7: Brush and Bake
Arrange the wedges on the prepared baking sheet with a little space between each one. Brush the tops lightly with heavy cream, which gives the scones a beautiful golden color and slightly crisp top. Bake for 18–22 minutes, until the edges are golden brown and the tops are lightly browned.
Step 8: Prepare the Glaze
While the scones bake, whisk the powdered sugar with fresh orange juice. Add the juice gradually, starting with 1 tablespoon, until the glaze is smooth and drizzleable. It should flow off a spoon in a thick ribbon.
Step 9: Glaze and Serve
Let the scones cool for 10–15 minutes on the baking sheet or a wire rack. Glazing them while they are too hot will cause the glaze to melt and run off. Drizzle the orange glaze over the tops and let it set for a few minutes. Enjoy with coffee, tea or a glass of milk!
Pro Tips for Perfect Scones
💡 Keep everything cold. Cold butter, cold cream and even a cold egg make a difference. If your kitchen is warm, chill the cubed butter in the freezer for 10 minutes before you start. You can also chill the shaped, cut scones for 15 minutes in the refrigerator before baking for an even taller rise.
💡 Do not overwork the dough. Mix just until the dough comes together. A few dry spots and a shaggy look are perfectly fine. The dough will finish coming together when you pat it out.
💡 Use frozen cranberries straight from the freezer. Do not thaw them. Thawed berries release extra moisture and juice, which makes the dough sticky and can turn it pink. Chop them while still frozen for cleaner cuts.
💡 Boost the citrus. For an extra citrus punch, rub the orange zest into the sugar with your fingertips before mixing. This releases the essential oils and perfumes the whole dough. You can also add a little extra zest to the glaze.
💡 Cut straight down. Pressing the knife straight down, without twisting, keeps the edges open so the scones rise evenly.
💡 Space them out. Leave about 1–2 inches between wedges so heat can circulate and the sides brown evenly. If you like soft-sided scones that touch, place them closer together.
💡 Rotate the pan. Ovens often have hot spots. Rotating the baking sheet halfway through helps all the scones bake evenly.
💡 Weigh your ingredients. A kitchen scale is the single best tool for consistent baking results.
Common Scone Mistakes (and How to Fix Them)
Problem: My scones are dry and crumbly. This usually means too much flour or overbaking. Spoon and level your flour (or weigh it), and take the scones out as soon as the edges are golden. Check them at the 18-minute mark.
Problem: My scones are tough and chewy. The dough was likely overmixed or overkneaded. Mix only until combined and handle the dough as little as possible.
Problem: My scones spread out flat instead of rising. Several culprits could be to blame: warm butter, expired baking powder, or dough that was too wet. Keep the butter cold, check the baking powder date, and make sure you measure the cream accurately. Chilling the cut scones before baking helps them hold their shape.
Problem: My scones are pale on top. Make sure to brush with cream before baking, and confirm your oven is truly at 400°F. An inexpensive oven thermometer can tell you if your oven runs cool.
Problem: The dough is too sticky to handle. Lightly flour your hands and work surface. If you used frozen cranberries that thawed, the extra moisture may be the issue. Use them frozen next time. A tablespoon or two of extra flour can help, but add it sparingly.
Problem: The cranberries turned the dough pink. This is purely cosmetic and does not affect flavor. To minimize it, add cranberries straight from the freezer and fold them in gently at the end.
Problem: The glaze is too thin or too thick. Too thin? Whisk in more powdered sugar a teaspoon at a time. Too thick? Add orange juice a few drops at a time until it drizzles smoothly.
Fresh vs. Frozen Cranberries: Which Is Better?
Both work wonderfully in this recipe, so use whichever you have on hand.
Fresh cranberries are available in autumn and early winter, typically from October through December. They are firm, bright and easy to chop. Buy a couple of extra bags when they are in season and freeze them to bake with all year long.
Frozen cranberries are available year round and perform just as well. Add them straight from the freezer to prevent excess moisture and color bleeding into the dough.
What about dried cranberries? You can swap in about ½ cup of dried cranberries (sweetened) for a chewier, sweeter scone. Because dried cranberries are sweeter and less tart, you may want to reduce the sugar in the dough by a tablespoon. Soaking them in warm orange juice for 10 minutes, then draining well, makes them plump and extra flavorful.
Variations and Flavor Ideas
Once you have mastered the base recipe, it is easy to make it your own.
White chocolate cranberry orange scones. Fold in ½ cup of white chocolate chips for a sweeter, more dessert-like scone that pairs beautifully with tart cranberries.
Cranberry orange pecan or walnut scones. Add ½ cup of toasted, chopped pecans or walnuts for crunch and a nutty depth of flavor.
Spiced cranberry orange scones. Add ½ teaspoon of cinnamon and a pinch of nutmeg or cardamom for a cozy, holiday-spiced version.
Cranberry orange cream scones with a sugar crunch. Skip the glaze and sprinkle the cream-brushed tops with coarse sparkling sugar before baking for a sparkly, crunchy finish.
Mini scones. Pat the dough into two smaller circles and cut each into 8 wedges to make 16 bite-size scones. Reduce the baking time to about 14–16 minutes. They are perfect for parties and brunch spreads.
Drop scones. If you prefer not to shape and cut, simply scoop the dough in mounds onto the baking sheet for rustic, craggy drop scones.
Cranberry orange buttermilk scones. Replace the heavy cream with cold buttermilk for a tangier, slightly lighter scone.
Orange cream cheese glaze. For a richer topping, beat 2 tablespoons of softened cream cheese into the glaze with an extra tablespoon of powdered sugar.
Cranberry orange scones with Earl Grey. Steep a tea bag in the cream, chill, then use it in the dough for a fragrant, afternoon-tea-inspired flavor.
What to Serve with Cranberry Orange Scones
These scones are delicious on their own, but a few thoughtful pairings make them even more special.
Beverages
- Hot coffee or a creamy latte
- Black tea, Earl Grey or English Breakfast
- Chai or spiced herbal tea
- A cold glass of milk
- Sparkling wine or mimosas for a festive brunch
Spreads and toppings
- Softened salted butter
- Clotted cream or whipped cream
- Orange marmalade or cranberry jam
- Lemon curd
- Honey butter
Brunch pairings
- Scrambled eggs or a veggie frittata
- Fresh fruit salad
- Greek yogurt with granola
- Crispy bacon or breakfast sausage for a sweet-and-savory contrast
Afternoon tea spread
- Cucumber sandwiches
- Mini quiches
- Shortbread cookies
- Fresh berries
Make-Ahead, Storage and Freezing
Storing Baked Scones
Keep cooled scones in an airtight container at room temperature for up to 2 days. For the best texture, store glazed scones in a single layer so the glaze does not smudge. Scones are always best the day they are baked, so reheat them briefly before serving.
Reheating
Warm leftover scones in a 300°F (150°C) oven for 5–8 minutes to refresh the texture and bring back that just-baked flavor. Avoid the microwave if possible, as it can make scones soft and chewy.
Freezing Baked Scones
Freeze unglazed baked scones for up to 3 months. Cool them completely, wrap each one individually or place them in a freezer-safe bag with the air pressed out, and freeze. Thaw at room temperature, reheat in the oven, and glaze just before serving.
Freezing Unbaked Scones (My Favorite Method)
For fresh-baked scones on demand, freeze the shaped, cut wedges on a parchment-lined tray until solid, then transfer them to a freezer bag. Bake straight from frozen, brushed with cream, at 400°F (200°C), adding about 3–5 extra minutes to the baking time. No thawing needed.
Making the Dough Ahead
You can prepare the dough, shape and cut it, then cover the wedges tightly and refrigerate overnight. Brush with cream and bake in the morning for a no-stress holiday breakfast.
Frequently Asked Questions
Can I make cranberry orange scones without heavy cream? Yes. You can substitute whole milk or half-and-half, although the scones will be slightly less rich. Buttermilk also works well and adds a pleasant tang.
Can I use salted butter? You can. If you do, reduce or omit the added salt in the recipe to avoid an overly salty scone.
Why are my scones not rising? Check that your baking powder is fresh, your butter is cold, and your oven is fully preheated. Also avoid twisting the knife when cutting, which seals the edges.
Can I make these scones gluten free? A good cup-for-cup gluten-free flour blend can be substituted for the all-purpose flour. The dough may be slightly stickier, so handle it with floured hands and allow the scones to rest for a few minutes before baking.
Can I make them dairy free? Use a cold, firm plant-based butter and full-fat coconut cream or a thick plant-based cream in place of the dairy. Results will vary slightly in flavor and texture.
Do I need to use a food processor? No. Rubbing the butter in by hand or with a pastry cutter works perfectly. A food processor can speed things up, but pulse carefully to avoid overprocessing the butter.
How do I zest an orange properly? Use a microplane or fine grater and remove only the bright orange outer layer. The white pith beneath is bitter. Zest the orange before juicing it, since it is much easier when the fruit is whole.
What is the difference between a scone and a biscuit? They are similar in technique, but scones are typically richer and a bit sweeter, often made with cream, eggs and sugar, while American biscuits are usually savory and made with milk or buttermilk.
Can I make the glaze without orange juice? Yes. Substitute milk or cream with a little extra orange zest for flavor, although fresh orange juice gives the brightest citrus taste.
Can I use bottled orange juice? Fresh juice has the best flavor, but bottled juice works in a pinch for the glaze.
How do I know when scones are done? They should be golden brown around the edges and lightly golden on top. A toothpick inserted in the center should come out clean, without wet dough.
Why did my glaze soak in or disappear? The scones were probably still too warm. Let them cool for at least 10–15 minutes before glazing, and make sure your glaze is thick enough.
Final Thoughts
These cranberry orange scones prove that bakery-quality results do not require complicated techniques. With cold butter, a gentle hand and a hot oven, you get scones that are buttery, tender and beautifully golden, brightened with fragrant orange zest, dotted with jewel-like cranberries and finished with a silky orange glaze.
They are the ideal treat to welcome autumn, brighten a holiday morning, or turn an ordinary afternoon into something a little more special. Bake a batch for your family, share them with friends, or tuck a few into the freezer for a future cozy moment.
If you make this recipe, I would love to hear how it turned out. Leave a comment and a star rating, and share your favorite variations!
📌 Save these Cranberry Orange Scones for a bright, buttery homemade treat that’s perfect for breakfast or afternoon tea! 🍊❤️✨
Quick Recipe Card
Cranberry Orange Scones Prep: 15 min | Cook: 18–22 min | Total: 35–40 min | Yield: 8 scones
Scones: 2 cups (250 g) all-purpose flour · ⅓ cup (65 g) granulated sugar · 2 tsp baking powder · ¼ tsp salt · ½ cup (113 g) cold unsalted butter, cubed · ¾ cup (75 g) fresh or frozen cranberries, roughly chopped · 1 tbsp orange zest · ½ cup (120 ml) heavy cream, plus extra for brushing · 1 large egg · 1 tsp vanilla extract
Glaze: ½ cup (60 g) powdered sugar · 1–2 tbsp fresh orange juice
Method: Preheat to 400°F (200°C) and line a baking sheet. Whisk dry ingredients. Rub in cold butter to coarse crumbs. Stir in cranberries and zest. Whisk cream, egg and vanilla; mix into dry ingredients until a shaggy dough forms. Pat into a 1-inch-thick circle and cut into 8 wedges. Brush with cream and bake 18–22 minutes until golden. Cool 10–15 minutes, then drizzle with orange glaze.
Storage: Airtight container at room temperature up to 2 days; freeze unglazed scones up to 3 months.
Print
Cranberry Orange Scones Recipe
Ingredients
For the Scones
- 2 cups (250 g) all-purpose flour
- ⅓ cup (65 g) granulated sugar
- 2 tsp baking powder
- ¼ tsp salt
- ½ cup (113 g) cold unsalted butter, cubed
- ¾ cup (75 g) fresh or frozen cranberries, roughly chopped
- 1 tbsp orange zest
- ½ cup (120 ml) heavy cream, plus extra for brushing
- 1 large egg
- 1 tsp vanilla extract
For the Orange Glaze
- ½ cup (60 g) powdered sugar
- 1–2 tbsp fresh orange juice
Ingredient Notes
All-purpose flour. This is the backbone of the scone. All-purpose flour has the right protein level to give structure without making the scones tough. For best accuracy, weigh your flour with a kitchen scale. If you use measuring cups, spoon the flour into the cup and level it off instead of scooping straight from the bag, which packs in too much flour and leads to dry, dense scones.
Granulated sugar. Just enough sweetness to balance the tart cranberries. The scones are intentionally not overly sweet, because the glaze adds a second layer of sweetness on top.
Baking powder. This is your leavening agent and the reason these scones rise tall and fluffy. Check the date on your container. Baking powder loses strength over time, and old powder is one of the most common reasons scones turn out flat.
Instructions
Heat your oven to 400°F (200°C). Line a baking sheet with parchment paper. A hot oven is essential for scones. The high heat causes a fast burst of steam from the butter, which gives you that tall, flaky rise.
In a large bowl, whisk together the flour, sugar, baking powder and salt. Whisking ensures the baking powder is evenly distributed so every scone rises consistently.
Add the cold, cubed butter to the dry ingredients. Using your fingertips or a pastry cutter, rub the butter into the flour until the mixture resembles coarse crumbs, with some pea-sized pieces of butter remaining. Work quickly so the butter does not warm up and melt. Those little butter pieces are what create flaky layers.
Stir in the chopped cranberries and orange zest until evenly distributed. Coating the cranberries in the flour mixture also helps keep them from sinking or bleeding too much color into the dough.
In a separate bowl, whisk together the heavy cream, egg and vanilla extract. Pour the wet mixture into the dry ingredients and gently mix with a spatula or fork until a shaggy dough forms. It should look a little rough and slightly crumbly. Avoid overmixing. Overworking develops gluten, which makes scones tough instead of tender.
Transfer the dough to a lightly floured surface. With floured hands, gently pat and shape it into a circle about 1 inch (2.5 cm) thick. Use a sharp knife or bench scraper to cut the circle into 8 equal wedges. Press straight down when cutting rather than dragging or sawing the knife, which can seal the edges and limit the rise.
Arrange the wedges on the prepared baking sheet with a little space between each one. Brush the tops lightly with heavy cream, which gives the scones a beautiful golden color and slightly crisp top. Bake for 18–22 minutes, until the edges are golden brown and the tops are lightly browned.
While the scones bake, whisk the powdered sugar with fresh orange juice. Add the juice gradually, starting with 1 tablespoon, until the glaze is smooth and drizzleable. It should flow off a spoon in a thick ribbon.
Let the scones cool for 10–15 minutes on the baking sheet or a wire rack. Glazing them while they are too hot will cause the glaze to melt and run off. Drizzle the orange glaze over the tops and let it set for a few minutes. Enjoy with coffee, tea or a glass of milk!