
Easy No-Knead Sandwich Bread
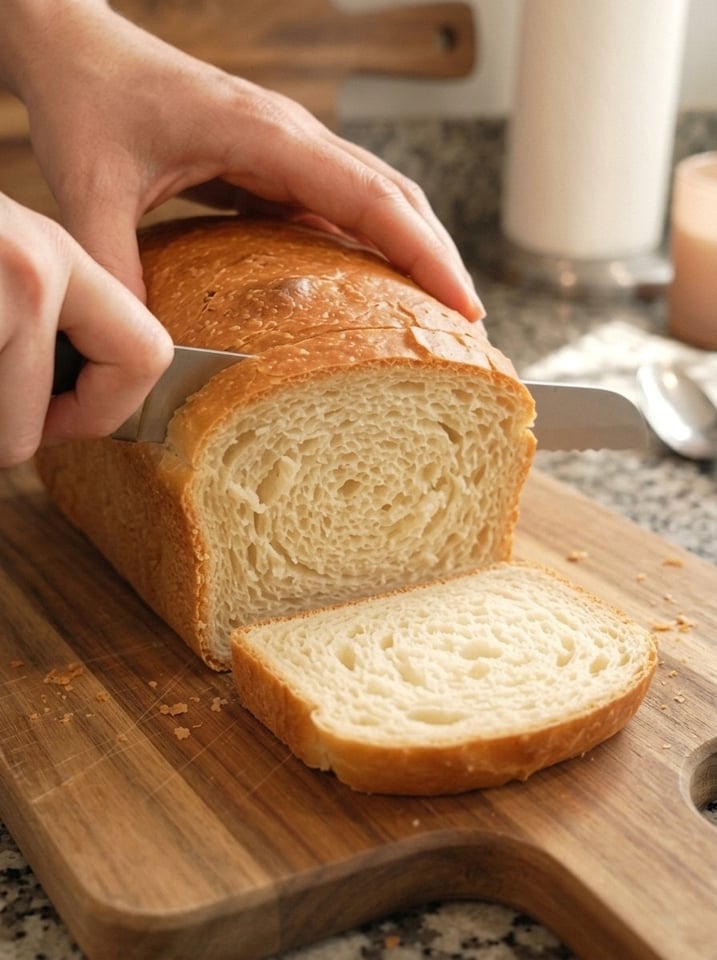
Easy No-Knead Sandwich Bread: Soft, Fluffy, and Made Without a Mixer 🤎🍞
Print
Easy No-Knead Sandwich Bread
Ingredients
- 3 cups (375 g) all-purpose flour or bread flour
- 1¼ cups (300 ml) lukewarm water
- 2 teaspoons instant yeast (7 g)
- 1 tablespoon granulated sugar (12 g)
- 1 teaspoon salt (6 g)
- 1 tablespoon olive oil or melted butter (optional)
🧐 A Closer Look at the Ingredients
Flour. All-purpose flour makes a soft, tender sandwich loaf, while bread flour has more protein and creates a taller, chewier loaf with a slightly stronger structure. Both work beautifully in this recipe. Because there is no kneading, the dough relies on time and hydration to build gluten, so measuring accurately matters. Weighing your flour (375 g) is the most reliable method. If you use cups, spoon the flour into the cup and level it off instead of scooping it directly from the bag.
Lukewarm water. Water should feel comfortably warm to the touch, about 100 to 110°F (38 to 43°C). If it is too hot, it can kill the yeast. If it is too cold, the dough will rise slowly. A kitchen thermometer takes the guesswork out.
Instant yeast. Instant yeast can be stirred directly into the dry ingredients, with no need to dissolve it first. If you only have active dry yeast, you can use the same amount, but dissolve it in the warm water with the sugar for about 5 to 10 minutes until foamy before adding it to the flour.
Granulated sugar. A small amount of sugar feeds the yeast, adds a hint of flavor, and helps the crust brown to a beautiful golden color.
Salt. Salt controls yeast activity, strengthens the dough, and brings out the flavor of the bread. Do not skip it, or the loaf will taste flat and may rise too quickly.
Olive oil or melted butter. Optional but recommended. A tablespoon of fat makes the crumb softer and the loaf stay fresh longer. Olive oil adds a subtle flavor, while butter gives a richer, more traditional sandwich bread taste.
Instructions
1️⃣ Mix the Dough 🥣
In a large mixing bowl, combine the flour, instant yeast, sugar, and salt. Whisk or stir them together so the yeast and salt are evenly distributed. Pour in the lukewarm water and olive oil or melted butter, if using. Stir with a wooden spoon until a sticky, shaggy dough forms and no dry flour remains. No kneading is necessary!
Tip: The dough will look rough and sticky at this stage. This is exactly what you want. The high moisture level is what allows the dough to develop gluten naturally as it rests.
2️⃣ Let the Dough Rise ⏳
Cover the bowl with plastic wrap, a plate, or a clean kitchen towel and leave it in a warm place for 60 to 90 minutes, or until the dough has roughly doubled in size. You should see bubbles on the surface and the dough should look puffy and airy.
Warm spot ideas: An oven that is turned off with the light on, the top of the refrigerator, or a spot near a sunny window all work well. In a cool kitchen, the rise may take longer, so be patient and watch the dough instead of the clock.
3️⃣ Shape the Loaf 🍞
Lightly flour your work surface and gently transfer the dough onto it. The dough will be sticky, so dust your hands with a little flour. Fold the edges toward the center to form a loaf shape, pressing gently to seal. Place it seam-side down in a greased 9 × 5-inch (23 × 13 cm) loaf pan. Use your fingertips to gently nudge the dough into the corners so it fills the pan evenly.
Tip: Grease the pan generously with butter or oil, or line it with parchment paper with an overhang to lift the loaf out easily after baking.
4️⃣ Rise Again ✨
Cover loosely and let the dough rise for another 30 to 45 minutes, until puffy and approaching the rim of the pan. A good sign is when the dough has risen about 1 inch (2.5 cm) above the edge of the pan or is just about to crest it. Do not let it overproof, or the loaf may collapse in the oven.
5️⃣ Bake Until Golden 🔥
Preheat the oven to 375°F (190°C) while the dough completes its second rise. Bake for 30 to 40 minutes, until the crust is golden brown and the loaf sounds hollow when tapped. For a reliable check, the center should reach approximately 190 to 200°F (88 to 93°C) on an instant-read thermometer. If the top is browning too quickly before the center is done, tent the loaf loosely with foil for the final 10 to 15 minutes.
6️⃣ Cool and Slice 🤎
Let the bread rest in the pan for 5 minutes, then transfer it to a wire rack. Allow it to cool completely before slicing for a soft, tender crumb that holds together beautifully. This is the hardest step, because warm bread smells wonderful, but slicing too early can make the crumb gummy and compress the slices.
💡 Tips for Perfect No-Knead Bread
- Keep the dough slightly sticky. Avoid adding too much extra flour to keep the loaf soft. A wetter dough produces a more tender crumb.
- Measure accurately. Weighing your flour helps ensure consistent results. Even a small difference in flour can change the texture.
- Be patient with rising. Dough rises more slowly in cooler kitchens. Judge by size, not by time.
- Want a softer crust? Brush the top with a little butter as soon as it comes out of the oven.
- Store it properly. Keep the cooled loaf in an airtight bag or container at room temperature for 2 to 3 days, or freeze sliced portions for longer storage.
- Check your yeast. Make sure it is fresh and has not expired. Old yeast is the most common reason bread does not rise.
- Use a thermometer. Checking the water temperature and the internal temperature of the loaf takes the guesswork out of baking.
- Preheat properly. Make sure the oven is fully heated before the loaf goes in, for a strong oven spring.
- Use the right pan size. A 9 × 5-inch loaf pan is ideal. A smaller pan creates a taller, domed loaf, while a larger one makes a flatter loaf.
- Try the poke test. Gently press a floured finger into the risen dough. If the dent springs back slowly and only partly, the dough is ready.
Easy No-Knead Sandwich Bread – Soft, Fluffy Homemade Loaf with 6 Simple Ingredients
Meta description: Bake soft, fluffy no-knead sandwich bread at home with simple pantry ingredients. No mixer, no kneading, no special skills. Perfect for sandwiches, toast, and warm slices with butter.
Focus keywords: no-knead sandwich bread, easy homemade sandwich bread, no knead bread recipe, soft homemade bread, beginner bread recipe, no mixer bread, homemade bread loaf pan
No mixer, no complicated kneading, and no special baking skills required! 🤎 This Easy No-Knead Sandwich Bread is soft, fluffy, and perfect for everyday sandwiches, golden toast, or enjoying warm with a little butter. With simple pantry ingredients and a little patience while the dough rises, you can make a beautiful homemade loaf right in your own kitchen! 🥖🏡
Homemade bread has a reputation for being difficult. Many people imagine long kneading sessions, special equipment, and a lot of guesswork. This recipe proves that none of that is necessary. You stir a handful of ingredients together in a bowl with a wooden spoon, let time do the work, shape the dough gently, give it a second rise in a loaf pan, and bake. The result is a tall, tender, evenly sliced sandwich loaf that is perfect for lunchboxes, breakfast toast, and everything in between.
In this guide, you will find the complete recipe, a detailed step-by-step walkthrough, an explanation of why no-knead dough works, tips for the best texture and rise, common problems and how to solve them, flavor variations, serving ideas, storage and freezing advice, and answers to frequently asked questions. Let’s get baking! 👩🍳
Why You Will Love This No-Knead Sandwich Bread
- No kneading and no mixer. A bowl and a wooden spoon are all you need. The dough develops its structure on its own as it rests and rises.
- Simple pantry ingredients. Flour, water, yeast, sugar, salt, and a little oil or butter. Nothing fancy or hard to find.
- Soft and fluffy crumb. The loaf has a tender texture that makes it ideal for sandwiches, toast, and French toast.
- Beginner friendly. There is no special technique to master. If you can stir, you can make this bread.
- Hands-off. Most of the time is spent waiting while the dough rises, which leaves you free to do other things.
- Reliable sandwich shape. Baking in a standard loaf pan gives you even slices that fit toasters and sandwiches perfectly.
- Budget friendly. Homemade bread costs a fraction of artisan loaves and has no preservatives or additives.
- Wonderful aroma. Few things make a home smell as inviting as a loaf of bread baking in the oven. 🏡
🛒 Ingredients
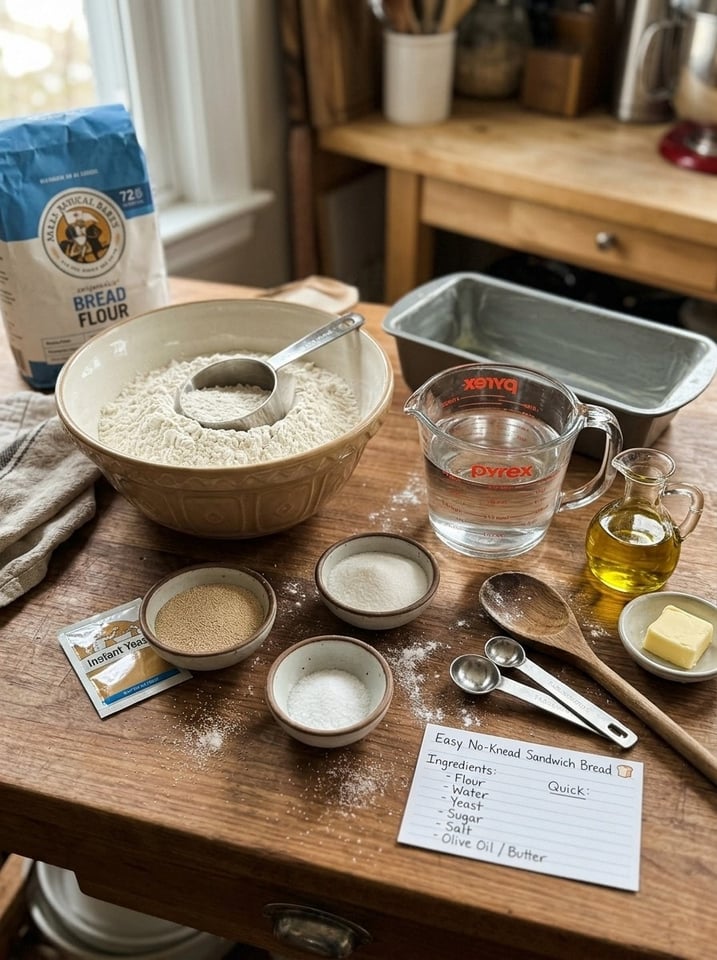
- 3 cups (375 g) all-purpose flour or bread flour
- 1¼ cups (300 ml) lukewarm water
- 2 teaspoons instant yeast (7 g)
- 1 tablespoon granulated sugar (12 g)
- 1 teaspoon salt (6 g)
- 1 tablespoon olive oil or melted butter (optional)
A Closer Look at the Ingredients
Flour. All-purpose flour makes a soft, tender sandwich loaf, while bread flour has more protein and creates a taller, chewier loaf with a slightly stronger structure. Both work beautifully in this recipe. Because there is no kneading, the dough relies on time and hydration to build gluten, so measuring accurately matters. Weighing your flour (375 g) is the most reliable method. If you use cups, spoon the flour into the cup and level it off instead of scooping it directly from the bag.
Lukewarm water. Water should feel comfortably warm to the touch, about 100 to 110°F (38 to 43°C). If it is too hot, it can kill the yeast. If it is too cold, the dough will rise slowly. A kitchen thermometer takes the guesswork out.
Instant yeast. Instant yeast can be stirred directly into the dry ingredients, with no need to dissolve it first. If you only have active dry yeast, you can use the same amount, but dissolve it in the warm water with the sugar for about 5 to 10 minutes until foamy before adding it to the flour.
Granulated sugar. A small amount of sugar feeds the yeast, adds a hint of flavor, and helps the crust brown to a beautiful golden color.
Salt. Salt controls yeast activity, strengthens the dough, and brings out the flavor of the bread. Do not skip it, or the loaf will taste flat and may rise too quickly.
Olive oil or melted butter. Optional but recommended. A tablespoon of fat makes the crumb softer and the loaf stay fresh longer. Olive oil adds a subtle flavor, while butter gives a richer, more traditional sandwich bread taste.
👩🍳 Step-by-Step Instructions
1️⃣ Mix the Dough 🥣
In a large mixing bowl, combine the flour, instant yeast, sugar, and salt. Whisk or stir them together so the yeast and salt are evenly distributed. Pour in the lukewarm water and olive oil or melted butter, if using. Stir with a wooden spoon until a sticky, shaggy dough forms and no dry flour remains. No kneading is necessary!
Tip: The dough will look rough and sticky at this stage. This is exactly what you want. The high moisture level is what allows the dough to develop gluten naturally as it rests.
2️⃣ Let the Dough Rise ⏳
Cover the bowl with plastic wrap, a plate, or a clean kitchen towel and leave it in a warm place for 60 to 90 minutes, or until the dough has roughly doubled in size. You should see bubbles on the surface and the dough should look puffy and airy.
Warm spot ideas: An oven that is turned off with the light on, the top of the refrigerator, or a spot near a sunny window all work well. In a cool kitchen, the rise may take longer, so be patient and watch the dough instead of the clock.
3️⃣ Shape the Loaf 🍞
Lightly flour your work surface and gently transfer the dough onto it. The dough will be sticky, so dust your hands with a little flour. Fold the edges toward the center to form a loaf shape, pressing gently to seal. Place it seam-side down in a greased 9 × 5-inch (23 × 13 cm) loaf pan. Use your fingertips to gently nudge the dough into the corners so it fills the pan evenly.
Tip: Grease the pan generously with butter or oil, or line it with parchment paper with an overhang to lift the loaf out easily after baking.
4️⃣ Rise Again ✨
Cover loosely and let the dough rise for another 30 to 45 minutes, until puffy and approaching the rim of the pan. A good sign is when the dough has risen about 1 inch (2.5 cm) above the edge of the pan or is just about to crest it. Do not let it overproof, or the loaf may collapse in the oven.
5️⃣ Bake Until Golden 🔥
Preheat the oven to 375°F (190°C) while the dough completes its second rise. Bake for 30 to 40 minutes, until the crust is golden brown and the loaf sounds hollow when tapped. For a reliable check, the center should reach approximately 190 to 200°F (88 to 93°C) on an instant-read thermometer. If the top is browning too quickly before the center is done, tent the loaf loosely with foil for the final 10 to 15 minutes.
6️⃣ Cool and Slice 🤎
Let the bread rest in the pan for 5 minutes, then transfer it to a wire rack. Allow it to cool completely before slicing for a soft, tender crumb that holds together beautifully. This is the hardest step, because warm bread smells wonderful, but slicing too early can make the crumb gummy and compress the slices.
Tips for Perfect No-Knead Bread
- Keep the dough slightly sticky. Avoid adding too much extra flour to keep the loaf soft. A wetter dough produces a more tender crumb.
- Measure accurately. Weighing your flour helps ensure consistent results. Even a small difference in flour can change the texture.
- Be patient with rising. Dough rises more slowly in cooler kitchens. Judge by size, not by time.
- Want a softer crust? Brush the top with a little butter as soon as it comes out of the oven.
- Store it properly. Keep the cooled loaf in an airtight bag or container at room temperature for 2 to 3 days, or freeze sliced portions for longer storage.
- Check your yeast. Make sure it is fresh and has not expired. Old yeast is the most common reason bread does not rise.
- Use a thermometer. Checking the water temperature and the internal temperature of the loaf takes the guesswork out of baking.
- Preheat properly. Make sure the oven is fully heated before the loaf goes in, for a strong oven spring.
- Use the right pan size. A 9 × 5-inch loaf pan is ideal. A smaller pan creates a taller, domed loaf, while a larger one makes a flatter loaf.
- Try the poke test. Gently press a floured finger into the risen dough. If the dent springs back slowly and only partly, the dough is ready.
⚠️ Common Problems and How to Fix Them
The dough did not rise. The yeast may be expired, the water may have been too hot or too cold, or the kitchen may be too cool. Check the date on your yeast, use a thermometer for the water, and move the dough to a warmer spot.
The loaf is dense. Too much flour, not enough rising time, or old yeast are the usual causes. Measure by weight, allow the full rising time, and use fresh yeast.
The bread collapsed in the oven. The dough may have risen too long during the second rise. Next time, bake the loaf as soon as it looks puffy and approaches the rim of the pan.
The crust is too dark. Lower the oven rack position or tent the loaf with foil during the last part of baking.
The crust is too pale. Make sure the oven is fully preheated and bake a few extra minutes. A touch more sugar or a brush of butter before baking can also help browning.
The center is gummy. The loaf may need more baking time, or it may have been cut before cooling. Use an instant-read thermometer to confirm it has reached at least 190°F (88°C), and let it cool completely before slicing.
The loaf has large holes. Large air pockets can form if the dough is not pressed and shaped firmly enough. Gently deflate the dough during shaping and press it into the pan to even out the texture.
The bread is too crumbly. This often means the dough was too dry. Measure the flour carefully and keep the dough sticky and soft.
🥖 Delicious Variations
- 🌾 Whole wheat sandwich bread. Replace up to half of the flour with whole wheat flour. You may need an extra tablespoon or two of water.
- 🍯 Honey bread. Replace the sugar with honey for a softer crumb and subtle sweetness.
- 🧀 Cheese bread. Mix in a cup of shredded cheddar or a mix of Parmesan and mozzarella before the first rise.
- 🧄 Garlic herb bread. Add garlic powder, dried Italian herbs, and a sprinkle of grated Parmesan.
- 🌱 Seeded loaf. Sprinkle sesame, sunflower, or flax seeds on top, or mix them into the dough.
- 🫒 Olive bread. Stir in chopped olives and a teaspoon of dried rosemary.
- 🍞 Milk bread style. Replace the water with warm milk for a richer, softer loaf.
- 🧈 Buttery top. Brush the loaf with melted butter and sprinkle with flaky salt right out of the oven.
- 🍇 Cinnamon raisin. Add cinnamon and raisins to the dough for a breakfast loaf.
🍽 How to Enjoy Your Homemade Sandwich Bread
- Sandwiches. Turkey and cheese, grilled chicken, tuna salad, egg salad, or classic peanut butter and jelly are all great on this loaf. 🥪
- Golden toast. Toast slices and top with butter, jam, honey, or avocado. 🥑
- French toast. Day-old slices soak up custard beautifully and cook up golden and soft.
- Grilled cheese. The sturdy crumb holds melted cheese without falling apart. 🧀
- Warm with butter. A thick slice, still slightly warm, with butter is hard to beat. 🧈
- Soup dippers. Serve alongside tomato soup, chicken noodle soup, or a hearty stew. 🍲
- Breadcrumbs and croutons. Turn leftover slices into homemade breadcrumbs or croutons to reduce waste.
- Bread pudding. Cube stale bread and bake it into a warm, comforting dessert.
📦 Storage and Freezing
- Room temperature: Store the cooled loaf in an airtight bag or container for 2 to 3 days. Keep it cut-side down on a cutting board if it is partly sliced.
- Refrigerator: Not recommended, since refrigeration speeds up staling and dries out the bread.
- Freezer: Slice the cooled loaf and freeze the slices in a freezer bag for up to 3 months. Place parchment between the slices so you can take out only what you need. Toast slices straight from the freezer or thaw at room temperature.
- Refreshing day-old bread: Warm slices in a toaster or heat the loaf in a 350°F (175°C) oven for 5 to 10 minutes.
🕒 Make-Ahead and Schedule Tips
This bread fits easily into a busy day:
- Morning: Mix the dough in about 5 minutes and leave it to rise.
- Mid-morning: Shape the loaf and let it rise a second time.
- Late morning or early afternoon: Bake, cool, and enjoy fresh bread for lunch or dinner.
- Overnight option: For deeper flavor and more flexibility, mix the dough in the evening and refrigerate it overnight in a covered bowl. In the morning, let it warm for about 30 to 45 minutes, then shape, rise, and bake as directed.
📝 Nutrition Notes
Homemade bread made from simple ingredients is free of the preservatives and additives found in many store-bought loaves. Each slice provides carbohydrates for energy and a modest amount of protein. Using whole wheat flour for part of the recipe adds fiber and nutrients, and olive oil adds heart-friendly fats. Exact nutrition values depend on the type of flour, the thickness of your slices, and the optional ingredients you choose, so use a nutrition calculator if you need precise numbers.
❓ Frequently Asked Questions
Do I really not need to knead this bread? That is right. The wet, sticky dough develops gluten on its own during the rise, so no kneading is needed. The folding during shaping adds a little extra structure.
Can I use bread flour instead of all-purpose flour? Yes. Bread flour makes a slightly taller and chewier loaf, while all-purpose flour gives a softer, more tender crumb. Both are delicious.
Can I use active dry yeast instead of instant yeast? Yes, in the same amount. Dissolve it in the warm water with the sugar for 5 to 10 minutes until foamy, then add it to the flour.
Why is my dough so sticky? Stickiness is normal for no-knead dough. Resist adding too much extra flour. Use floured hands and a lightly floured surface when shaping.
Can I make this dough ahead of time? Yes. After mixing, cover and refrigerate for 8 to 12 hours. Let it come to room temperature for 30 to 45 minutes, then shape and continue with the second rise.
What size loaf pan should I use? A standard 9 × 5-inch (23 × 13 cm) loaf pan is ideal. If you use a smaller pan, the loaf will be taller and may need a few more minutes in the oven.
How do I know when the bread is done? The crust should be golden brown, the loaf should sound hollow when tapped, and an instant-read thermometer should show 190 to 200°F (88 to 93°C) in the center.
Can I skip the sugar? You can reduce it, but a small amount helps the yeast and the browning. Even a teaspoon is enough.
Can I make the loaf without a loaf pan? Yes. Shape it into a free-form oval and bake on a parchment-lined tray. It will be flatter and more rustic, with a crispier crust.
Why did my bread collapse after rising? The dough probably overproofed. Bake it as soon as it looks puffy and nears the rim of the pan.
🏁 Final Thoughts
This Easy No-Knead Sandwich Bread shows that homemade bread does not need to be complicated. With a few pantry ingredients, a wooden spoon, and a little patience, you can bake a soft, fluffy, golden loaf that is perfect for sandwiches, toast, and warm slices with butter. 🤎 There is no mixer to clean, no kneading to tire your arms, and no special skills to learn. Just simple steps and delicious results.
Whether you are a first-time baker or someone who simply wants a reliable everyday loaf, this recipe is a keeper. Bake it once and you may never go back to store-bought bread. 🥖🏡
📌 Save this easy no-knead sandwich bread recipe for your next baking day! Leave a comment and tell us how your loaf turned out.
📋 Quick Recipe Card
Easy No-Knead Sandwich Bread
Ingredients: 3 cups (375 g) all-purpose flour or bread flour, 1¼ cups (300 ml) lukewarm water, 2 teaspoons instant yeast (7 g), 1 tablespoon granulated sugar (12 g), 1 teaspoon salt (6 g), 1 tablespoon olive oil or melted butter (optional).
Instructions:
- Combine the flour, yeast, sugar, and salt in a large bowl. Add the lukewarm water and olive oil or melted butter. Stir with a wooden spoon until a sticky, shaggy dough forms.
- Cover and let rise in a warm place for 60 to 90 minutes, until roughly doubled.
- Transfer the dough to a lightly floured surface, fold the edges toward the center, and place seam-side down in a greased 9 × 5-inch (23 × 13 cm) loaf pan.
- Cover loosely and let rise for 30 to 45 minutes, until puffy and approaching the rim of the pan.
- Preheat the oven to 375°F (190°C). Bake for 30 to 40 minutes, until golden brown and hollow-sounding, with a center temperature of 190 to 200°F (88 to 93°C).
- Rest in the pan for 5 minutes, then cool completely on a wire rack before slicing.