
Garlic Herb Pickled Red Onions & Sweet Peppers
Garlic Herb Pickled Red Onions & Sweet Peppers: Tangy, Crunchy, and Full of Flavor
SEO title: Garlic Herb Pickled Red Onions & Sweet Peppers – Easy Quick Pickle Recipe
Meta description: Make tangy, crunchy garlic herb pickled red onions and sweet peppers in about 20 minutes of work. A zesty vinegar brine with oregano, thyme, and garlic makes the perfect topping for sandwiches, tacos, salads, and charcuterie boards.
Focus keywords: pickled red onions and peppers, garlic herb pickled onions, quick pickled vegetables, refrigerator pickles, pickled sweet peppers, easy quick pickle recipe, pickled onion topping
Tangy, crunchy, colorful, and bursting with garlicky herb flavor! 😍🧄 These Garlic Herb Pickled Red Onions & Sweet Peppers combine crisp red onions, sweet bell peppers, fresh garlic, and aromatic herbs in a deliciously zesty vinegar brine. Every bite delivers the perfect balance of sweetness, tanginess, and savory flavor, making them an irresistible topping for sandwiches, burgers, tacos, salads, charcuterie boards, grilled meats, and roasted vegetables!
If you have ever wanted one simple condiment that makes almost everything taste better, this is it. A spoonful of bright, tangy pickled vegetables can cut through the richness of a juicy burger, wake up a plain grain bowl, add crunch to tacos, and turn a basic sandwich into something that tastes like it came from a good deli. And the best part is how little effort it takes. You slice the vegetables, warm a simple brine, pour it over, and let the refrigerator do the rest. There is no canning equipment, no special skills, and no complicated steps. 🫙
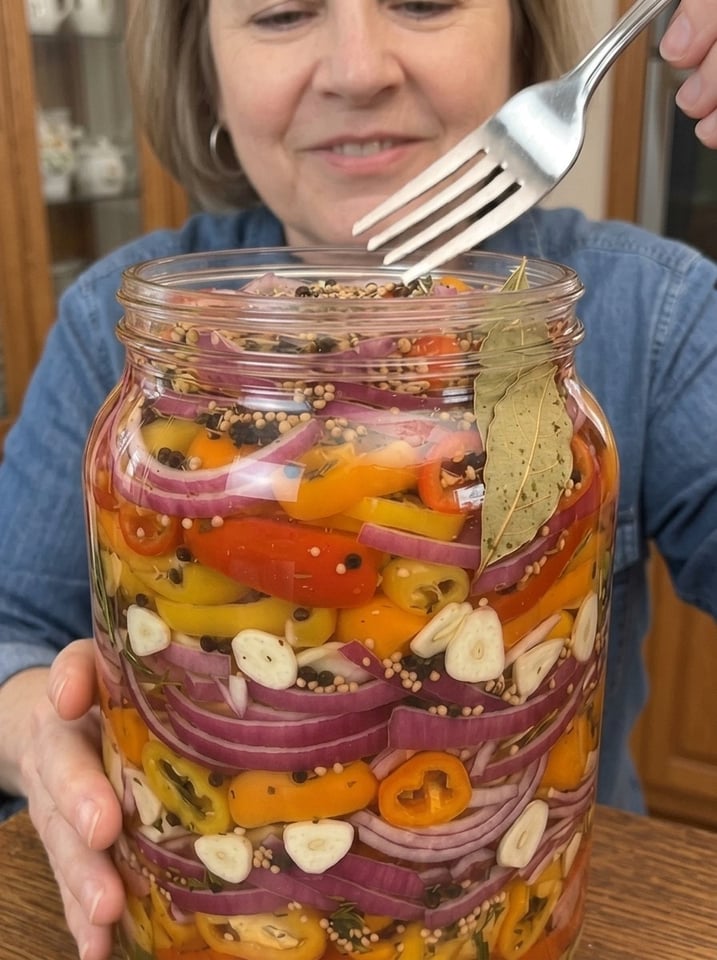
The jar looks as good as it tastes. Deep magenta onions, glossy red, yellow, and orange pepper strips, and slivers of garlic float in a clear brine with peppercorns, mustard seeds, and herbs. It is a jar you will be proud to pull out of the refrigerator and put on the table.
In this guide, you will find the complete recipe, a detailed step-by-step walkthrough, why the onions turn pink, how to choose and prepare the vegetables, important food safety notes, tips for the best texture and flavor, common problems and fixes, flavor variations, ways to use your pickles, and answers to frequently asked questions. Let’s get pickling! 👩🍳
⏱️ Recipe Details
- ⏱️ Prep Time: 15 minutes
- 🔥 Cook Time: 5 minutes
- ❄️ Chilling Time: 24 hours minimum
- ⏰ Total Time: About 24 hours 20 minutes
- 🍽 Yield: Approximately 1 large jar
- 🎯 Difficulty: Easy
🤔 Why You Will Love These Pickled Onions and Peppers
- Bold, balanced flavor. Tangy vinegar, a touch of sugar, savory garlic, and aromatic herbs create a brine that tastes lively without being harsh.
- Crisp and crunchy. Thinly sliced vegetables soak up the brine quickly yet keep a satisfying snap.
- Beautiful color. Red onions turn a vivid pink in the brine, and colorful peppers make the jar look like a work of art. 🌈
- Incredibly versatile. Pile them on sandwiches, burgers, tacos, salads, grain bowls, eggs, avocado toast, and more.
- Quick and easy. Fifteen minutes of prep and five minutes on the stove is all it takes. The refrigerator does the rest.
- No canning required. This is a refrigerator pickle, so you do not need a water bath, special jars, or any preserving experience.
- Customizable. Swap the herbs, add spices, or change the peppers to match your taste.
- Budget friendly. A few simple vegetables and pantry staples make a large jar that elevates many meals.
- Great for gifting and entertaining. A pretty jar is a thoughtful homemade gift, and a bowl of these pickles is a welcome addition to any appetizer spread.
🛒 Ingredients
Vegetables
- 2 medium red onions, thinly sliced 🧅
- 2 sweet bell peppers, thinly sliced 🌶️
- 4 to 6 garlic cloves, thinly sliced 🧄
Brine and Seasonings
- 1 cup (240 ml) white vinegar (5% acidity)
- 1 cup (240 ml) water
- 1 tablespoon sugar
- 1½ teaspoons pickling salt
- 1 teaspoon black peppercorns
- 1 teaspoon dried oregano
- ½ teaspoon dried thyme
- 1 teaspoon mustard seeds (optional)
- 1 bay leaf (optional)
- 1 tablespoon chopped fresh parsley or dill (optional)
🧐 A Closer Look at the Ingredients
Red onions. Red onions are the star of the jar. They have a mild, slightly sweet flavor that mellows even more as they pickle, and the acid in the brine turns them a beautiful bright pink. Slice them thinly and evenly, either into rings or half-moons, so they pickle at the same rate and stay pleasantly crisp.
Sweet bell peppers. Red, yellow, and orange peppers are sweeter than green ones and give the jar a rainbow of color. Remove the stems, seeds, and white membranes before slicing into thin strips. Green peppers work too, though their flavor is more grassy and slightly bitter.
Garlic. Thin slices of fresh garlic infuse the brine with a savory, aromatic flavor. Over time, the garlic mellows and becomes pleasantly tangy. Use four cloves for a gentle garlic note and six if you love bold flavor.
White vinegar (5% acidity). White vinegar provides a clean, sharp tang and the acidity needed for safe, flavorful pickling. Make sure the label states 5% acidity. You can also use apple cider vinegar for a fruitier, slightly mellower flavor, but check that it is also 5% acidity.
Water. Dilutes the vinegar so the brine is tangy without being overpowering. The one-to-one ratio of vinegar to water is a classic quick-pickle base.
Sugar. A single tablespoon balances the acidity and rounds out the flavor. It does not make the pickles sweet, but it softens the sharp edges of the vinegar.
Pickling salt. Pickling salt is fine, pure salt without additives, so it dissolves easily and keeps the brine clear. If you do not have it, you can use kosher salt or fine sea salt, but avoid iodized table salt, which can make the brine cloudy. If you use a different salt, weigh it for accuracy, since crystal sizes vary.
Black peppercorns, mustard seeds, and bay leaf. These classic pickling spices add warmth, a subtle heat, and a deeper aroma. They are lovely in the jar, but the recipe still works if you leave out the optional ones.
Oregano and thyme. These dried herbs give the pickles their Mediterranean-style garlic herb flavor, making them a particularly good match for sandwiches, grilled meats, and roasted vegetables.
Fresh parsley or dill. Optional but wonderful. Fresh herbs add brightness and a lovely color. Dill gives a classic pickle flavor, while parsley adds freshness.
👩🍳 Step-by-Step Instructions
1️⃣ Prepare the Vegetables 🧅
Peel the red onions and slice them into thin rings or half-moons. Wash the sweet peppers, remove the stems and seeds, and cut them into thin strips. Thinly slice the garlic cloves. A sharp knife or a mandoline makes it easy to get thin, even slices. Aim for slices about ⅛ inch (3 mm) thick. Thicker pieces will take longer to absorb the brine and will not be as tender.
2️⃣ Fill the Jar 🫙
Place the red onions, sweet peppers, and garlic in a clean, heat-safe glass jar. Add the black peppercorns, oregano, thyme, mustard seeds, and bay leaf if using. Pack the vegetables in snugly but do not crush them. A tight, even pack keeps the vegetables submerged and prevents them from floating up. Use a large, wide-mouth jar of about 1 quart (1 liter), or divide between two smaller jars.
Tip: Wash the jar and lid in hot, soapy water and rinse well before using. Clean equipment helps keep your pickles fresh.
3️⃣ Prepare the Pickling Brine ✨
In a small saucepan, combine the vinegar, water, sugar, and pickling salt. Bring to a gentle simmer over medium heat, stirring until the sugar and salt dissolve. This takes only 2 to 3 minutes. You do not need a hard boil. Once everything is dissolved and the brine is steaming and clear, remove it from the heat.
4️⃣ Pour Over the Vegetables 🌿
Carefully pour the hot brine into the jar until the vegetables are fully submerged. Use a clean utensil to release any trapped air bubbles if necessary. Tap the jar gently on the counter to help air escape. Sprinkle the chopped fresh parsley or dill on top if using, and press gently so everything stays under the liquid.
5️⃣ Cool and Refrigerate ❄️
Allow the jar to cool briefly, then cover and refrigerate promptly. Keep the onions, peppers, and garlic submerged beneath the brine. Do not leave the jar sitting out at room temperature for long periods. These are refrigerator pickles, so they must be stored cold.
6️⃣ Let the Flavors Develop 😋
Refrigerate for at least 24 hours before serving. For a deeper garlic and herb flavor, allow the vegetables to pickle for 2 to 3 days. The onions will turn a rich pink color within an hour or two, but the flavor continues to develop and mellow as the jar rests.
🧪 Why Do Red Onions Turn Pink?
Red onions contain natural pigments called anthocyanins. These pigments are sensitive to acidity: in an acidic environment, such as vinegar brine, they shift to a vivid pink or magenta color. That is why the onions seem to glow in the jar. The color change is harmless and a sign that the brine is doing its work. You may also notice that the brine itself turns slightly pink.
🛡️ Food Safety Notes
Homemade pickled vegetables with garlic need careful handling, so please keep these points in mind:
- Refrigerate promptly. This is a refrigerator pickle, not a shelf-stable canned product. Keep the jar in the refrigerator at 40°F (4°C) or below at all times, and never store it at room temperature.
- Use within 4 days as a conservative guideline. Homemade garlic and vegetables in liquid are best treated carefully, so plan to enjoy the jar within 4 days. Make smaller batches more often if you want them at peak freshness.
- Keep everything submerged. Vegetables that stick out above the brine are more likely to spoil. Use a clean utensil to push them down.
- Use clean tools. Always use a clean fork or tongs to remove pickles from the jar.
- Check before eating. Discard the pickles if you notice an off smell, bubbling, cloudiness that was not there before, mold, or a slimy texture.
- Do not alter the vinegar ratio. Using less vinegar than the recipe calls for lowers the acidity and may reduce safety.
- Freezing for longer storage. If you want to keep them longer, you can freeze them, though the texture will soften after thawing, so they are better suited for cooked dishes than for fresh topping.
💡 Tips for Perfect Garlic Herb Pickled Vegetables
- Slice evenly. Uniform slices help the onions and peppers absorb the brine evenly.
- Choose colorful peppers. Red, yellow, and orange peppers create a beautiful, vibrant jar.
- Customize the herbs. Try fresh dill, rosemary, or Italian seasoning for a different flavor profile.
- Keep everything submerged. Use a clean utensil to keep the vegetables beneath the brine.
- Store safely. Keep refrigerated at 40°F (4°C) or below and use within 4 days as a conservative guideline for homemade garlic and vegetables in liquid. Freeze for longer storage if desired. Do not store at room temperature.
- Use a mandoline. It produces thin, even slices quickly and keeps the vegetables crisp.
- Do not overcook. The brine only needs to dissolve the sugar and salt. Boiling the vegetables makes them soft.
- Pack the jar well. Snug packing keeps the vegetables underwater and makes for a prettier jar.
- Let it rest. The flavor improves noticeably after a full day, and even more after 2 to 3 days.
- Taste and adjust next time. If you prefer a sweeter or tangier pickle, adjust the sugar slightly while keeping the vinegar and water amounts the same.
⚠️ Common Problems and How to Fix Them
The pickles are too sharp or sour. Let them rest another day to mellow, or add an extra teaspoon of sugar next time. You can also rinse the pickles briefly before serving.
The vegetables are soft. The brine may have been boiled too hard, the slices may have been too thin, or the pickles may have been stored too long. Use hot, but not boiling, brine and enjoy within the recommended time.
The brine is cloudy. Iodized salt or anti-caking agents can make the brine cloudy. Use pickling salt, kosher salt, or sea salt without additives. Cloudiness that develops later, along with an off smell or sliminess, means the pickles should be discarded.
The garlic turned blue or green. This is a harmless reaction between compounds in garlic and the acid in the brine. It does not affect safety or taste, though it can look unusual.
The onions are not pink. The color deepens with time. Make sure the onions are fully submerged in the brine and give them a few hours.
The pickles taste bland. Increase the herbs and garlic, add a pinch of red pepper flakes, or let the jar rest longer in the refrigerator.
The vegetables float. Pack the jar tighter, or place a small piece of clean parchment on top to hold them down.
🥒 Delicious Variations
- 🌶 Spicy version. Add sliced fresh jalapeños, red pepper flakes, or a whole dried chile to the jar.
- 🌿 Fresh dill. Replace the dried herbs with fresh dill and a few extra peppercorns for a classic dill pickle flavor.
- 🍋 Citrus twist. Add a few strips of lemon or orange peel to brighten the brine.
- 🍯 Honey sweetened. Replace the sugar with honey for a softer sweetness, stirring until dissolved.
- 🍎 Apple cider vinegar. Use 5% acidity apple cider vinegar for a mellow, fruity tang.
- 🌱 Rosemary and thyme. Add a fresh sprig of rosemary for an earthy, fragrant flavor.
- 🥕 Extra vegetables. Add thin carrot slices, cucumber, or radishes for variety.
- 🧂 Smoky. Add a pinch of smoked paprika or a few whole allspice berries.
- 🌸 Pink peppercorn. Use pink peppercorns for a delicate, floral note.
🍽 How to Use Garlic Herb Pickled Onions and Peppers
These pickles are one of the most useful things you can keep in your refrigerator. Here are some delicious ways to use them:
- Sandwiches and burgers. Layer them on cheeseburgers, grilled cheese, turkey sandwiches, or deli subs for tangy crunch. 🍔
- Tacos and burritos. They are a classic topping for carnitas, grilled chicken, fish tacos, and bean burritos. 🌮
- Salads. Toss into green salads, pasta salads, potato salad, or grain bowls for bright acidity. 🥗
- Charcuterie boards. Pair with cheeses, cured meats, olives, and crackers. 🧀
- Grilled meats. Serve alongside steak, sausages, grilled chicken, or pork chops to cut through the richness.
- Roasted vegetables. Spoon over roasted potatoes, cauliflower, or sweet potatoes.
- Eggs and breakfast. Add to omelets, scrambled eggs, breakfast burritos, or avocado toast. 🥑
- Rice and grain bowls. Brighten up rice, quinoa, and noodle bowls.
- Pizza and flatbreads. Add as a tangy topping after baking.
- Hot dogs and brats. A spoonful instead of relish adds crunch and tang. 🌭
- Hummus and dips. Serve on top of hummus or alongside dips for a pop of color and flavor.
📦 Storage Guidelines
- Refrigerator: Store in a clean, covered jar at 40°F (4°C) or below, with the vegetables fully submerged in the brine. Use within 4 days as a conservative guideline.
- Never at room temperature: These are not shelf-stable. Do not leave the jar on the counter or pantry shelf.
- Freezer: You can freeze for longer storage, though the texture will soften. Frozen pickles work best in cooked dishes, sauces, and warm recipes.
- Making smaller batches: If you do not expect to finish a large jar in 4 days, halve the recipe and make fresh batches as needed.
- Gifting: If giving as a gift, include a label that says to keep refrigerated and use within 4 days.
📝 Nutrition Notes
Pickled onions and peppers are low in calories and add flavor without much fat. Red onions contain antioxidants, and bell peppers provide vitamin C and other nutrients. The brine contains sodium, so enjoy them as a condiment rather than a large side. Exact nutrition values depend on how much of the brine is consumed, so use a nutrition calculator for precise numbers.
❓ Frequently Asked Questions
How long should I let the pickles sit before eating? At least 24 hours in the refrigerator. For deeper garlic and herb flavor, wait 2 to 3 days.
Can I use other vinegars? Apple cider vinegar and rice vinegar both work, as long as they have at least 5% acidity. White vinegar gives the cleanest flavor and the brightest color.
Do I need to use pickling salt? It is preferred because it dissolves cleanly and keeps the brine clear. Kosher salt or fine sea salt can be used, but avoid iodized table salt.
Can I skip the sugar? Yes. The pickles will be tangier and sharper, but still delicious. A small amount of sugar balances the acidity.
Why only 4 days? Homemade garlic and vegetables stored in liquid are best handled conservatively, so 4 days is used as a cautious guideline. Make smaller batches for the freshest results.
Can I can these pickles for shelf storage? This recipe is designed as a refrigerator pickle and has not been tested for canning. Follow a tested canning recipe from a trusted source if you want shelf-stable pickles.
Can I reuse the brine? It is best to use the brine only once, since it dilutes as the vegetables release water and can pick up flavors and bacteria.
Why does my garlic look blue or green? This is a harmless chemical reaction between the garlic and acid. It does not make the pickles unsafe.
Can I use green bell peppers? Yes, but red, yellow, and orange peppers are sweeter and more colorful.
Can I add more vegetables? Yes. Carrots, cucumbers, radishes, and cauliflower all pickle well. Keep the total volume similar so they stay submerged in the brine.
🏁 Final Thoughts
These Garlic Herb Pickled Red Onions & Sweet Peppers are proof that a few simple ingredients and a little time can create something extraordinary. 🧅🌶️ With their crisp texture, vibrant colors, and zesty garlic and herb flavor, they turn everyday meals into something special. Keep a jar in the refrigerator and you will find endless excuses to use it, from burgers and tacos to salads and charcuterie boards.
Make a jar today, let it rest in the refrigerator for a day or two, and enjoy the tangy, crunchy results. Remember to keep it cold and enjoy it within a few days for the best flavor and safety. 🧄😋
📌 Save this easy garlic herb pickled onion and pepper recipe for your next sandwich, taco night, or charcuterie board! Leave a comment and tell us how you enjoyed yours.
📋 Quick Recipe Card
Garlic Herb Pickled Red Onions & Sweet Peppers
⏱️ Prep: 15 minutes | 🔥 Cook: 5 minutes | ❄️ Chill: 24 hours minimum | ⏰ Total: About 24 hours 20 minutes | 🍽 Yield: Approximately 1 large jar
Ingredients: 2 medium red onions (thinly sliced), 2 sweet bell peppers (thinly sliced), 4 to 6 garlic cloves (thinly sliced), 1 cup (240 ml) white vinegar (5% acidity), 1 cup (240 ml) water, 1 tablespoon sugar, 1½ teaspoons pickling salt, 1 teaspoon black peppercorns, 1 teaspoon dried oregano, ½ teaspoon dried thyme, 1 teaspoon mustard seeds (optional), 1 bay leaf (optional), 1 tablespoon chopped fresh parsley or dill (optional).
Instructions:
- Slice the onions into thin rings or half-moons, cut the peppers into thin strips, and thinly slice the garlic.
- Place the onions, peppers, and garlic in a clean, heat-safe glass jar and add the peppercorns, oregano, thyme, mustard seeds, and bay leaf if using.
- Combine the vinegar, water, sugar, and salt in a small saucepan and bring to a gentle simmer, stirring until dissolved.
- Pour the hot brine over the vegetables until fully submerged, releasing any trapped air bubbles.
- Cool briefly, cover, and refrigerate promptly, keeping the vegetables submerged.
- Refrigerate at least 24 hours, or 2 to 3 days for deeper flavor.
Storage: Keep refrigerated at 40°F (4°C) or below and use within 4 days as a conservative guideline. Do not store at room temperature.
Print
Garlic Herb Pickled Red Onions & Sweet Peppers
Ingredients
Vegetables
- 2 medium red onions, thinly sliced 🧅
- 2 sweet bell peppers, thinly sliced 🌶️
- 4 to 6 garlic cloves, thinly sliced 🧄
Brine and Seasonings
- 1 cup (240 ml) white vinegar (5% acidity)
- 1 cup (240 ml) water
- 1 tablespoon sugar
- 1½ teaspoons pickling salt
- 1 teaspoon black peppercorns
- 1 teaspoon dried oregano
- ½ teaspoon dried thyme
- 1 teaspoon mustard seeds (optional)
- 1 bay leaf (optional)
- 1 tablespoon chopped fresh parsley or dill (optional)
Instructions
Peel the red onions and slice them into thin rings or half-moons. Wash the sweet peppers, remove the stems and seeds, and cut them into thin strips. Thinly slice the garlic cloves. A sharp knife or a mandoline makes it easy to get thin, even slices. Aim for slices about ⅛ inch (3 mm) thick. Thicker pieces will take longer to absorb the brine and will not be as tender.
Place the red onions, sweet peppers, and garlic in a clean, heat-safe glass jar. Add the black peppercorns, oregano, thyme, mustard seeds, and bay leaf if using. Pack the vegetables in snugly but do not crush them. A tight, even pack keeps the vegetables submerged and prevents them from floating up. Use a large, wide-mouth jar of about 1 quart (1 liter), or divide between two smaller jars.
Tip: Wash the jar and lid in hot, soapy water and rinse well before using. Clean equipment helps keep your pickles fresh.
In a small saucepan, combine the vinegar, water, sugar, and pickling salt. Bring to a gentle simmer over medium heat, stirring until the sugar and salt dissolve. This takes only 2 to 3 minutes. You do not need a hard boil. Once everything is dissolved and the brine is steaming and clear, remove it from the heat.
Carefully pour the hot brine into the jar until the vegetables are fully submerged. Use a clean utensil to release any trapped air bubbles if necessary. Tap the jar gently on the counter to help air escape. Sprinkle the chopped fresh parsley or dill on top if using, and press gently so everything stays under the liquid.
Allow the jar to cool briefly, then cover and refrigerate promptly. Keep the onions, peppers, and garlic submerged beneath the brine. Do not leave the jar sitting out at room temperature for long periods. These are refrigerator pickles, so they must be stored cold.
Refrigerate for at least 24 hours before serving. For a deeper garlic and herb flavor, allow the vegetables to pickle for 2 to 3 days. The onions will turn a rich pink color within an hour or two, but the flavor continues to develop and mellow as the jar rests.