
No-Knead Soft & Fluffy Sandwich Bread
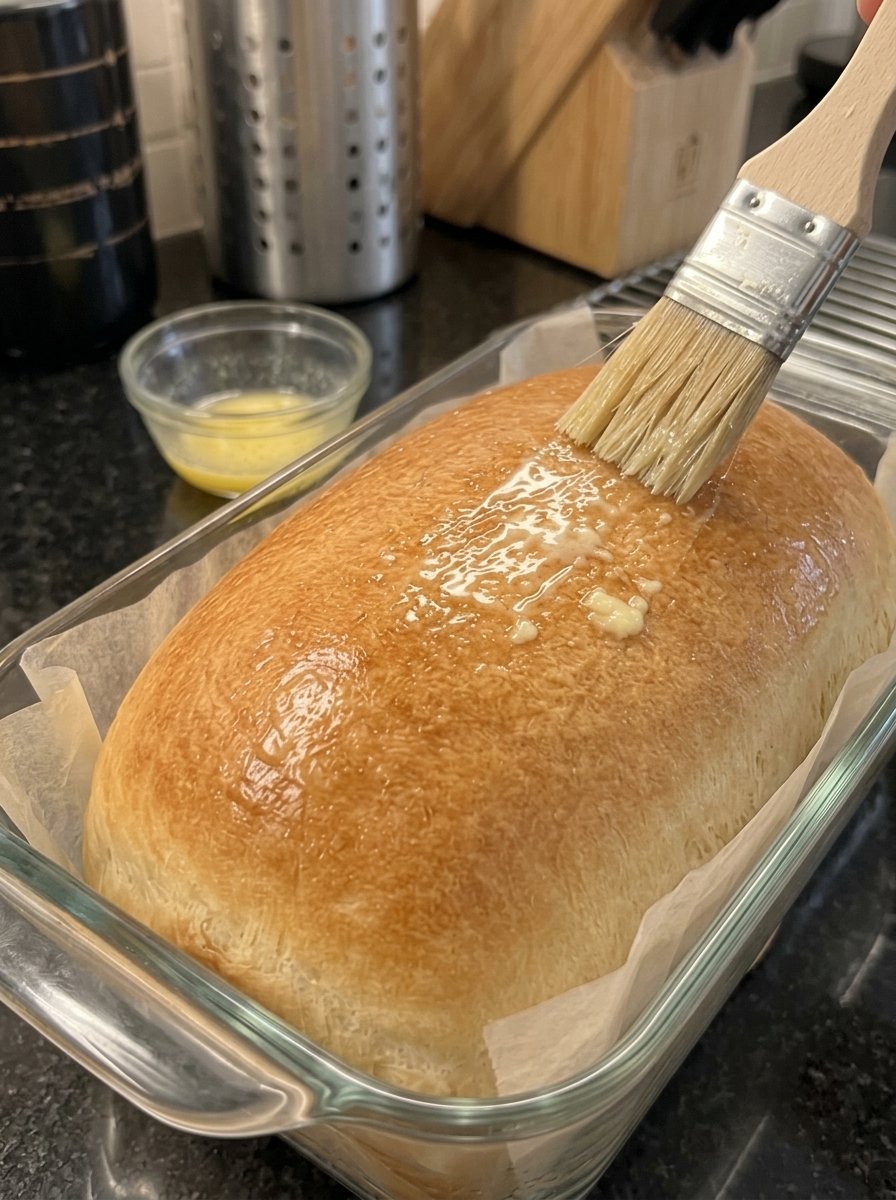
No-Knead Soft & Fluffy Sandwich Bread: The Easy Homemade Loaf
There is something deeply satisfying about slicing into a loaf of bread you made yourself. The golden crust, the soft and tender crumb, the smell that fills the kitchen: homemade bread feels like a small luxury. The problem is that most people assume it takes hours of kneading, special equipment and years of experience.
It does not. This no-knead soft and fluffy sandwich bread is wonderfully tender, light and easy to make with simple pantry ingredients. There is no kneading and no complicated technique. You stir a sticky dough together in one bowl, let time do the work, and bake a golden loaf with a soft crumb that is perfect for sandwiches, toast, grilled cheese, or enjoying warm with a little butter.
In this guide, you will get the full recipe, step-by-step instructions, the science behind why no-knead dough works, troubleshooting help, variations, storage tips and answers to the most common questions. Whether you have never baked bread before or you simply want an easier weeknight loaf, this recipe is a great place to start.
Why You Will Love This No-Knead Sandwich Bread
- No kneading at all. You only need a bowl and a wooden spoon. There is no mixer, no dough hook and no sore arms.
- Simple pantry ingredients. Flour, water, yeast, honey or sugar, salt and a little oil or butter are all you need.
- Soft and fluffy texture. The high-hydration dough bakes into a tender, airy crumb that stays soft for days.
- Genuinely sandwich-friendly. Baked in a standard loaf pan, it slices evenly and holds up to fillings, spreads and toasting.
- Mostly hands-off. Active time is about 10 minutes. The rest is rising and baking.
- Beginner friendly. The dough is forgiving, and the visual cues in this recipe make it easy to know when each stage is done.
- Budget friendly. A homemade loaf typically costs a fraction of a good bakery loaf and contains no preservatives or additives.
Recipe Snapshot
- Prep time: 10 minutes
- Rise time: about 80 to 120 minutes total (first rise plus second rise)
- Cook time: 30 to 35 minutes
- Total time: about 2 hours 15 minutes
- Servings: 10 to 12 slices
- Pan: 9×5-inch loaf pan
- Oven temperature: 375°F (190°C)
Ingredients
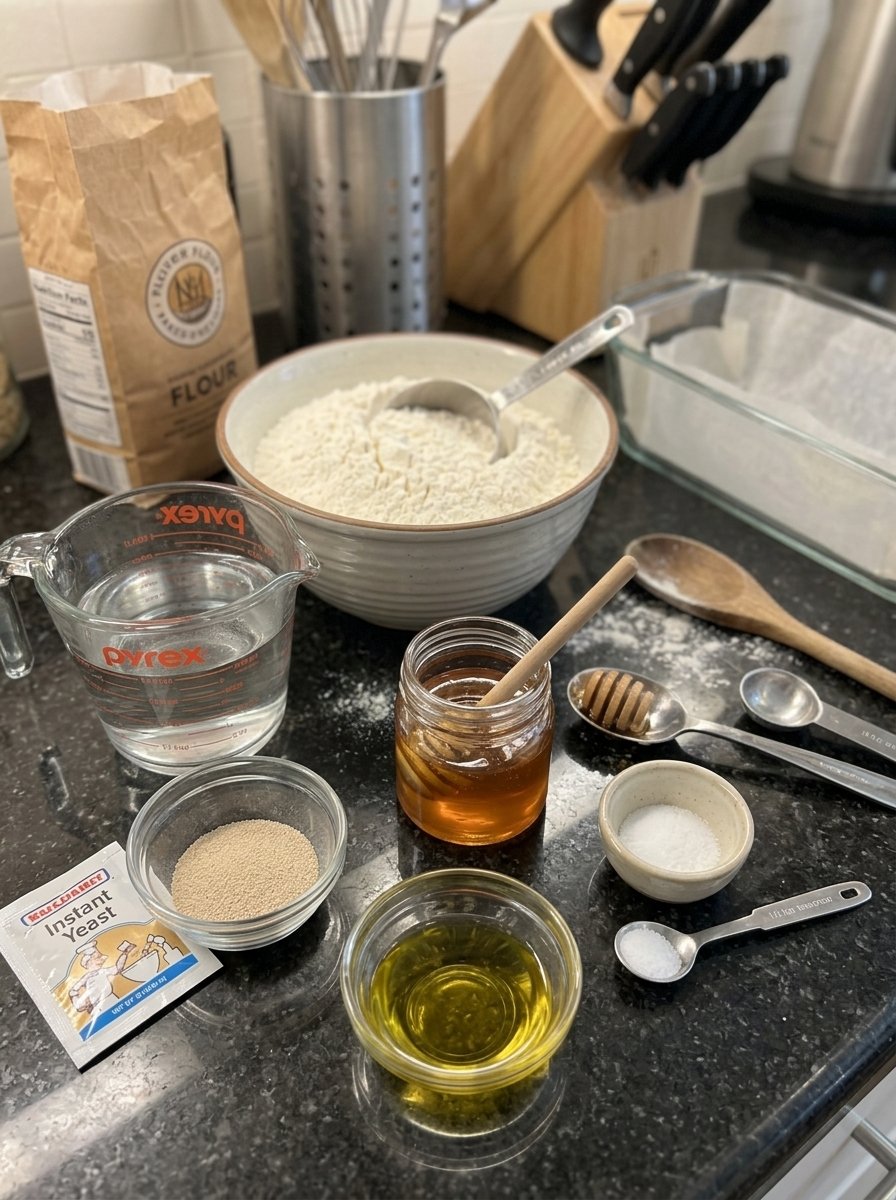
- 3 cups (375 g) all-purpose flour or bread flour
- 1½ cups (360 ml) warm water
- 2¼ teaspoons (7 g) instant yeast
- 1 tablespoon honey or sugar
- 1½ teaspoons salt
- 1 tablespoon olive oil or melted butter
You will also need a little extra oil or butter to grease the pan and, if you like, a bit of melted butter to brush on top of the finished loaf.
Ingredient Notes and Substitutions
Flour. Both all-purpose flour and bread flour work. Bread flour has a higher protein content, which builds more gluten and tends to give a slightly taller, chewier loaf. All-purpose flour gives a slightly softer, more tender result. Either way, weighing your flour is the most reliable way to get consistent results. Three cups is 375 grams in this recipe. If you measure by cup, spoon the flour into the measuring cup and level it off rather than scooping directly from the bag, which packs in too much flour and makes the dough dry.
Water. The water should be warm, not hot. Aim for roughly 105°F to 115°F (about 40°C to 46°C), which feels comfortably warm on your wrist. Water that is too hot can damage the yeast, and water that is too cold slows the rise.
Yeast. This recipe uses instant yeast, which can be mixed directly into the dry ingredients. If you only have active dry yeast, you can usually substitute it in roughly the same amount, though it may rise a little more slowly. For best results with active dry yeast, dissolve it in the warm water with the honey for about 5 to 10 minutes first, until it looks foamy.
Honey or sugar. A tablespoon of sweetener feeds the yeast, adds a touch of flavor and helps the crust brown. Honey gives a subtle sweetness, while granulated sugar keeps things neutral.
Salt. Salt controls the yeast, strengthens the dough and gives the bread flavor. Do not skip it. Without salt, the loaf will taste flat and may rise too quickly and then collapse.
Olive oil or melted butter. Fat softens the crumb and helps the bread stay tender. Olive oil adds a faint fruity note, while butter gives a richer, more classic sandwich-loaf flavor.
How to Make No-Knead Soft & Fluffy Sandwich Bread
Step 1: Mix the ingredients
In a large bowl, combine the flour, instant yeast, salt and honey. Add the warm water and olive oil. Stir with a wooden spoon until a sticky, shaggy dough forms. No kneading is necessary.
Make sure there are no dry pockets of flour at the bottom of the bowl. The dough should look messy and wet, and that is exactly what you want. This high hydration is what gives the finished bread its soft, open crumb.
Step 2: Let the dough rise
Cover the bowl and leave it in a warm place for 60 to 90 minutes, or until the dough has noticeably risen and looks airy. You should see bubbles on the surface and along the sides of the bowl, and the dough should have roughly doubled or at least grown significantly.
The exact time depends on the temperature of your kitchen. In a warm room the dough may be ready in 60 minutes, while in a cool kitchen it can take closer to 90 minutes or a little longer. Watch the dough rather than the clock.
Step 3: Transfer to the loaf pan
Lightly grease a 9×5-inch loaf pan. Scrape the sticky dough into the pan using a spatula. With lightly oiled fingers, gently smooth the top.
Resist the urge to add extra flour. The dough is supposed to be sticky, and oiled hands or a oiled spatula are the easiest way to handle it without changing the recipe.
Step 4: Allow a second rise
Cover loosely and let the dough rise for another 20 to 30 minutes, until puffy and approaching the top of the pan. This short second rise gives the loaf its lift and shapes the final crumb.
A good visual cue is that the dough should look pillowy and rise to just near the rim of the pan. Do not let it overflow dramatically, since it will still rise a bit more in the oven.
Step 5: Bake the bread
Preheat your oven to 375°F (190°C). Start heating the oven during the second rise so it is fully hot when the loaf is ready. Bake for 30 to 35 minutes, until the top is golden brown and the loaf is cooked through.
To check for doneness, tap the bottom of the loaf after removing it from the pan: it should sound hollow. If you use an instant-read thermometer, the center of a fully baked loaf generally reads around 190°F to 200°F (88°C to 93°C). If the top browns too quickly before the center is done, tent the loaf loosely with foil for the last 10 minutes.
Step 6: Cool and slice
Let the bread rest in the pan for 10 minutes, then transfer it to a wire rack. Brush the top with a little butter if desired, and let it cool completely before slicing.
This is the hardest step, because warm bread smells irresistible. But slicing too early can make the crumb seem gummy and compress the slices. Give it at least an hour to cool, and use a serrated bread knife for clean, even slices.
Why No-Knead Bread Works
Traditional bread recipes rely on kneading to develop gluten, the network of proteins that traps gas and gives bread its structure. Kneading physically stretches and folds the dough so those proteins line up and strengthen.
No-knead bread takes a different route: time and hydration. When flour is mixed with a generous amount of water, the gluten-forming proteins hydrate on their own and gradually link together as the dough rests. Yeast ferments during that rest, producing bubbles and tiny movements in the dough that also help the gluten network organize itself. The result is a dough that builds its own structure with almost no effort from you.
Because the dough is wetter than a traditional kneaded dough, it also produces more steam in the oven. That steam helps create an airy crumb and a tender, soft texture, which is exactly what you want in a sandwich loaf.
Tips for the Softest, Fluffiest Loaf
- Do not add extra flour. A sticky dough is a feature, not a flaw. Too much flour leads to a dense, dry loaf.
- Measure accurately. A kitchen scale is the most dependable tool for consistent bread.
- Use warm, not hot, water. Hot water can kill the yeast and ruin the rise.
- Find a warm spot for rising. An oven with only the light on, the top of the refrigerator or a spot near a warm (not hot) appliance can help in a cool kitchen.
- Watch the dough, not the clock. Rise times are a guide. Look for a dough that is puffy, airy and visibly larger.
- Brush with butter for a softer crust. For a softer crust, brush the loaf with melted butter as soon as it comes out of the oven.
- Cool completely before slicing. This protects the texture and keeps the slices neat.
- Store properly. Once the bread is fully cooled, keep it wrapped or in a bread bag so the crust does not dry out.
Troubleshooting Common Problems
My dough did not rise. The most common culprits are old or expired yeast, water that was too hot or too cold, or a very cool kitchen. Check the date on your yeast, use warm water at a comfortable temperature, and give the dough more time in a warmer spot.
My bread is dense. This can happen if too much flour was added, the dough was under-risen, or the yeast was weak. Weigh your flour, avoid adding extra and make sure the dough looks airy and puffy before baking.
The top collapsed or sank. The dough may have over-proofed, meaning it rose for too long and ran out of strength. Next time, shorten the second rise and bake as soon as the dough is puffy and near the top of the pan.
The crust is too hard. Brush the hot loaf with melted butter right after baking, and cover it loosely with a clean towel while it cools. Storing it in a bread bag once cool will also keep the crust soft.
The center is gummy. The loaf may be underbaked or sliced too early. Bake until deeply golden, check that the bottom sounds hollow and allow the bread to cool fully before slicing.
The bread is pale. Make sure the oven is fully preheated and that you used the sweetener, which helps browning. If needed, bake a few minutes longer, or move the pan to a slightly higher rack for the last part of the bake.
The bread has big holes. Large air pockets can result from very wet dough, a very long rise, or air trapped when the dough was transferred. Gently smoothing the top and not over-proofing helps create a more even crumb.
Delicious Variations
Once you have mastered the basic loaf, you can adapt it in simple ways. These changes go beyond the base recipe, so treat them as experiments and adjust to taste.
- Honey-oat topping: Brush the top with butter or a little water and sprinkle with rolled oats before the second rise.
- Seeded loaf: Add a tablespoon or two of sesame, sunflower or poppy seeds to the dough, or sprinkle them on top.
- Herb and garlic bread: Stir in dried herbs such as rosemary or Italian seasoning, plus a little garlic powder, for a savory loaf that is lovely with soup.
- Cheese bread: Fold in a handful of shredded cheddar or parmesan just before transferring the dough to the pan.
- Partial whole wheat: Replace a portion of the white flour with whole wheat flour for a heartier flavor. Because whole wheat absorbs more water, the dough may feel slightly thicker, so be careful not to change the balance too much.
- Butter-brushed shine: For a bakery-style glossy finish, brush with melted butter twice: once right out of the oven and again a few minutes later.
How to Use Your Homemade Sandwich Bread
This loaf is a true all-rounder. Here are a few ideas.
- Classic sandwiches. Turkey and cheese, chicken salad, egg salad, tuna melt or a simple peanut butter and jelly.
- Grilled cheese. The soft crumb crisps beautifully in a buttered pan, and the slices are sturdy enough to hold melted cheese.
- Toast. Serve with butter and jam, avocado, or a fried egg.
- French toast. Slightly day-old slices soak up custard well without falling apart.
- Breadcrumbs and croutons. Leftover or stale slices can be cubed and toasted into croutons or processed into breadcrumbs, so nothing goes to waste.
- Garlic toast. Brush slices with garlic butter and toast until golden for a quick side dish.
Storage, Freezing and Reheating
Room temperature: Once completely cool, store the loaf in a bread bag, a bread box or wrapped in a clean towel and foil. It stays soft for about 2 to 3 days. Homemade bread has no preservatives, so it will go stale faster than store-bought loaves.
Refrigerator: Refrigeration tends to dry bread out faster, so it is usually best to avoid it unless your kitchen is very warm and humid.
Freezer: For longer storage, slice the cooled loaf and freeze the slices in a freezer-safe bag, with parchment between them if you like. They keep well for about 2 to 3 months. You can toast slices straight from the freezer.
Reheating: To refresh a whole loaf, wrap it in foil and warm it in a 350°F (175°C) oven for about 10 minutes. Individual slices can go straight into the toaster.
Nutrition Overview
Exact nutrition depends on the brand of flour, the type of fat and how thickly you slice the loaf. As a rough estimate, a slice from a loaf cut into 10 to 12 pieces may provide somewhere around 130 to 160 calories, with most of the energy coming from carbohydrates. Because it is made with simple ingredients and no added preservatives, you control exactly what goes into your bread. For precise numbers, enter your own ingredients into a nutrition calculator. This information is general and not medical or dietary advice.
Can You Make This Recipe Vegan, Dairy-Free or Gluten-Free?
Dairy-free and vegan: Yes. Use olive oil instead of butter, and choose sugar or maple syrup instead of honey if you avoid honey. The rest of the ingredients are already plant-based.
Gluten-free: This recipe depends on wheat gluten for structure, so it is not gluten-free as written. Gluten-free bread usually requires a different flour blend and different ratios, so it is best to use a recipe designed for that purpose.
Frequently Asked Questions
Do I really not need to knead this bread?
Correct. The long rise and the high water content allow the gluten to develop on its own. You only need to stir the ingredients until combined.
Can I use active dry yeast instead of instant yeast?
Yes. Dissolve it in the warm water with the honey first and wait until it looks foamy, about 5 to 10 minutes. The rise may take a bit longer.
Can I use all-purpose flour instead of bread flour?
Yes. All-purpose flour works well and gives a softer, more tender loaf. Bread flour gives a slightly chewier, taller result.
Why is my dough so sticky?
It is supposed to be. The sticky, wet dough is what creates the soft, fluffy crumb. Use oiled hands or a spatula to handle it, and avoid adding extra flour.
Can I let the dough rise in the refrigerator?
A slow, cold rise can develop deeper flavor, but it changes the timing of the recipe. If you want to try it, let the first rise happen in the refrigerator overnight and then allow the dough to come closer to room temperature before shaping and doing the second rise. Keep a close eye on the dough, since timing will vary.
What size loaf pan should I use?
A standard 9×5-inch loaf pan is ideal for this amount of dough. A smaller pan will give you a taller, more crowded loaf and may cause overflow.
How do I know when the bread is fully baked?
The top should be deep golden brown, the loaf should sound hollow when tapped on the bottom, and an instant-read thermometer should read around 190°F to 200°F (88°C to 93°C) in the center.
Can I double the recipe?
Yes, you can mix a double batch and bake two loaves, either in two pans at the same time or one after the other. Make sure your bowl is large enough to allow the dough to rise.
Why did my bread turn out dense?
The usual causes are too much flour, expired yeast or not letting the dough rise enough. Weigh your ingredients and look for puffy, airy dough before baking.
How long does homemade sandwich bread last?
At room temperature it stays soft for roughly 2 to 3 days when stored well, and it can be frozen for a few months.
Final Thoughts
This no-knead soft and fluffy sandwich bread proves that great homemade bread does not need to be complicated. With six simple ingredients, one bowl and a wooden spoon, you can bake a golden loaf with a tender crumb that is ready for sandwiches, toast and everything in between.
Remember the key points: keep the dough sticky, use warm water, let the dough rise until it is puffy and airy, and give the loaf time to cool before slicing. Brush it with butter right out of the oven if you want an extra-soft crust.
Once you have baked this loaf a time or two, you will likely find yourself reaching for the flour instead of the store-bought bag. If you try it, leave a comment and tell us how you served your first slice.