
Quick Colorful Pickled Peppers
Quick Colorful Pickled Peppers: Crunchy, Tangy & Ready in Hours 🌶️🫑🌈
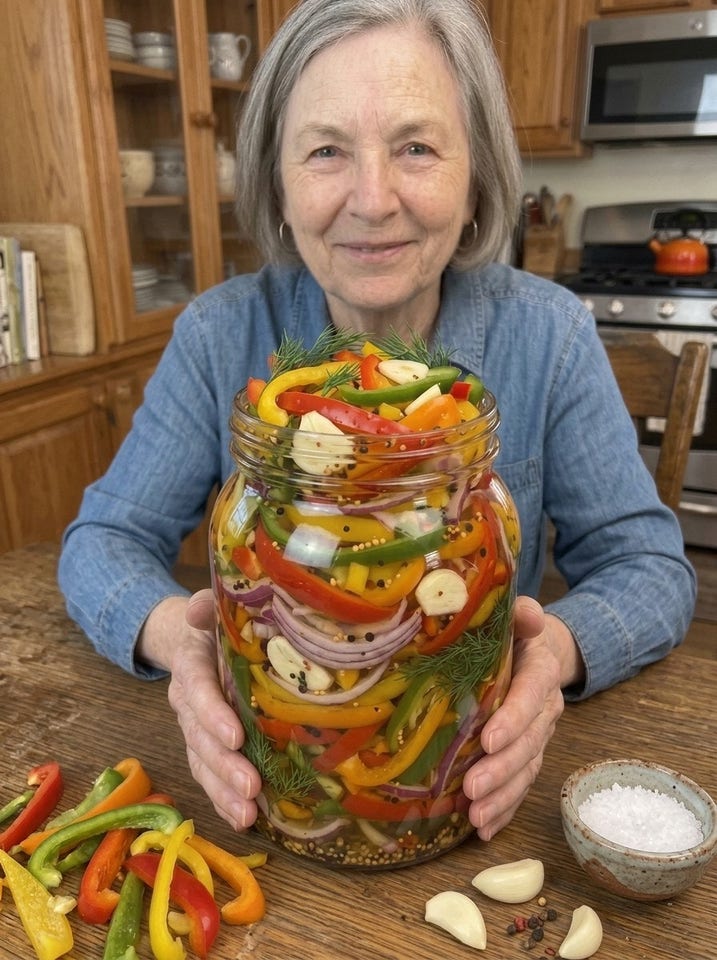
Open the refrigerator and picture this: a big glass jar glowing with red, yellow, orange, and green pepper strips, tucked among garlic slices, peppercorns, and golden mustard seeds. It looks like a jar of edible stained glass. 😍 And the best part is that it tastes even better than it looks.
These Quick Colorful Pickled Peppers combine a vibrant mix of sweet bell peppers with fresh garlic and a zesty vinegar brine. They are bright, crunchy, tangy, and bursting with flavor. They take only minutes of hands-on work, they need no canning equipment, and they are ready to eat in just a few hours. That makes them one of the easiest and most rewarding recipes you can keep in your kitchen.
Pile them on burgers and sandwiches, tuck them into tacos, toss them into salads, serve them with grilled meats, or arrange them on a charcuterie board. Once you have a jar in the fridge, you will find yourself reaching for it again and again. 🌈
In this complete guide, you will find the full recipe, step-by-step instructions, ingredient notes, tips for keeping the peppers crunchy, flavor variations, dozens of serving ideas, safe storage guidelines, and answers to common questions. Let’s get pickling! 🫙
🤔 What Are Quick Pickled Peppers?
Quick pickled peppers, also known as refrigerator pickled peppers, are fresh vegetables preserved briefly in a hot brine made from vinegar, water, sugar, salt, and spices. Unlike traditionally fermented pickles, which develop flavor over days or weeks, quick pickles get their tang directly from the vinegar. This means they are ready to enjoy in a matter of hours instead of weeks.
Bell peppers are especially wonderful for quick pickling for a few reasons:
- They are naturally sweet. Ripe red, yellow, and orange bell peppers contain natural sugars that balance the sharp tang of the vinegar beautifully.
- They are crisp and juicy. Bell peppers have thick, fleshy walls that stay pleasantly crunchy in the brine.
- They are gorgeous. A mix of colors makes the jar look festive and appetizing, and the finished peppers brighten up every plate.
- They are mild. Unlike hot chilies, bell peppers appeal to everyone, including kids and spice-averse eaters. The optional red pepper flakes let you add a gentle kick if you like.
Because this is a refrigerator pickle rather than a shelf-stable canned pickle, the jar must always be kept cold. That also helps the peppers stay crisper and taste fresher.
❤️ Why You Will Love This Recipe
- ✅ Bright and colorful. The rainbow of peppers makes every dish look more inviting.
- ✅ Crunchy and tangy. A perfect balance of sweet, sour, and savory.
- ✅ Super easy. Slice, pack, pour, and chill. No canning skills needed.
- ✅ Ready fast. Enjoy after 2 to 4 hours, or wait overnight for deeper flavor.
- ✅ Made with simple ingredients. Everything is easy to find at any grocery store.
- ✅ Wonderfully versatile. Great on burgers, sandwiches, tacos, salads, and boards.
- ✅ Great for meal prep. Make one batch and upgrade your meals all week.
- ✅ Low calorie. A big flavor boost without heavy sauces.
- ✅ A crowd pleaser. Perfect for parties, potlucks, and holiday gatherings.
🛒 Ingredients
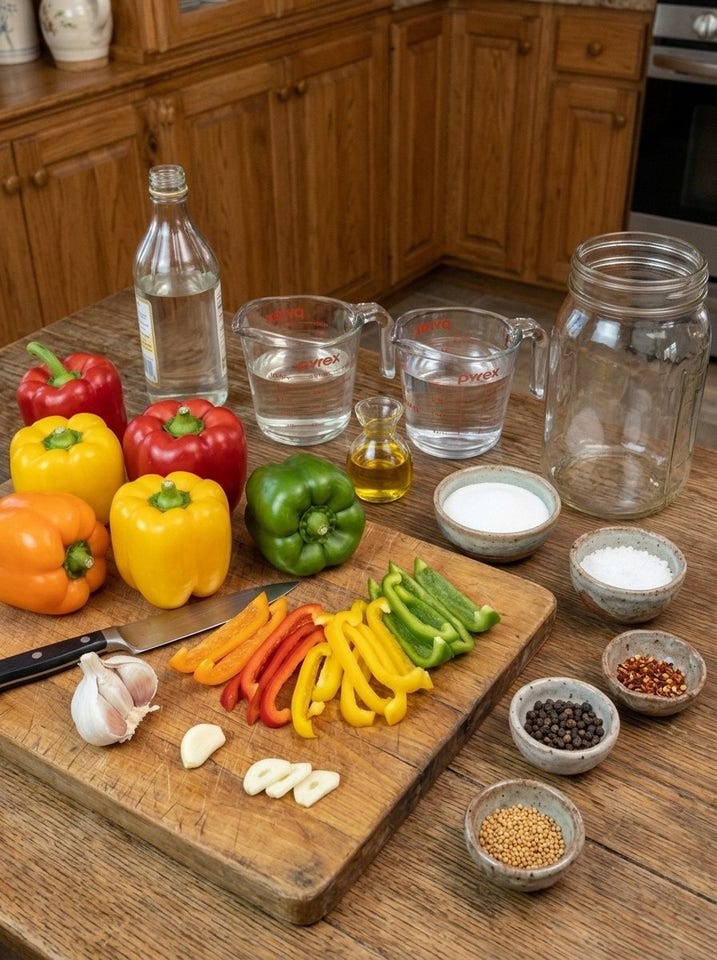
The peppers and aromatics
- 2 red bell peppers, thinly sliced
- 2 yellow bell peppers, thinly sliced
- 2 orange bell peppers, thinly sliced
- 1 green bell pepper, thinly sliced
- 3 garlic cloves, thinly sliced
The brine
- 1 cup (240 ml) white vinegar
- 1 cup (240 ml) water
- 2 tablespoons sugar
- 1 tablespoon salt
- 1 teaspoon black peppercorns
- 1 teaspoon mustard seeds
- ½ teaspoon red pepper flakes (optional)
- 1 tablespoon olive oil (optional)
🧂 Ingredient Notes and Smart Substitutions
Understanding each ingredient helps you get consistent results and customize the recipe to your taste.
Bell peppers
The colorful mix is the star of this recipe. Red, yellow, and orange bell peppers are fully ripened and therefore sweeter, while the green bell pepper is picked earlier and has a slightly grassy, more bitter flavor that adds contrast. Choose peppers that are firm, glossy, and heavy for their size, with smooth skin and no soft spots or wrinkles. Fresh, firm peppers will stay crunchy in the jar much longer.
Variation: Not a fan of green peppers? Skip it and use an extra yellow or orange pepper instead. You can also use mini sweet peppers, which are easy to slice into colorful rings.
Garlic
Thin slices of fresh garlic soak up the brine and become mellow, savory, and slightly sweet. Slicing rather than mincing keeps the brine clearer and the garlic easy to find. Three cloves give a gentle background flavor. Add more if you love garlic.
White vinegar
Distilled white vinegar with 5 percent acidity creates a clean, sharp tang that lets the pepper and spice flavors shine. The 1-to-1 ratio of vinegar to water in this recipe produces a bright but balanced brine that is not overly harsh. Always make sure your vinegar is labeled 5 percent acidity.
Water
Water dilutes the vinegar to a pleasant strength. If you notice that your tap water has a strong taste, use filtered water for a cleaner flavor.
Sugar
Sugar mellows the vinegar and rounds out the flavor. Two tablespoons keep the peppers tangy with just a hint of sweetness. Increase it slightly if you like sweeter pickles, or reduce it for a more tart result.
Salt
Salt seasons the peppers and helps them stay crisp. Use kosher salt or pickling salt whenever possible, because they dissolve cleanly and have no additives that can cloud the brine. If you use fine table salt, reduce the amount slightly (about 2 teaspoons), because it is denser than coarse salt.
Black peppercorns
Whole peppercorns release a warm, aromatic spice into the brine slowly and look beautiful in the jar.
Mustard seeds
Yellow mustard seeds bring the earthy, tangy flavor you would recognize from classic deli pickles. They also give the jar a lovely rustic look.
Red pepper flakes (optional)
A half teaspoon adds a gentle, lingering warmth that does not overpower the sweet peppers. Leave them out for a completely mild pickle, or increase to a full teaspoon for more heat.
Olive oil (optional)
A tablespoon of olive oil adds a touch of richness and a silky mouthfeel, and it can carry flavor from the spices. Many cooks stir it into the finished brine or drizzle it over the jar. Because oil floats, it will form a thin layer on the surface, and that is perfectly normal. Skip it if you prefer a cleaner, lighter pickle, or if you want the brine to stay clear.
Vinegar swaps
- Apple cider vinegar: Slightly fruity and mellow. A delicious choice with sweet peppers.
- White wine vinegar: Light, elegant, and a little softer than distilled white vinegar.
- Rice vinegar: Mild and gentle. Reduce the sugar a bit if the rice vinegar is sweetened.
- Red wine vinegar: Bolder and slightly fruity, though it can darken the color of the peppers.
Whichever vinegar you use, make sure it has at least 5 percent acidity.
👩🍳 How to Make Quick Colorful Pickled Peppers: Step-by-Step
Step 1: Prepare the peppers
Wash the bell peppers thoroughly and pat them dry. Cut off the tops and bottoms, then remove the seeds and white inner membranes. Slice the peppers into thin strips, about ¼ inch (6 mm) wide. Keep the strips fairly uniform so that they pickle evenly and look attractive in the jar.
Cutting tip: Slice each pepper in half lengthwise, scoop out the seeds with a spoon, lay the halves skin-side down, and slice with a sharp knife. Cutting with the skin side down is easier and keeps the strips neat.
Slice the garlic cloves thinly.
Step 2: Fill the jar
Arrange the colorful pepper strips and the sliced garlic in a clean glass jar. This recipe makes a generous amount of peppers, so you will likely need either one very large jar (about 2 quarts or 2 liters) or two smaller jars (such as two 1-quart jars). Layer the colors for a pretty, striped effect, and tuck garlic slices between the layers so the flavor spreads throughout.
Pack the peppers snugly but without crushing them. Leave about ½ inch (1 cm) of space at the top of the jar.
Step 3: Prepare the brine
In a medium saucepan, combine the white vinegar, water, sugar, salt, black peppercorns, mustard seeds, and red pepper flakes (if using).
Step 4: Heat the mixture
Bring the brine to a gentle boil over medium heat, stirring until the sugar and salt dissolve completely. This should take 3 to 5 minutes. Once everything has dissolved, remove the pan from the heat.
Step 5: Pour over the peppers
Carefully pour the hot brine over the peppers until they are fully submerged. A funnel or a ladle makes this easier and prevents spills. Make sure the peppercorns and mustard seeds go into the jar along with the liquid. Use a clean spoon to gently press down any peppers that float above the surface.
If you are using the optional olive oil, drizzle it into the jar now, or stir it into the brine just before pouring.
Safety tip: Always handle hot brine with care. Wear oven mitts, pour slowly, and keep your face away from the steam.
Step 6: Cool
Allow the jar to cool to room temperature, about 30 to 45 minutes. Letting the peppers cool slowly in the brine helps them stay tender-crisp instead of turning soft. Do not leave the jar out for longer than a couple of hours.
Step 7: Refrigerate
Seal the jar with its lid and place it in the refrigerator. Let the peppers pickle for at least 2 to 4 hours for a quick pickle, or overnight for deeper flavor. The garlic, mustard, and pepper flavors will continue to develop over the first day or two.
Step 8: Serve
Enjoy the colorful pickled peppers on sandwiches, burgers, salads, tacos, grilled meats, or antipasto platters. Use a clean fork or tongs to remove them from the jar. 🌈
🌶️ What Do Quick Pickled Peppers Taste Like?
The flavor is sweet, tangy, crisp, garlicky, and refreshingly zesty. The colorful bell peppers bring natural sweetness and crunch, while the vinegar adds a bright tang. The garlic and mustard seeds provide savory depth, and the black peppercorns give a warm, aromatic note. The optional red pepper flakes add a gentle kick that makes every bite vibrant and flavorful.
Each color also tastes a little different. Red peppers are the sweetest and fruitiest, orange peppers are sweet and mellow, yellow peppers are mild and slightly floral, and green peppers add a fresh, slightly bitter edge that keeps the flavor balanced.
💡 Pro Tips for the Crunchiest, Most Flavorful Pickled Peppers
- Start with very fresh peppers. Firm, crisp peppers produce the crunchiest pickles. Avoid soft or wrinkled ones.
- Slice evenly. Uniform strips pickle at the same rate and look polished.
- Do not cut them too thin. Strips about ¼ inch wide stay crisper than very thin slivers.
- Do not overcook the brine. A gentle boil just to dissolve the sugar and salt is all you need.
- Let the jar cool before refrigerating. This prevents condensation and helps preserve the texture.
- Keep everything submerged. Peppers sticking out of the brine can discolor and soften.
- Use a glass jar. Glass does not absorb flavors and does not react with the vinegar.
- Be patient. Overnight pickling gives noticeably better flavor than a few hours.
- Use clean utensils. Always use a clean fork or tongs to remove peppers from the jar.
- Taste and adjust next time. Add more sugar, garlic, or red pepper flakes depending on your preferences.
🔧 Troubleshooting: Common Pickled Pepper Problems
My peppers are soft. Peppers can soften if they were not very fresh, were sliced too thin, or sat in hot brine too long. Choose firm peppers, slice them about ¼ inch wide, and refrigerate as soon as the jar has cooled.
My brine is cloudy. Cloudiness can come from table salt with additives, garlic particles, or spices. Using kosher or pickling salt and clean, neatly sliced garlic usually helps. If you used olive oil, you may see small oil droplets, which is normal.
The garlic turned blue or green. This is a harmless chemical reaction between garlic and the acid in the brine. The garlic is still safe to eat and tastes the same. Fresh garlic and filtered water can reduce the chance of it happening.
The peppers float. Pepper strips are light and tend to float. Pack the jar snugly, and use a small piece of folded parchment or a pickle weight to keep everything below the surface.
They taste too sharp or sour. Add a bit more sugar next time, or dilute the brine with a splash more water. You can also rinse the peppers briefly before serving.
They are too sweet. Reduce the sugar to 1 tablespoon, or use a slightly stronger vinegar flavor.
They are not spicy enough. Add more red pepper flakes, or slip in a few slices of fresh jalapeño or a pinch of cayenne.
The colors look faded. Over time, the vibrant colors can mellow, especially the green pepper, which tends to turn a dull olive shade in acidic brine. This is normal, and the flavor is still good. For the best look, enjoy the peppers within the first week.
The brine did not cover the peppers. If you have too many peppers for the jar, switch to a larger jar or divide them into two. If you are short on brine, make a small extra batch using the same 1-to-1 vinegar-to-water ratio.
🍽 How to Use Colorful Pickled Peppers: 25+ Delicious Ideas
A jar of these peppers makes almost any meal more exciting. Here are some of the best ways to use them.
🍔 On sandwiches and burgers
- Burgers and cheeseburgers: The tang and crunch cut through juicy, rich patties.
- Grilled chicken sandwiches: Add a pop of color and zest.
- Italian subs: Pile onto salami, ham, provolone, and lettuce.
- Turkey and roast beef sandwiches: A bright upgrade over plain lettuce and tomato.
- Philly cheesesteaks: Layer on top of the beef and melted cheese.
- Sausages and hot dogs: A colorful, tangy topping.
- Grilled cheese: Tuck a few strips inside for a surprising tangy bite.
- Paninis and wraps: Add crunch and moisture.
🌮 On tacos and Mexican dishes
- Tacos: Wonderful on carnitas, chicken, steak, fish, or shrimp.
- Fajitas: Serve alongside sizzling meat and onions.
- Burrito bowls: A tangy, crunchy finish.
- Nachos and quesadillas: Cut through the richness of melted cheese.
- Breakfast tacos and burritos: Add brightness to eggs and potatoes.
🥗 In salads and bowls
- Green salads: Toss in for color and zing.
- Pasta and potato salads: Brighten up creamy dressings.
- Grain bowls: Perfect on rice, quinoa, or couscous bowls.
- Mediterranean salads: Pair with feta, olives, cucumbers, and tomatoes.
- Chopped salads: Add sweet, tangy crunch.
- Tuna, chicken, or egg salad: Stir in some chopped peppers for contrast.
🍗 With grilled and roasted meats
- Grilled steak, chicken, and pork: Serve on the side as a cooling, tangy relish.
- Sausages and bratwurst: Wonderful with mustard and a crusty roll.
- Grilled fish and shrimp: Add brightness without heavy sauces.
- Pulled pork or BBQ: Cut through smoky richness.
- Meatballs and kebabs: A tangy counterpoint to savory meat.
🧀 For boards and appetizers
- Charcuterie and cheese boards: Add vibrant color and acidity next to cured meats and creamy cheeses.
- Antipasto platters: A natural fit alongside olives, artichokes, and salami.
- Bruschetta and crostini: Top with ricotta or goat cheese and a few pickled peppers.
- Dips and spreads: Serve alongside hummus, cream cheese, or whipped feta.
- Deviled eggs: Garnish with a pepper slice.
🍳 For breakfast and snacks
- Scrambled eggs and omelets: Fold in chopped peppers.
- Avocado toast: Layer on top for color and crunch.
- Pizza: Add after baking for a fresh, tangy topping.
- Rice and bean dishes: Add brightness to hearty comfort food.
🌿 Delicious Flavor Variations
Once you have mastered the basic recipe, try these easy twists:
- Spicy pickled peppers: Add sliced jalapeños, serranos, or a pinch of cayenne alongside the bell peppers.
- Sweet and tangy: Increase the sugar to 3 tablespoons for a sweeter, Italian-deli-style pickle.
- Herb pickled peppers: Tuck in sprigs of fresh dill, thyme, oregano, or basil.
- Mediterranean style: Add a bay leaf, a strip of lemon peel, and a pinch of dried oregano.
- Mexican style: Add a few cumin seeds, a pinch of dried oregano, and slices of fresh jalapeño.
- Honey pickled peppers: Replace the sugar with honey for a floral sweetness.
- Apple cider peppers: Use apple cider vinegar for a fruity twist.
- Extra garlicky: Increase the garlic to 6 cloves.
- Pickled pepper and onion mix: Add thinly sliced red onion to the jar for a colorful medley.
- Coriander and fennel: Add ½ teaspoon of coriander seeds or fennel seeds for a fragrant, spiced note.
- Rainbow veggie mix: Add sliced carrots, cauliflower florets, or cucumber for a pickled vegetable medley.
📦 Storage, Shelf Life, and Safety
How long do they last?
Keep the pickled peppers refrigerated at or below 40°F (4°C) and use them within 2 weeks. The peppers are at their crispest and most flavorful during the first week, and they gradually soften afterward.
Important: this is not a canning recipe
This is a refrigerator pickle recipe, not a shelf-stable canning recipe. The jar must be kept cold at all times, and the peppers should not be stored at room temperature. The recipe has not been designed or tested for water bath canning. Because bell peppers are a low-acid vegetable, canning requires a tested recipe with specific acidity levels, processing times, and procedures. If you want shelf-stable pickled peppers, follow a tested canning recipe from a trusted source such as the National Center for Home Food Preservation.
A note about oil
If you add the optional olive oil, be aware that oil in a jar of low-acid vegetables is not a shelf-stable preparation. Keep the jar refrigerated, use it within the recommended 2 weeks, and always use clean utensils.
Signs the pickles have gone bad
Discard the jar if you notice any of these:
- Mold anywhere in the jar
- A foul, rotten, or off smell
- A slimy texture
- Unexpected fizzing, bubbling, or a bulging lid
- A strange cloudiness or discoloration that is not explained by spices
When in doubt, throw it out.
Tips for freshness
- Keep the peppers fully submerged in the brine.
- Always use clean utensils.
- Keep the lid tightly sealed.
- Store the jar toward the back of the fridge, where temperatures are most stable.
- Label the jar with the date you made it.
Don’t Throw Out the Brine!
The leftover brine is full of flavor, thanks to the garlic, peppercorns, and mustard seeds. Here are some ways to use it:
- Salad dressing: Whisk a splash with olive oil and mustard for a quick vinaigrette.
- Marinade: Use as a tangy marinade for chicken, pork, or vegetables.
- Potato or pasta salad: Add a tablespoon or two for extra zing.
- Sauces and stews: Brighten a pan sauce, a pot of beans, or a stew with a splash.
- Slaws: Dress shredded cabbage and carrots.
- Pickle more vegetables: Slice cucumbers, carrots, or radishes and add them to the brine for a quick second batch (use within a week).
🥗 Nutrition Notes
Bell peppers are naturally rich in vitamin C and are low in calories, which makes these pickles a light, flavorful addition to meals. The brine adds a small amount of sugar and sodium, so enjoy them as a condiment or side. If you are watching your sodium intake, you can drain the peppers well before serving.
❓ Frequently Asked Questions
How long do I need to wait before eating quick pickled peppers?
At least 2 to 4 hours in the refrigerator for a quick pickle. For the deepest flavor, let them sit overnight.
How long do pickled peppers last in the refrigerator?
Keep them refrigerated at or below 40°F (4°C) and use them within 2 weeks.
Do I have to cook the brine?
Heating the brine dissolves the sugar and salt completely and helps the peppers absorb flavor faster. You can make a cold brine by stirring until the sugar and salt dissolve, but the peppers will take longer to pickle and will be a little firmer.
Can I can these pickled peppers for shelf-stable storage?
Not with this recipe. This is a refrigerator pickle recipe only. If you want to can pickled peppers, follow a tested canning recipe from a trusted source.
Can I use apple cider vinegar instead of white vinegar?
Yes. It will give a slightly fruitier, milder flavor. Make sure the vinegar has at least 5 percent acidity.
Can I use only one color of bell pepper?
Absolutely. The mix of colors is for beauty and a range of sweetness, but any bell pepper or combination works well.
Can I use hot peppers?
Yes. Try jalapeños, serranos, banana peppers, or pepperoncini. You can mix them with bell peppers for a medley with some kick.
Are these pickled peppers spicy?
Not very. Bell peppers are mild, and the red pepper flakes are optional. A half teaspoon gives a gentle warmth, and you can leave them out for no heat at all.
Do I have to add the olive oil?
No, it is optional. It adds a little richness, but the recipe works well without it. If you add it, keep the jar refrigerated and use it within 2 weeks.
Why are my peppers not crunchy?
Peppers may be soft if they were not fresh, were cut too thin, or were left in hot brine for too long. Start with firm peppers, slice them about ¼ inch wide, and refrigerate once cool.
Why did my green pepper turn dull?
Green peppers lose their bright color in acidic brine because the acid breaks down chlorophyll. The flavor is still good, and the other colors stay vibrant.
Do I need to sterilize the jar?
For refrigerator pickles, a clean glass jar washed in hot soapy water or run through the dishwasher is sufficient. Full sterilization is only needed for canning.
Can I reuse the brine?
You can reuse the brine once for a quick batch of other vegetables, such as carrots, cucumbers, or radishes, and use them within a week. Do not reuse it repeatedly, because it becomes diluted and less effective.
Can I freeze pickled peppers?
It is not recommended. Freezing changes the texture and makes the peppers soft and watery.
Can I double the recipe?
Yes. Scale the ingredients proportionally and use larger or additional jars, making sure the peppers are fully submerged in brine.
Can I eat the garlic and spices in the jar?
Yes. The pickled garlic slices are delicious, and the mustard seeds and peppercorns are edible, although many people prefer to leave the peppercorns aside because they are strong.
What is the best way to serve pickled peppers?
Serve them cold, straight from the fridge, on burgers, sandwiches, tacos, salads, and boards. They also make a tangy, colorful side for grilled meats.
🏁 Final Thoughts
These Quick Colorful Pickled Peppers prove that a few simple ingredients and a little time in the fridge can produce something truly special. In just minutes of hands-on work, you get a jar of bright, crunchy, tangy, sweet, and garlicky peppers that will liven up your meals all week long. 🌈
Keep a jar in the fridge, and you will always have an easy way to add color, crunch, and zesty flavor to burgers, sandwiches, tacos, salads, grilled meats, and charcuterie boards. They are as pretty as they are delicious, and once you make them, you will want a jar on hand at all times. 😍
If you try this recipe, leave a comment and a star rating below, and let us know how you enjoyed your pickled peppers. Happy pickling! 💛
📌 Quick Recipe Card
Quick Colorful Pickled Peppers ⏱ Prep: 15 min | 🔥 Brine: 5 min | ⏰ Pickle: 2 to 4 hrs (overnight best) | 🍽 Yield: About 2 quarts
Ingredients: 2 red bell peppers, 2 yellow bell peppers, 2 orange bell peppers, 1 green bell pepper (all thinly sliced), 3 garlic cloves (thinly sliced), 1 cup white vinegar, 1 cup water, 2 tbsp sugar, 1 tbsp salt, 1 tsp black peppercorns, 1 tsp mustard seeds, ½ tsp red pepper flakes (optional), 1 tbsp olive oil (optional).
Method: Wash the peppers, remove the seeds, and slice into thin strips. Pack the peppers and garlic into a clean glass jar. Combine the vinegar, water, sugar, salt, peppercorns, mustard seeds, and red pepper flakes in a saucepan and bring to a gentle boil, stirring until dissolved. Pour the hot brine over the peppers until fully submerged. Cool to room temperature, seal, and refrigerate for at least 2 to 4 hours, or overnight for deeper flavor. Serve on sandwiches, burgers, salads, tacos, grilled meats, or antipasto platters.
Storage: Keep refrigerated at or below 40°F (4°C) and use within 2 weeks. This is a refrigerator pickle recipe, not a shelf-stable canning recipe.
Print
Quick Colorful Pickled Peppers
Ingredients
The peppers and aromatics
- 2 red bell peppers, thinly sliced
- 2 yellow bell peppers, thinly sliced
- 2 orange bell peppers, thinly sliced
- 1 green bell pepper, thinly sliced
- 3 garlic cloves, thinly sliced
The brine
- 1 cup (240 ml) white vinegar
- 1 cup (240 ml) water
- 2 tablespoons sugar
- 1 tablespoon salt
- 1 teaspoon black peppercorns
- 1 teaspoon mustard seeds
- ½ teaspoon red pepper flakes (optional)
- 1 tablespoon olive oil (optional)
🧂 Ingredient Notes and Smart Substitutions
Understanding each ingredient helps you get consistent results and customize the recipe to your taste.
Bell peppers
The colorful mix is the star of this recipe. Red, yellow, and orange bell peppers are fully ripened and therefore sweeter, while the green bell pepper is picked earlier and has a slightly grassy, more bitter flavor that adds contrast. Choose peppers that are firm, glossy, and heavy for their size, with smooth skin and no soft spots or wrinkles. Fresh, firm peppers will stay crunchy in the jar much longer.
Variation: Not a fan of green peppers? Skip it and use an extra yellow or orange pepper instead. You can also use mini sweet peppers, which are easy to slice into colorful rings.
Garlic
Thin slices of fresh garlic soak up the brine and become mellow, savory, and slightly sweet. Slicing rather than mincing keeps the brine clearer and the garlic easy to find. Three cloves give a gentle background flavor. Add more if you love garlic.
White vinegar
Distilled white vinegar with 5 percent acidity creates a clean, sharp tang that lets the pepper and spice flavors shine. The 1-to-1 ratio of vinegar to water in this recipe produces a bright but balanced brine that is not overly harsh. Always make sure your vinegar is labeled 5 percent acidity.
Water
Water dilutes the vinegar to a pleasant strength. If you notice that your tap water has a strong taste, use filtered water for a cleaner flavor.
Sugar
Sugar mellows the vinegar and rounds out the flavor. Two tablespoons keep the peppers tangy with just a hint of sweetness. Increase it slightly if you like sweeter pickles, or reduce it for a more tart result.
Salt
Salt seasons the peppers and helps them stay crisp. Use kosher salt or pickling salt whenever possible, because they dissolve cleanly and have no additives that can cloud the brine. If you use fine table salt, reduce the amount slightly (about 2 teaspoons), because it is denser than coarse salt.
Black peppercorns
Whole peppercorns release a warm, aromatic spice into the brine slowly and look beautiful in the jar.
Mustard seeds
Yellow mustard seeds bring the earthy, tangy flavor you would recognize from classic deli pickles. They also give the jar a lovely rustic look.
Red pepper flakes (optional)
A half teaspoon adds a gentle, lingering warmth that does not overpower the sweet peppers. Leave them out for a completely mild pickle, or increase to a full teaspoon for more heat.
Olive oil (optional)
A tablespoon of olive oil adds a touch of richness and a silky mouthfeel, and it can carry flavor from the spices. Many cooks stir it into the finished brine or drizzle it over the jar. Because oil floats, it will form a thin layer on the surface, and that is perfectly normal. Skip it if you prefer a cleaner, lighter pickle, or if you want the brine to stay clear.
Vinegar swaps
- Apple cider vinegar: Slightly fruity and mellow. A delicious choice with sweet peppers.
- White wine vinegar: Light, elegant, and a little softer than distilled white vinegar.
- Rice vinegar: Mild and gentle. Reduce the sugar a bit if the rice vinegar is sweetened.
- Red wine vinegar: Bolder and slightly fruity, though it can darken the color of the peppers.
Whichever vinegar you use, make sure it has at least 5 percent acidity.
Instructions
Wash the bell peppers thoroughly and pat them dry. Cut off the tops and bottoms, then remove the seeds and white inner membranes. Slice the peppers into thin strips, about ¼ inch (6 mm) wide. Keep the strips fairly uniform so that they pickle evenly and look attractive in the jar.
Cutting tip: Slice each pepper in half lengthwise, scoop out the seeds with a spoon, lay the halves skin-side down, and slice with a sharp knife. Cutting with the skin side down is easier and keeps the strips neat.
Slice the garlic cloves thinly.
Arrange the colorful pepper strips and the sliced garlic in a clean glass jar. This recipe makes a generous amount of peppers, so you will likely need either one very large jar (about 2 quarts or 2 liters) or two smaller jars (such as two 1-quart jars). Layer the colors for a pretty, striped effect, and tuck garlic slices between the layers so the flavor spreads throughout.
Pack the peppers snugly but without crushing them. Leave about ½ inch (1 cm) of space at the top of the jar.
In a medium saucepan, combine the white vinegar, water, sugar, salt, black peppercorns, mustard seeds, and red pepper flakes (if using).
Bring the brine to a gentle boil over medium heat, stirring until the sugar and salt dissolve completely. This should take 3 to 5 minutes. Once everything has dissolved, remove the pan from the heat.
Carefully pour the hot brine over the peppers until they are fully submerged. A funnel or a ladle makes this easier and prevents spills. Make sure the peppercorns and mustard seeds go into the jar along with the liquid. Use a clean spoon to gently press down any peppers that float above the surface.
If you are using the optional olive oil, drizzle it into the jar now, or stir it into the brine just before pouring.
Safety tip: Always handle hot brine with care. Wear oven mitts, pour slowly, and keep your face away from the steam.
Allow the jar to cool to room temperature, about 30 to 45 minutes. Letting the peppers cool slowly in the brine helps them stay tender-crisp instead of turning soft. Do not leave the jar out for longer than a couple of hours.
Seal the jar with its lid and place it in the refrigerator. Let the peppers pickle for at least 2 to 4 hours for a quick pickle, or overnight for deeper flavor. The garlic, mustard, and pepper flavors will continue to develop over the first day or two.
Enjoy the colorful pickled peppers on sandwiches, burgers, salads, tacos, grilled meats, or antipasto platters. Use a clean fork or tongs to remove them from the jar. 🌈