
Easy French Loaf Bread
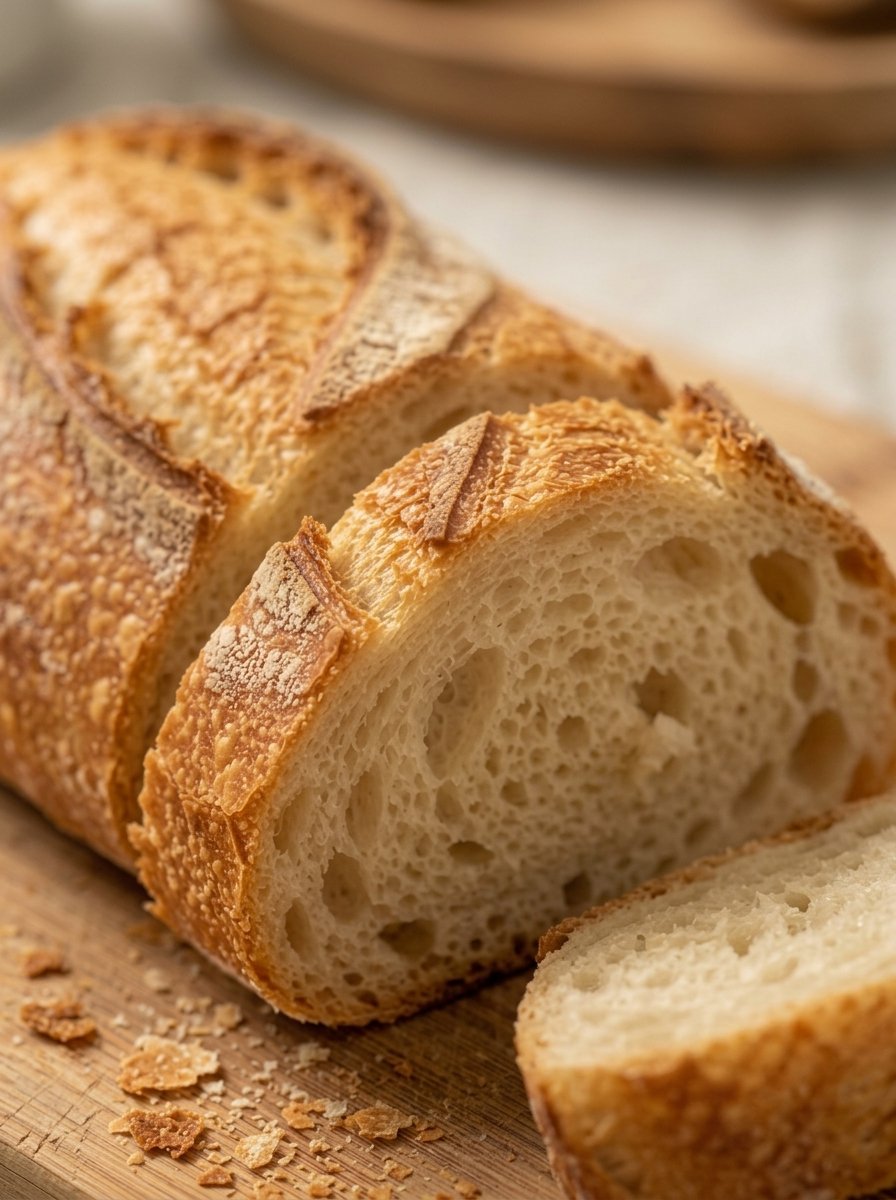
Easy French Loaf Bread: Crusty, Golden and Bakery-Style at Home
There is a special kind of magic in a loaf of French bread that crackles when you squeeze it, fills the kitchen with the aroma of a bakery and reveals a soft, airy center when you slice it open. Many home cooks assume that kind of bread is out of reach without professional ovens or years of training.
It is not. This easy French loaf bread brings the taste of a bakery into your own kitchen. It has a crunchy golden crust, a soft and airy center and that classic homemade bread flavor everyone loves. It is perfect for sandwiches, garlic bread, soups, or simply served warm with butter. Better still, one batch makes two loaves, so there is plenty to share or to tuck away in the freezer.
In this guide you will find the complete recipe, clear step-by-step instructions, ingredient notes, the reasoning behind each technique, troubleshooting help, variations, storage tips and answers to common questions. If you have baked bread before, this recipe will feel comfortable. If you have not, the detailed cues will help you succeed on your first try.
What Is French Loaf Bread?
Traditional French bread, such as the classic baguette, is famous for its simplicity: flour, water, yeast and salt, shaped into long loaves and baked in a hot, steamy oven. The steam and heat produce a thin, crisp, golden crust with a tender, chewy crumb inside.
This recipe is a home-friendly version of that idea. It uses the same basic building blocks, with a little sugar to help the yeast and browning and an optional spoonful of olive oil for extra tenderness. The loaves are shaped long with tapered ends, scored across the top and baked with a pan of hot water in the oven to create steam.
It is worth being honest about what this is: a delicious, easy, everyday French-style loaf rather than a strict reproduction of a Parisian baguette. Professional bakers use specialized ovens, long fermentation and precise techniques. This version gives you the look, crunch and flavor of a bakery loaf with a method that works in a regular home oven.
Why You Will Love This Easy French Bread Recipe
- Crunchy golden crust. Steam in the oven helps the crust turn crisp and glossy.
- Soft and airy center. Proper kneading and rising give a light, tender crumb.
- Simple ingredients. Flour, water, yeast, sugar and salt, plus optional olive oil, are all you need.
- Makes two loaves. Enjoy one fresh and freeze the other, or serve both at a family dinner.
- Incredibly versatile. Use it for sandwiches, garlic bread, croutons, bruschetta, French toast and more.
- Beginner friendly. The recipe gives clear visual cues for every stage.
- No special equipment. You only need a baking sheet, parchment paper and a pan for hot water.
Recipe Snapshot
- Prep time: 20 minutes
- Cook time: 25 to 30 minutes
- Total time: about 2 hours (including rising)
- Servings: 2 loaves
- Oven temperature: 425°F (220°C)
Ingredients
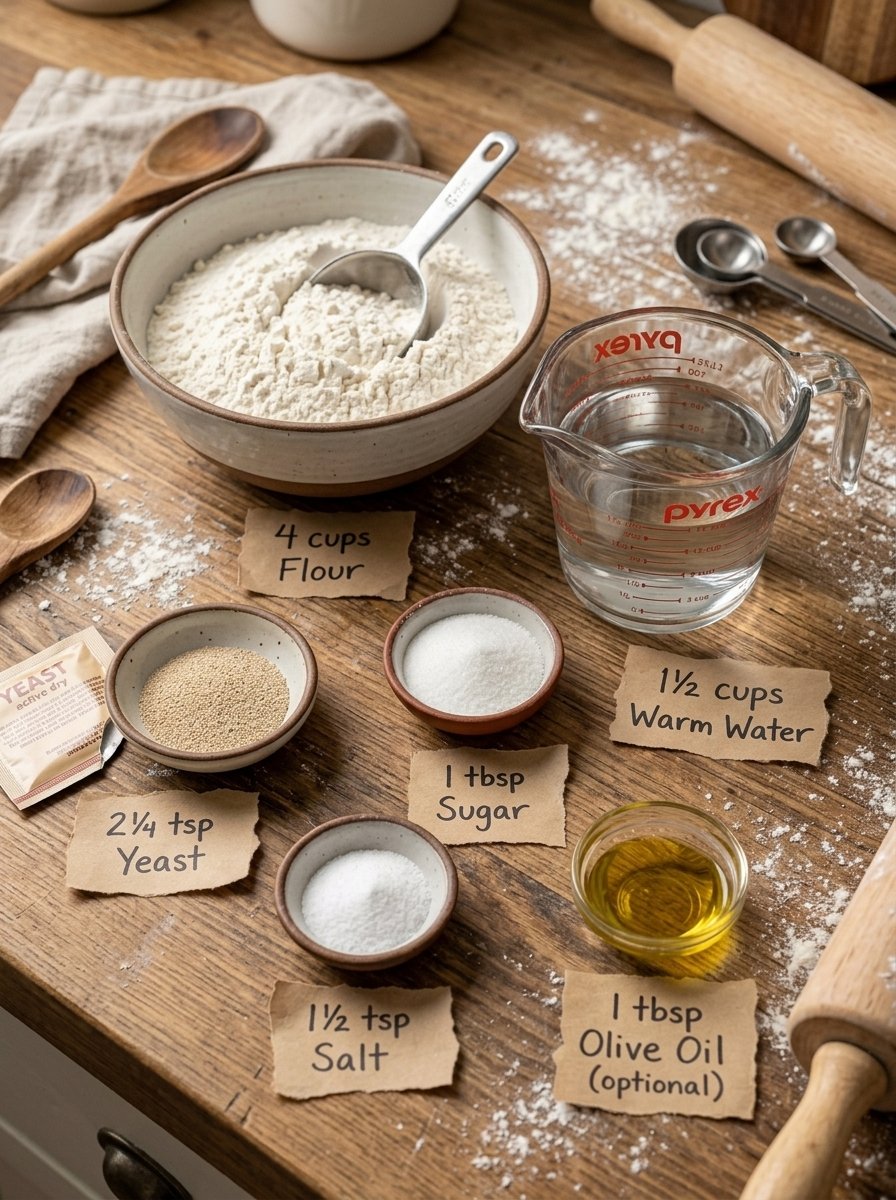
- 4 cups (500 g) all-purpose flour or bread flour
- 1½ cups (360 ml) lukewarm water
- 2¼ teaspoons (7 g) active dry yeast
- 1 tablespoon sugar
- 1½ teaspoons salt
- 1 tablespoon olive oil (optional)
- Extra flour for dusting
Ingredient Notes and Substitutions
Flour. Both all-purpose flour and bread flour work well. Bread flour has more protein, which helps build a chewier, slightly taller loaf with a more structured crumb. All-purpose flour gives a slightly softer bite. For accuracy, weigh the flour: four cups is 500 grams here. If you use measuring cups, spoon the flour in and level it off rather than scooping from the bag, which can pack in too much and make the dough stiff.
Water. Lukewarm water, roughly 100°F to 110°F (about 38°C to 43°C), wakes up the yeast without harming it. If the water feels hot on your wrist, let it cool a little. Water that is too hot can kill the yeast.
Active dry yeast. This recipe starts by activating the yeast in the water with sugar until foamy. This confirms that the yeast is alive before you invest time and flour. If you use instant yeast instead, you can usually mix it directly into the flour, though this recipe is written for the activation method.
Sugar. One tablespoon feeds the yeast and encourages a golden crust. It does not make the bread sweet.
Salt. Salt adds flavor and strengthens the dough. Without it, French-style bread tastes flat. Add the salt with the flour rather than directly onto the yeast mixture at the start.
Olive oil. Optional, but a spoonful makes the crumb a touch softer and the dough easier to handle. A traditional baguette contains no oil, so omit it if you prefer a leaner, more classic crust and crumb.
Extra flour. Use a light dusting on the work surface and loaves, but avoid working in too much additional flour while kneading.
How to Make Easy French Loaf Bread: Step by Step
Step 1: Activate the yeast
Mix the lukewarm water, sugar and yeast in a large bowl. Let it sit for 5 to 10 minutes until foamy. A creamy, bubbly layer on the surface tells you the yeast is active. If nothing happens after 10 minutes, the yeast may be expired or the water may have been too hot or too cold, so start over with fresh yeast.
Step 2: Make the dough
Add the flour, salt and optional olive oil. Stir until a rough dough forms. At this stage the dough will look shaggy and uneven, which is fine. Make sure all the flour has been incorporated before you turn the dough out.
Step 3: Knead
Knead for 8 to 10 minutes until the dough is smooth and elastic. You can knead by hand on a lightly floured surface by pushing the dough away with the heel of your hand, folding it back and turning it. If you use a stand mixer with a dough hook, medium-low speed for roughly the same amount of time works well.
To check the dough, try the windowpane test: pinch off a small piece and gently stretch it. If it stretches thin enough to become translucent without tearing right away, the gluten is well developed. The dough should be soft and slightly tacky, but not sticking to your hands in clumps.
Step 4: First rise
Place the dough in a lightly greased bowl, cover and let it rise for 60 to 75 minutes, until doubled in size. A warm, draft-free spot helps. The dough should look puffy, and a finger pressed gently into it should leave a dent that fills in slowly.
Step 5: Shape
Gently deflate the dough and divide it into two equal pieces. Shape each into a long loaf with tapered ends.
To shape, pat each piece into a rough rectangle, fold the top third down and the bottom third up like a letter, then roll it up tightly from the long edge and pinch the seam closed. Gently roll the log back and forth with your hands, applying light pressure and working from the center outward, until it reaches the length you want, with slightly tapered ends. Place each loaf seam side down.
Step 6: Second rise
Place the loaves on a parchment-lined baking sheet. Cover loosely and let them rise for another 25 to 30 minutes. They should look puffy and slightly larger, and a gentle poke should leave a mark that springs back slowly. Do not let them over-proof, or they may collapse in the oven.
Step 7: Score
Preheat the oven to 425°F (220°C). Make 3 to 4 shallow diagonal cuts across the top of each loaf using a sharp knife.
Scoring controls where the loaf expands in the oven, helping it rise evenly instead of bursting in random places. Use a very sharp knife or a razor blade, and cut about ¼ inch deep with confident, quick strokes at a slight angle. A dull knife drags and deflates the dough.
Start heating the oven early enough that it is fully preheated when the loaves are ready.
Step 8: Create steam
Carefully place a heatproof pan with hot water on the lower oven rack to help develop a crisp crust.
Steam keeps the surface of the dough moist and flexible during the first minutes of baking, allowing the loaf to expand fully before the crust sets. It also gives the finished crust its shine and crispness. Be careful when pouring hot water, and keep your face away from the rising steam when opening the oven door.
Step 9: Bake
Bake for 25 to 30 minutes, until the loaves are golden brown and sound hollow when tapped underneath. If you use an instant-read thermometer, the center of a fully baked loaf generally reads around 190°F to 210°F (88°C to 99°C). If the loaves brown too quickly, rotate the pan or lower the oven temperature slightly for the last few minutes.
Step 10: Cool
Transfer the loaves to a wire rack and let them cool before slicing. Enjoy with butter, cheese, soup or your favorite sandwich fillings.
It is tempting to cut right in, but a short cooling time lets the interior finish setting, so you get a soft crumb rather than a gummy one. Listen closely as the loaves cool: the crust often crackles softly, a sign of a well-baked loaf.
The Science Behind a Crusty French Loaf
Understanding why each step matters can help you troubleshoot and improve your bread.
Kneading builds structure. Kneading aligns and strengthens gluten, the protein network that traps gas from the yeast. This is what gives the loaf an airy interior and a pleasant chew.
Fermentation builds flavor and lift. As yeast ferments the flour’s sugars, it produces carbon dioxide, which inflates the dough, along with flavor compounds that give bread its characteristic taste. A thorough first rise matters for both texture and flavor.
Steam creates the crust. In the first minutes of baking, steam delays crust formation and lets the loaf expand, a phenomenon bakers call oven spring. As the steam dissipates, the surface dries, browns and crisps.
High heat browns the crust. At 425°F (220°C), sugars and proteins on the surface undergo browning reactions that create deep color and rich flavor.
Tips for the Best French Loaf Bread
- Check that the yeast is foamy. A good start prevents flat, dense bread.
- Weigh your flour. Too much flour makes a dry, heavy loaf.
- Knead fully. The full 8 to 10 minutes develops the gluten that supports tall, airy loaves.
- Do not skip the first rise. Let the dough double in size for the best texture and flavor.
- Shape tightly. A taut surface helps the loaf hold its shape and rise upward.
- Do not over-proof the second rise. Bake when the loaves are puffy but still spring back slowly.
- Score with a very sharp blade. Clean cuts make a cleaner, more attractive loaf.
- Use real steam. The pan of hot water makes a noticeable difference in crispness.
- Bake until deeply golden. Pale crusts tend to be soft rather than crunchy.
- Cool before slicing. This protects the crumb and keeps the crust crisp.
Troubleshooting Common Problems
My yeast did not get foamy. The yeast may be old, or the water may have been too hot or too cold. Check the expiration date and use lukewarm water.
My dough did not rise. The kitchen may be too cool, or the yeast may be weak. Move the dough to a warmer spot and allow more time.
My loaves are dense. Common causes include too much flour, insufficient kneading, an under-risen dough or weak yeast. Weigh the flour, knead the full time and make sure the dough doubles during the first rise.
My crust is soft, not crunchy. Make sure the oven is fully preheated, use a pan of hot water for steam, and bake until the loaves are deeply golden. Cooling the bread on a wire rack, rather than in a closed bag, also helps preserve crispness.
My loaves spread out flat. The dough may have been shaped too loosely, or it may have over-proofed. Shape the loaves tightly, with a firm surface, and bake when they are puffy but not collapsing.
My loaves burst open on the sides. The scoring may have been too shallow, or the loaves may have been under-proofed. Cut a little deeper and make sure the second rise is complete.
The bottom is too dark. Place the baking sheet on a middle rack or use a lighter-colored pan. Double-lining with parchment or stacking two baking sheets can also help.
The inside is gummy. The loaf may be underbaked or sliced too early. Check for a hollow sound underneath and allow the bread to cool first.
The crust is too hard or thick. Reduce the baking time slightly, and wrap the cooled loaf loosely in a towel for a softer crust.
Ways to Use French Loaf Bread
Sandwiches and Subs
Slice a loaf lengthwise and fill it with deli meats, cheese, lettuce and tomato, or with grilled chicken and pesto. The crisp crust and soft interior make an ideal sandwich base.
Garlic Bread
Mix softened butter with minced garlic and chopped parsley, spread it on sliced bread and bake until bubbly and golden. Add grated parmesan or mozzarella for a cheesy version.
Served with Soups and Stews
Tear off a piece and dip it into tomato soup, French onion soup, a hearty stew or a bowl of chili.
Bruschetta and Crostini
Toast thin slices, rub them with a cut garlic clove, brush with olive oil and top with tomatoes and basil, whipped ricotta, or roasted vegetables.
French Toast
Slightly day-old slices soak up custard well and hold their shape, making excellent French toast.
Croutons and Breadcrumbs
Cube leftover bread, toss with olive oil and seasonings and bake until crisp for croutons. Or pulse dried bread into breadcrumbs for coatings and toppings.
With Butter, Cheese and Charcuterie
Serve warm slices with good butter, jam, cheese, olives and cured meats for an easy appetizer board.
Delicious Variations
Once you are comfortable with the basic recipe, try a few simple changes. These go beyond the base recipe, so treat them as experiments and adjust to taste.
- Herb loaf: Knead in a tablespoon or two of chopped fresh herbs such as rosemary or thyme.
- Garlic and cheese loaf: Add a little garlic powder to the dough and fold in shredded cheese just before shaping.
- Seeded crust: Brush the loaves with water and sprinkle with sesame, poppy or sunflower seeds before baking.
- Partial whole wheat: Replace a portion of the flour with whole wheat flour for a heartier, nuttier loaf. Add a little extra water if the dough feels stiff.
- Mini loaves or rolls: Divide the dough into smaller pieces for sandwich rolls or dinner rolls, and reduce the baking time accordingly.
- Cheesy-topped loaf: In the last few minutes of baking, sprinkle shredded cheese on top and bake until melted.
Storage, Freezing and Reheating
Room temperature: French-style bread is at its best the day it is baked. Store leftovers in a paper bag or loosely wrapped in a clean towel for up to about 1 to 2 days to protect the crust. A sealed plastic bag keeps the interior soft but makes the crust soften as well.
Freezer: Cool the loaves completely, then wrap them well in plastic wrap and foil or place them in a freezer bag. They keep for about 2 to 3 months. You can freeze whole loaves or slices.
Reheating: To refresh a day-old loaf, sprinkle it lightly with water and bake it in a 350°F (175°C) oven for about 8 to 12 minutes, until warm and crisp. Frozen loaves can go straight into a hot oven, wrapped in foil for part of the time and unwrapped at the end to crisp the crust.
Stale bread: Do not throw it away. Turn it into croutons, breadcrumbs, French toast or bread pudding.
Nutrition Overview
Exact nutrition depends on your ingredients and how you slice the loaves. As a rough estimate, a slice from a loaf cut into about 8 slices may provide somewhere around 110 to 140 calories, mostly from carbohydrates. Because this bread is made at home with simple ingredients, you control exactly what goes into it. For accurate numbers, enter your ingredients into a nutrition calculator. This information is general and is not medical or dietary advice.
Can You Make It Vegan, Dairy-Free or Whole Wheat?
Vegan and dairy-free: Yes. The recipe contains no dairy or eggs, so it is naturally vegan as written. Use olive oil if you include any fat.
Whole wheat: You can replace part of the flour with whole wheat flour. Using all whole wheat will give a denser, heartier loaf and require more water.
Gluten-free: This recipe relies on wheat gluten for structure and is not gluten-free as written.
Frequently Asked Questions
Is this the same as a French baguette?
It is similar in spirit, with a crisp crust and soft interior, but it is an easy home-style version. Authentic baguettes involve specialized techniques and equipment, and usually a longer fermentation.
Can I use instant yeast instead of active dry yeast?
Yes, in roughly the same amount. You can mix instant yeast directly into the flour, though you can still activate it in the water if you prefer.
Do I have to add olive oil?
No, it is optional. A little oil makes the crumb slightly softer, while leaving it out gives a leaner, more traditional loaf.
Why do I need to put hot water in the oven?
The steam keeps the surface of the dough flexible so the loaf can rise fully, and it helps create a thin, crisp, shiny crust.
Can I make this without a stand mixer?
Absolutely. The recipe is written for hand kneading, which takes about 8 to 10 minutes.
How do I know when the dough has doubled?
It should look noticeably larger and puffy. A finger pressed gently into the dough should leave a dent that fills in slowly.
Can I make the dough ahead of time?
Yes. You can let the dough rise slowly in the refrigerator, which develops more flavor. Allow it to warm up and finish rising before shaping and baking, and keep a close eye on timing, since it will differ from the recipe.
How do I get a crispier crust?
Use a fully preheated oven, add steam, score the loaves and bake until deeply golden. Cooling the bread on a wire rack also helps.
Can I bake it in a loaf pan?
You can, but the shape, crust and crumb will differ from a traditional free-form French loaf. For the classic look and crunch, bake the loaves on a parchment-lined sheet.
Why is my bread dense?
The most common causes are too much flour, not enough kneading or rising, and weak yeast. Weigh the flour and rely on visual cues for the rise.
How long does French bread stay fresh?
It is best the day it is baked and stays acceptable for about a day or two. For longer storage, freeze it.
Final Thoughts
This easy French loaf bread proves that a bakery-style loaf is well within reach of any home cook. With a handful of simple ingredients and a little time, you get two golden, crusty loaves with a soft, airy center, ready for sandwiches, garlic bread, soups or a warm slice with butter.
Remember the essentials: activate the yeast until foamy, knead until the dough is smooth and elastic, let it rise until doubled, shape the loaves tightly, score them with a sharp blade and bake with steam until deeply golden. Then give them a little time to cool before you slice.