
I Left My Sourdough Dough on the Counter Overnight
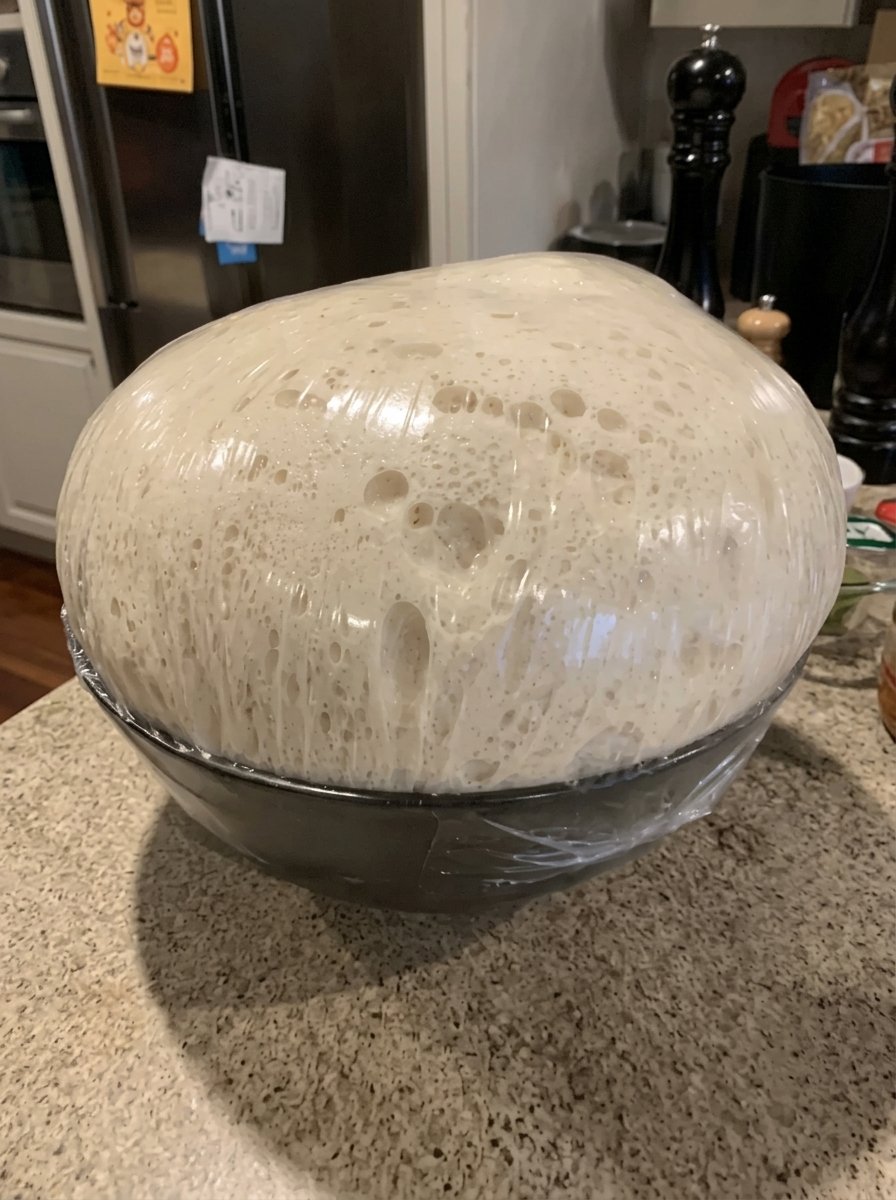
I Left My Sourdough Dough on the Counter Overnight: Is It Ruined? (Plus an Easy Overnight Sourdough Recipe)
SEO title (under 60 characters): Sourdough Left on the Counter Overnight? What to Do
Meta description (under 160 characters): Left sourdough dough out overnight? Learn how to tell if it’s ready, overproofed or unsafe, plus an easy overnight sourdough bread recipe with 4 ingredients.
Primary keyword: sourdough dough left on the counter overnight
Secondary keywords: overnight sourdough bread, overproofed sourdough, how to fix overproofed dough, sourdough bulk fermentation, easy sourdough recipe, sourdough for beginners, is overnight dough safe
Suggested URL slug: /sourdough-dough-left-on-counter-overnight
You mixed your sourdough dough in the evening, meant to put it in the fridge, and then life got in the way. Now it is morning, the bowl is sitting on the kitchen counter, and you are staring at it wondering whether you have just wasted a bag of flour and a day of effort.
Don’t panic. This happens to nearly every sourdough baker at some point, and in many cases the dough is perfectly fine. In fact, an overnight rest at room temperature is a standard way to make sourdough: it is how many bakers develop a deliciously tangy flavor, a chewy interior and a beautiful golden crust. The secret is knowing when your dough is ready to bake, what to do if it has overproofed, and when it is safest to throw it away.
This guide walks you through all of it. You will get a simple four-ingredient overnight sourdough bread recipe, step-by-step instructions, a clear way to judge whether your dough is ready or overproofed, rescue strategies for dough that has gone too far, and a candid look at food safety. Whether you meant to leave the dough out or not, you will know exactly what to do next.
Is Sourdough Dough Left Out Overnight Ruined?
In most cases, no. Here is why.
Sourdough relies on a living culture of wild yeast and bacteria. When you mix the starter with flour and water, the yeast produce gas that makes the dough rise, while the bacteria produce acids that give sourdough its characteristic tang. This process, called fermentation, is slow and steady, and it continues for as long as the dough is at a comfortable temperature and there is food (the flour’s starches and sugars) for the culture to eat.
That is exactly why overnight fermentation works so well. It gives the dough many hours to rise gently, develop flavor and build structure. A long ferment is not a mistake. It is a technique.
The real question is not whether the dough was left out, but what condition it is in now. That depends mainly on two things:
- How warm your kitchen was. In a cool room, fermentation is slow, and dough often finishes beautifully by morning. In a warm room, fermentation is much faster, and the same dough can overproof well before sunrise.
- How active your starter is. A strong, vigorous starter ferments quickly. A young or sluggish one takes longer.
So the dough in your bowl might be perfectly proofed, slightly overproofed or very overproofed. You can figure out which by looking, touching and smelling, and the sections below show you how.
Overnight Sourdough Bread Recipe
- Prep time: 20 minutes (active)
- Cook time: 45 to 50 minutes
- Total time: 12 to 18 hours (mostly hands-off fermentation)
- Servings: 1 loaf (8 to 10 slices)
Ingredients
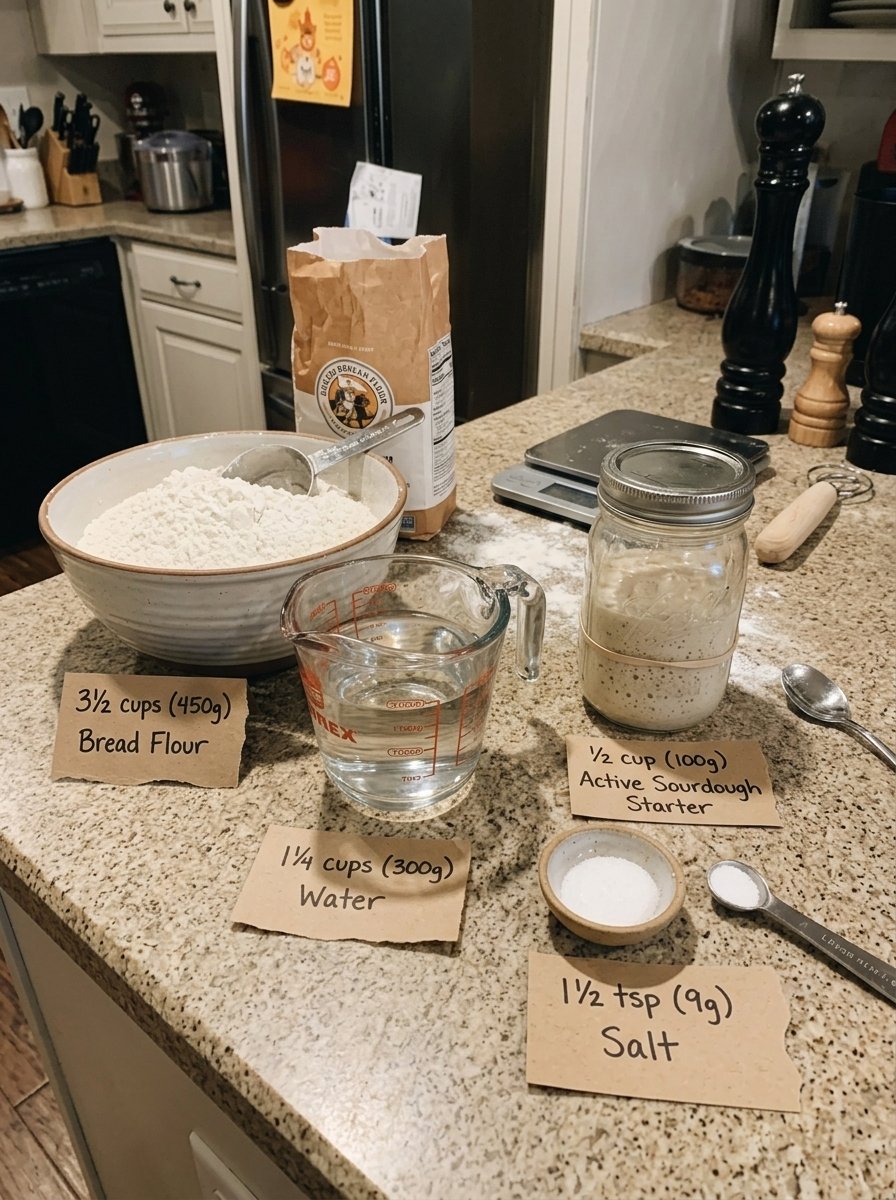
- 3½ cups (450 g) bread flour
- 1¼ cups (300 g) water, room temperature
- ½ cup (100 g) active sourdough starter
- 1½ teaspoons (9 g) salt
That is all you need: flour, water, starter and salt.
Ingredient Notes
Bread flour. Bread flour has a higher protein content than all-purpose flour, which helps build the strong gluten network sourdough needs to trap gas and hold its shape through a long fermentation. It also tends to give a chewier crumb.
Water. Use room-temperature water. Very warm water speeds fermentation, which increases the risk of overproofing during an overnight rest. If your kitchen runs warm, consider using cooler water.
Active sourdough starter. Your starter should be bubbly, risen and recently fed, typically at or near its peak. A weak or unfed starter will ferment slowly and produce a dense loaf. A common test is to see whether a spoonful floats in water, though this is not a perfect measure, so also rely on appearance: lots of bubbles and a domed top are good signs.
Salt. Salt adds flavor, strengthens the dough and moderates fermentation. Do not leave it out.
Instructions
Step 1: Mix the dough. In a large bowl, combine the sourdough starter and water. Add the flour and salt, mixing until no dry flour remains. The dough will look rough and shaggy, which is exactly right.
Step 2: Rest. Cover the bowl and let the dough rest for 30 minutes. This rest, often called an autolyse-style rest, allows the flour to absorb water and begins gluten development with no effort from you.
Step 3: Develop the dough. With slightly damp hands, stretch and fold the dough over itself on all four sides. To do this, grab one edge of the dough, stretch it upward gently, and fold it over the center. Turn the bowl and repeat on the remaining sides. Repeat this set once or twice during the first 1 to 2 hours. Each set strengthens the dough without traditional kneading.
Step 4: Overnight fermentation. Cover the bowl and leave the dough to ferment until it looks airy and has increased noticeably in volume. Timing depends on room temperature and starter activity. This is the long, flavor-building stage, and in many kitchens it takes roughly 8 to 14 hours, though your timing may vary.
Step 5: Check the dough. If it holds its shape and feels elastic, gently shape it into a round loaf. If it has spread out, become extremely sticky or collapsed, it may be overproofed. Handle it gently and consider baking it in a loaf pan. More on judging this below.
Step 6: Shape and rest. Shape the dough and place it seam-side up in a floured proofing basket or towel-lined bowl. Let it rest while the oven heats.
Step 7: Preheat. Heat the oven to 450°F (230°C), with a covered Dutch oven inside if using one. Allow at least 30 minutes for the pot to heat fully.
Step 8: Score. Carefully turn the dough onto parchment paper and make one confident slash across the top using a sharp knife or razor blade.
Step 9: Bake. Transfer the dough into the hot Dutch oven. Bake covered for 25 minutes, then uncover and bake for another 20 to 25 minutes until deeply golden. The covered phase traps steam, which helps the loaf expand and form a crisp crust.
Step 10: Cool. Let the loaf cool on a wire rack for at least 1 hour before slicing. Cutting too early can make the crumb seem gummy, since the interior is still setting.
How to Tell If Your Overnight Dough Is Ready to Bake
Before you decide what to do, look closely at the dough. A well-fermented sourdough dough usually shows these signs:
- It has grown noticeably. Many recipes aim for the dough to increase by roughly 50 to 100 percent, though it depends on the recipe and flour.
- It looks airy. You should see bubbles on the surface and along the sides of the bowl, and the dough may look slightly domed.
- It jiggles. When you shake the bowl gently, the dough wobbles like a soft gelatin rather than sitting like a dense mass.
- It feels elastic. It should be smooth, stretchy and relatively cohesive.
- It smells pleasant. A mildly tangy, yeasty, slightly fruity or yogurt-like aroma is normal.
- It holds its shape. When you turn it out onto a floured surface, it should hold a round form and not immediately spread flat.
If your dough shows these signs, congratulations. It is ready to shape and bake, and you can continue from Step 6 of the recipe.
Signs Your Sourdough Has Overproofed
Overproofing happens when the dough ferments for too long. The yeast have consumed much of the available food, and the acids and enzymes have weakened the gluten structure, so the dough can no longer hold its gas. The result is dough that is slack, weak and hard to handle.
The common signs are:
- The dough has spread out in the bowl and does not hold any shape.
- It has collapsed or has a sunken, cratered surface after having risen.
- It is extremely sticky and wet, sometimes almost soupy, and tears easily when you try to stretch it.
- It smells very sharp, strongly acidic or like nail-polish remover or alcohol. A mild sour smell is normal, but a harsh, solvent-like smell often signals very advanced fermentation.
- It has large, irregular bubbles and looks stringy or loose.
Overproofed dough is not necessarily dangerous. It is simply past its structural peak, which affects the texture of the loaf. A loaf baked from overproofed dough tends to be flatter, denser or gummier and may have a very sour taste, a pale crust or a tight, uneven crumb. But it is often still edible and, with the right approach, can still make a tasty loaf.
How to Rescue Overproofed Sourdough Dough
If your dough has gone too far, here are practical ways to salvage it.
1. Handle it gently
Overproofed dough has little strength left, so avoid aggressive shaping. Scrape it onto a lightly floured surface and use minimal handling.
2. Bake it in a loaf pan
The recipe suggests this for a reason. A loaf pan supports a weak dough on all sides, so it can rise upward instead of spreading out. Grease the pan well, gently fold the dough into a rough log, place it in the pan and let it rest briefly before baking. Bake until deeply golden.
3. Shorten or skip the final proof
If the dough has already used up its energy, a long second rise will only make things worse. After shaping, bake it fairly soon.
4. Try a quick reshape with a short rest
Some bakers gently reshape dough that has slightly overproofed and give it a brief rest before baking, which can restore a little tension. Use a light touch.
5. Turn it into something else
If the dough is too slack for a loaf, repurpose it:
- Flatbread or pizza base: Stretch or pat it out and cook it in a hot skillet or oven.
- Focaccia-style bread: Spread it in an oiled pan, dimple with your fingers and top with olive oil, salt and herbs.
- Sourdough crackers: Roll it thin, season and bake until crisp.
- Pancakes or waffles: Thinned overproofed dough can often be worked into a batter.
- Breadsticks or rolls: Divide it into small pieces and bake in a pan.
These recipes are far more forgiving of weak dough than a free-form loaf.
What If the Dough Is Underproofed?
If you wake up and your dough has barely changed, it may simply have fermented slowly in a cool kitchen or because your starter was not very strong. This is easy to fix: give it more time. Leave it covered in a slightly warmer spot and check every hour or so until it looks airy and has grown noticeably. Do not rush to bake dough that is dense and flat, since it will produce a tight, heavy loaf.
Is It Safe? Food Safety Considerations for Dough Left Out Overnight
This is the part many articles gloss over, so let’s be careful and honest.
Traditional sourdough, made only with flour, water, salt and a starter, is a long-established method, and overnight fermentation at room temperature is a standard technique. As the dough ferments, it becomes more acidic, which creates a less friendly environment for many unwanted microbes. That is part of why sourdough has a long track record of safe use.
However, that does not mean any dough left out for any length of time is automatically safe. Keep these points in mind:
- Look for mold or unusual discoloration. If you see fuzzy growth, pink, orange or green patches, or other unexpected colors, discard the dough.
- Notice a rotten smell. A clearly rotten, putrid or foul smell is not the same as a pleasantly sour one. If it smells rotten, throw it out.
- A sour smell alone does not prove safety. An ordinary sour smell is expected in sourdough, but it does not by itself show that the dough is safe to eat.
- Time and temperature matter. If the dough sat for many hours in a warm room, the safest choice may be to discard it.
- Added ingredients change the equation. If your dough contains perishable additions such as dairy, eggs, meat, cheese or fresh vegetables, it should not sit out like a plain flour-and-water dough. When in doubt, discard it.
- Baking is not a guaranteed fix. Baking does not reliably make improperly stored food safe, because some toxins produced by bacteria are not destroyed by heat.
In short: for a simple four-ingredient dough in a normal or cool room, an overnight rest is usually standard practice. If anything looks, smells or feels wrong, or you are unsure, throw it out. This article is general information and is not a substitute for food safety guidance from health authorities.
Overnight Sourdough Tips Based on Your Room Temperature
Temperature is the biggest variable in overnight fermentation, so adjust your approach to your kitchen.
Cool room. Dough may ferment slowly and turn out beautifully. A cooler environment gives you a wider window, and the long, slow rise can develop excellent flavor. You may find the dough needs a little extra time in the morning.
Warm room. Dough can overproof much faster. If your kitchen is warm, consider reducing the amount of starter, using cooler water or shortening the bulk fermentation, or moving the dough to the refrigerator for part of the night.
Unsure about timing? Many bakers use the refrigerator to slow fermentation and gain flexibility. A cold rest overnight also deepens flavor and makes the dough easier to shape and score. This changes the timing of the recipe, so watch the dough rather than the clock.
Tips for Better Overnight Sourdough
- Use a strong, active starter. Feed it and use it at or near its peak.
- Watch the dough, not the clock. Times in recipes are guides. Your kitchen temperature and starter decide the real schedule.
- Use a straight-sided container. A clear container with a marked starting level helps you see how much the dough has grown.
- Cover it properly. A lid, plate or damp towel prevents a dry skin from forming.
- Do your folds early. The early stretch-and-fold sets build strength while the dough is still active.
- Keep your hands damp. Wet hands keep the sticky dough from clinging to your skin.
- Preheat the Dutch oven fully. A very hot pot creates the strong oven spring and crisp crust that sourdough is known for.
- Score with confidence. One quick, decisive slash gives the loaf a place to expand.
- Wait before slicing. At least an hour of cooling lets the crumb set properly.
Troubleshooting Common Sourdough Problems
My loaf is flat. The dough may have been overproofed or lacked structure. Next time, shorten the fermentation, handle the dough gently and make sure the starter is active.
My loaf is dense and gummy. This can result from underproofing, an underbaked loaf or slicing too soon. Make sure the dough has grown and looks airy, bake until deeply golden and allow a full hour to cool.
My bread is too sour. Long fermentation, especially in a warm place, produces more acidity. Use a shorter or cooler ferment, or refrigerate part of the time.
My bread is not sour enough. A shorter, warmer ferment tends to be milder. A longer, cooler ferment encourages more tang.
The crust is pale. Preheat the oven and pot thoroughly, and uncover the loaf for the final stage of baking so the crust can brown deeply.
The dough sticks to everything. Sourdough dough is wet and sticky by nature. Use damp hands during folds and a lightly floured surface and basket when shaping.
The bottom burned. Place the pot on a lower-middle rack, slide a baking sheet underneath or reduce the temperature slightly for the last few minutes.
There are huge holes in one spot. This often signals uneven shaping or overproofing. Shape with firm, gentle tension and bake while the dough still has strength.
Storage and Freezing
Room temperature: Store the cooled loaf cut-side down on a board or wrapped loosely in a clean towel or paper bag for about 2 to 3 days. Sourdough tends to keep better than many yeasted breads thanks to its acidity.
Freezer: Slice the cooled loaf and freeze the slices in a freezer-safe bag for up to about 3 months. Toast slices straight from the freezer.
Refreshing: To revive a day-old loaf, run it briefly under water and bake it in a 350°F (175°C) oven for about 10 minutes.
Using leftovers: Stale sourdough makes outstanding croutons, breadcrumbs, French toast and bread pudding.
Frequently Asked Questions
Is it okay to leave sourdough dough out overnight?
Overnight fermentation at room temperature is a common sourdough method for a plain flour, water, salt and starter dough. The important factors are your room temperature, how active your starter is, and whether the dough looks and smells normal in the morning.
How long can sourdough dough sit out?
It depends on temperature and starter strength. In a cool room, a long ferment can work well. In a warm room, dough may overproof within hours. Judge by the dough’s condition rather than a fixed number, and discard it if you have any doubt.
How do I know if my dough has overproofed?
Signs include dough that has spread out, collapsed, become very sticky or slack, and smells extremely sharp or like alcohol.
Can I still bake overproofed sourdough?
Often, yes. Handle it gently and consider baking in a loaf pan or turning it into flatbread, focaccia or crackers.
What does sourdough dough look like when it is ready?
It looks airy and has grown noticeably, with bubbles on the surface and sides, a slightly domed top and a jiggly, elastic feel.
Does the dough need to double in size?
Not necessarily. Many recipes target some increase in volume rather than a strict doubling. Look for an airy, jiggly, elastic dough that has visibly grown.
Should I refrigerate dough overnight instead?
Refrigeration slows fermentation, which gives you more flexibility and often develops extra flavor. The recipe’s timing will change, so watch the dough closely.
Why does my dough smell like alcohol?
A strong alcohol or acetone-like smell often indicates very advanced fermentation. The dough may be overproofed, though it can sometimes still be baked into a loaf.
Is overproofed sourdough safe to eat?
Overproofing is mainly a texture and flavor issue. But if the dough shows mold, unusual discoloration or a rotten smell, discard it, and when in doubt, throw it out.
Can I use all-purpose flour instead of bread flour?
Yes, but the dough will have less strength, so it may be stickier and spread more. Bread flour is better suited to a long, overnight ferment.
Do I need a Dutch oven?
It is helpful because it traps steam, but you can bake on a preheated baking stone or sheet with a pan of hot water for steam. Results will differ a bit.
Why is my crumb tight and dense?
Common causes are an inactive starter, underproofing, or overproofing that weakened the gluten. Check your starter’s activity and watch the dough’s volume and texture.
Final Thoughts
Leaving your sourdough dough on the counter overnight is not a disaster. It is often the way sourdough is meant to be made. With a simple mix of bread flour, water, starter and salt, an overnight ferment builds a tangy flavor, a chewy interior and a beautiful golden crust.
The key is judging the dough in the morning: if it is airy, elastic and holds its shape, shape it and bake. If it has spread out, turned very sticky or collapsed, handle it gently and bake it in a loaf pan or turn it into flatbread or focaccia. And if the dough shows mold, unusual discoloration or a clearly rotten smell, or if it sat for many hours in a warm room and you are unsure, the safest choice is to discard it.
Once you understand how temperature, starter strength and timing work together, overnight sourdough becomes one of the easiest and most rewarding breads you can make. Give the recipe a try and leave a comment to tell us how your loaf turned out.