
Fluffy Homemade Milk Sandwich Loaf
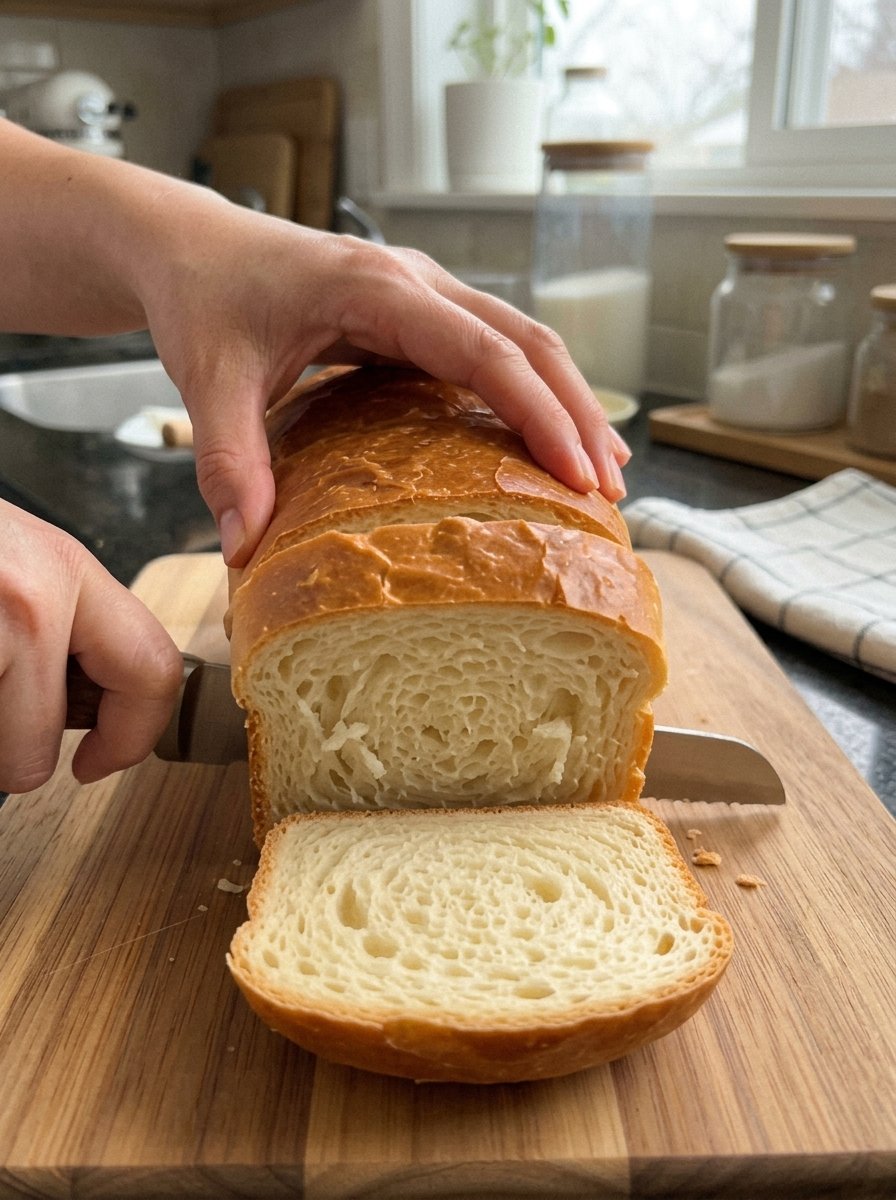
Fluffy Homemade Milk Sandwich Loaf: Soft, Buttery & Perfectly Tender Bread Recipe
Meta title: Fluffy Homemade Milk Sandwich Loaf Recipe – Soft, Buttery Bread
Meta description: Bake the softest homemade milk sandwich loaf with simple pantry ingredients. A golden crust, tender crumb, and delicate milky flavor, perfect for toast, sandwiches, and French toast.
Focus keyword: milk sandwich loaf
Secondary keywords: homemade sandwich bread, soft milk bread recipe, fluffy white bread, easy bread recipe, homemade bread for beginners, bread for toast, French toast bread, how to bake sandwich bread
Nothing beats the smell of freshly baked homemade bread drifting through your kitchen. This fluffy homemade milk sandwich loaf is wonderfully soft, light, and tender, with a beautiful golden crust and a delicate milky flavor that makes every slice feel like a treat. It is perfect for sandwiches, breakfast toast, French toast, or simply enjoying warm with a generous swipe of butter.
Made with simple pantry ingredients, this loaf is easy to prepare, even if you are new to bread baking, and it stays deliciously soft for days when stored properly. In this complete guide, you will find the full recipe, step-by-step instructions with detailed explanations, troubleshooting advice, variations, serving ideas, and storage tips so you can bake a perfect loaf again and again.
Recipe at a Glance
- Prep time: 20 minutes
- Rise time: 1 hour 30 minutes
- Bake time: 30–35 minutes
- Total time: About 2 hours 30 minutes
- Yield: 1 loaf (10–12 slices)
- Pan size: 9 × 5-inch loaf pan
- Difficulty: Easy to moderate
What Is a Milk Sandwich Loaf?
A milk sandwich loaf is a soft, enriched white bread made with milk instead of water as the main liquid. The milk, together with a little butter, sugar, and egg, creates a tender crumb, a subtly sweet flavor, and a soft golden crust. Unlike rustic artisan breads with chewy interiors and crackly crusts, a sandwich loaf is designed to be light, fluffy, and easy to slice, which makes it ideal for everyday use.
Milk breads are loved around the world. From soft Japanese-style loaves to classic American sandwich bread and British tin loaves, the idea is the same: enrich the dough, develop the gluten well, and bake in a pan so the loaf rises tall with an even, uniform shape. The result is the kind of bread that is equally at home in a lunch box, on a breakfast table, or on a brunch menu.
Why You Will Love This Recipe
- Incredibly soft and fluffy. The enriched dough produces a light, tender crumb that tears gently and slices cleanly.
- Rich, buttery, milky flavor. The whole milk and butter give a delicate sweetness without being heavy.
- Simple pantry ingredients. Flour, milk, sugar, yeast, salt, an egg, and butter are all you need.
- Beginner friendly. The steps are straightforward, and the dough is forgiving.
- Versatile. Use it for sandwiches, toast, grilled cheese, French toast, bread pudding, and more.
- Stays soft for days. Proper storage keeps the crumb tender long after baking.
- Better than store-bought. There are no preservatives or additives, just real ingredients and homemade flavor.
Ingredients for Fluffy Milk Sandwich Bread
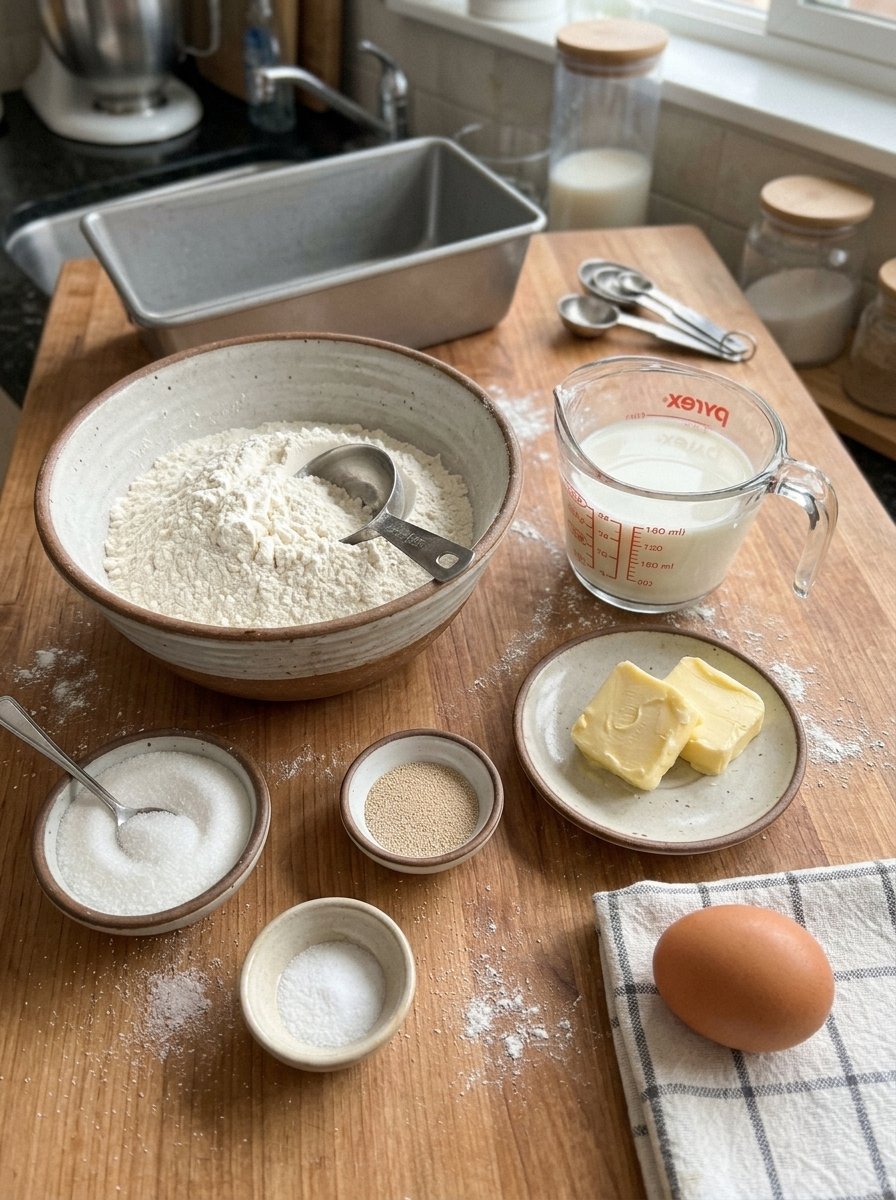
Here is everything you need for one 9 × 5-inch loaf.
For the dough:
- 3 cups (375 g) bread flour or all-purpose flour
- ¾ cup (180 ml) warm whole milk
- 2 tablespoons granulated sugar
- 2¼ teaspoons (7 g) instant yeast
- 1 teaspoon salt
- 1 large egg, at room temperature
- 3 tablespoons (42 g) softened unsalted butter
For the topping:
- 1 tablespoon milk, for brushing
- 1 tablespoon melted butter, optional
Understanding the Ingredients
Bread flour or all-purpose flour. Bread flour has a higher protein content, which means more gluten development and a taller, chewier, more structured loaf. All-purpose flour works well too and creates a slightly softer, more delicate crumb. Either choice makes a wonderful sandwich loaf, so use whichever you have on hand.
Whole milk. Milk contributes fat, natural sugars, and proteins that soften the crumb, encourage browning, and add that signature milky flavor. Whole milk gives the best flavor and texture, though 2 percent milk will also work. Heating the milk gently until warm helps activate the yeast.
Granulated sugar. A small amount of sugar feeds the yeast, adds a subtle sweetness, and helps the crust turn golden brown.
Instant yeast. Instant yeast can be mixed directly into the dry ingredients and does not require proofing first. If you only have active dry yeast, see the substitution tips later in this guide.
Salt. Salt strengthens the gluten, controls the yeast, and brings out the flavor of the bread. Do not leave it out.
Egg. The egg enriches the dough, adds structure, and contributes to a soft, tender texture and a richer color.
Butter. Softened butter coats the gluten strands, which tenderizes the crumb, adds flavor, and helps the bread stay fresh longer.
Equipment You Will Need
- A large mixing bowl
- Measuring cups and spoons, or better yet, a kitchen scale
- A 9 × 5-inch loaf pan
- A clean kitchen towel or plastic wrap
- A rolling pin (optional, you can also press the dough by hand)
- A pastry brush
- A wire cooling rack
- A thermometer for checking the temperature of the milk (helpful but optional)
- A stand mixer with a dough hook (optional, as the dough can be kneaded by hand)
How to Make Fluffy Homemade Milk Sandwich Loaf: Step-by-Step
Step 1: Prepare the Dough
In a large mixing bowl, combine the flour, sugar, instant yeast, and salt. Whisk lightly so the yeast and salt are distributed evenly. Add the warm milk and the egg. Mix with a wooden spoon or a dough hook until a rough, shaggy dough forms and no dry flour remains.
Step 2: Knead the Dough
Knead the dough for about 5 minutes until the ingredients come together into a cohesive mass. Then add the softened butter gradually, one tablespoon at a time, kneading until each addition is fully incorporated before adding the next. The dough may look greasy and slippery at first, but keep going. It will come together.
Continue kneading for another 8 to 10 minutes, until the dough becomes smooth, elastic, and slightly tacky. If you are using a stand mixer, knead on medium-low speed for the same amount of time.
How to know the dough is ready: Try the windowpane test. Pinch off a small piece of dough and gently stretch it between your fingers. If it stretches thin enough to become translucent without tearing, the gluten is well developed. The dough should also spring back slowly when poked.
Step 3: First Rise
Place the dough in a lightly greased bowl and turn it once to coat the surface. Cover with a clean kitchen towel or plastic wrap and let it rise in a warm place for 60 to 75 minutes, or until doubled in size. A turned-off oven with the light on, a warm corner of the kitchen, or the top of the refrigerator are all good spots.
Step 4: Shape the Loaf
Gently press the dough to release the excess air. Transfer it to a lightly floured surface and roll or pat it into a rectangle about the same width as your loaf pan, roughly 9 inches wide and 12 inches long.
Starting from a short end, roll the dough tightly into a log, pinching the seam closed as you go. Tight rolling creates surface tension, which helps the loaf rise upward instead of outward. Place the log seam-side down in a greased 9 × 5-inch loaf pan, tucking in the ends neatly.
Step 5: Second Rise
Cover the pan loosely and let the dough rise for 35 to 50 minutes, until it rises just above the rim of the pan. The dough should look puffy and feel soft and airy. When you gently press a fingertip into the side, the indentation should spring back slowly.
Do not rush this step. A properly proofed loaf bakes up taller, lighter, and more tender.
Step 6: Preheat the Oven
Preheat your oven to 350°F (175°C) while the dough finishes rising. Brush the top of the loaf gently with milk for a beautiful golden finish. Use a soft brush and a light hand so you do not deflate the dough.
Step 7: Bake Until Golden
Bake for 30 to 35 minutes, until the top is golden brown and the loaf sounds hollow when gently tapped on the top or bottom. If you use an instant-read thermometer, the center of the loaf should reach about 190°F (88°C). If the top begins to brown too quickly, loosely cover it with foil during the final part of baking.
Step 8: Brush and Cool
Remove the loaf from the oven and, if you like, brush the top with melted butter for a softer, shinier crust and extra flavor. Let the bread rest in the pan for 5 to 10 minutes, then carefully turn it out onto a wire rack.
Allow it to cool completely before slicing. Cutting into hot bread can compress the crumb and make it gummy. Patience gives you the softest, neatest slices.
Helpful Tips for Perfect Sandwich Bread
Use Warm, Not Hot, Milk
Aim for a temperature of about 100°F to 110°F (38°C to 43°C). Milk that is too hot can damage or kill the yeast, while milk that is too cold slows the rise. It should feel comfortably warm to the touch, like a baby’s bottle.
Knead Until Elastic
Proper gluten development gives the loaf its soft, fluffy structure. Underkneaded dough produces a dense, crumbly loaf that does not rise well. Take your time and use the windowpane test to confirm.
Add Butter Gradually
Adding the butter in stages helps the dough absorb the fat evenly. If you add it all at once before the gluten has begun to form, the dough can become greasy and hard to work with.
Do Not Rush the Second Rise
Let the dough become visibly puffy before baking. Underproofed bread can tear on the sides or bake up dense, while overproofed bread can collapse. Aim for a dough that has risen just above the rim and springs back slowly when pressed.
Measure Flour Carefully
Too much flour is the most common cause of dense bread. Spoon the flour into the measuring cup and level it off rather than scooping directly from the bag, which packs it down. A kitchen scale is the most accurate method, so use the gram measurements whenever possible.
For an Extra-Soft Crust
Brush the warm loaf with melted butter as soon as it comes out of the oven. You can also cover it with a clean towel while it cools to trap a little steam and keep the crust tender.
Keep the Dough Slightly Tacky
A slightly sticky dough yields a softer loaf. Resist the temptation to add a lot of extra flour during kneading. If the dough is very sticky, add flour only one tablespoon at a time.
Check Your Yeast
If your yeast is old, your bread may not rise. Check the expiration date and store yeast in a cool, dry place, ideally in the refrigerator or freezer once opened.
Troubleshooting Common Bread Problems
My Bread Is Dense
The usual causes are too much flour, not enough kneading, expired yeast, or not letting the dough rise long enough. Measure carefully, knead until the windowpane test passes, and let the dough fully double in the first rise.
My Dough Did Not Rise
Check that your milk was not too hot or too cold, that your yeast is fresh, and that your kitchen is warm enough. In a cool room, the rise can take significantly longer. Give it extra time rather than forcing it.
The Top Browned Too Fast
Cover the loaf loosely with foil during the last 10 to 15 minutes of baking. Ovens vary, so you may also need to lower the rack position slightly.
The Loaf Collapsed After Rising
This usually means the dough was overproofed. Next time, shorten the second rise and bake as soon as the dough has crested above the rim of the pan.
The Crumb Is Gummy
The bread was probably cut before it cooled, or it was underbaked. Let the loaf cool completely and check that the center reaches about 190°F (88°C).
The Crust Is Too Hard
Brush with melted butter after baking and cover the loaf with a towel as it cools. Make sure you are not baking longer than necessary.
Substitutions and Variations
Using Active Dry Yeast
If you only have active dry yeast, use the same amount (2¼ teaspoons), but dissolve it in the warm milk with a pinch of sugar and let it sit for 5 to 10 minutes until foamy before adding it to the flour. The rise may take slightly longer.
Dairy-Free Option
You can substitute unsweetened plant-based milk, such as oat or soy milk, and replace the butter with a dairy-free butter alternative or neutral oil. The flavor and softness will differ slightly, but the loaf will still be delicious.
Whole Wheat Milk Bread
Replace up to one cup of the flour with whole wheat flour for a heartier loaf. You may need a splash of extra milk, as whole wheat absorbs more liquid.
Honey Milk Bread
Swap the sugar for an equal amount of honey for a subtle floral sweetness and a slightly darker crust.
Cinnamon Swirl Loaf
When shaping the loaf, sprinkle the rolled-out rectangle with a mixture of cinnamon and sugar before rolling it up for a bakery-style cinnamon swirl.
Cheesy Herb Loaf
Sprinkle shredded cheese and chopped herbs over the dough before rolling it up to create a savory loaf that is wonderful with soup.
Dinner Rolls
This dough also makes excellent soft dinner rolls. Divide it into 12 equal pieces, shape into balls, arrange in a greased baking dish, let rise, and bake for about 18 to 22 minutes.
Serving Ideas
This versatile bread shines in countless ways:
- Toast with butter and jam. Golden, crisp on the outside, and soft within.
- Classic sandwiches. Turkey and cheese, egg salad, chicken salad, or peanut butter and jelly all taste better on homemade bread.
- Grilled cheese. The soft crumb crisps beautifully in a buttered pan.
- French toast. Thick slices soak up custard without falling apart, making breakfast extra special.
- Bread pudding. Day-old slices are perfect for a warm, comforting dessert.
- Breakfast sandwiches. Layer with eggs, cheese, and bacon or sausage.
- Warm with honey. Serve a thick slice with honey or your favorite spread.
- Croutons and breadcrumbs. Turn leftovers into crunchy croutons or fresh breadcrumbs.
How to Store Homemade Milk Bread
Proper storage keeps your loaf fresh and soft.
- Room temperature: Store the cooled loaf in an airtight bread bag or container for up to 3 days.
- Refrigerator: Refrigeration can dry out homemade bread, so room-temperature storage is best for short-term use.
- Freezer: Slice the completely cooled loaf and freeze for up to 2 months, separating slices with parchment paper so they do not stick together. Wrap tightly in a freezer bag to prevent freezer burn.
- Reheating: Toast slices straight from the freezer, or warm them gently in the oven. For a whole loaf, wrap in foil and heat at 300°F (150°C) for about 10 to 15 minutes.
Make-Ahead Tips
If you want fresh bread in the morning, try this overnight method. After shaping the loaf and placing it in the pan, cover it tightly and refrigerate for 8 to 12 hours. In the morning, let it sit at room temperature until it rises just above the rim, then bake as directed. The slow, cold fermentation also develops deeper flavor.
You can also let the first rise happen in the refrigerator overnight, then shape and complete the second rise the next day. This is a great way to fit bread baking into a busy schedule.
Flavor and Texture Profile
Soft, fluffy, buttery, and full of comforting homemade flavor, this milk sandwich loaf has a delicate sweetness and a gentle milky aroma. The crust is golden and tender, and the crumb is light, airy, and slightly springy, with a feathery pull when you tear a slice. It is the kind of bread that tastes wonderful plain, toasted, or used as the foundation for your favorite fillings.
Frequently Asked Questions
Can I make this bread without a stand mixer?
Yes. This recipe can be kneaded entirely by hand. It takes about 13 to 15 minutes of kneading. Use a lightly floured surface and the heel of your hand to push, fold, and turn the dough until smooth and elastic.
Can I use all-purpose flour instead of bread flour?
Absolutely. All-purpose flour makes a slightly softer, less chewy loaf, while bread flour produces a taller, chewier one. Both are delicious.
What can I use instead of whole milk?
You can use 2 percent milk, evaporated milk diluted with water, or a plant-based milk. Whole milk gives the richest flavor and softest texture.
Why is my dough sticky?
A slightly tacky dough is normal and leads to a softer loaf. If it is excessively sticky, knead a few more minutes first, since gluten development reduces stickiness, then add flour sparingly if needed.
How do I know when the bread is done?
The loaf should be deep golden brown on top and sound hollow when tapped. An instant-read thermometer inserted into the center should read about 190°F (88°C).
Can I freeze the dough?
Yes. After the first rise, shape the loaf, wrap it tightly, and freeze for up to a month. Thaw overnight in the refrigerator, then let it complete its second rise at room temperature before baking.
Why did my bread have large holes inside?
Large air pockets can form if the dough was not rolled tightly or if there was trapped air during shaping. Press out the air firmly and roll the dough snugly.
Can I double the recipe?
Yes. Double all the ingredients and bake in two loaf pans. You may need slightly longer kneading time, and the pans should be placed side by side with space between them.
How thick should I slice the bread?
For sandwiches, aim for about ½ inch (1.25 cm). For French toast and toast, slices of ¾ to 1 inch (2 to 2.5 cm) work wonderfully. A serrated bread knife makes clean cuts.
Why does homemade bread go stale faster than store-bought?
Homemade bread does not contain preservatives or dough conditioners, so it stales more quickly. Store it airtight, freeze extra slices, and refresh older slices by toasting.
Final Thoughts
There is something deeply satisfying about pulling a tall, golden loaf of homemade bread from the oven. This fluffy milk sandwich loaf delivers that joy with simple ingredients, clear steps, and wonderfully soft, buttery results. Once you master it, you will find yourself reaching for the recipe again and again, whether for weekday sandwiches, weekend French toast, or a loaf to share with neighbors and friends.
Measure carefully, knead until the dough is smooth and elastic, give it the time it needs to rise, and let the loaf cool before slicing. Do those things, and you will be rewarded with bread that is soft, fluffy, buttery, and full of comforting homemade flavor.
Did you bake this loaf? Leave a comment and rating, share your favorite way to enjoy it, and save the recipe for your next baking day!
Print
Fluffy Homemade Milk Sandwich Loaf
Ingredients
For the dough:
- 3 cups (375 g) bread flour or all-purpose flour
- ¾ cup (180 ml) warm whole milk
- 2 tablespoons granulated sugar
- 2¼ teaspoons (7 g) instant yeast
- 1 teaspoon salt
- 1 large egg, at room temperature
- 3 tablespoons (42 g) softened unsalted butter
For the topping:
- 1 tablespoon milk, for brushing
- 1 tablespoon melted butter, optional
Understanding the Ingredients
Bread flour or all-purpose flour. Bread flour has a higher protein content, which means more gluten development and a taller, chewier, more structured loaf. All-purpose flour works well too and creates a slightly softer, more delicate crumb. Either choice makes a wonderful sandwich loaf, so use whichever you have on hand.
Whole milk. Milk contributes fat, natural sugars, and proteins that soften the crumb, encourage browning, and add that signature milky flavor. Whole milk gives the best flavor and texture, though 2 percent milk will also work. Heating the milk gently until warm helps activate the yeast.
Granulated sugar. A small amount of sugar feeds the yeast, adds a subtle sweetness, and helps the crust turn golden brown.
Instant yeast. Instant yeast can be mixed directly into the dry ingredients and does not require proofing first. If you only have active dry yeast, see the substitution tips later in this guide.
Salt. Salt strengthens the gluten, controls the yeast, and brings out the flavor of the bread. Do not leave it out.
Egg. The egg enriches the dough, adds structure, and contributes to a soft, tender texture and a richer color.
Butter. Softened butter coats the gluten strands, which tenderizes the crumb, adds flavor, and helps the bread stay fresh longer.
Equipment You Will Need
- A large mixing bowl
- Measuring cups and spoons, or better yet, a kitchen scale
- A 9 × 5-inch loaf pan
- A clean kitchen towel or plastic wrap
- A rolling pin (optional, you can also press the dough by hand)
- A pastry brush
- A wire cooling rack
- A thermometer for checking the temperature of the milk (helpful but optional)
- A stand mixer with a dough hook (optional, as the dough can be kneaded by hand)
Instructions
In a large mixing bowl, combine the flour, sugar, instant yeast, and salt. Whisk lightly so the yeast and salt are distributed evenly. Add the warm milk and the egg. Mix with a wooden spoon or a dough hook until a rough, shaggy dough forms and no dry flour remains.
Knead the dough for about 5 minutes until the ingredients come together into a cohesive mass. Then add the softened butter gradually, one tablespoon at a time, kneading until each addition is fully incorporated before adding the next. The dough may look greasy and slippery at first, but keep going. It will come together.
Continue kneading for another 8 to 10 minutes, until the dough becomes smooth, elastic, and slightly tacky. If you are using a stand mixer, knead on medium-low speed for the same amount of time.
How to know the dough is ready: Try the windowpane test. Pinch off a small piece of dough and gently stretch it between your fingers. If it stretches thin enough to become translucent without tearing, the gluten is well developed. The dough should also spring back slowly when poked.
Place the dough in a lightly greased bowl and turn it once to coat the surface. Cover with a clean kitchen towel or plastic wrap and let it rise in a warm place for 60 to 75 minutes, or until doubled in size. A turned-off oven with the light on, a warm corner of the kitchen, or the top of the refrigerator are all good spots.
Gently press the dough to release the excess air. Transfer it to a lightly floured surface and roll or pat it into a rectangle about the same width as your loaf pan, roughly 9 inches wide and 12 inches long.
Starting from a short end, roll the dough tightly into a log, pinching the seam closed as you go. Tight rolling creates surface tension, which helps the loaf rise upward instead of outward. Place the log seam-side down in a greased 9 × 5-inch loaf pan, tucking in the ends neatly.
Cover the pan loosely and let the dough rise for 35 to 50 minutes, until it rises just above the rim of the pan. The dough should look puffy and feel soft and airy. When you gently press a fingertip into the side, the indentation should spring back slowly.
Do not rush this step. A properly proofed loaf bakes up taller, lighter, and more tender.
Preheat your oven to 350°F (175°C) while the dough finishes rising. Brush the top of the loaf gently with milk for a beautiful golden finish. Use a soft brush and a light hand so you do not deflate the dough.
Bake for 30 to 35 minutes, until the top is golden brown and the loaf sounds hollow when gently tapped on the top or bottom. If you use an instant-read thermometer, the center of the loaf should reach about 190°F (88°C). If the top begins to brown too quickly, loosely cover it with foil during the final part of baking.
Remove the loaf from the oven and, if you like, brush the top with melted butter for a softer, shinier crust and extra flavor. Let the bread rest in the pan for 5 to 10 minutes, then carefully turn it out onto a wire rack.
Allow it to cool completely before slicing. Cutting into hot bread can compress the crumb and make it gummy. Patience gives you the softest, neatest slices.