
No-Knead Mini Olive Focaccia
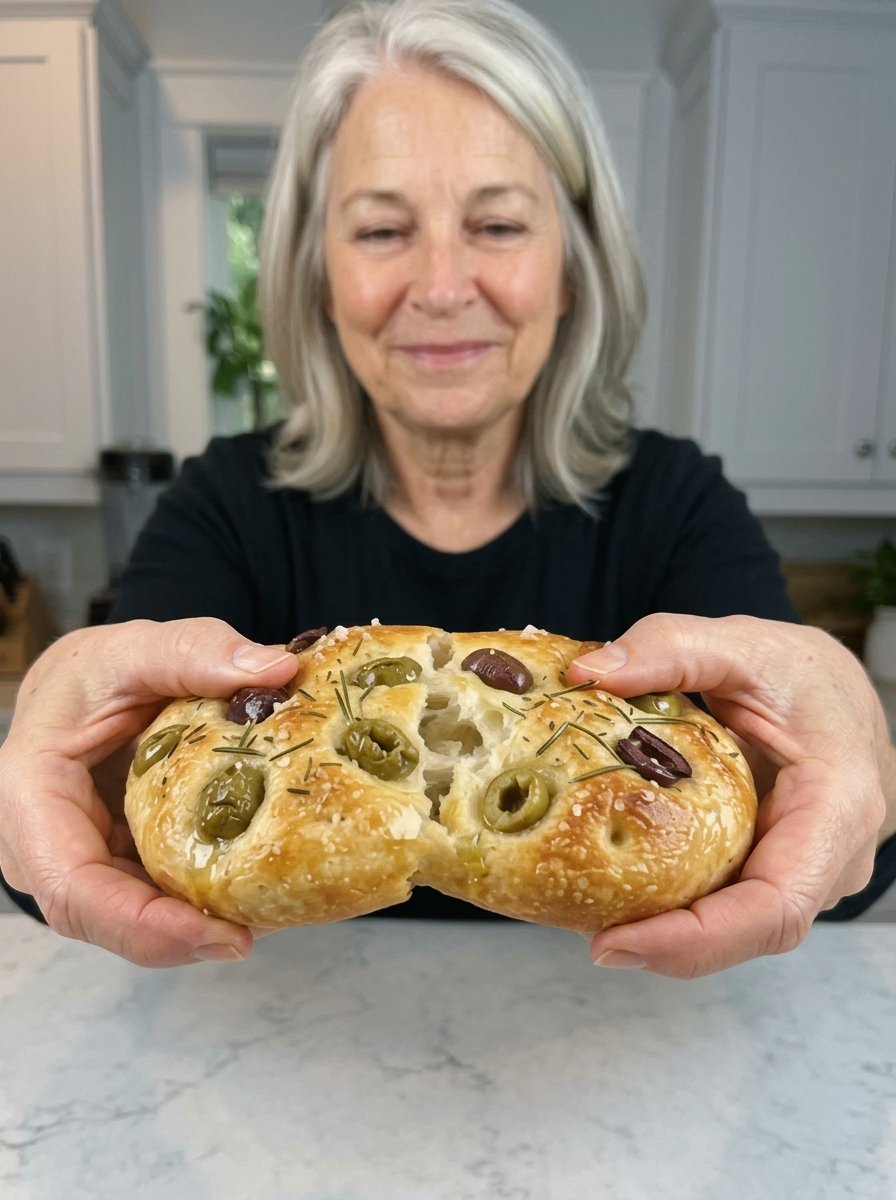
No-Knead Mini Olive Focaccia: The Easy, Crispy-Edged Recipe You’ll Make on Repeat
SEO Title (under 60 characters): No-Knead Mini Olive Focaccia Recipe | Easy & Fluffy
Meta Description (under 160 characters): Make golden, airy no-knead mini olive focaccia with rosemary and flaky sea salt. Simple mix-and-rise method, crisp edges, soft center. Ready in 2 hours.
Primary Keyword: no-knead mini olive focaccia
Secondary Keywords: easy focaccia recipe, olive focaccia bread, mini focaccia, no-knead focaccia, rosemary olive focaccia, homemade focaccia
URL Slug: no-knead-mini-olive-focaccia
There is something almost magical about pulling a tray of golden, olive-studded focaccia out of the oven. The kitchen fills with the scent of warm olive oil and fresh rosemary, the edges crackle as they cool, and the centers are so soft and airy that you want to tear into them immediately. Now imagine getting all of that without kneading a single time and without any special equipment. That is exactly what these no-knead mini olive focaccias deliver.
These little Italian-style breads are made with just a handful of pantry staples: flour, yeast, salt, a touch of sugar, warm water, olive oil, olives, and rosemary. You stir the dough in one bowl, let time do the hard work, shape it into six individual rounds, dimple them, top them, and bake. The result is a bread that looks like it came from an artisan bakery but takes barely 15 minutes of hands-on effort.
Whether you are a complete beginner who has never worked with yeast or an experienced baker looking for a reliable weeknight bread, this easy focaccia recipe is going to become a favorite. Let’s walk through everything you need to know, from ingredients and step-by-step instructions to troubleshooting, variations, storage, and serving ideas.
Why You’ll Love This No-Knead Mini Olive Focaccia
Before we get to the recipe, here are the reasons this bread deserves a spot in your regular rotation:
- Truly no kneading. The dough is wet and sticky, and that is a good thing. Hydration does the work that kneading would normally do, developing a soft, open crumb with almost no effort.
- Minimal hands-on time. You spend about 15 minutes total working with the dough. The rest is resting and baking.
- Mini portions. Individual focaccias are perfect for sandwiches, soup dunking, lunchboxes, party platters, and portion control. Everyone gets their own crispy-edged piece.
- Pantry-friendly ingredients. No starter, no preferment, no special flour. All-purpose flour works beautifully.
- Big flavor. Briny olives, fragrant rosemary, good olive oil, and flaky sea salt make every bite savory and satisfying.
- Endlessly customizable. Swap the toppings for cherry tomatoes, garlic, caramelized onions, or herbs and you have an entirely new bread.
- Great for entertaining. Mini focaccias look beautiful on a board and are easy to tear, share, and dip.
What Is Focaccia?
Focaccia is a flat, oven-baked Italian bread that dates back centuries and is closely associated with the Liguria region, especially the city of Genoa. Traditionally, it is made from a simple yeasted dough enriched generously with olive oil. The signature look comes from dimpling the dough with your fingertips before baking, creating little wells that catch pools of olive oil and hold toppings in place.
A great focaccia has three defining characteristics: a crisp, golden bottom and edges, a soft and airy interior, and a rich, olive-oil-forward flavor. Because the dough is so hydrated, it bakes up light and chewy rather than dense. Our mini version keeps all of those qualities but gives you six individual portions, which means even more of those coveted crispy edges.
Ingredients for No-Knead Mini Olive Focaccia
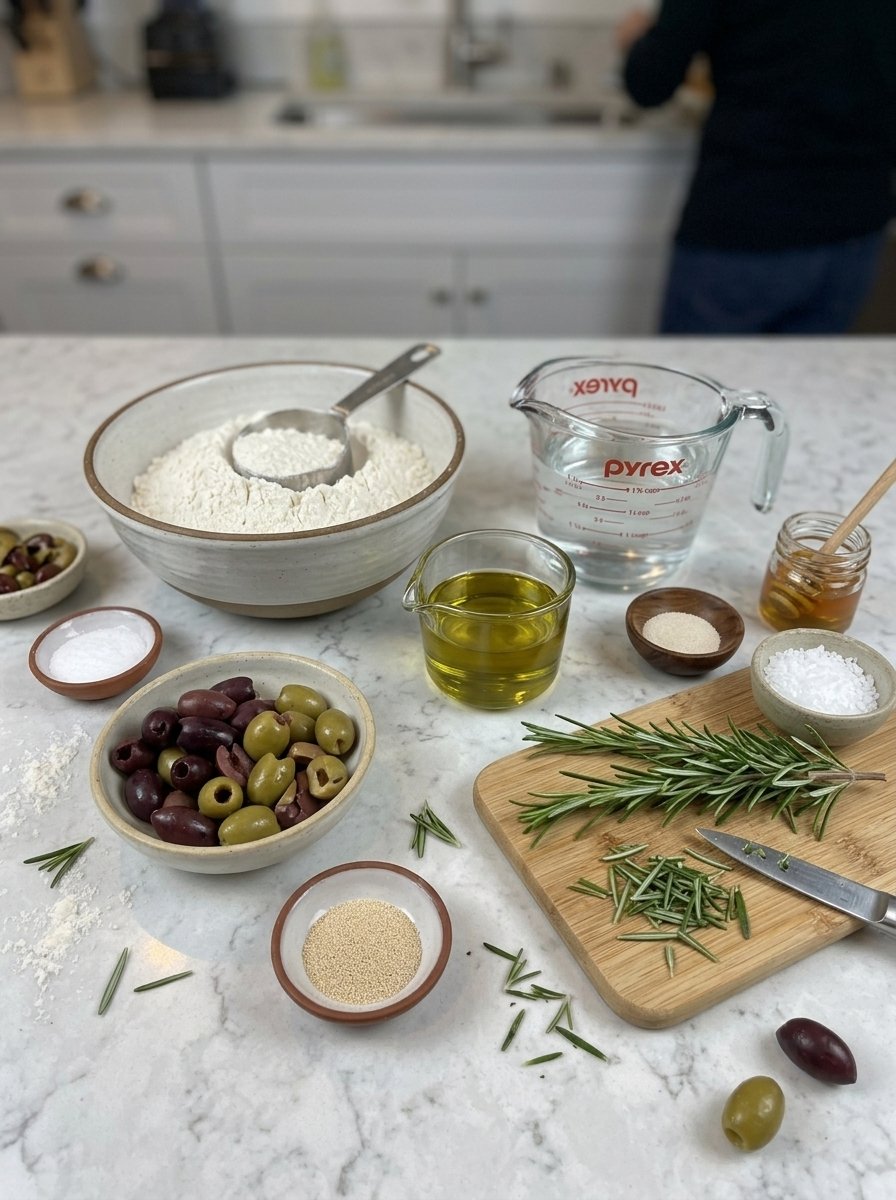
This recipe makes 6 mini focaccias.
- 3 cups (375 g) all-purpose or bread flour
- 2¼ teaspoons instant yeast (one standard packet)
- 1 teaspoon salt
- 1 teaspoon sugar or honey
- 1¼ cups (300 ml) warm water
- 3 tablespoons olive oil, divided
- ¾ cup pitted olives, halved or sliced
- 1 tablespoon fresh rosemary, chopped (or 1 teaspoon dried rosemary)
- Flaky sea salt, for topping
Ingredient Notes and Smart Substitutions
Flour. All-purpose flour gives a tender, soft crumb that is ideal for mini focaccia. Bread flour has a higher protein content and produces a slightly chewier, more structured texture. Both work, so use whichever you have on hand. If you measure by cups, spoon the flour into the measuring cup and level it off rather than scooping directly from the bag, which can pack in too much flour and make the dough dry. Weighing your flour (375 g) is the most accurate method.
Instant yeast. Instant yeast can be mixed directly into the dry ingredients without proofing. If you only have active dry yeast, you can use the same amount, but dissolve it in the warm water for about 5 minutes first until it looks foamy, and expect the rise to take a little longer.
Sugar or honey. The small amount of sugar feeds the yeast and helps with browning. Honey adds a subtle floral note. Either one works.
Warm water. Aim for roughly 105°F to 110°F (40°C to 43°C), which feels comfortably warm but not hot on your wrist. Water that is too hot can kill the yeast, while water that is too cold will slow the rise.
Olive oil. Since olive oil is a star flavor here, use a good-quality extra virgin olive oil. It enriches the dough, crisps the bottom, and provides that unmistakable focaccia taste.
Olives. Kalamata, green Castelvetrano, Manzanilla, or a mixed Mediterranean blend all work well. Choose pitted olives to save time, and make sure they are well drained. Kalamata olives bring a deep, wine-like richness, while green olives are milder and buttery.
Rosemary. Fresh rosemary delivers the best aroma and flavor. If using dried rosemary, crush it between your fingers before sprinkling to release its oils. Thyme, oregano, or Italian seasoning make good alternatives.
Flaky sea salt. This is the finishing touch that adds crunch and brightness. Maldon or a similar flaky salt is ideal, but coarse kosher salt works in a pinch.
Equipment You’ll Need
One of the best things about this recipe is how little equipment it requires:
- A large mixing bowl
- A sturdy spoon or silicone spatula
- A baking sheet (rimmed is best)
- Parchment paper
- A bench scraper or knife for dividing the dough
- A pastry brush (optional, for finishing with oil)
No stand mixer, no dough hook, and no kneading board required.
How to Make No-Knead Mini Olive Focaccia: Step-by-Step
Prep time: 15 minutes | Cook time: 20–25 minutes | Total time: about 2 hours 15 minutes | Yield: 6 mini focaccias
Step 1: Mix the Dough
In a large bowl, combine the flour, instant yeast, salt, and sugar. Whisk them together briefly so the yeast and salt are evenly distributed. Pour in the warm water and 1 tablespoon of the olive oil. Stir with a spoon or spatula until all the flour is hydrated and a sticky, shaggy dough forms. This takes about one minute.
Do not be tempted to add extra flour. The dough is supposed to be sticky, and that stickiness is what creates the airy, bubbly texture inside the finished focaccia. If it clings to your spoon and sides of the bowl, you are on the right track.
Step 2: Let the Dough Rise
Cover the bowl with a clean kitchen towel, plastic wrap, or a plate, and set it in a warm, draft-free spot. Let the dough rise for 60 to 90 minutes, or until it has roughly doubled in size and you can see bubbles on the surface.
The exact timing depends on the temperature of your kitchen. In a cool room, it may take closer to 90 minutes or slightly longer. In a warm kitchen, it may be ready in an hour. Watch the dough rather than the clock: a puffy, jiggly, bubbly dough is ready.
Warm spot ideas: Turn your oven light on and place the bowl inside the switched-off oven, set the bowl near a sunny window, or place it on top of the refrigerator.
Step 3: Shape the Mini Focaccias
Line a baking sheet with parchment paper and lightly oil the parchment. Lightly oil your hands and your bench scraper as well, since this dough is sticky. Turn the risen dough out onto a lightly oiled surface or directly onto the parchment. Using the bench scraper or a knife, divide the dough into 6 equal portions.
Gently shape each portion into a small round or oval about 4 to 5 inches wide, handling the dough as little as possible to preserve the air bubbles. Space the portions a couple of inches apart on the baking sheet, since they will puff and spread as they rest and bake.
Step 4: Rest the Dough and Preheat the Oven
Cover the shaped portions loosely with a towel or lightly oiled plastic wrap and let them rest for 20 to 30 minutes. This second short rest relaxes the dough and gives it a final boost of puffiness. While they rest, preheat your oven to 425°F (220°C).
Step 5: Add the Toppings
Drizzle the remaining 2 tablespoons of olive oil over the dough. Oil your fingertips and press straight down into each focaccia to create deep dimples, all the way down toward the pan without poking through. Then gently press the halved or sliced olives into the dimples and surface. Sprinkle with chopped rosemary and finish with a generous pinch of flaky sea salt.
The dimples are not just decorative. They trap olive oil, anchor the toppings, and prevent the dough from puffing up into a dome, which gives you that classic flat-but-fluffy focaccia shape.
Step 6: Bake
Bake for 20 to 25 minutes, until the focaccias are puffed and deeply golden brown around the edges. The bottoms should be crisp and golden when you lift one gently with a spatula. If your oven bakes unevenly, rotate the pan halfway through.
Step 7: Serve Warm
Remove from the oven and, if you like, brush the warm tops with a little extra olive oil for added shine and flavor. Let the focaccias cool for 5 to 10 minutes on the pan or a wire rack, then enjoy them warm.
Tips for Perfect Mini Focaccia Every Time
These simple tips make the difference between good focaccia and great focaccia.
1. Keep the dough sticky. A wet dough creates a soft, airy interior with big irregular holes. Resist the urge to add flour. If the dough is hard to handle, oil your hands and tools instead.
2. Drain and dry the olives. Olives packed in brine hold a lot of moisture. Drain them well and pat them dry with a paper towel so they do not make the surface soggy or prevent browning.
3. Do not skip the dimples. Press firmly with oiled fingertips. Shallow dimples disappear during baking, while deep ones give you the signature texture and little pockets of olive oil.
4. Use enough olive oil. Focaccia is not a low-fat bread. The oil is what makes the bottom crisp and the crumb tender. Do not skimp on the drizzle.
5. Check your yeast. If your dough does not rise, the yeast may be old or the water may have been too hot or too cold. Always check the expiration date.
6. Bake until deeply golden. Pale focaccia can taste doughy. Look for a rich golden color on the edges and a crisp bottom.
7. Season at the end. Flaky salt sprinkled just before baking stays crunchy and flavorful. Add a little more after baking if you like.
Troubleshooting Common Focaccia Problems
My dough did not rise. The most common culprits are expired yeast, water that was too hot, or a room that is too cold. Move the bowl to a warmer spot and give it extra time. If there is still no activity after 2 hours, start again with fresh yeast and water around 105°F to 110°F.
My focaccia is dense. Too much flour, under-proofing, or over-handling the dough can cause a heavy texture. Measure flour carefully, allow the dough to double, and shape gently.
The bottoms are pale. Make sure the oven is fully preheated and use a metal baking sheet, which conducts heat better than glass or ceramic. Placing the pan on a lower rack can also help the bottoms crisp.
The tops are browning too fast. Move the pan to a lower rack or loosely tent the focaccias with foil for the last several minutes of baking.
The olives are burning. Olives near the surface can darken in a hot oven. Press them slightly into the dough and brush them with a little oil to protect them.
Delicious Variations to Try
Once you have mastered the base recipe, the possibilities are endless.
- Cherry tomato and basil focaccia. Press halved cherry tomatoes into the dimples and top with fresh basil after baking.
- Roasted garlic focaccia. Scatter thinly sliced garlic or roasted garlic cloves over the dough before baking.
- Caramelized onion focaccia. Spread jammy caramelized onions over the top for a sweet and savory bread.
- Lemon and thyme focaccia. Replace rosemary with fresh thyme and add thin lemon slices or zest.
- Parmesan and herb focaccia. Sprinkle grated Parmesan over the top in the last five minutes of baking.
- Feta and oregano focaccia. Crumble feta over the dough and add dried oregano for a Greek-inspired twist.
- Sun-dried tomato and olive focaccia. Add chopped oil-packed sun-dried tomatoes alongside the olives.
- Everything-seasoning focaccia. Skip the olives and rosemary and top with everything bagel seasoning.
What to Serve with Mini Olive Focaccia
These versatile little breads pair well with nearly any meal:
- Soups and stews. Tomato soup, minestrone, lentil soup, and creamy vegetable soups all love a piece of focaccia for dunking.
- Dipping oils. Serve with a small dish of olive oil, balsamic vinegar, and cracked black pepper.
- Sandwiches. Slice the minis in half horizontally and fill them with mozzarella, tomato, basil, and pesto, or with turkey, arugula, and roasted peppers.
- Pasta night. Round out a bowl of spaghetti, lasagna, or baked ziti with warm focaccia on the side.
- Salads. Pair with a Caesar, Greek, or arugula salad for a satisfying lunch.
- Charcuterie and appetizer boards. Tear the focaccias into pieces and serve with cheese, cured meats, hummus, and marinated vegetables.
- Breakfast. Split and toast a mini focaccia, then top it with a fried egg and avocado.
How to Store Leftover Focaccia
Room temperature: Store cooled focaccias in an airtight container or wrapped in a clean kitchen towel for up to 2 days. Avoid sealing them while warm, which traps steam and softens the crust.
Refrigerator: Focaccia keeps in the fridge for up to 4 days in an airtight bag, though refrigeration can dry the bread out slightly. Reheat before serving.
Freezer: Wrap each cooled mini focaccia tightly in plastic wrap, then place them in a freezer bag. Freeze for up to 3 months. Thaw at room temperature or warm directly from frozen.
To reheat: Warm the focaccias in a 350°F (175°C) oven for 5 to 8 minutes, until heated through and the crust is crisp again. A toaster oven or air fryer also works well. Avoid the microwave, which makes the crust chewy.
Make-Ahead Options
If you want to prepare the dough in advance, you have two easy options:
- Overnight rise in the fridge. After mixing, cover the dough and refrigerate for 8 to 24 hours. A slow, cold rise develops deeper flavor. When ready to bake, let the dough sit at room temperature for about 30 to 45 minutes, then continue with shaping, resting, topping, and baking.
- Bake and freeze. Bake the focaccias fully, cool completely, and freeze. Reheat as needed for fresh-tasting bread on short notice.
Frequently Asked Questions
Can I make this focaccia without kneading?
Yes. This recipe is designed to be completely no-knead. The high-hydration dough develops structure naturally as it rests and rises, so you only need to stir the ingredients together.
Can I use active dry yeast instead of instant yeast?
Yes. Use the same amount, but dissolve it in the warm water first and let it sit for about 5 minutes until foamy. The rise may take slightly longer.
Should I use all-purpose flour or bread flour?
Both work. All-purpose flour makes a softer, more tender crumb, while bread flour gives a chewier texture and slightly more rise. Choose based on your preference.
Why is my dough so sticky?
Stickiness is normal and necessary for good focaccia. Use oiled hands, a lightly oiled bench scraper, and oiled parchment to handle it without adding extra flour.
Can I make one large focaccia instead of six minis?
Absolutely. Spread the dough in an oiled 9×13-inch pan, let it rest, dimple, top, and bake for about 25 to 30 minutes, until deeply golden.
Can I use dried rosemary?
Yes. Use 1 teaspoon of dried rosemary in place of 1 tablespoon of fresh. Crush it between your fingers first to release its flavor.
What kind of olives are best?
Kalamata olives offer bold, rich flavor, while green olives like Castelvetrano are milder and buttery. A mix of both is delicious. Always use pitted olives and pat them dry.
Can I freeze the dough?
Yes. After the first rise, divide the dough, wrap each portion in oiled plastic, and freeze for up to 1 month. Thaw overnight in the refrigerator, bring to room temperature, then shape, rest, top, and bake.
How do I know when the focaccia is done?
Look for a puffed, deep golden brown top and edges, and a crisp bottom. If you tap the bottom, it should sound slightly hollow.
Is this recipe vegan?
Yes. As written, it contains no dairy, eggs, or animal products. If you use honey instead of sugar, it will no longer be strictly vegan, so choose sugar if that matters to you.
Final Thoughts
These no-knead mini olive focaccias prove that incredible homemade bread does not have to be complicated. With a simple stir-together dough, a relaxed rise, and a generous finish of olive oil, olives, rosemary, and flaky salt, you get bakery-quality results with almost no effort. The edges are crisp, the centers are pillowy, and the flavor is pure Mediterranean comfort.
Make a batch for your next soup night, serve them on a party board, or tuck a few into the freezer for busy days. However you enjoy them, they are best straight from the oven, still warm, with a little extra olive oil for dipping.
If you try this recipe, leave a comment and a rating below, and share your favorite topping variations. Happy baking!
Quick Recipe Card: No-Knead Mini Olive Focaccia
Prep Time: 15 minutes Cook Time: 20–25 minutes Total Time: 2 hours 15 minutes Servings: 6 mini focaccias
Ingredients:
- 3 cups (375 g) all-purpose or bread flour
- 2¼ teaspoons instant yeast
- 1 teaspoon salt
- 1 teaspoon sugar or honey
- 1¼ cups (300 ml) warm water
- 3 tablespoons olive oil, divided
- ¾ cup pitted olives, halved or sliced
- 1 tablespoon fresh rosemary, chopped, or 1 teaspoon dried
- Flaky sea salt, for topping
Instructions:
- Combine flour, yeast, salt, and sugar in a large bowl. Add warm water and 1 tablespoon olive oil and stir until a sticky dough forms.
- Cover and let rise in a warm place for 60–90 minutes, until doubled.
- Line a baking sheet with oiled parchment. Divide the dough into 6 portions and shape into small rounds or ovals.
- Cover loosely and rest for 20–30 minutes. Preheat the oven to 425°F (220°C).
- Drizzle with remaining olive oil, dimple with your fingertips, press in the olives, and top with rosemary and flaky sea salt.
- Bake for 20–25 minutes, until puffed and golden.
- Brush with extra olive oil if desired, cool slightly, and serve warm

No-Knead Mini Olive Focaccia
Ingredients
This recipe makes 6 mini focaccias.
- 3 cups (375 g) all-purpose or bread flour
- 2¼ teaspoons instant yeast (one standard packet)
- 1 teaspoon salt
- 1 teaspoon sugar or honey
- 1¼ cups (300 ml) warm water
- 3 tablespoons olive oil, divided
- ¾ cup pitted olives, halved or sliced
- 1 tablespoon fresh rosemary, chopped (or 1 teaspoon dried rosemary)
- Flaky sea salt, for topping
Ingredient Notes and Smart Substitutions
Flour. All-purpose flour gives a tender, soft crumb that is ideal for mini focaccia. Bread flour has a higher protein content and produces a slightly chewier, more structured texture. Both work, so use whichever you have on hand. If you measure by cups, spoon the flour into the measuring cup and level it off rather than scooping directly from the bag, which can pack in too much flour and make the dough dry. Weighing your flour (375 g) is the most accurate method.
Instant yeast. Instant yeast can be mixed directly into the dry ingredients without proofing. If you only have active dry yeast, you can use the same amount, but dissolve it in the warm water for about 5 minutes first until it looks foamy, and expect the rise to take a little longer.
Sugar or honey. The small amount of sugar feeds the yeast and helps with browning. Honey adds a subtle floral note. Either one works.
Warm water. Aim for roughly 105°F to 110°F (40°C to 43°C), which feels comfortably warm but not hot on your wrist. Water that is too hot can kill the yeast, while water that is too cold will slow the rise.
Olive oil. Since olive oil is a star flavor here, use a good-quality extra virgin olive oil. It enriches the dough, crisps the bottom, and provides that unmistakable focaccia taste.
Olives. Kalamata, green Castelvetrano, Manzanilla, or a mixed Mediterranean blend all work well. Choose pitted olives to save time, and make sure they are well drained. Kalamata olives bring a deep, wine-like richness, while green olives are milder and buttery.
Rosemary. Fresh rosemary delivers the best aroma and flavor. If using dried rosemary, crush it between your fingers before sprinkling to release its oils. Thyme, oregano, or Italian seasoning make good alternatives.
Flaky sea salt. This is the finishing touch that adds crunch and brightness. Maldon or a similar flaky salt is ideal, but coarse kosher salt works in a pinch.
Instructions
One of the best things about this recipe is how little equipment it requires:
- A large mixing bowl
- A sturdy spoon or silicone spatula
- A baking sheet (rimmed is best)
- Parchment paper
- A bench scraper or knife for dividing the dough
- A pastry brush (optional, for finishing with oil)
No stand mixer, no dough hook, and no kneading board required.
How to Make No-Knead Mini Olive Focaccia: Step-by-Step
Prep time: 15 minutes | Cook time: 20–25 minutes | Total time: about 2 hours 15 minutes | Yield: 6 mini focaccias
Step 1: Mix the Dough
In a large bowl, combine the flour, instant yeast, salt, and sugar. Whisk them together briefly so the yeast and salt are evenly distributed. Pour in the warm water and 1 tablespoon of the olive oil. Stir with a spoon or spatula until all the flour is hydrated and a sticky, shaggy dough forms. This takes about one minute.
Do not be tempted to add extra flour. The dough is supposed to be sticky, and that stickiness is what creates the airy, bubbly texture inside the finished focaccia. If it clings to your spoon and sides of the bowl, you are on the right track.
Step 2: Let the Dough Rise
Cover the bowl with a clean kitchen towel, plastic wrap, or a plate, and set it in a warm, draft-free spot. Let the dough rise for 60 to 90 minutes, or until it has roughly doubled in size and you can see bubbles on the surface.
The exact timing depends on the temperature of your kitchen. In a cool room, it may take closer to 90 minutes or slightly longer. In a warm kitchen, it may be ready in an hour. Watch the dough rather than the clock: a puffy, jiggly, bubbly dough is ready.
Warm spot ideas: Turn your oven light on and place the bowl inside the switched-off oven, set the bowl near a sunny window, or place it on top of the refrigerator.
Step 3: Shape the Mini Focaccias
Line a baking sheet with parchment paper and lightly oil the parchment. Lightly oil your hands and your bench scraper as well, since this dough is sticky. Turn the risen dough out onto a lightly oiled surface or directly onto the parchment. Using the bench scraper or a knife, divide the dough into 6 equal portions.
Gently shape each portion into a small round or oval about 4 to 5 inches wide, handling the dough as little as possible to preserve the air bubbles. Space the portions a couple of inches apart on the baking sheet, since they will puff and spread as they rest and bake.
Step 4: Rest the Dough and Preheat the Oven
Cover the shaped portions loosely with a towel or lightly oiled plastic wrap and let them rest for 20 to 30 minutes. This second short rest relaxes the dough and gives it a final boost of puffiness. While they rest, preheat your oven to 425°F (220°C).
Step 5: Add the Toppings
Drizzle the remaining 2 tablespoons of olive oil over the dough. Oil your fingertips and press straight down into each focaccia to create deep dimples, all the way down toward the pan without poking through. Then gently press the halved or sliced olives into the dimples and surface. Sprinkle with chopped rosemary and finish with a generous pinch of flaky sea salt.
The dimples are not just decorative. They trap olive oil, anchor the toppings, and prevent the dough from puffing up into a dome, which gives you that classic flat-but-fluffy focaccia shape.
Step 6: Bake
Bake for 20 to 25 minutes, until the focaccias are puffed and deeply golden brown around the edges. The bottoms should be crisp and golden when you lift one gently with a spatula. If your oven bakes unevenly, rotate the pan halfway through.
Step 7: Serve Warm
Remove from the oven and, if you like, brush the warm tops with a little extra olive oil for added shine and flavor. Let the focaccias cool for 5 to 10 minutes on the pan or a wire rack, then enjoy them warm.
Tips for Perfect Mini Focaccia Every Time
These simple tips make the difference between good focaccia and great focaccia.
1. Keep the dough sticky. A wet dough creates a soft, airy interior with big irregular holes. Resist the urge to add flour. If the dough is hard to handle, oil your hands and tools instead.
2. Drain and dry the olives. Olives packed in brine hold a lot of moisture. Drain them well and pat them dry with a paper towel so they do not make the surface soggy or prevent browning.
3. Do not skip the dimples. Press firmly with oiled fingertips. Shallow dimples disappear during baking, while deep ones give you the signature texture and little pockets of olive oil.
4. Use enough olive oil. Focaccia is not a low-fat bread. The oil is what makes the bottom crisp and the crumb tender. Do not skimp on the drizzle.
5. Check your yeast. If your dough does not rise, the yeast may be old or the water may have been too hot or too cold. Always check the expiration date.
6. Bake until deeply golden. Pale focaccia can taste doughy. Look for a rich golden color on the edges and a crisp bottom.
7. Season at the end. Flaky salt sprinkled just before baking stays crunchy and flavorful. Add a little more after baking if you like.