
Homemade Crispy Bread
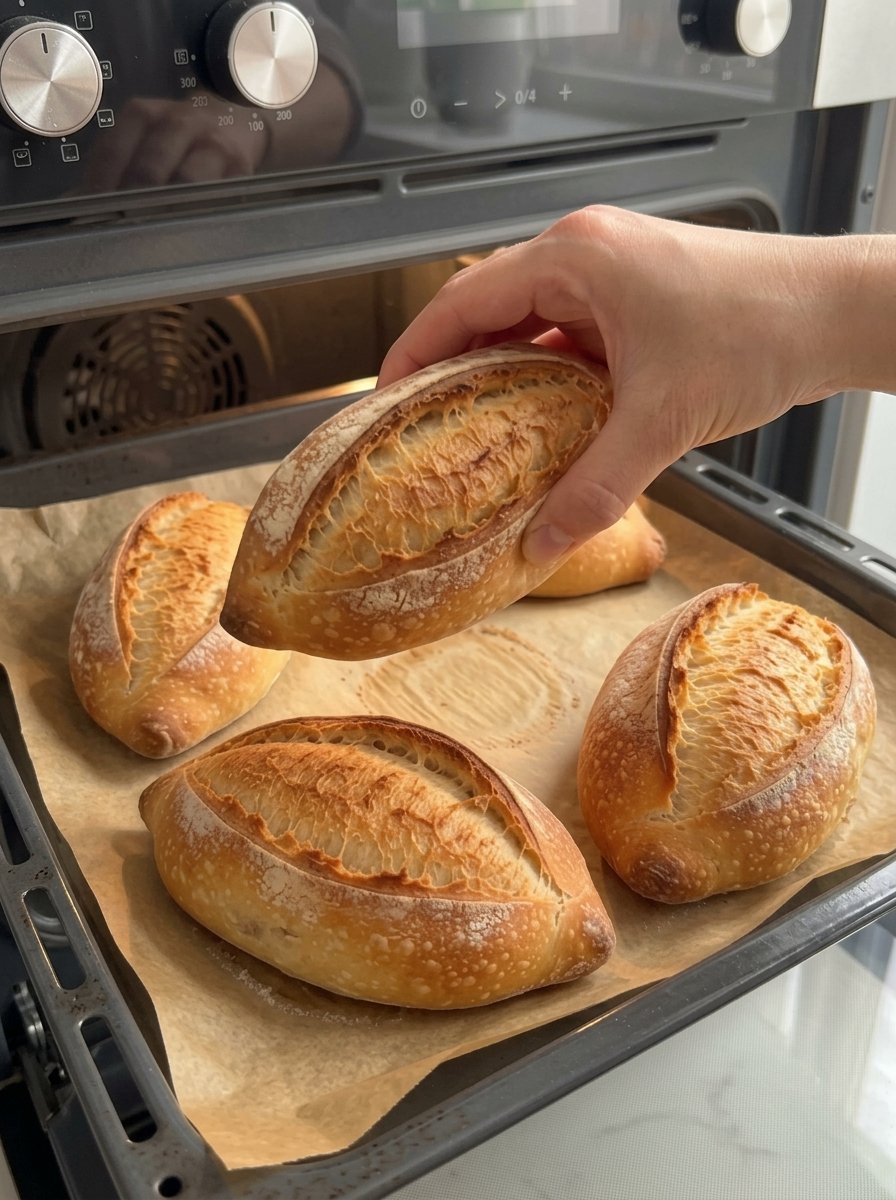
Homemade Crispy Bread: Golden, Crunchy Crust with a Soft, Airy Center
Nothing beats the smell of freshly baked bread coming out of the oven. The crust crackles as it cools, the steam rises from the first slice, and the whole kitchen smells warm and yeasty. If you’ve always assumed that kind of bread requires a bakery, this recipe will change your mind.
This homemade crispy bread has a deeply golden, crunchy crust and a soft, airy center. It’s made with simple pantry ingredients: flour, instant yeast, salt, a little sugar, warm water, and a splash of olive oil. The trick to the shatteringly crisp crust is a hot oven and a burst of steam at the start of baking, both of which are easy to do at home.
The recipe makes two small rustic loaves, perfect for dipping in olive oil, serving alongside soup, or tearing apart and eating warm with butter. This guide covers the full recipe, step-by-step instructions, the science behind a crispy crust, ingredient notes, troubleshooting, variations, serving ideas, storage, and frequently asked questions.
Recipe at a Glance
- Prep time: 15 minutes
- Rise time: 60 to 75 minutes, plus a 20 to 30 minute rest after shaping
- Cook time: 25 to 30 minutes
- Total time: About 2 hours
- Servings: 2 small loaves
- Difficulty: Beginner-friendly
Why You’ll Love This Crispy Bread Recipe
The crust is truly crunchy. A hot oven, a steam tray, and a bake until deeply golden give you a crust with real crackle, not a soft, pale shell.
The inside is soft and airy. A slightly sticky dough produces an open, tender crumb that contrasts beautifully with the crisp exterior.
It uses pantry staples. Flour, yeast, salt, sugar, water, and olive oil are all you need. No starter, no special flour, and no unusual equipment.
It makes two loaves. Share one, keep one, or freeze one for later.
It’s incredibly versatile. Serve it with soup, dip it in olive oil, make sandwiches, turn it into garlic bread, or slice and toast it for bruschetta.
It’s mostly hands-off. After mixing and kneading, the rising and baking do the heavy lifting.
What Makes Bread Crispy?
Understanding what creates a crunchy crust helps you bake it reliably every time.
High heat. A hot oven, in this recipe 450°F (230°C), dries the surface quickly and drives the browning reactions that create color and flavor.
Steam at the start. Steam in the first minutes of baking keeps the surface of the dough moist and stretchy. That lets the loaf expand fully, a process known as oven spring, before the crust sets. The moisture also gelatinizes the starches on the surface, which later dry into a thin, glossy, crackly shell. Without steam, the crust hardens early, restricts expansion, and often turns out dull and thick instead of crisp.
The Maillard reaction and caramelization. The deep golden color and toasty flavor come from reactions between proteins and sugars on the crust’s surface. A longer bake gives a deeper color and a crunchier texture. A pale loaf will always be softer.
Moisture loss. As the loaf bakes and cools, moisture leaves the crust. Cooling on a wire rack lets air circulate around the bread so the bottom stays crisp instead of steaming itself soft.
A slightly wet dough. A dough that is a bit sticky creates more steam inside the loaf, which produces an airy crumb and helps the crust stay thin and crisp.
Ingredients for Homemade Crispy Bread
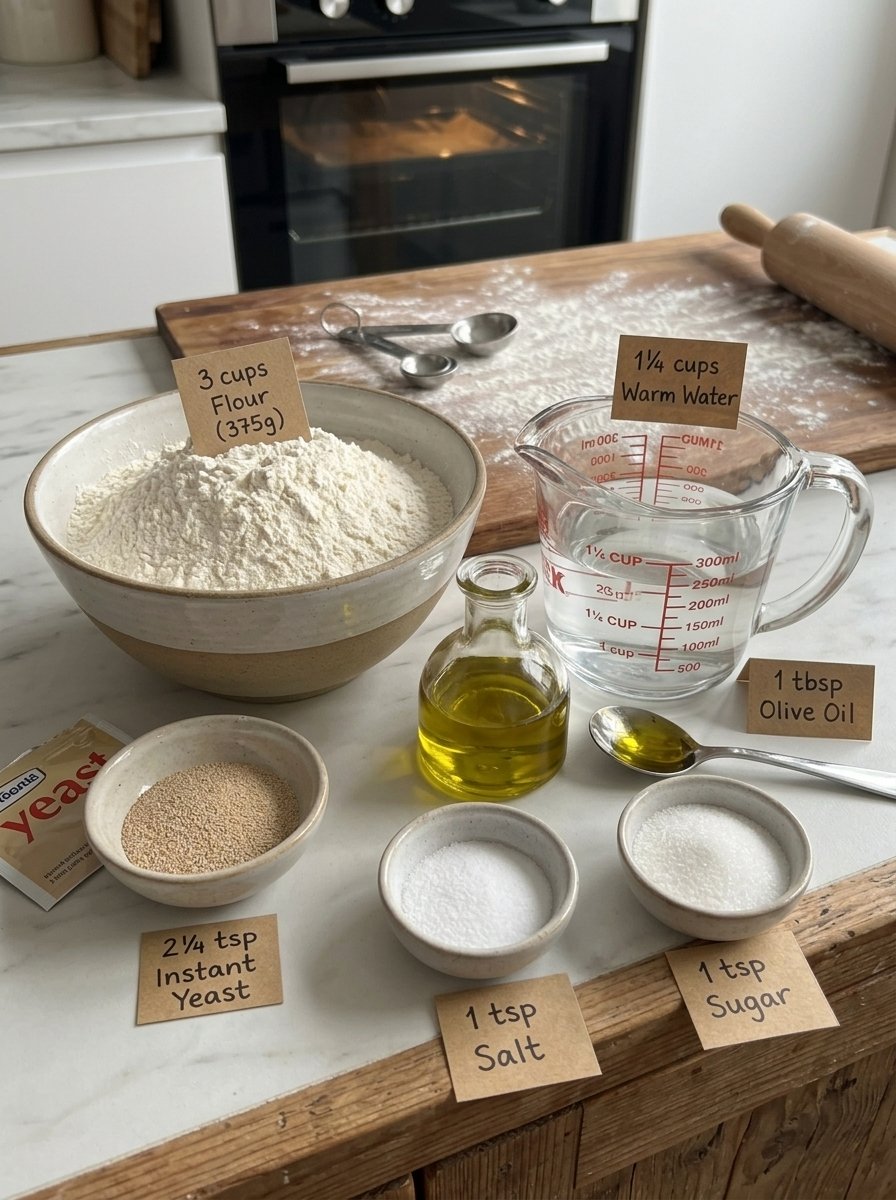
This recipe makes 2 small loaves:
- 3 cups (375 g) all-purpose or bread flour
- 2¼ teaspoons instant yeast
- 1 teaspoon salt
- 1 teaspoon sugar
- 1¼ cups (300 ml) warm water
- 1 tablespoon olive oil
- Extra flour, for shaping
Ingredient Notes and Smart Swaps
Flour. Bread flour has more protein, which builds more gluten and gives a chewier, taller loaf with a sturdy crust. All-purpose flour works well too and yields a slightly softer crumb. For the best accuracy, weigh the flour. If you use measuring cups, spoon the flour into the cup and level it off rather than scooping, which can pack in extra flour and dry out the dough.
Instant yeast. Instant yeast (also called rapid-rise or bread machine yeast) can be mixed straight into the flour. If you only have active dry yeast, use the same amount but dissolve it in the warm water for 5 to 10 minutes until foamy, and expect the rises to take a little longer.
Salt. Salt adds flavor, strengthens gluten, and moderates yeast activity. Without it, the bread tastes flat. Fine sea salt or table salt works best for even distribution.
Sugar. Just one teaspoon feeds the yeast and encourages browning. It won’t make the bread sweet.
Warm water. Aim for roughly 105°F to 115°F (40°C to 46°C), which feels comfortably warm, not hot. Water that is too hot can kill yeast, while cold water slows the rise.
Olive oil. A tablespoon adds flavor and a little tenderness to the crumb without softening the crust significantly.
Extra flour. Use it sparingly for dusting your hands, the work surface, and the loaves. Too much flour changes the dough’s hydration and makes the bread denser.
Equipment You’ll Need
- A large mixing bowl
- A wooden spoon or dough whisk
- A clean work surface for kneading
- A stand mixer with a dough hook (optional)
- A baking sheet lined with parchment paper
- A metal baking tray or cast-iron pan for steam (not glass, which can shatter)
- A sharp knife or razor blade for scoring
- A wire cooling rack
- Oven mitts
- A kitchen scale (optional)
- An instant-read thermometer (optional)
How to Make Homemade Crispy Bread (Step by Step)
Step 1: Mix the Dough
In a large bowl, combine the flour, instant yeast, salt, and sugar. Whisk briefly to distribute everything evenly. Add the warm water and olive oil, then stir until a sticky dough forms and no dry flour remains.
Step 2: Knead Until Smooth
Turn the dough onto a lightly floured surface and knead for 8 to 10 minutes by hand, or 5 to 6 minutes with a stand mixer on medium-low speed. To knead by hand, push the dough away from you with the heel of your hand, fold it back, rotate it a quarter turn, and repeat. The dough will transform from sticky and shaggy to smooth and elastic.
Add only a little flour if it’s unmanageable. A slightly sticky dough produces the lightest, airiest interior.
The windowpane test: Pinch off a small piece and gently stretch it. If it forms a thin, translucent membrane without tearing, the gluten is well developed.
Step 3: Let the Dough Rise
Place the dough in a lightly oiled bowl, cover it, and leave it in a warm place for 60 to 75 minutes, or until doubled in size. Good spots include an oven with only the light on or a draft-free corner of the kitchen.
The poke test: Gently press a floured fingertip into the dough. If the dent springs back slowly and incompletely, it’s ready.
Step 4: Shape the Loaves
Gently deflate the dough and divide it into two equal portions. Shape each into a rustic oval loaf by patting it into a rectangle, folding it in thirds, and pinching the seam closed. Roll it gently so the surface is taut. Place each loaf seam-side down on a parchment-lined baking sheet, leaving room between them.
Step 5: Rest and Preheat
Cover the loaves loosely and let them rest for 20 to 30 minutes. Meanwhile, preheat the oven to 450°F (230°C) and place an empty metal baking tray on the lower rack. The tray must heat with the oven so it produces plenty of steam when you add water.
Step 6: Score the Bread
Dust the loaves lightly with flour. Using a sharp knife or razor blade, make one or two shallow slashes across the top of each loaf, about ¼ inch deep. Use a quick, confident motion. Scoring guides expansion and creates the classic rustic look.
Step 7: Create Steam and Bake
Carefully pour about 1 cup of hot water into the preheated metal tray, avoiding splashes. Place the baking sheet in the oven right away and close the door. Bake for 25 to 30 minutes, until the loaves are deeply golden and crisp. They should sound hollow when tapped on the bottom.
Keep your face and hands away from the steam, and use oven mitts. Never use a glass dish for the steam tray, since cold water on hot glass can shatter it.
Step 8: Cool Before Serving
Transfer the loaves to a wire rack and let them cool for at least 20 minutes before slicing. As they cool, you may hear the crust crackle. That’s the sign of a properly crisp loaf. Cooling also lets the interior finish setting, which prevents a gummy crumb.
Tips for Extra-Crispy Bread
- Keep the dough slightly sticky. Higher hydration creates a light, airy interior and a thinner crust.
- Use steam at the beginning. It lets the loaf expand and gives the crust its shine and crunch.
- Bake until deeply golden. A pale crust won’t be crunchy. Don’t be afraid of a rich, dark golden color.
- Cool on a wire rack. This keeps moisture from softening the bottom.
- Preheat the oven fully. Give it at least 15 to 20 minutes, and use an oven thermometer if your oven runs inconsistent.
- Preheat the steam tray. A hot tray creates instant steam.
- Weigh your flour. Accurate measurements make a noticeable difference.
- Check your yeast. Old yeast is the number one reason dough fails to rise.
- Score with a sharp blade. A dull knife drags and deflates the dough.
- Eat it the same day. Crispy crust is at its best within hours of baking.
Troubleshooting Common Problems
The crust isn’t crispy. Likely causes include not baking long enough, skipping steam, or letting the loaf cool in a covered or humid spot. Bake until deeply golden, use steam, and cool on a rack.
The crust is too hard or thick. You may have used too much steam, baked too long, or used too little water in the dough. Reduce the baking time slightly and make sure the dough is slightly sticky.
The bread is dense. Too much flour, under-kneading, or an under-proofed dough are the typical culprits. Weigh the flour, knead until smooth and elastic, and let the dough double.
The dough didn’t rise. The yeast may be expired, the water too hot or cold, or the kitchen too cool. Test yeast by mixing a pinch with warm water and sugar. It should foam within 10 minutes.
The loaves spread out flat. The dough may have over-proofed or been too wet. Shorten the final rest and shape the loaves with a taut surface.
The bread is pale. Check that your oven reached 450°F (230°C). Bake a few minutes longer until deeply golden.
The top browns too fast but the inside is raw. Move the rack lower, reduce the heat slightly, and tent loosely with foil.
The bottom is soggy. Cool the bread on a wire rack, not on a plate or counter.
The center is gummy. The loaf was cut too early or underbaked. Check that it sounds hollow and let it cool for at least 20 minutes.
The bread tastes bland. Make sure you included the salt. For deeper flavor, try an overnight rise in the refrigerator.
There’s a huge hole under the crust. This can come from over-proofing or too much flour during shaping. Shape firmly and use flour sparingly.
Variations to Try
- Garlic herb crispy bread: Mix 1 to 2 teaspoons of dried herbs into the flour and brush with garlic butter after baking.
- Rosemary and sea salt: Sprinkle chopped fresh rosemary and flaky salt on top before baking.
- Seeded crust: Brush with water and sprinkle sesame, poppy, or sunflower seeds before scoring.
- Cheese crisp: Add shredded Parmesan or cheddar on top for the last 5 minutes of baking.
- Whole wheat blend: Replace up to 1 cup of flour with whole wheat flour and add a splash more water.
- Olive bread: Fold in chopped olives during shaping.
- Everything seasoning: Sprinkle everything bagel seasoning on top.
- Overnight flavor boost: After kneading, refrigerate the dough in a covered, oiled bowl for 8 to 12 hours, then bring to room temperature, shape, and proceed. The slower rise develops deeper flavor.
- Baguette-style: Shape each portion into a long, slender loaf and shorten the bake time by a few minutes.
- Dinner rolls: Divide the dough into 8 to 10 pieces and bake for 15 to 20 minutes.
How to Serve Homemade Crispy Bread
With olive oil. Dip chunks of bread into good olive oil with balsamic vinegar, cracked pepper, and herbs.
With butter. Serve warm, with salted butter melting into the crumb.
With soup. Crispy bread is ideal for tomato soup, minestrone, French onion soup, and creamy chowders.
As sandwiches. The sturdy crust holds up to hearty fillings without turning soggy.
As garlic bread. Slice, brush with garlic butter, and bake until golden.
As bruschetta. Toast slices and top with tomatoes, basil, and olive oil.
With cheese boards. Pair slices with brie, cheddar, cured meats, olives, and fruit.
With dips. Serve alongside hummus, spinach dip, or whipped feta.
As toast. Top with avocado, ricotta and honey, or eggs.
As croutons or breadcrumbs. Use leftover bread for salads and gratins.
How to Store Homemade Crispy Bread
- Same day: The crust is crunchiest within a few hours of baking.
- Room temperature: Store in a paper bag or loosely wrapped in a clean kitchen towel for 1 to 2 days. Avoid sealed plastic, which softens the crust.
- Freezer: Cool completely, wrap tightly in foil or plastic wrap, and freeze for up to 3 months.
- Re-crisping: Warm in a 350°F (175°C) oven for 5 to 10 minutes. For extra crunch, lightly sprinkle the crust with water first. From frozen, bake for 15 to 20 minutes.
- Avoid the refrigerator: Cold air speeds up staling and dries out the crumb.
If you notice mold, discard the whole loaf.
Frequently Asked Questions
Do I need steam to get a crispy crust?
Steam isn’t strictly required, but it makes a noticeable difference. It improves oven spring and produces a thinner, shinier, crunchier crust. Without it, the bread will still taste good, but the crust will be thicker and duller.
Can I use a glass dish for the steam?
No. Use a metal tray or cast-iron pan. Pouring cold or hot water into a hot glass dish can cause it to shatter.
Can I use all-purpose flour instead of bread flour?
Yes. Bread flour gives a chewier loaf, while all-purpose gives a slightly softer crumb. Both create a crisp crust.
Can I use a stand mixer?
Yes. Use the dough hook on medium-low speed for 5 to 6 minutes until smooth and elastic.
Can I use active dry yeast?
Yes, in the same amount. Dissolve it in the warm water first until foamy.
Why is my dough so sticky?
A slightly sticky dough is intentional and creates an airy interior. It becomes smoother as you knead. Add flour only a tablespoon at a time if needed.
How do I know when the bread is done?
It should be deeply golden and sound hollow when you tap the bottom. An internal temperature of about 200°F to 210°F (93°C to 99°C) confirms doneness.
Can I make the dough ahead of time?
Yes. After kneading, refrigerate the dough in an oiled, covered bowl for up to 24 hours. Let it come to room temperature before shaping and baking.
Can I bake this on a pizza stone or Dutch oven?
Yes. A preheated stone gives a crisp bottom crust, and a Dutch oven traps steam naturally. If using a Dutch oven, bake covered for the first 20 minutes, then uncover to finish browning. Adjust shaping to fit the pot.
Can I make one large loaf instead of two?
Yes. Shape one large loaf and add about 10 to 15 minutes to the bake time, checking for color and hollow sound.
Why did my bread get soft after cooling?
Trapped moisture is the usual cause. Cool on a wire rack and avoid wrapping the bread while it’s warm.
Can I make this recipe without sugar?
Yes. The sugar is just a small boost for the yeast and browning. Without it, the loaf may brown slightly less.
How do I get a more open crumb?
Keep the dough slightly sticky, handle it gently after the first rise, and don’t overwork it when shaping.
Can I double the recipe?
Yes. Double all ingredients, divide into four loaves, and bake in batches or on two trays, rotating halfway through.
Final Thoughts
Making crispy bread at home is far easier than it looks. With a handful of pantry ingredients, a little kneading, and a hot oven filled with steam, you can pull out two golden, crackling loaves with a soft, airy center and a bakery-style aroma.
The keys are simple: keep the dough slightly sticky, create steam at the start, bake until deeply golden, and cool on a wire rack. Master those steps, and you can adapt the recipe with herbs, seeds, cheese, or whole grains to suit any meal.
Quick Recipe Recap:
- Combine flour, yeast, salt, and sugar, then add warm water and olive oil.
- Knead 8 to 10 minutes by hand (5 to 6 with a mixer) until smooth.
- Let rise 60 to 75 minutes until doubled.
- Divide, shape into two oval loaves, and rest 20 to 30 minutes.
- Preheat the oven to 450°F (230°C) with an empty metal tray on the lower rack.
- Dust, score, pour 1 cup hot water into the tray, and bake 25 to 30 minutes until deeply golden.
- Cool on a wire rack at least 20 minutes before slicing.
Homemade Crispy Bread
Ingredients
This recipe makes 2 small loaves:
- 3 cups (375 g) all-purpose or bread flour
- 2¼ teaspoons instant yeast
- 1 teaspoon salt
- 1 teaspoon sugar
- 1¼ cups (300 ml) warm water
- 1 tablespoon olive oil
- Extra flour, for shaping
Ingredient Notes and Smart Swaps
Flour. Bread flour has more protein, which builds more gluten and gives a chewier, taller loaf with a sturdy crust. All-purpose flour works well too and yields a slightly softer crumb. For the best accuracy, weigh the flour. If you use measuring cups, spoon the flour into the cup and level it off rather than scooping, which can pack in extra flour and dry out the dough.
Instant yeast. Instant yeast (also called rapid-rise or bread machine yeast) can be mixed straight into the flour. If you only have active dry yeast, use the same amount but dissolve it in the warm water for 5 to 10 minutes until foamy, and expect the rises to take a little longer.
Salt. Salt adds flavor, strengthens gluten, and moderates yeast activity. Without it, the bread tastes flat. Fine sea salt or table salt works best for even distribution.
Sugar. Just one teaspoon feeds the yeast and encourages browning. It won’t make the bread sweet.
Warm water. Aim for roughly 105°F to 115°F (40°C to 46°C), which feels comfortably warm, not hot. Water that is too hot can kill yeast, while cold water slows the rise.
Olive oil. A tablespoon adds flavor and a little tenderness to the crumb without softening the crust significantly.
Extra flour. Use it sparingly for dusting your hands, the work surface, and the loaves. Too much flour changes the dough’s hydration and makes the bread denser.
Instructions
- A large mixing bowl
- A wooden spoon or dough whisk
- A clean work surface for kneading
- A stand mixer with a dough hook (optional)
- A baking sheet lined with parchment paper
- A metal baking tray or cast-iron pan for steam (not glass, which can shatter)
- A sharp knife or razor blade for scoring
- A wire cooling rack
- Oven mitts
- A kitchen scale (optional)
- An instant-read thermometer (optional)
How to Make Homemade Crispy Bread (Step by Step)
Step 1: Mix the Dough
In a large bowl, combine the flour, instant yeast, salt, and sugar. Whisk briefly to distribute everything evenly. Add the warm water and olive oil, then stir until a sticky dough forms and no dry flour remains.
Step 2: Knead Until Smooth
Turn the dough onto a lightly floured surface and knead for 8 to 10 minutes by hand, or 5 to 6 minutes with a stand mixer on medium-low speed. To knead by hand, push the dough away from you with the heel of your hand, fold it back, rotate it a quarter turn, and repeat. The dough will transform from sticky and shaggy to smooth and elastic.
Add only a little flour if it’s unmanageable. A slightly sticky dough produces the lightest, airiest interior.
The windowpane test: Pinch off a small piece and gently stretch it. If it forms a thin, translucent membrane without tearing, the gluten is well developed.
Step 3: Let the Dough Rise
Place the dough in a lightly oiled bowl, cover it, and leave it in a warm place for 60 to 75 minutes, or until doubled in size. Good spots include an oven with only the light on or a draft-free corner of the kitchen.
The poke test: Gently press a floured fingertip into the dough. If the dent springs back slowly and incompletely, it’s ready.
Step 4: Shape the Loaves
Gently deflate the dough and divide it into two equal portions. Shape each into a rustic oval loaf by patting it into a rectangle, folding it in thirds, and pinching the seam closed. Roll it gently so the surface is taut. Place each loaf seam-side down on a parchment-lined baking sheet, leaving room between them.
Step 5: Rest and Preheat
Cover the loaves loosely and let them rest for 20 to 30 minutes. Meanwhile, preheat the oven to 450°F (230°C) and place an empty metal baking tray on the lower rack. The tray must heat with the oven so it produces plenty of steam when you add water.
Step 6: Score the Bread
Dust the loaves lightly with flour. Using a sharp knife or razor blade, make one or two shallow slashes across the top of each loaf, about ¼ inch deep. Use a quick, confident motion. Scoring guides expansion and creates the classic rustic look.
Step 7: Create Steam and Bake
Carefully pour about 1 cup of hot water into the preheated metal tray, avoiding splashes. Place the baking sheet in the oven right away and close the door. Bake for 25 to 30 minutes, until the loaves are deeply golden and crisp. They should sound hollow when tapped on the bottom.
Keep your face and hands away from the steam, and use oven mitts. Never use a glass dish for the steam tray, since cold water on hot glass can shatter it.
Step 8: Cool Before Serving
Transfer the loaves to a wire rack and let them cool for at least 20 minutes before slicing. As they cool, you may hear the crust crackle. That’s the sign of a properly crisp loaf. Cooling also lets the interior finish setting, which prevents a gummy crumb.