
Single-Serve Garlic Herb Skillet Focaccia
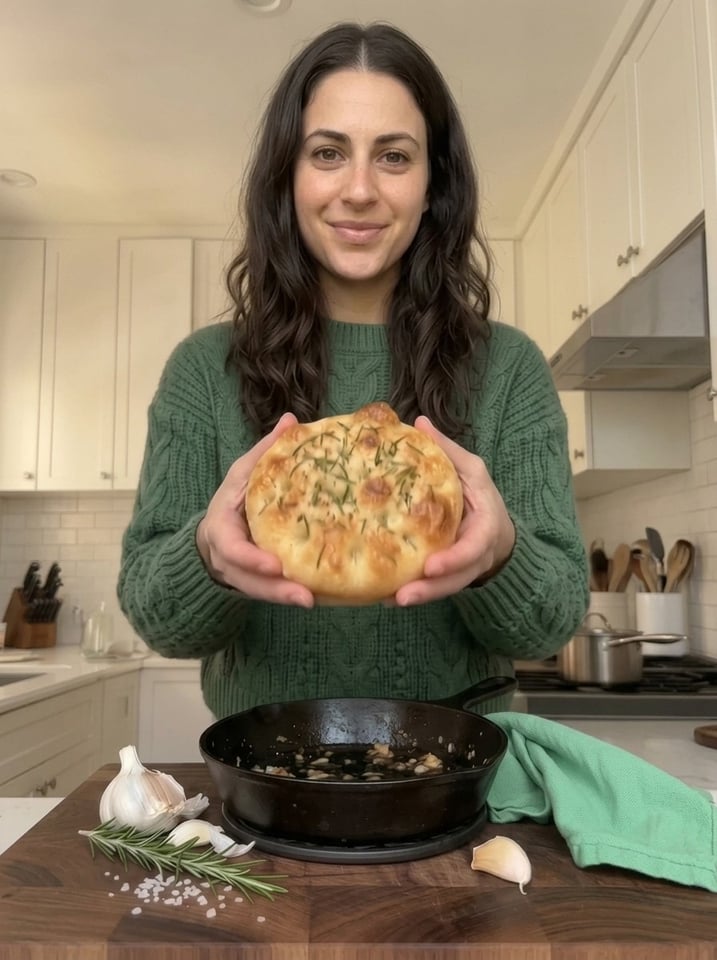
Single-Serve Garlic Herb Skillet Focaccia: A Crispy, Fluffy Mini Loaf Made Just for You 🧄🌿🍞
There are evenings when you want warm, fragrant, homemade bread, but you don’t want a whole loaf sitting on the counter. This Single-Serve Garlic Herb Skillet Focaccia is the answer. It’s golden and fluffy, with a crisp olive-oil crust, a soft and airy center, and a topping of garlic-infused oil, herbs, and flaky sea salt that smells incredible as it bakes. It’s made in a small skillet, requires no kneading, and gives you exactly one mini focaccia, which is just the right amount for a solo lunch, a cozy snack, or a side for a bowl of soup.
The method is as simple as bread gets: stir a handful of ingredients together in a small bowl, let the dough rise until puffy, stretch it into a skillet, dress it with garlic and herb oil, press in the classic dimples, and bake. About an hour and fifteen minutes later, most of it hands-off, you’re tearing into a warm, savory bread that tastes like it came from an Italian bakery.
In this complete guide, you’ll find the full recipe, a closer look at each ingredient, step-by-step instructions with visual cues, a guide to preventing burnt garlic, the science behind focaccia’s texture, expert tips, skillet alternatives, troubleshooting help, flavor variations, serving ideas, storage and reheating instructions, and answers to the most common questions about mini focaccia.
Why You’ll Love This Single-Serve Garlic Herb Focaccia ❤️
It makes exactly one portion. No scaling down large recipes, no leftover loaf going stale. You make just what you want.
It’s a no-knead recipe. The dough is stirred with a spoon, and the rise does the work. There’s no mixer and no kneading.
The crust is crisp and golden. Olive oil in the skillet and on top gives the focaccia its signature fried-and-crackly bottom and edges.
The center is soft and airy. A slightly wet dough and a patient rise create a tender, open crumb.
The flavor is garlicky and herby. Fresh garlic, fragrant herbs, flaky salt, and olive oil make every bite savory and aromatic.
It uses pantry staples. Flour, yeast, sugar, salt, water, olive oil, a clove of garlic, and dried herbs are all you need.
It’s mostly hands-off. Only 10 minutes of active work, with the rest of the time spent rising and baking.
It’s a perfect partner for meals. Serve it with soup, salad, pasta, or eggs, or dip it in marinara or olive oil.
It’s a fun beginner project. The small scale makes it low-risk and forgiving, and a great way to practice bread baking.
Recipe Overview
- Prep Time: 10 minutes
- Cook Time: 18–22 minutes
- Total Time: About 1 hour 15 minutes
- Servings: 1 mini focaccia
Ingredients You’ll Need 🛒
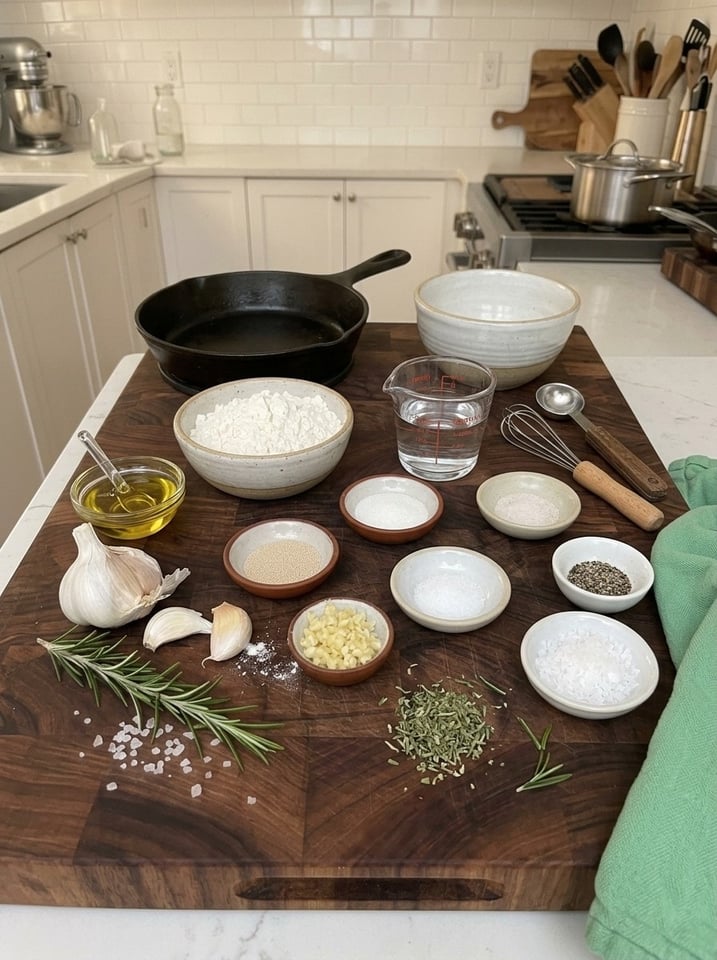
For the Dough
- ½ cup (65 g) all-purpose flour or bread flour
- ¼ tsp instant yeast
- ¼ tsp sugar
- ¼ tsp salt
- ¼ cup (60 ml) lukewarm water
- 1 tsp olive oil
For the Garlic Herb Topping
- 1 tbsp olive oil
- 1 small garlic clove, finely minced
- ½ tsp dried Italian herbs or chopped fresh rosemary
- Flaky sea salt, to taste
- A pinch of black pepper (optional)
A Closer Look at the Ingredients
Flour. All-purpose flour gives a soft, tender mini focaccia, while bread flour produces a chewier, slightly taller one thanks to its higher protein content. Both work well. Because this recipe is tiny, accuracy matters. A scooped half cup can vary by 15 grams or more, which is a big difference in such a small batch, so weigh the flour at 65 grams if you can.
Instant yeast. Just ¼ teaspoon is needed because the dough is small and gets a long rise. Instant yeast can be stirred directly into the flour. If you only have active dry yeast, use the same amount, but dissolve it in the lukewarm water with the sugar for 5 to 10 minutes, until foamy, before adding it to the flour. Measure carefully with a proper measuring spoon, since a pinch too much can make the dough rise too fast and taste overly yeasty.
Sugar. A tiny amount feeds the yeast and encourages browning. It doesn’t make the bread sweet.
Salt. Salt flavors the dough and controls yeast activity. Don’t skip it. The flaky salt on top provides an extra savory finish.
Lukewarm water. Lukewarm means comfortably warm to the touch, about 100°F to 110°F (38°C to 43°C). Water that’s too hot can kill the yeast, while water that’s too cold slows the rise. The dough is relatively wet, which is what gives focaccia its airy interior.
Olive oil. Olive oil is central to focaccia. A teaspoon in the dough adds tenderness and flavor, and the tablespoon of garlic-infused oil on top, plus the oil in the skillet, creates the crisp crust. Use a good extra virgin olive oil if you have it.
Garlic. One small clove is enough to flavor the whole mini loaf. Mince it very finely so it distributes evenly and cooks quickly. Garlic is the ingredient most likely to burn, which is why the oil-mixing technique in this recipe matters.
Herbs. Dried Italian herbs are convenient, but fresh rosemary gives the most classic focaccia flavor. If using fresh rosemary, chop it finely and use about 1 teaspoon. Thyme, oregano, and basil all work beautifully too.
Flaky sea salt. The delicate flakes dissolve slowly and add pops of salty flavor and a satisfying crunch.
Black pepper (optional). A pinch adds gentle warmth and complements the garlic.
Step-by-Step Instructions 👩🍳
Step 1: Mix the Dough
In a small bowl, combine the flour, yeast, sugar, and salt. Add the lukewarm water and 1 teaspoon of olive oil. Stir with a spoon or small spatula until a sticky, shaggy dough forms and no dry flour remains. No kneading is needed. The dough will look wet and rough, and that’s exactly right for focaccia. Resist adding extra flour.
Step 2: Let It Rise
Cover the bowl with plastic wrap, a plate, or a damp towel and leave it in a warm place for 45 to 60 minutes. The dough is ready when it looks puffy, has expanded noticeably, and shows bubbles on the surface or along the sides of the bowl. A turned-off oven with the light on is a good draft-free spot. If your kitchen is cool, the rise may take closer to 75 minutes. Judge by the dough rather than the clock.
Step 3: Prepare the Skillet
Lightly grease a small oven-safe skillet, about 5 to 6 inches wide, with olive oil. Use enough to coat the bottom and sides. A cast iron skillet is ideal because it holds and transfers heat well, giving the bottom a deeply golden, crispy crust.
Step 4: Shape the Dough
Scrape the dough into the skillet with a greased spatula or oiled fingers. Gently stretch it toward the edges with your fingertips. If the dough springs back and resists stretching, let it rest for a few minutes and try again. After shaping, let it rest in the skillet for another 10 to 15 minutes so it relaxes and puffs slightly. During this time, preheat your oven.
Step 5: Add the Topping
In a small bowl, mix the tablespoon of olive oil with the minced garlic and herbs. Drizzle the mixture over the dough. Then, with oiled fingertips, press dimples firmly across the surface, pushing nearly to the bottom of the skillet. The dimples catch pools of garlic-herb oil and give focaccia its classic look. Sprinkle with flaky salt and a pinch of black pepper if desired.
Step 6: Bake Until Golden
Preheat the oven to 425°F (220°C). Bake the focaccia for 18 to 22 minutes, until puffed and golden around the edges. Keep an eye on the garlic. If it starts to darken too much before the bread is done, loosely tent the skillet with foil. The bottom should be golden brown and crisp when lifted with a spatula.
Step 7: Cool and Serve
Remove the skillet carefully with oven mitts. The handle will be extremely hot. Let the focaccia cool in the skillet for about 5 minutes, then loosen the edges with a spatula and transfer it to a rack or plate. Serve warm on its own, or alongside soup, salad, or pasta.
How to Prevent Burnt Garlic 🧄
Garlic is delicious when golden and mellow, but acrid when burnt. Because focaccia bakes at a high temperature, the thin pieces of garlic on top are at risk. Here’s how to keep them perfect:
Mix the garlic into the oil. Stirring the minced garlic into olive oil, rather than scattering it dry over the dough, coats each piece in a protective layer of oil, so it cooks gently rather than scorching.
Press the garlic into the dimples. Garlic nestled into the dough’s dimples is insulated by the bread around it.
Mince finely, don’t slice thin. Very thin slices burn quickly. Finely minced garlic in oil distributes evenly and melds into the topping.
Use a small clove. A small clove gives plenty of flavor without much burn risk.
Tent with foil if needed. If the topping is darkening too quickly, cover the skillet loosely for the last few minutes.
Consider garlic powder as a backup. If you’re worried, use ¼ teaspoon of garlic powder mixed into the oil, which is much less likely to burn.
Use roasted garlic. Mashed roasted garlic, spread over the dough, adds a sweet, mellow flavor with no burn risk.
The Science Behind Great Mini Focaccia 🔬
A wet dough makes an airy crumb. Focaccia dough has a high proportion of water. In the oven, that water turns to steam, which expands the gas bubbles created by the yeast and results in an open, tender interior.
Time builds structure. Without kneading, gluten forms slowly as the flour hydrates and the dough rests, giving the bread strength without effort.
Olive oil fries the crust. The oil in the skillet works like shallow frying, crisping and browning the bottom and edges, while the oil on top keeps the surface rich and golden.
Dimples control the rise. Pressing the dough deflates large bubbles and prevents a puffy dome, keeping the bread flat and giving oil and toppings a place to pool.
High heat gives color and flavor. At 425°F (220°C), the exterior browns quickly through the Maillard reaction and caramelization, producing toasty, complex flavor, while the inside stays soft.
Cast iron retains heat. A preheated or thick skillet provides strong, steady bottom heat, giving a crisper crust than a thin pan.
Expert Tips for the Best Mini Focaccia 💡
Keep the dough sticky. A slightly wet dough helps create a soft, airy center.
Use plenty of olive oil. This creates the signature crispy focaccia crust.
Prevent burnt garlic. Mix the minced garlic into the oil rather than scattering it dry over the dough.
Try different herbs. Rosemary, oregano, thyme, or Italian seasoning all work beautifully.
Skillet safety. Use only an oven-safe skillet and handle it with oven mitts. Remember that the handle stays hot long after leaving the oven. Consider draping a towel over the handle as a reminder.
Measure accurately. In a tiny recipe, small differences matter. Use proper measuring spoons and a scale.
Be patient with the rise. The rise time depends on your kitchen’s temperature. Wait for a puffy, expanded dough.
Oil your hands. Oiled fingers keep the sticky dough from clinging while you stretch and dimple.
Dimple deeply. Press all the way down so the dimples survive baking.
Preheat the skillet for extra crunch. For an even crispier bottom, warm the oiled skillet in the oven while it preheats, then carefully add the dough. Use extreme care with the hot pan.
Check early. Small breads bake quickly. Start checking at 18 minutes.
Add fresh herbs after baking. Delicate herbs, such as basil or parsley, taste best added after baking.
What If I Don’t Have a Small Skillet?
You can still make this focaccia without a 5- to 6-inch skillet. Here are alternatives:
- Small cast iron or oven-safe skillet: Any heavy, oven-safe pan around 5 to 7 inches wide works.
- Small cake pan or pie tin: A 6-inch round cake pan or a small metal pie dish works nicely. Grease it generously with olive oil.
- Ramekin or small baking dish: For a thicker, taller focaccia, use an oven-safe ramekin and check doneness a few minutes later.
- Muffin tin: Divide the dough into 2 or 3 oiled cups for mini focaccia rolls, reducing the baking time slightly.
- Baking sheet: Shape the dough into a small oval on a parchment-lined, oil-brushed sheet pan. The focaccia will be flatter, with a slightly less crisp bottom.
Avoid skillets with plastic or rubber handles, which aren’t oven-safe, and nonstick pans not rated for 425°F.
Troubleshooting Common Problems
My dough didn’t rise. The yeast may be old, the water may have been too hot or too cold, or the room may be too cool. Use fresh yeast, check the water temperature, and move the dough to a warmer spot.
The focaccia is dense. Too much flour, too little rise, or too little water can cause density. Weigh your flour, and make sure the dough looks puffy before shaping.
The dough keeps springing back. The gluten is tight. Cover the dough and let it rest 5 to 10 minutes before stretching again.
The bottom is pale and soft. Not enough oil was used, or the skillet wasn’t hot enough. Use more oil, and consider preheating the skillet.
The garlic burned. Mix it into the oil, press it into the dimples, or tent with foil. Consider garlic powder or roasted garlic next time.
The bottom burned. Cast iron heats intensely. Lower the rack, reduce the oven temperature by 25°F, or shorten the baking time.
The top is too pale. Bake a few minutes longer, or move the skillet to a higher rack for the last few minutes.
The focaccia sticks to the skillet. Use more olive oil, and loosen the edges with a thin spatula while it’s still warm.
The center is gummy. The focaccia may need a few more minutes. The edges should be crisp and the top deeply golden.
The dough is too sticky to handle. Oil your hands rather than adding flour. A sticky dough is normal and desirable.
The bread tastes too yeasty. Too much yeast or too long a rise can cause this. Measure accurately and don’t overproof.
Delicious Variations to Try 🌿
Rosemary and sea salt. Use only fresh rosemary and flaky salt for the classic version.
Garlic Parmesan focaccia. Sprinkle grated Parmesan over the dough in the last 5 minutes of baking.
Cheesy garlic focaccia. Top with shredded mozzarella for the last 3 to 5 minutes.
Cherry tomato and basil. Press halved cherry tomatoes into the dimples and finish with fresh basil.
Olive and herb. Add sliced olives and thyme.
Lemon and thyme. Add lemon zest and fresh thyme for a bright, fragrant version.
Roasted garlic focaccia. Spread mashed roasted garlic over the dough before dimpling.
Everything seasoning focaccia. Sprinkle with everything bagel seasoning.
Chili-garlic focaccia. Add a pinch of crushed red pepper flakes to the garlic oil.
Pesto focaccia. Brush the baked focaccia with pesto.
Honey and herb focaccia. Drizzle with a little honey just after baking for a sweet-savory finish.
What to Serve with Garlic Herb Skillet Focaccia 🍽️
- Soup: Tear and dunk into tomato soup, minestrone, or lentil soup.
- Salad: Serve alongside a Caesar, Caprese, or simple green salad.
- Pasta: Pair with spaghetti, lasagna, or baked ziti to soak up the sauce.
- Marinara or olive oil dips: Use it for dipping with marinara, olive oil and balsamic, or whipped ricotta.
- Eggs: Serve with scrambled eggs, a frittata, or poached eggs for brunch.
- Mini sandwich: Slice horizontally and fill with mozzarella, tomato, and basil.
- Cheese and charcuterie: Add it to a solo snack board with cheese, olives, and cured meats.
- Hummus and dips: Serve with hummus or white bean dip.
- Grilled meats and veggies: Add it to a plate of grilled chicken or roasted vegetables.
Storage and Reheating Instructions
Eat it fresh. Focaccia is at its best within an hour or two of baking, when the crust is crisp and the center is soft.
Room temperature: Store leftovers in an airtight container or bag for up to 1 to 2 days.
Refrigerator: Refrigeration tends to dry out bread, so it’s best to avoid it unless you’ve added perishable toppings, such as cheese or fresh vegetables. Use within 3 days.
Freezer: Wrap cooled focaccia tightly and freeze for up to 2 months. Thaw at room temperature before reheating.
Reheating: Warm in a 350°F (175°C) oven for 5 to 8 minutes, or crisp in a dry skillet over medium heat for a couple of minutes per side. A light drizzle of olive oil before reheating refreshes the crust.
Scaling up: Want to make more? Double or triple the recipe and bake in a larger skillet or cake pan, adding a few minutes to the baking time.
Frequently Asked Questions
Do I need to knead the dough? No. The dough is stirred and rests, and the wet consistency and long rise develop the structure on their own.
Can I use active dry yeast instead of instant yeast? Yes. Use the same amount, dissolve it in the lukewarm water with the sugar for 5 to 10 minutes until foamy, then continue with the recipe. The rise may take a little longer.
Do I need a cast iron skillet? No, but cast iron gives the crispiest bottom. Any small oven-safe skillet or pan will work.
Can I double or triple the recipe? Yes. Use a larger skillet or pan and add a few minutes to the baking time.
Can I use bread flour? Absolutely. Bread flour produces a slightly chewier and taller focaccia.
Why is my dough so sticky? Focaccia dough is meant to be wet. That moisture creates the airy interior. Use oiled hands for handling.
Can I let the dough rise overnight? Yes. Cover the dough and refrigerate it for 8 to 12 hours, then let it come to room temperature for about 30 minutes before shaping and baking.
Can I use fresh garlic and fresh herbs? Yes. Use about 1 teaspoon of finely chopped fresh herbs in place of ½ teaspoon of dried, and keep the garlic finely minced and mixed into the oil.
Why did my garlic burn? Garlic scattered dry on the surface can burn at high heat. Mixing it into the oil and pressing it into the dimples protects it. Tenting with foil also helps.
Can I make this vegan? Yes, the recipe as written is vegan. Skip cheese toppings or use plant-based alternatives.
Can I bake this in an air fryer? Yes, if the pan fits. Bake at about 350°F (175°C) for 12 to 15 minutes, checking early.
How do I know when it’s done? The top should be golden, the edges crisp, and the bottom golden and crunchy when lifted with a spatula.
Can I use a toaster oven? Yes, but check for doneness a few minutes early, since toaster ovens can run hot.
Final Thoughts ✨🧄
This Single-Serve Garlic Herb Skillet Focaccia delivers everything people love about bakery focaccia: a crisp, olive-oil-rich crust, a soft, airy center, and a savory topping of garlic, herbs, and flaky salt, all in a portion made just for you. With a handful of pantry ingredients, a small skillet, and a little time, you can bake warm, fragrant bread without the commitment of a full loaf.
Stir the dough, let it rise, dress it with garlic herb oil, press in those dimples, and bake until golden. Then tear into it while it’s warm, with soup, salad, pasta, or all on its own. Your next homemade bread craving has an easy answer!
Print
Single-Serve Garlic Herb Skillet Focaccia
Ingredients
- ½ cup (65 g) all-purpose flour or bread flour
- ¼ tsp instant yeast
- ¼ tsp sugar
- ¼ tsp salt
- ¼ cup (60 ml) lukewarm water
- 1 tsp olive oil
For the Garlic Herb Topping
- 1 tbsp olive oil
- 1 small garlic clove, finely minced
- ½ tsp dried Italian herbs or chopped fresh rosemary
- Flaky sea salt, to taste
- A pinch of black pepper (optional)
A Closer Look at the Ingredients
Flour. All-purpose flour gives a soft, tender mini focaccia, while bread flour produces a chewier, slightly taller one thanks to its higher protein content. Both work well. Because this recipe is tiny, accuracy matters. A scooped half cup can vary by 15 grams or more, which is a big difference in such a small batch, so weigh the flour at 65 grams if you can.
Instant yeast. Just ¼ teaspoon is needed because the dough is small and gets a long rise. Instant yeast can be stirred directly into the flour. If you only have active dry yeast, use the same amount, but dissolve it in the lukewarm water with the sugar for 5 to 10 minutes, until foamy, before adding it to the flour. Measure carefully with a proper measuring spoon, since a pinch too much can make the dough rise too fast and taste overly yeasty.
Sugar. A tiny amount feeds the yeast and encourages browning. It doesn’t make the bread sweet.
Salt. Salt flavors the dough and controls yeast activity. Don’t skip it. The flaky salt on top provides an extra savory finish.
Lukewarm water. Lukewarm means comfortably warm to the touch, about 100°F to 110°F (38°C to 43°C). Water that’s too hot can kill the yeast, while water that’s too cold slows the rise. The dough is relatively wet, which is what gives focaccia its airy interior.
Olive oil. Olive oil is central to focaccia. A teaspoon in the dough adds tenderness and flavor, and the tablespoon of garlic-infused oil on top, plus the oil in the skillet, creates the crisp crust. Use a good extra virgin olive oil if you have it.
Garlic. One small clove is enough to flavor the whole mini loaf. Mince it very finely so it distributes evenly and cooks quickly. Garlic is the ingredient most likely to burn, which is why the oil-mixing technique in this recipe matters.
Herbs. Dried Italian herbs are convenient, but fresh rosemary gives the most classic focaccia flavor. If using fresh rosemary, chop it finely and use about 1 teaspoon. Thyme, oregano, and basil all work beautifully too.
Flaky sea salt. The delicate flakes dissolve slowly and add pops of salty flavor and a satisfying crunch.
Black pepper (optional). A pinch adds gentle warmth and complements the garlic.
Instructions
In a small bowl, combine the flour, yeast, sugar, and salt. Add the lukewarm water and 1 teaspoon of olive oil. Stir with a spoon or small spatula until a sticky, shaggy dough forms and no dry flour remains. No kneading is needed. The dough will look wet and rough, and that’s exactly right for focaccia. Resist adding extra flour.
Cover the bowl with plastic wrap, a plate, or a damp towel and leave it in a warm place for 45 to 60 minutes. The dough is ready when it looks puffy, has expanded noticeably, and shows bubbles on the surface or along the sides of the bowl. A turned-off oven with the light on is a good draft-free spot. If your kitchen is cool, the rise may take closer to 75 minutes. Judge by the dough rather than the clock.
Lightly grease a small oven-safe skillet, about 5 to 6 inches wide, with olive oil. Use enough to coat the bottom and sides. A cast iron skillet is ideal because it holds and transfers heat well, giving the bottom a deeply golden, crispy crust.
Scrape the dough into the skillet with a greased spatula or oiled fingers. Gently stretch it toward the edges with your fingertips. If the dough springs back and resists stretching, let it rest for a few minutes and try again. After shaping, let it rest in the skillet for another 10 to 15 minutes so it relaxes and puffs slightly. During this time, preheat your oven.
In a small bowl, mix the tablespoon of olive oil with the minced garlic and herbs. Drizzle the mixture over the dough. Then, with oiled fingertips, press dimples firmly across the surface, pushing nearly to the bottom of the skillet. The dimples catch pools of garlic-herb oil and give focaccia its classic look. Sprinkle with flaky salt and a pinch of black pepper if desired.
Preheat the oven to 425°F (220°C). Bake the focaccia for 18 to 22 minutes, until puffed and golden around the edges. Keep an eye on the garlic. If it starts to darken too much before the bread is done, loosely tent the skillet with foil. The bottom should be golden brown and crisp when lifted with a spatula.
Remove the skillet carefully with oven mitts. The handle will be extremely hot. Let the focaccia cool in the skillet for about 5 minutes, then loosen the edges with a spatula and transfer it to a rack or plate. Serve warm on its own, or alongside soup, salad, or pasta.
Garlic is delicious when golden and mellow, but acrid when burnt. Because focaccia bakes at a high temperature, the thin pieces of garlic on top are at risk. Here’s how to keep them perfect:
Mix the garlic into the oil. Stirring the minced garlic into olive oil, rather than scattering it dry over the dough, coats each piece in a protective layer of oil, so it cooks gently rather than scorching.
Press the garlic into the dimples. Garlic nestled into the dough’s dimples is insulated by the bread around it.
Mince finely, don’t slice thin. Very thin slices burn quickly. Finely minced garlic in oil distributes evenly and melds into the topping.
Use a small clove. A small clove gives plenty of flavor without much burn risk.
Tent with foil if needed. If the topping is darkening too quickly, cover the skillet loosely for the last few minutes.
Consider garlic powder as a backup. If you’re worried, use ¼ teaspoon of garlic powder mixed into the oil, which is much less likely to burn.
Use roasted garlic. Mashed roasted garlic, spread over the dough, adds a sweet, mellow flavor with no burn risk.