
5-Ingredient No-Knead Sandwich Bread
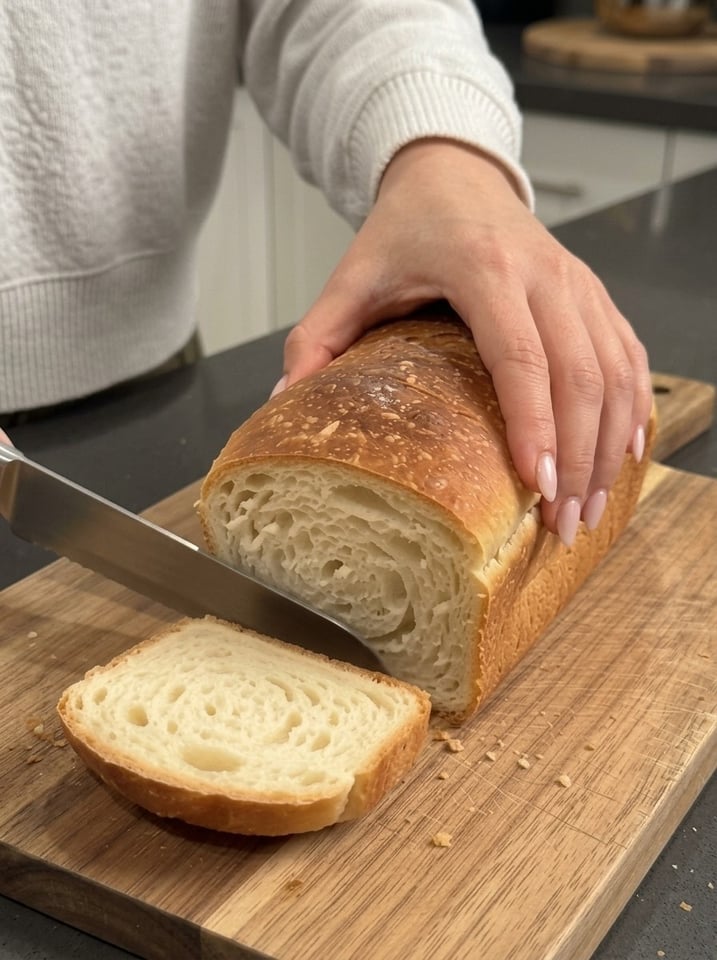
5-Ingredient No-Knead Sandwich Bread: Soft, Fluffy Homemade Loaf With Pantry Staples 🍞✨
There is something deeply satisfying about slicing into a loaf of bread you made yourself. The crust is golden, the crumb is soft and fluffy, and the whole kitchen smells like a bakery. The best part is that this 5-Ingredient No-Knead Sandwich Bread asks almost nothing of you. There is no kneading, no stand mixer, no complicated shaping, and no special equipment beyond a bowl, a spatula, and a loaf pan.
With flour, water, instant yeast, salt, and a splash of olive oil, you can bake a homemade sandwich loaf that is perfect for sandwiches, breakfast toast, grilled cheese, or enjoying warm with a little butter. You stir the dough together in about 10 minutes, let time do the work, and bake it until it is beautifully golden.
In this complete guide you will find the full recipe, a closer look at each of the five ingredients, detailed step-by-step instructions with visual cues, the science behind no-knead bread, expert tips, troubleshooting help, creative variations, serving ideas, storage and freezing instructions, and answers to the most common questions about homemade sandwich bread.
Why You’ll Love This No-Knead Sandwich Bread ❤️
It uses only 5 pantry ingredients. Flour, water, yeast, salt, and olive oil. Nothing hard to find, nothing expensive.
There is no kneading. A spatula and a bowl do all the mixing. That makes it ideal for beginners and for anyone without a stand mixer or the time to knead.
It is almost entirely hands-off. Active work is about 10 minutes plus a few minutes of shaping. The yeast does the rest.
It bakes up soft and fluffy. Baking in a loaf pan gives you the tender, sliceable crumb you expect from sandwich bread, with a golden crust.
It is perfect for sandwiches and toast. Slices are sturdy enough for fillings, and they toast beautifully.
It is far cheaper than store-bought artisan bread. A loaf costs a fraction of what you would pay at a bakery.
You control what goes in. No preservatives, no dough conditioners, no long ingredient list.
It makes your home smell amazing. Fresh-baked bread is its own reward.
Recipe Overview
- Prep Time: 10 minutes
- Rise Time: 1½–2 hours (plus 20–30 minutes for the second rise)
- Cook Time: 35–40 minutes
- Total Time: About 2 hours 30 minutes
- Servings: 10–12 slices
Ingredients You’ll Need 🛒
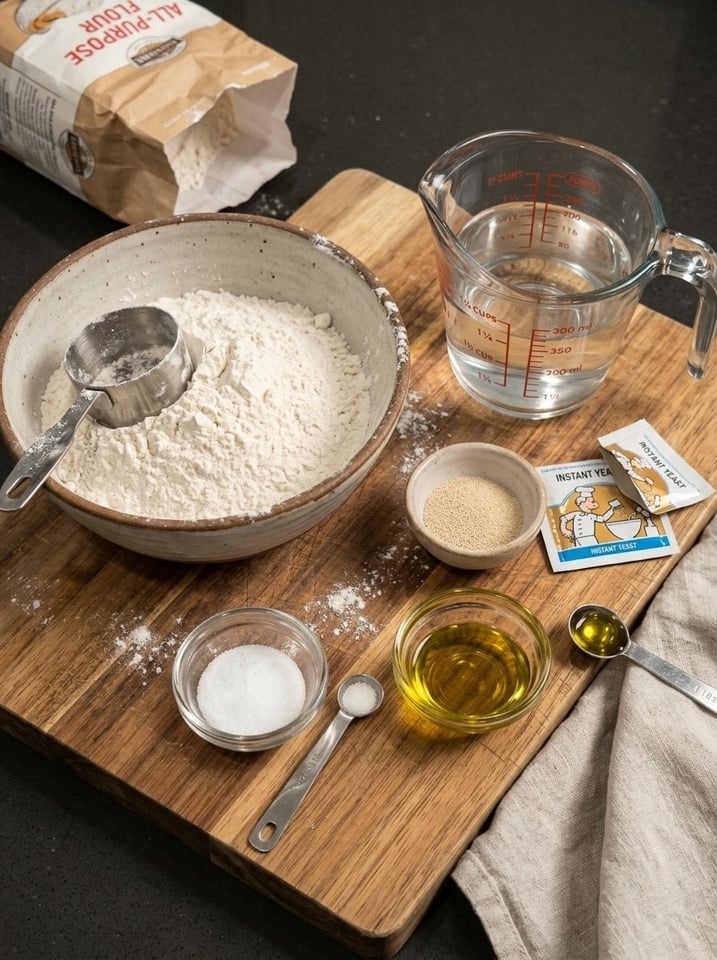
- 3 cups (375 g) all-purpose or bread flour
- 1¼ cups (300 ml) lukewarm water
- 2¼ teaspoons (7 g) instant yeast
- 1½ teaspoons salt
- 1 tablespoon olive oil
A Closer Look at the Ingredients
Flour. Both all-purpose flour and bread flour work. All-purpose flour gives a soft, tender crumb and is what most people already have. Bread flour has more protein, which builds more gluten and gives a slightly chewier, taller loaf. If you can, weigh your flour: 375 g is more reliable than 3 cups, because scooping directly from the bag can pack in extra flour and lead to a dense loaf. If you use cups, spoon the flour into the measuring cup and level it off.
Lukewarm water. Water around 100–110°F (38–43°C) feels barely warm on your wrist. It wakes up the yeast without harming it. Water that is too hot can kill the yeast, and water that is too cold slows the rise considerably. This dough is wet and sticky by design, because the extra hydration is what allows gluten to develop without kneading.
Instant yeast. Instant yeast can be mixed straight into the flour with no proofing needed. If you only have active dry yeast, you can use the same amount, but it is best to dissolve it in the lukewarm water for about 5 to 10 minutes first, and the rise may take a little longer. Check the expiration date, since old yeast is a common reason bread fails to rise.
Salt. Salt adds flavor and also controls the yeast, strengthening the dough and keeping the rise steady. Bread without salt tastes flat. Fine sea salt or table salt both work. If you use a coarse kosher salt, you may want to measure slightly more, since it is less dense by volume.
Olive oil. A tablespoon of olive oil adds a touch of richness, softens the crumb, and helps the bread stay fresh a little longer. You can substitute another neutral oil or melted butter if you prefer.
Step-by-Step Instructions 👩🍳
Step 1: Mix the Dough
In a large bowl, combine the flour, instant yeast, and salt. Whisk or stir briefly so the yeast and salt are evenly distributed. Add the lukewarm water and olive oil, then stir with a spatula or wooden spoon until a sticky, shaggy dough forms and no dry flour remains. This takes about a minute or two. The dough will look rough and messy, and that is exactly right. Do not add extra flour.
Step 2: Let It Rise
Cover the bowl with a clean kitchen towel or plastic wrap. Leave it in a warm place for 1½ to 2 hours, or until the dough has roughly doubled in size. You should see bubbles on the surface and along the sides of the bowl, and the dough will look puffy and jiggly. A turned-off oven with the light on, or a spot near a warm (not hot) appliance, works well in a cool kitchen.
Step 3: Prepare the Loaf Pan
Lightly grease a 9 × 5-inch (23 × 13 cm) loaf pan, or line it with parchment paper, leaving an overhang on the long sides to help lift the loaf out later.
Step 4: Shape the Dough
With lightly oiled hands or a spatula, gently pull the dough away from the sides of the bowl and fold it over itself a few times to form a rough loaf shape. Transfer it to the pan, seam side down if possible, and smooth the top. Be gentle, since you want to keep as many air bubbles as possible.
Step 5: Second Rise
Cover the pan loosely and let the dough rise for 20 to 30 minutes, until puffy and approaching the top of the pan. A good sign is that the dough domes slightly above the rim or sits about an inch below it, depending on your pan. If you gently poke it, the dent should fill back in slowly.
Step 6: Preheat the Oven
While the dough finishes its second rise, heat your oven to 375°F (190°C). Position a rack in the center of the oven.
Step 7: Bake the Bread
Bake for 35 to 40 minutes, until the crust is deep golden brown and the loaf sounds hollow when you tap the bottom or top. If you have an instant-read thermometer, the center of the loaf should reach about 190–200°F (88–93°C). If the top is browning too quickly, tent loosely with foil for the last 10 to 15 minutes.
Step 8: Cool Completely
Remove the loaf from the pan after 5 to 10 minutes and transfer it to a wire rack. Let it cool fully before slicing. It is tempting to cut into it right away, but the crumb is still setting as it cools, and slicing too early can make it seem gummy.
The Science Behind No-Knead Bread 🔬
Time replaces kneading. Kneading helps flour proteins link up into gluten, the stretchy network that traps gas and gives bread its structure. In a wet dough, those proteins can hydrate and align on their own over time, with only a little help from the folding in step 4. A long, slow rise gives gluten the chance to develop without effort.
High hydration makes it work. This dough contains a lot of water relative to the flour. Water helps gluten form and also lets enzymes break some starches into sugars, which feeds the yeast and boosts flavor and browning.
Yeast produces gas and flavor. As yeast ferments sugars, it releases carbon dioxide, which inflates the gluten network, and also produces alcohols and acids that give bread its characteristic taste. A slower rise generally gives more flavor.
The oven spring. In the first minutes of baking, the heat makes gases expand and the yeast works one final burst before it dies. The loaf rises further, then the crust sets.
Starch gelatinization sets the crumb. As the loaf bakes, starches absorb water and swell, then firm up as the bread cools. That is why a fully cooled loaf slices cleanly.
The Maillard reaction creates the crust. Sugars and proteins on the surface brown at high heat, producing the golden color and toasty flavor.
Expert Tips for Perfect Sandwich Bread 💡
Keep the dough slightly sticky. Avoid adding too much extra flour, which can make the bread dense. Use oiled hands or a wet spatula to manage the stickiness instead.
Use lukewarm water. Water that is too hot can damage the yeast. If it feels hot on your wrist, let it cool.
Watch the rise, not just the clock. Cooler kitchens may need more rising time, and warm kitchens less. Look for doubled size and plenty of bubbles.
Weigh your ingredients. A kitchen scale is the best way to get consistent results.
For a softer crust. Brush the warm loaf lightly with olive oil after baking. You can also brush with melted butter.
Check doneness with a thermometer. A center temperature of 190–200°F (88–93°C) means the bread is fully baked.
Don’t skip the cooling time. Cut too early, and the crumb will feel gummy.
Use a serrated knife. A bread knife slices cleanly without squashing the loaf.
Make sure your yeast is fresh. If you are unsure, test it by stirring a pinch into warm water with a little sugar. It should foam within 10 minutes.
Store properly. Keep in an airtight bag or container at room temperature for up to 3 days, or freeze slices for longer storage.
Troubleshooting Common Problems
My dough didn’t rise. The yeast may be old, the water too hot or too cold, or the kitchen too cool. Use fresh yeast, lukewarm water, and give the dough more time in a warmer spot.
My bread is dense. Too much flour, too little rising time, or underproofing can cause density. Weigh the flour, keep the dough sticky, and let it double.
My loaf collapsed or sank in the middle. The dough may have over-risen during the second rise. Bake it when it is puffy and near the top of the pan, not far above it.
The crust is too hard. Brush the warm loaf with olive oil or butter, and store it in a bag so the crust softens.
The crust is too pale. Bake a few minutes longer, or move the pan to a slightly higher rack for the last 10 minutes.
The top is browning too fast. Tent the loaf with foil, and check that your oven temperature is accurate with an oven thermometer.
The crumb is gummy. The loaf may be underbaked or sliced while still hot. Check that the center reaches 190–200°F (88–93°C), and let it cool completely.
The bread tastes bland. Make sure you included the full 1½ teaspoons of salt, and consider a longer rise for more flavor.
The bread tastes too yeasty. The dough may have risen too long or in too warm a spot. Shorten the rise slightly, or use a little less yeast.
The dough is too sticky to handle. That is normal. Use oiled hands, a wet spatula, or a bit of oil on the counter instead of adding flour.
There are big holes in the crumb. The dough was likely shaped too loosely or rose too far. Gently press out the largest bubbles when shaping.
Delicious Variations to Try 🌿
Whole wheat version. Replace up to 1 cup of the flour with whole wheat flour. You may need a splash more water.
Herb and garlic loaf. Stir 1 teaspoon of dried Italian herbs and ½ teaspoon of garlic powder into the dry ingredients.
Cheddar and chive loaf. Fold in ¾ cup of shredded cheddar and a tablespoon of chopped chives before the first rise.
Seeded sandwich bread. Brush the top with water and sprinkle sesame, sunflower, or poppy seeds before baking.
Honey oat bread. Add a tablespoon of honey to the dough and sprinkle rolled oats on top.
Cinnamon raisin loaf. Add 1 teaspoon of cinnamon and ½ cup of raisins, plus a tablespoon of sugar.
Rosemary olive oil bread. Add chopped fresh rosemary and brush the baked loaf with extra olive oil.
Dinner rolls. Divide the dough into 10 to 12 pieces, place them in a greased baking dish, let them rise, and bake for about 20 to 25 minutes.
Mini loaves. Divide the dough between two smaller pans and reduce the baking time to about 25 to 30 minutes.
What to Serve with Homemade Sandwich Bread 🍽️
- Classic sandwiches: Turkey and cheese, ham, chicken salad, or egg salad.
- Grilled cheese: Butter the outside and griddle until golden.
- Breakfast toast: Top with butter and jam, honey, or peanut butter.
- Avocado toast: Add a poached egg and chili flakes.
- French toast: Slightly stale slices soak up custard beautifully.
- BLTs: Toasted slices hold up to bacon, lettuce, and tomato.
- Soup dippers: Serve toasted slices alongside tomato soup or chili.
- Garlic bread: Spread with garlic butter and bake until crisp.
- Bread pudding or croutons: Use leftover slices for sweet or savory recipes.
- Open-faced toasts: Top with cream cheese, smoked salmon, and herbs.
Storage and Freezing Instructions
Room temperature. Once the loaf is completely cool, store it in an airtight bag or container at room temperature for up to 3 days. Keep it cut-side down on a cutting board, or wrapped, to slow staling.
Refrigerator. It is generally better not to refrigerate bread, since the cold speeds up staling. If your kitchen is very warm and humid, storing it in the fridge can help prevent mold, but toast the slices to refresh them.
Freezer. Slice the cooled loaf, then freeze the slices in a freezer bag, with parchment between them if you like, for up to 3 months. Toast slices straight from frozen, or thaw at room temperature.
Reheating. Refresh a whole or half loaf by warming it in a 350°F (175°C) oven for 5 to 10 minutes.
Make-ahead option. You can mix the dough, cover it, and let it rise slowly in the refrigerator for up to about 24 hours for more flavor. Let it warm up a little, then shape and finish the second rise before baking.
Frequently Asked Questions
Is this bread really no-knead? Yes. You only stir the dough and gently fold it when shaping. The long rise and wet dough develop the gluten for you.
Can I use all-purpose flour instead of bread flour? Yes. All-purpose flour gives a softer, more tender loaf. Bread flour gives a slightly chewier, taller loaf.
Can I use active dry yeast instead of instant yeast? Yes. Use the same amount, dissolve it in the lukewarm water for 5 to 10 minutes first, and expect the rise to take a little longer.
Why is my dough so sticky? This is a high-hydration dough, and stickiness is normal. Use oiled hands or a wet spatula instead of adding more flour.
How do I know when the dough has doubled? It will look puffy and domed, with bubbles on the surface and sides of the bowl. Marking the starting level with a rubber band or tape on the bowl can help.
How do I know when the bread is done? The crust should be deep golden, the loaf should sound hollow when tapped, and the center should reach 190–200°F (88–93°C).
Can I make the dough ahead of time? Yes. After mixing, refrigerate the covered dough for up to about 24 hours. Bring it back toward room temperature and finish the rises before baking.
Can I use a different size pan? Yes, but adjust the baking time. A smaller pan makes a taller loaf that needs a little more time, and a larger pan makes a flatter loaf that bakes faster.
Can I make it without oil? Yes. The bread will still work, though the crumb will be slightly less soft and it may stale a bit faster.
Why did my bread come out dense? Common causes are too much flour, old yeast, a cool kitchen, or not letting the dough rise enough. Weigh your flour and watch the dough, not the clock.
Can I add whole wheat flour? Yes. Replace up to 1 cup of the flour with whole wheat flour, and add a little more water if the dough seems stiff.
Can I bake it in a Dutch oven instead? Yes. For a crustier, round loaf, bake it in a preheated covered Dutch oven at 450°F (230°C) for about 30 minutes covered, then uncovered until golden. It will have a chewier crust than the pan version.
How long does it keep? Up to 3 days at room temperature in an airtight bag, or up to 3 months frozen.
Can I double the recipe? Yes. Double all the ingredients and divide the dough between two pans. The rise times stay about the same.
Final Thoughts 🍞🏡
This 5-Ingredient No-Knead Sandwich Bread proves that homemade bread does not have to be hard. With flour, water, yeast, salt, and olive oil, a spatula, and a little patience, you get a soft, fluffy, golden loaf that is ready for sandwiches, toast, and everything in between. Keep the dough sticky, watch the rise, let the bread cool, and you will be rewarded with a loaf you can be proud of.
Print
5-Ingredient No-Knead Sandwich Bread
Ingredients
- 3 cups (375 g) all-purpose or bread flour
- 1¼ cups (300 ml) lukewarm water
- 2¼ teaspoons (7 g) instant yeast
- 1½ teaspoons salt
- 1 tablespoon olive oil
A Closer Look at the Ingredients
Flour. Both all-purpose flour and bread flour work. All-purpose flour gives a soft, tender crumb and is what most people already have. Bread flour has more protein, which builds more gluten and gives a slightly chewier, taller loaf. If you can, weigh your flour: 375 g is more reliable than 3 cups, because scooping directly from the bag can pack in extra flour and lead to a dense loaf. If you use cups, spoon the flour into the measuring cup and level it off.
Lukewarm water. Water around 100–110°F (38–43°C) feels barely warm on your wrist. It wakes up the yeast without harming it. Water that is too hot can kill the yeast, and water that is too cold slows the rise considerably. This dough is wet and sticky by design, because the extra hydration is what allows gluten to develop without kneading.
Instant yeast. Instant yeast can be mixed straight into the flour with no proofing needed. If you only have active dry yeast, you can use the same amount, but it is best to dissolve it in the lukewarm water for about 5 to 10 minutes first, and the rise may take a little longer. Check the expiration date, since old yeast is a common reason bread fails to rise.
Salt. Salt adds flavor and also controls the yeast, strengthening the dough and keeping the rise steady. Bread without salt tastes flat. Fine sea salt or table salt both work. If you use a coarse kosher salt, you may want to measure slightly more, since it is less dense by volume.
Olive oil. A tablespoon of olive oil adds a touch of richness, softens the crumb, and helps the bread stay fresh a little longer. You can substitute another neutral oil or melted butter if you prefer.
Instructions
In a large bowl, combine the flour, instant yeast, and salt. Whisk or stir briefly so the yeast and salt are evenly distributed. Add the lukewarm water and olive oil, then stir with a spatula or wooden spoon until a sticky, shaggy dough forms and no dry flour remains. This takes about a minute or two. The dough will look rough and messy, and that is exactly right. Do not add extra flour.
Cover the bowl with a clean kitchen towel or plastic wrap. Leave it in a warm place for 1½ to 2 hours, or until the dough has roughly doubled in size. You should see bubbles on the surface and along the sides of the bowl, and the dough will look puffy and jiggly. A turned-off oven with the light on, or a spot near a warm (not hot) appliance, works well in a cool kitchen.
Lightly grease a 9 × 5-inch (23 × 13 cm) loaf pan, or line it with parchment paper, leaving an overhang on the long sides to help lift the loaf out later.
With lightly oiled hands or a spatula, gently pull the dough away from the sides of the bowl and fold it over itself a few times to form a rough loaf shape. Transfer it to the pan, seam side down if possible, and smooth the top. Be gentle, since you want to keep as many air bubbles as possible.
Cover the pan loosely and let the dough rise for 20 to 30 minutes, until puffy and approaching the top of the pan. A good sign is that the dough domes slightly above the rim or sits about an inch below it, depending on your pan. If you gently poke it, the dent should fill back in slowly.
While the dough finishes its second rise, heat your oven to 375°F (190°C). Position a rack in the center of the oven.
Bake for 35 to 40 minutes, until the crust is deep golden brown and the loaf sounds hollow when you tap the bottom or top. If you have an instant-read thermometer, the center of the loaf should reach about 190–200°F (88–93°C). If the top is browning too quickly, tent loosely with foil for the last 10 to 15 minutes.
Remove the loaf from the pan after 5 to 10 minutes and transfer it to a wire rack. Let it cool fully before slicing. It is tempting to cut into it right away, but the crumb is still setting as it cools, and slicing too early can make it seem gummy.