
Cranberry Orange Scones
Cranberry Orange Scones: Buttery, Tender and Bursting with Citrus
These cranberry orange scones are buttery, tender and filled with tart cranberries and bright citrus flavor. Fresh orange zest adds a refreshing aroma, while a light orange glaze makes every bite extra special. They come together in about 40 minutes with no special equipment, so they are ideal for breakfast, afternoon tea, holiday brunch or a cozy treat with coffee.
In this guide you will find the complete recipe, step-by-step instructions, ingredient notes, the reasons behind each technique, troubleshooting help, variations, make-ahead and freezing advice, and answers to frequently asked questions. Whether this is your first scone or your fiftieth, a few simple habits, especially keeping the butter cold and handling the dough lightly, will help you bake a bakery-quality batch.
Why You Will Love These Cranberry Orange Scones
- Buttery and tender. Cold butter worked into the flour creates a tender, slightly flaky crumb.
- Bright citrus flavor. Fresh orange zest and orange juice give the scones a vivid, fragrant aroma and taste.
- Tart and sweet balance. Dried cranberries add chewy bursts of tartness, and the glaze adds a touch of sweetness.
- Ready in 40 minutes. Most of the time is spent baking, not waiting.
- No special tools. A bowl, a whisk and your fingertips or a pastry cutter are enough.
- Beginner friendly. The dough is mixed quickly and shaped by hand into wedges, with no rolling pin required.
- Perfect for any occasion. They suit weekend breakfasts, holiday brunches, bake sales, gift boxes and afternoon tea.
Recipe Snapshot
- Prep time: 15 minutes
- Cook time: 18 to 22 minutes
- Total time: 40 minutes
- Servings: 8 scones
- Oven temperature: 400°F (200°C)
Ingredients
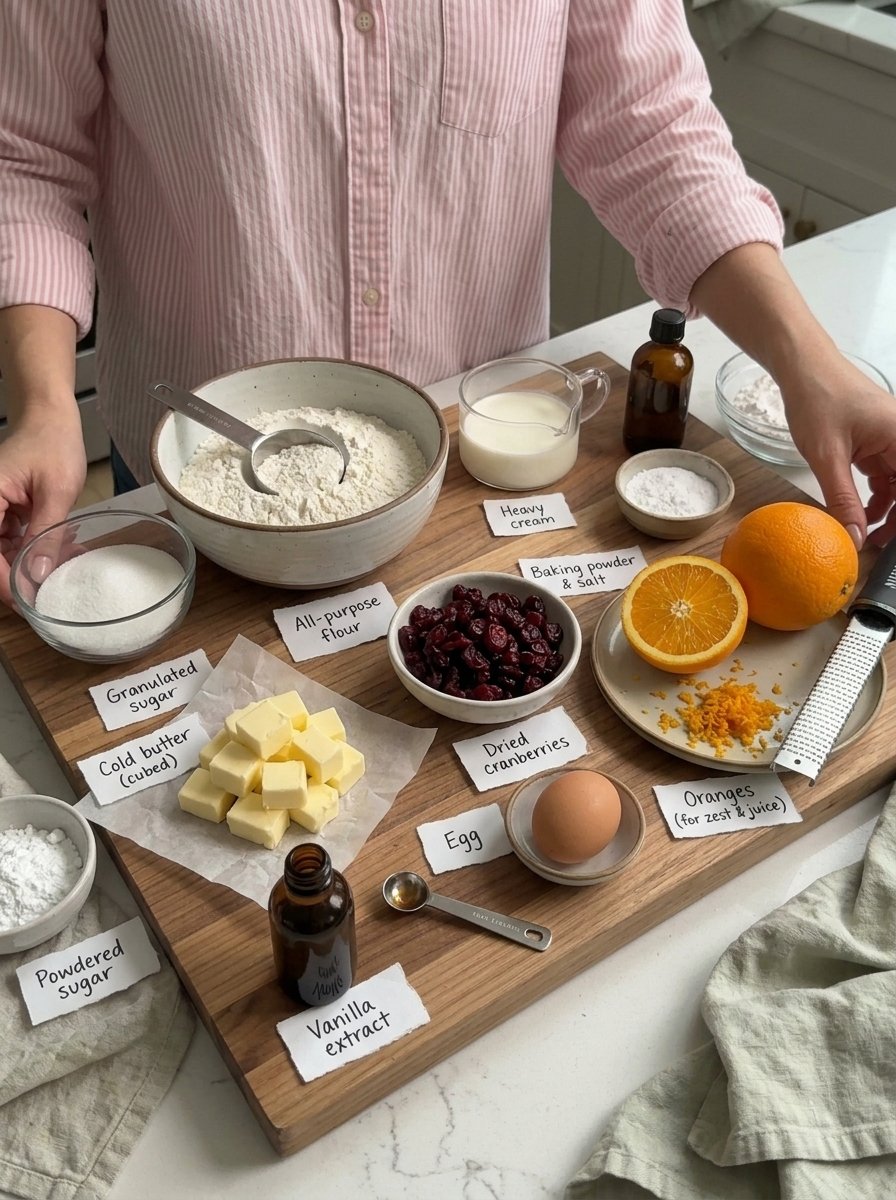
For the Scones
- 2 cups (250 g) all-purpose flour
- ⅓ cup (67 g) granulated sugar
- 2 teaspoons baking powder
- ¼ teaspoon salt
- ½ cup (113 g) cold unsalted butter, cubed
- ½ cup (60 g) dried cranberries
- Zest of 1 large orange
- ⅓ cup (80 ml) cold heavy cream
- 1 large egg
- 2 tablespoons fresh orange juice
- 1 teaspoon vanilla extract
For the Orange Glaze
- ½ cup (60 g) powdered sugar
- 1 to 2 tablespoons fresh orange juice
You may also want a little extra heavy cream for brushing the tops, and a little flour for dusting the work surface.
Ingredient Notes and Substitutions
All-purpose flour. All-purpose flour gives a tender scone with a soft crumb. Weigh the flour if you can: 2 cups is 250 grams here. If you measure by cup, spoon the flour into the cup and level it off, rather than scooping directly from the bag, which packs in extra flour and leads to dry, heavy scones.
Granulated sugar. The sugar adds sweetness and helps the scones brown. It is a moderate amount, so the scones are lightly sweet before the glaze.
Baking powder. Baking powder is the leavening that helps the scones rise. Make sure yours is fresh, since old baking powder loses its strength and can give flat, dense scones.
Salt. A small amount of salt balances the sweetness and enhances the buttery and citrus flavors.
Cold unsalted butter. Butter is the heart of a great scone. When small pieces of cold butter melt in the hot oven, they release steam that creates tender, flaky layers. Keep the butter cold until the moment you use it. Cubing it and returning it to the refrigerator or freezer for 10 minutes before mixing can help on a warm day.
Dried cranberries. Dried cranberries add chewy texture and tartness. They are often sweetened, so the balance in this recipe assumes standard sweetened dried cranberries. If you prefer, you can plump them briefly in warm orange juice or water and pat them dry before adding.
Fresh orange zest. The zest holds the orange’s fragrant oils, which give the scones their bright aroma. Use a fine grater or zester and avoid the bitter white pith underneath. Zest the orange before juicing it.
Cold heavy cream. Cream adds richness and tenderness. Keep it cold so it does not soften the butter in the dough.
Egg. The egg adds structure, richness and moisture.
Fresh orange juice. Freshly squeezed juice tastes brighter than bottled. You will use some in the dough and some in the glaze, so one large orange usually provides enough for both after you have zested it.
Vanilla extract. Vanilla rounds out the flavor and enhances the buttery taste.
Powdered sugar. Powdered sugar dissolves smoothly into orange juice for a silky glaze. Sift it if it looks lumpy.
How to Make Cranberry Orange Scones: Step by Step
Step 1: Preheat the oven
Heat the oven to 400°F (200°C). Line a baking sheet with parchment paper. A hot oven is important for scones because the high heat sets the outside quickly, helping the scones rise tall and stay tender inside.
Step 2: Combine the dry ingredients
In a large bowl, whisk together the flour, sugar, baking powder and salt. Whisking distributes the baking powder evenly so every scone rises uniformly.
Step 3: Cut in the butter
Add the cold cubed butter. Use a pastry cutter or your fingertips to work it into the flour until the mixture resembles coarse crumbs. Some pea-sized pieces of butter are fine and even desirable, since they melt in the oven and create pockets of steam. If you use your fingers, work quickly so the heat from your hands does not melt the butter. A food processor can also work with a few short pulses, though it is easy to overdo.
Step 4: Add the flavor
Stir in the dried cranberries and fresh orange zest. Rub the zest into the dry mixture briefly with your fingertips if you like, which helps release its fragrant oils and spreads the flavor evenly.
Step 5: Mix the wet ingredients
In a separate bowl, whisk together the heavy cream, egg, orange juice and vanilla extract. Whisk until smooth and evenly combined. If you plan to brush the scones with cream, reserve a spoonful of cream before whisking.
Step 6: Form the dough
Pour the wet mixture into the dry ingredients. Stir gently until a soft dough forms. Avoid overmixing.
This is the most important step for texture. Overworking the dough develops gluten, which makes scones tough and chewy rather than tender. Stir only until you no longer see large patches of dry flour. The dough will look shaggy and slightly sticky, and that is exactly right. If it seems too dry to come together, gently press it with your hands, or add a teaspoon or two of cream.
Step 7: Shape the scones
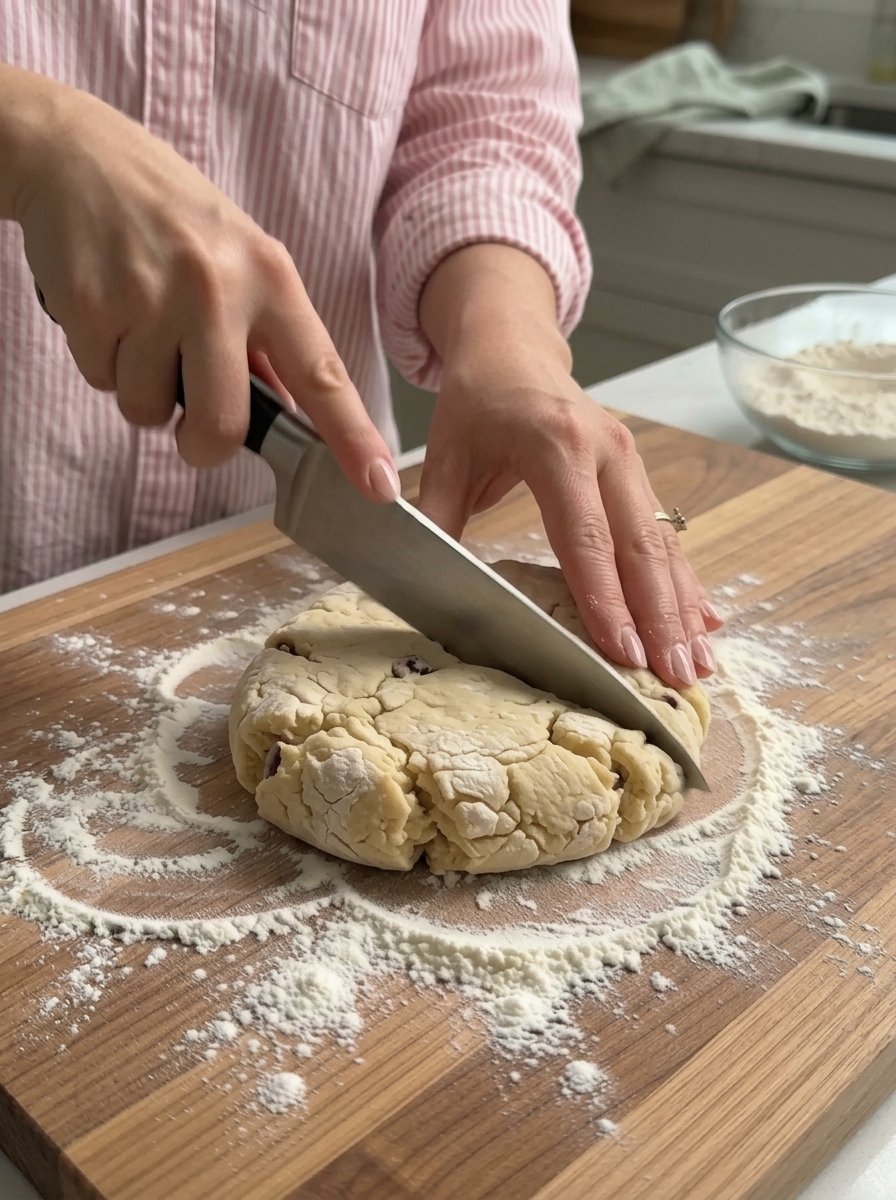
Transfer the dough to a lightly floured surface. Gently shape it into a circle about 1 inch thick, then cut into 8 wedges. Use as little flour as possible, because extra flour makes scones dry. Pat the dough with your hands rather than rolling it, and use a sharp knife or bench scraper to cut straight down through the dough instead of sawing, which helps the scones rise evenly.
Step 8: Prepare for baking
Arrange the wedges on the baking sheet, leaving space between them. Brush the tops with a little extra cream if desired. The cream gives the scones a deeper golden color and a slightly crisp, glossy top. For an extra-tender result and taller scones, some bakers chill the shaped wedges in the refrigerator for 15 to 20 minutes before baking, which keeps the butter cold.
Step 9: Bake
Bake for 18 to 22 minutes, until the edges are lightly golden and the centers are cooked through. A toothpick or thin knife inserted into the thickest part should come out without wet batter. Ovens vary, so start checking around 18 minutes. Avoid overbaking, which dries out the scones.
Step 10: Make the glaze
Whisk the powdered sugar with enough orange juice to create a smooth, pourable glaze. Start with 1 tablespoon of juice and add more a little at a time. The glaze should be thick enough to coat the back of a spoon and drizzle slowly. Too thin, and it will run right off the scones. Too thick, and it will not drizzle smoothly.
Step 11: Finish and serve
Let the scones cool for 10 to 15 minutes, then drizzle with the orange glaze. Serve fresh with tea or coffee. Glazing slightly cooled scones keeps the glaze from melting completely and sliding off, leaving a pretty, set finish.
Tips for Perfect Scones
- Keep the butter cold. This helps create a tender, flaky texture. Warm butter melts into the dough and leads to flat, greasy scones.
- Don’t overwork the dough. Mix just until the ingredients come together. A few dry streaks are fine.
- Measure the flour carefully. Too much flour makes dry, dense scones.
- Want extra citrus flavor? Add a little more orange zest to the dough.
- Prefer fresh cranberries? Use about ¾ cup of chopped fresh cranberries and add 1 to 2 extra tablespoons of sugar if desired. Fresh cranberries are much more tart than dried ones, so the added sugar balances them.
- Cut straight down. Do not twist the knife or cutter, which seals the edges and limits the rise.
- Use a hot oven. The initial blast of heat helps the scones puff up.
- Chill if the dough is warm. A short rest in the refrigerator firms up the butter and improves texture.
- Glaze after cooling slightly. Let the scones cool for 10 to 15 minutes so the glaze sets instead of running off.
- Serve fresh. Scones are at their best the day they are baked.
Troubleshooting Common Scone Problems
My scones are tough. The dough was probably overmixed or overworked. Stir only until the ingredients just come together, and handle the dough as little as possible.
My scones are dry. This is usually caused by too much flour or overbaking. Measure the flour carefully, use only a light dusting on your work surface and take the scones out when the edges are golden.
My scones spread out flat. The butter may have been too warm, the dough too wet, or the baking powder too old. Keep the butter and cream cold, chill the shaped wedges briefly if your kitchen is warm and check that your baking powder is fresh.
My scones did not rise much. Make sure the baking powder is fresh, the oven is fully preheated and you cut the dough straight down without twisting.
The dough is too sticky. A soft, slightly sticky dough is normal. Lightly flour your hands and surface, and chill the dough for a few minutes if it is hard to handle. Avoid adding a lot of extra flour.
The dough is too crumbly. The mixture may need a touch more liquid. Add a teaspoon of cold cream at a time, and press the dough together gently.
The bottoms are too dark. Use a lighter-colored baking sheet, place it on the middle rack, or stack two baking sheets to insulate the bottom.
The cranberries sank or burned. Dried cranberries on the surface can darken in the oven. Press them down into the dough while shaping so they are mostly covered.
The glaze is too thin or too thick. For thin glaze, whisk in a little more powdered sugar. For thick glaze, add a few drops of orange juice.
The glaze soaked in or ran off. Make sure the scones have cooled for 10 to 15 minutes, and use a slightly thicker glaze.
Delicious Variations
Once you are comfortable with the basic recipe, try a few simple twists. These go beyond the base recipe, so treat them as experiments and adjust to taste.
- White chocolate cranberry orange: Fold in a handful of white chocolate chips with the cranberries.
- Pecan or walnut crunch: Add a small amount of chopped, toasted nuts for extra texture.
- Fresh cranberry version: Swap in chopped fresh cranberries and add a little extra sugar, as noted in the tips.
- Extra-orange scones: Increase the zest slightly, or add a little orange zest to the glaze.
- Sparkling sugar tops: Brush the scones with cream and sprinkle with coarse sugar before baking for a sparkly, crunchy finish.
- Cream cheese glaze: For a richer topping, whisk a spoonful of softened cream cheese into the glaze and thin it with orange juice.
- Mini scones: Shape the dough into smaller wedges or rounds and reduce the baking time, checking early.
- Drop scones: If you prefer not to shape the dough, you can scoop it onto the baking sheet in rustic mounds.
What to Serve with Cranberry Orange Scones
- Hot tea or coffee. Earl Grey, English breakfast or a simple black coffee all pair well with the citrus.
- Butter and jam. Fresh orange marmalade, strawberry jam or lemon curd.
- Whipped cream or clotted cream. For an afternoon tea feel.
- Fruit. Fresh berries, sliced oranges or a simple fruit salad.
- Brunch spreads. Serve alongside eggs, yogurt parfaits, bacon or a brunch casserole.
- Holiday gift boxes. Wrap cooled, unglazed scones and pack the glaze in a small jar, or glaze them and box them carefully for a thoughtful homemade gift.
Make-Ahead, Storage and Freezing
Make-ahead dough: You can shape the dough into wedges, place them on the baking sheet, cover and refrigerate for several hours or overnight, then bake straight from the refrigerator, adding a minute or two if needed. This is a great way to have fresh scones at breakfast with little morning effort.
Freezing unbaked scones: Arrange the cut wedges on a tray and freeze until firm, then transfer them to a freezer bag. Bake from frozen at the same temperature, adding a few extra minutes. Freezing the scones unbaked often gives the freshest-tasting result.
Room temperature storage: Store cooled scones in an airtight container at room temperature for up to about 2 days. They are best the day they are baked. The glaze may soften slightly over time.
Freezing baked scones: Wrap cooled, unglazed scones well and freeze for up to about 2 to 3 months. Thaw at room temperature, then warm them in the oven before glazing.
Reheating: Warm scones in a 325°F (160°C) oven for about 5 to 8 minutes to refresh them. Avoid the microwave if you want to keep the texture crisp at the edges.
Nutrition Overview
Exact nutrition depends on your ingredients and how large you cut the scones. As a rough estimate, one scone with glaze may provide somewhere around 330 to 380 calories, mostly from carbohydrates and fat from the butter and cream. These are a treat, best enjoyed in moderation as part of a balanced diet. For precise numbers, enter your own ingredients into a nutrition calculator. This information is general and is not medical or dietary advice.
Can You Make It Dairy-Free, Vegan or Gluten-Free?
Dairy-free and vegan: This recipe relies on butter, heavy cream and an egg, all of which contribute to the texture, so substitutions will change the result. Some bakers use cold dairy-free butter sticks and a plant-based cream alternative, and an egg replacer, but results vary, and it is best to use a recipe developed for vegan scones.
Gluten-free: This recipe uses wheat flour and is not gluten-free as written. A gluten-free scone usually needs a gluten-free flour blend designed for baking and may need different liquid amounts.
Lower sugar: You can reduce the glaze or skip it, though the scones will taste less sweet. Dried cranberries are also sweetened, so the overall sweetness will still be moderate.
Frequently Asked Questions
Can I use fresh cranberries instead of dried?
Yes. Use about ¾ cup of chopped fresh cranberries and add 1 to 2 extra tablespoons of sugar if desired, since fresh cranberries are quite tart.
Can I use frozen cranberries?
Yes, you can use frozen cranberries, chopped, and fold them in while still frozen to avoid staining the dough. They may release more moisture, so handle the dough gently.
Why do the scones need cold butter?
Cold butter melts in the oven and releases steam, which creates tender, flaky pockets in the scones. Warm butter blends into the flour and leads to flat, dense, greasy scones.
Can I use milk instead of heavy cream?
You can, but the scones will be less rich and less tender. Heavy cream is recommended for the best texture.
Can I make the dough in a food processor?
Yes, for the butter-cutting step. Pulse the flour mixture with the cold butter until crumbly, then transfer it to a bowl before adding the other ingredients so you do not overwork the dough.
Why are my scones crumbly?
They may have too much flour or too little liquid. Measure carefully and add a splash of cold cream if the dough seems too dry.
Do I need to use a pastry cutter?
No. Your fingertips, two forks or a box grater (with frozen butter) can also cut the butter into the flour.
How do I get taller scones?
Keep the dough about 1 inch thick, cut straight down without twisting, keep the butter cold and bake in a hot oven. Chilling the shaped scones before baking also helps.
Can I prepare the glaze in advance?
Yes, but whisk it again before using, and keep it covered so it does not form a skin. If it thickens, add a few drops of orange juice.
Can I double the recipe?
Yes. Prepare the dough in a large bowl, shape into two circles and cut each into 8 wedges. Bake in batches, or use two baking sheets in the oven, rotating them halfway through.
How do I know when the scones are done?
The edges should be lightly golden, the tops set and the centers cooked through. A toothpick inserted into the thickest part should come out without wet batter.
Why are my scones spreading?
Spreading often happens when the butter is too warm, the dough is too wet or the baking powder is old. Chill the shaped scones before baking and check your ingredients.
Final Thoughts
These cranberry orange scones show how a few simple ingredients can turn into something that feels special. Buttery, tender and filled with tart cranberries and bright citrus, they are finished with a light orange glaze that makes every bite a little more memorable.
Remember the essentials: keep the butter cold, do not overwork the dough, shape the dough about 1 inch thick, cut straight down and bake in a hot oven until lightly golden. Let the scones cool slightly before glazing, and serve them fresh with your favorite tea or coffee.
Whether you bake them for a holiday brunch, an afternoon tea or a quiet morning at home, these scones are sure to be a hit. If you try the recipe, leave a comment and tell us how yours turned out.