
Crispy Loaded Double Bacon Cheeseburger Ranch Pickle Cheddar Taco Crunch Cups
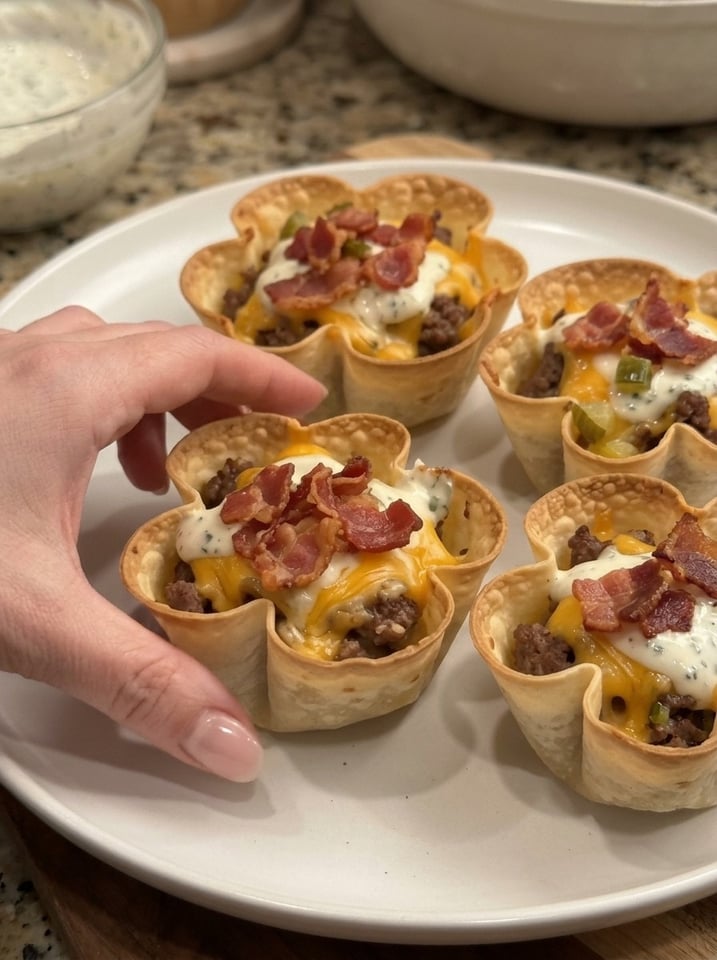
Crispy Loaded Double Bacon Cheeseburger Ranch Pickle Cheddar Taco Crunch Cups 🔥🧀
Meta title: Crispy Double Bacon Cheeseburger Taco Cups with Ranch & Pickles (Easy Party Recipe)
Meta description: Crispy tortilla cups loaded with seasoned beef, double bacon, melted cheddar, dill pickles, and ranch. A 45-minute game day appetizer that tastes like a cheeseburger and a taco had a baby.
URL slug: /double-bacon-cheeseburger-taco-crunch-cups
Focus keyword: bacon cheeseburger taco cups
Secondary keywords: cheeseburger taco cups, loaded taco cups, game day appetizer, muffin tin tacos, bacon cheeseburger bites, ranch pickle cheddar cups
Why You’ll Love These Bacon Cheeseburger Taco Cups
If you have ever stood at a party table wondering whether to grab a cheeseburger or a taco, these Crispy Loaded Double Bacon Cheeseburger Ranch Pickle Cheddar Taco Crunch Cups settle the debate. They combine two of America’s favorite comfort foods into one crunchy, cheesy, bite-sized appetizer that disappears within minutes of hitting the table. 🤤
Each cup starts with a flour tortilla pressed into a muffin tin and baked until golden and crisp. Inside you’ll find juicy seasoned ground beef, a double dose of crispy bacon, a blanket of melted cheddar, tangy dill pickles, and a generous drizzle of cool, creamy ranch. It is everything you love about a loaded bacon cheeseburger, served in an edible, crunchy bowl with no bun, no mess, and no fork required.
Here’s why this recipe deserves a spot in your regular rotation:
- Big cheeseburger flavor in a handheld bite. Worcestershire, ketchup, mustard, and smoked paprika give the beef that classic burger-joint taste.
- Double the bacon. Bacon goes into the filling and on top, so every bite is smoky and crisp.
- Crunch from edge to center. Pre-baking the shells and adding a cheese barrier keeps them crispy.
- Party-friendly. The recipe makes 12 cups, and it scales easily for a crowd.
- Simple ingredients. Everything is available at any grocery store, and the technique is beginner-friendly.
- Endlessly customizable. Swap cheeses, add heat, or change the toppings to suit your crowd.
Whether you’re planning a Super Bowl spread, a birthday party, a family dinner, or just a fun weekend snack, these taco crunch cups are guaranteed to be the first plate emptied. 🌮🥓🧀
What Makes These Cheeseburger Taco Cups So Good?
The magic of this recipe is in the balance of textures and flavors. Great food isn’t just about taste. It’s about contrast, and these cups deliver plenty of it.
Crunchy meets juicy. The oven-baked tortilla shell shatters pleasantly with each bite, giving way to a tender, savory beef filling.
Smoky meets tangy. Crispy bacon brings deep, salty smokiness, while finely diced dill pickles add a bright, vinegary snap that cuts through the richness.
Creamy meets sharp. Cool ranch dressing mellows the sharp, melty cheddar and ties all the flavors together.
Familiar meets fun. Everyone knows the taste of a bacon cheeseburger. Serving it in a taco-style cup turns a classic into a conversation starter.
🥣 Ingredients
For the Crispy Taco Cups
- 12 small flour tortillas, about 6 inches each
- 2 tablespoons olive oil or melted butter
- ½ teaspoon garlic powder
- ½ teaspoon smoked paprika
- ¼ teaspoon salt
For the Double Bacon Cheeseburger Filling
- 450 g (1 lb) ground beef
- 12 slices bacon, cooked until crispy and chopped
- 1 small onion, finely diced
- 2 cloves garlic, minced
- 1 teaspoon Worcestershire sauce
- 1 tablespoon ketchup
- 1 teaspoon yellow mustard
- ½ teaspoon smoked paprika
- ½ teaspoon onion powder
- Salt and black pepper, to taste
For the Cheddar Cheese Layer
- 1½ cups (150–180 g) shredded cheddar cheese
- ½ cup (50 g) shredded mozzarella, optional
For the Ranch Pickle Topping
- ½ cup ranch dressing
- ¾ cup dill pickles, finely diced
- 2 tablespoons chopped fresh chives or parsley
- 2 tablespoons finely sliced green onions
- 1 tablespoon ketchup or burger sauce, optional
Ingredient Notes and Smart Substitutions
Understanding your ingredients helps you get consistent results every time.
Flour tortillas. Small 6-inch flour tortillas are the best choice because they’re flexible, pleat easily, and crisp up beautifully in a standard muffin tin. Corn tortillas tend to crack when shaped this way, so stick with flour unless you soften corn tortillas thoroughly first.
Ground beef. An 80/20 blend gives the best flavor and juiciness, but you’ll want to drain any excess fat so the shells stay crisp. Ground turkey or chicken works as a lighter alternative. Just add a touch more seasoning, since poultry is milder.
Bacon. Standard-cut bacon works best because it crisps evenly and chops easily. Thick-cut bacon is delicious but may need a few extra minutes in the skillet. For a hands-off method, bake the bacon on a sheet pan at 400°F (200°C) for 15–20 minutes.
Cheddar cheese. Sharp cheddar gives the boldest cheeseburger flavor. Shredding your own from a block generally gives a smoother melt than pre-shredded cheese, which often contains anti-caking agents.
Dill pickles. Classic dill pickles give the right tang. Dice them small and pat them dry with a paper towel so they don’t water down the toppings.
Ranch dressing. Use your favorite store-bought brand or whip up a homemade version. Thicker ranch holds its shape better when drizzled.
👩🍳 How to Make Bacon Cheeseburger Taco Cups (Step by Step)
Step 1: Prepare the Crispy Tortilla Cups
Preheat your oven to 375°F (190°C).
Lightly brush both sides of the tortillas with olive oil or melted butter. Sprinkle with garlic powder, smoked paprika, and a little salt.
Warm the tortillas in the microwave for 10–15 seconds if needed to make them flexible. Gently press each tortilla into a cup of a standard muffin tin, creating a bowl shape with the edges folded into small pleats.
Bake for 8–10 minutes, until the shells begin to firm up and turn lightly golden. Remove from the oven and set aside.
Tip: If the tortillas keep springing back, warm them a little longer before pressing them into the muffin tin.
Step 2: Cook the Bacon Until Crispy
Place the bacon in a skillet over medium heat and cook until golden and crisp, turning as needed.
Transfer to a paper towel-lined plate to drain. Once cool enough to handle, chop into small pieces.
Reserve a little bacon for sprinkling over the finished cups.
Step 3: Brown the Cheeseburger Beef
In the same skillet, carefully remove excess bacon grease, leaving about 1 tablespoon for flavor.
Add the diced onion and cook for 2–3 minutes until softened. Stir in the minced garlic and cook for another 30 seconds.
Add the ground beef and cook for 6–8 minutes, breaking it into small crumbles with a wooden spoon until browned and fully cooked to 160°F (71°C).
Drain excess grease if necessary.
Step 4: Season the Burger Filling
Add the Worcestershire sauce, ketchup, mustard, smoked paprika, onion powder, salt, and black pepper.
Stir thoroughly and cook for another 1–2 minutes, allowing the seasonings to coat the beef.
Fold in most of the crispy bacon, keeping a small portion aside for the final topping.
The filling should be juicy and flavorful without excess liquid that could soften the tortilla shells.
Step 5: Add the First Cheese Layer
Sprinkle a small amount of shredded cheddar into the bottom of each pre-baked tortilla cup.
This creates a delicious melted cheese layer and helps keep the shells crisp by forming a light barrier between the tortilla and the meat filling.
For extra cheesiness, combine cheddar with mozzarella.
Step 6: Fill the Cups Generously
Spoon the seasoned beef and bacon mixture into each tortilla cup, dividing it evenly among the 12 cups.
Press the filling down gently so it sits securely without crushing the shells.
Top each cup with another generous pinch of cheddar cheese and a few pieces of reserved bacon.
Step 7: Bake Until Golden and Melty
Return the filled tortilla cups to the oven and bake for 7–10 minutes, until the cheese is melted, bubbling, and lightly golden around the edges.
The tortilla shells should be crisp, while the beef filling remains juicy.
Let the cups rest in the muffin tin for 2–3 minutes before carefully removing them.
Step 8: Prepare the Ranch Pickle Topping
In a small bowl, combine the diced dill pickles, chopped chives, and green onions.
Keep the ranch dressing separate so you can drizzle it over the cups just before serving.
For a tangier flavor, stir a teaspoon of pickle juice into the ranch dressing.
Step 9: Load Up the Toppings
Arrange the warm taco crunch cups on a serving platter.
Drizzle each cup with ranch dressing, then sprinkle over the pickle mixture and the remaining crispy bacon.
Add a little ketchup or burger sauce if desired, and finish with freshly chopped parsley or green onions.
Step 10: Serve While Crispy
Serve immediately while the tortilla shells are crunchy, the bacon is crisp, and the cheddar is still beautifully melted.
Each bite delivers smoky bacon, juicy cheeseburger beef, sharp cheddar, tangy pickles, and creamy ranch in one irresistible little cup! 🥓🌮🧀
💡 Tips for Perfect Taco Crunch Cups
Getting crispy, sturdy cups every time comes down to a few simple habits:
- Choose flexible tortillas. Small flour tortillas are easy to shape and crisp up beautifully in a muffin tin.
- Pre-bake the shells. This helps them hold their shape and prevents soggy bottoms.
- Drain the beef. Too much grease can soften the tortilla cups.
- Use freshly shredded cheese. It generally melts more smoothly than pre-shredded cheese.
- Don’t overload the shells. Leave enough room for the cheese and toppings.
- Add pickles after baking. This keeps their tangy crunch fresh.
- Drizzle ranch just before serving. Adding it too early can soften the crispy shells.
- Make them spicy. Add diced jalapeños, hot sauce, or a pinch of cayenne to the beef.
- Try different cheeses. Pepper Jack, Monterey Jack, or smoked cheddar all work beautifully.
Common Mistakes to Avoid
Even simple recipes can go sideways. Here are the most frequent pitfalls and how to sidestep them.
Skipping the pre-bake. Filling raw tortillas leads to doughy, limp bottoms. The first bake sets the structure and gives you that signature crunch.
Using cold, stiff tortillas. Cold tortillas crack and spring back. A quick 10–15 seconds in the microwave makes them pliable enough to pleat neatly.
Leaving too much grease in the beef. Excess fat pools at the bottom of the cup and softens the shell. Drain thoroughly, leaving just enough to keep the meat flavorful.
Overfilling the cups. A heaping pile may look impressive, but it makes the cups hard to lift and eat. Fill generously but leave room for toppings.
Topping too early. Ranch and pickles are best added at the last minute. If they sit on the hot cups for too long, the shells lose their crunch.
Undercooking the beef. Ground beef should reach an internal temperature of 160°F (71°C). Use a food thermometer if you’re unsure.
Delicious Variations to Try
Once you’ve mastered the base recipe, the possibilities are endless.
Spicy Jalapeño Popper Version. Stir diced jalapeños and a pinch of cayenne into the beef, use pepper jack cheese, and drizzle with jalapeño ranch.
Smoky BBQ Bacon Cups. Swap the ketchup in the filling for barbecue sauce, use smoked cheddar, and top with crispy fried onions.
Chicken Ranch Cups. Replace the beef with shredded or ground chicken and add a pinch of dried dill to the filling for a ranch-forward flavor.
Breakfast Taco Cups. Skip the pickles and add a spoonful of scrambled egg to each cup before the final cheese layer.
Lighter Version. Use ground turkey, reduced-fat cheese, and Greek yogurt ranch to cut calories without losing the fun.
Big Mac Style. Mix a little burger sauce into the beef, add shredded lettuce after baking, and top with sesame seeds for a Big Mac–inspired cup.
🧊 Storage and Reheating
Refrigerator. Store leftover cups in an airtight container for up to 3–4 days. Keep ranch and fresh pickle toppings separate.
Oven reheating. Bake at 375°F (190°C) for 6–10 minutes, until hot and crispy.
Air fryer. Reheat at 350°F (175°C) for 3–5 minutes, checking frequently.
Freezing. Freeze the cooked beef filling separately for up to 2–3 months. Freshly assembled cups generally have a better texture than frozen, fully assembled ones.
For the best results, add the ranch dressing, pickles, and fresh herbs after reheating.
Make-Ahead Tips for Parties
Hosting a crowd? You can break this recipe into stages so that party day is stress-free.
- Up to 2 days ahead: Cook the bacon and the beef filling. Store them separately in airtight containers in the refrigerator.
- Up to 1 day ahead: Pre-bake the tortilla shells, cool them completely, and store them in an airtight container at room temperature.
- Day of the party: Assemble the cups, bake until the cheese is bubbly, and add the toppings right before serving.
This approach means the final bake takes only about 10 minutes, so you can enjoy your guests instead of spending the party in the kitchen.
🍽️ Delicious Ways to Serve
- 🍟 With crispy French fries or seasoned potato wedges.
- 🥒 Alongside extra dill pickles and a bowl of ranch dip.
- 🌶️ With spicy chipotle mayo or jalapeño ranch.
- 🥗 With a fresh crunchy slaw to balance the rich filling.
- 🍔 As part of a cheeseburger-themed party platter.
- 🎉 Served as bite-sized game-day appetizers with multiple dipping sauces.
Perfect Occasions
These cups shine at nearly any gathering: Super Bowl and football parties, birthday celebrations, summer cookouts, holiday open houses, kids’ parties, potlucks, and relaxed family dinners. They’re also a fun way to get everyone involved. Set up a topping bar with ranch, pickles, chives, hot sauce, and burger sauce, and let guests customize their own.
Frequently Asked Questions
Can I make these taco cups without a muffin tin?
Yes. You can drape tortillas over the back of an inverted muffin tin or use oven-safe ramekins. A standard muffin tin, however, gives the most reliable shape and keeps the filling contained.
Can I use corn tortillas instead of flour?
Flour tortillas are recommended because they bend without breaking. If you prefer corn, soften them first by warming them thoroughly, and expect a slightly different texture.
How do I keep the taco cups from getting soggy?
Pre-bake the shells, drain the beef well, add the cheese layer at the bottom, and wait to add ranch and pickles until just before serving.
Can I make these in an air fryer?
You can reheat finished cups in the air fryer at 350°F (175°C) for 3–5 minutes. For baking a full batch from scratch, the oven is more efficient.
Can I use ground turkey or chicken?
Absolutely. Poultry works well as a substitute. Season generously and cook to a safe internal temperature of 165°F (74°C) for poultry.
Can I freeze these cups?
The cooked beef filling freezes well for 2–3 months. Fully assembled cups can be frozen, but they usually have a better texture when freshly made.
How many cups does this recipe make?
The recipe makes 12 taco crunch cups, enough for a small party or a family dinner with sides.
What dipping sauces go well with these?
Ranch is the natural choice, but chipotle mayo, burger sauce, honey mustard, and barbecue sauce all pair nicely.
Final Thoughts
These Crispy Loaded Double Bacon Cheeseburger Ranch Pickle Cheddar Taco Crunch Cups prove that the best recipes are often the most playful ones. You get the nostalgic flavor of a diner cheeseburger, the satisfying crunch of a taco, and the fun of a finger food that’s easy to share. With simple ingredients, flexible variations, and plenty of make-ahead options, they’re ideal for busy hosts and weeknight cooks alike.
Double bacon, juicy cheeseburger beef, crispy tortilla cups, melted cheddar, crunchy pickles, and creamy ranch. These Loaded Taco Crunch Cups are a flavor explosion in every bite! 🔥🤤🧀
If you try the recipe, leave a comment and star rating below, and share your favorite topping combination. Happy cooking! 🥓🌮🧀
Print
Crispy Loaded Double Bacon Cheeseburger Ranch Pickle Cheddar Taco Crunch Cups
Ingredients
For the Crispy Taco Cups
- 12 small flour tortillas, about 6 inches each
- 2 tablespoons olive oil or melted butter
- ½ teaspoon garlic powder
- ½ teaspoon smoked paprika
- ¼ teaspoon salt
For the Double Bacon Cheeseburger Filling
- 450 g (1 lb) ground beef
- 12 slices bacon, cooked until crispy and chopped
- 1 small onion, finely diced
- 2 cloves garlic, minced
- 1 teaspoon Worcestershire sauce
- 1 tablespoon ketchup
- 1 teaspoon yellow mustard
- ½ teaspoon smoked paprika
- ½ teaspoon onion powder
- Salt and black pepper, to taste
For the Cheddar Cheese Layer
- 1½ cups (150–180 g) shredded cheddar cheese
- ½ cup (50 g) shredded mozzarella, optional
For the Ranch Pickle Topping
- ½ cup ranch dressing
- ¾ cup dill pickles, finely diced
- 2 tablespoons chopped fresh chives or parsley
- 2 tablespoons finely sliced green onions
- 1 tablespoon ketchup or burger sauce, optional
Instructions
Preheat your oven to 375°F (190°C).
Lightly brush both sides of the tortillas with olive oil or melted butter. Sprinkle with garlic powder, smoked paprika, and a little salt.
Warm the tortillas in the microwave for 10–15 seconds if needed to make them flexible. Gently press each tortilla into a cup of a standard muffin tin, creating a bowl shape with the edges folded into small pleats.
Bake for 8–10 minutes, until the shells begin to firm up and turn lightly golden. Remove from the oven and set aside.
Tip: If the tortillas keep springing back, warm them a little longer before pressing them into the muffin tin.
Place the bacon in a skillet over medium heat and cook until golden and crisp, turning as needed.
Transfer to a paper towel-lined plate to drain. Once cool enough to handle, chop into small pieces.
Reserve a little bacon for sprinkling over the finished cups.
In the same skillet, carefully remove excess bacon grease, leaving about 1 tablespoon for flavor.
Add the diced onion and cook for 2–3 minutes until softened. Stir in the minced garlic and cook for another 30 seconds.
Add the ground beef and cook for 6–8 minutes, breaking it into small crumbles with a wooden spoon until browned and fully cooked to 160°F (71°C).
Drain excess grease if necessary.
Add the Worcestershire sauce, ketchup, mustard, smoked paprika, onion powder, salt, and black pepper.
Stir thoroughly and cook for another 1–2 minutes, allowing the seasonings to coat the beef.
Fold in most of the crispy bacon, keeping a small portion aside for the final topping.
The filling should be juicy and flavorful without excess liquid that could soften the tortilla shells.
Sprinkle a small amount of shredded cheddar into the bottom of each pre-baked tortilla cup.
This creates a delicious melted cheese layer and helps keep the shells crisp by forming a light barrier between the tortilla and the meat filling.
For extra cheesiness, combine cheddar with mozzarella.
Spoon the seasoned beef and bacon mixture into each tortilla cup, dividing it evenly among the 12 cups.
Press the filling down gently so it sits securely without crushing the shells.
Top each cup with another generous pinch of cheddar cheese and a few pieces of reserved bacon.
Return the filled tortilla cups to the oven and bake for 7–10 minutes, until the cheese is melted, bubbling, and lightly golden around the edges.
The tortilla shells should be crisp, while the beef filling remains juicy.
Let the cups rest in the muffin tin for 2–3 minutes before carefully removing them.
In a small bowl, combine the diced dill pickles, chopped chives, and green onions.
Keep the ranch dressing separate so you can drizzle it over the cups just before serving.
For a tangier flavor, stir a teaspoon of pickle juice into the ranch dressing.
Arrange the warm taco crunch cups on a serving platter.
Drizzle each cup with ranch dressing, then sprinkle over the pickle mixture and the remaining crispy bacon.
Add a little ketchup or burger sauce if desired, and finish with freshly chopped parsley or green onions.
Serve immediately while the tortilla shells are crunchy, the bacon is crisp, and the cheddar is still beautifully melted.
Each bite delivers smoky bacon, juicy cheeseburger beef, sharp cheddar, tangy pickles, and creamy ranch in one irresistible little cup! 🥓🌮