
Simple No-Knead Soft Sandwich Bread
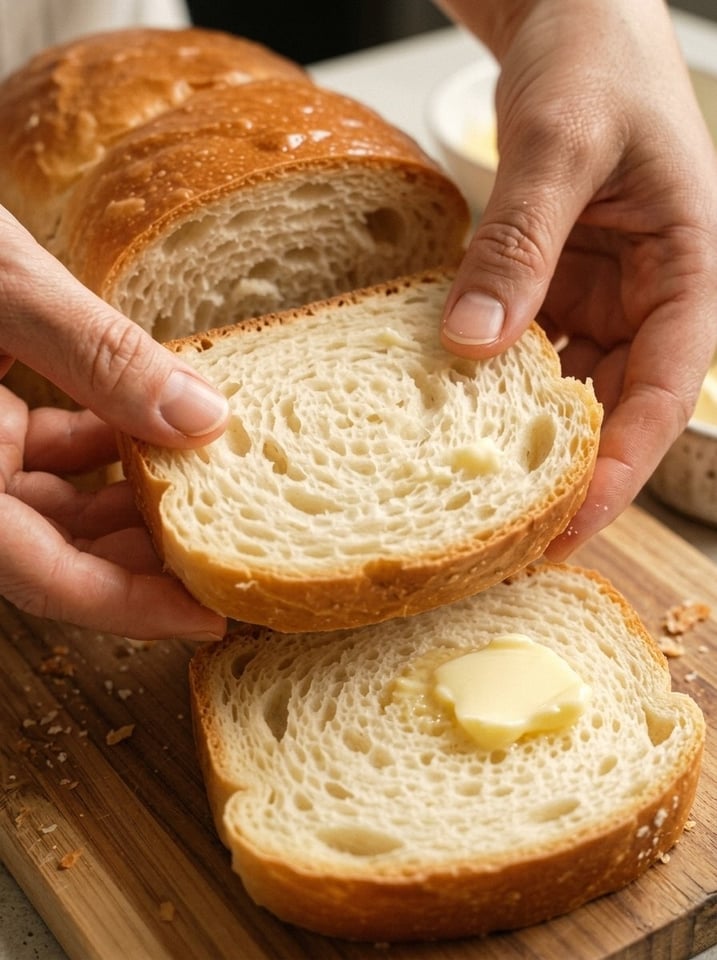
Simple No-Knead Soft Sandwich Bread: Fluffy, Tender, and Easy
Simple No-Knead Soft Sandwich Bread – Fluffy Homemade Milk Bread Loaf
Meta description: Bake soft, fluffy no-knead sandwich bread with milk, egg, and butter. A golden, tender loaf that slices neatly for sandwiches, toast, and grilled cheese. No mixer, no kneading, about 2 hours 20 minutes. Makes 10 to 12 slices.
Focus keywords: no-knead sandwich bread, soft sandwich bread recipe, homemade sandwich bread, easy bread for beginners, soft milk bread, no knead bread loaf pan, fluffy homemade bread
This Simple No-Knead Soft Sandwich Bread is wonderfully fluffy, tender, and perfect for everyday homemade sandwiches! 🤍🍞 With a soft, golden crust and a light, pillowy interior, this easy bread recipe requires no kneading, no special equipment, and only a handful of simple ingredients.
Just mix, let the dough rise, shape it, and bake! The result is a beautiful homemade loaf that slices easily and tastes delicious with butter, jam, cheese, or your favorite sandwich fillings. Whether you are preparing breakfast toast, school lunches, or a comforting grilled cheese sandwich, this soft homemade bread is sure to become a family favorite. 🥪✨
Store-bought sandwich bread is convenient, but nothing compares to the taste and texture of a loaf baked at home. This recipe is built around milk, an egg, and a little melted butter, which make the dough richer and the crumb softer than a basic water-and-flour loaf. The dough is mixed with a spoon in one bowl, so there is no mixer to wash and no kneading to tire your arms. A first rise develops flavor and lift, a quick shaping gives the loaf its classic sandwich form, and a second rise in the pan creates that light, even texture. A brush of melted butter right out of the oven keeps the crust soft and tender, just the way sandwich bread should be.
In this guide, you will find the complete recipe, a step-by-step walkthrough, an explanation of what each ingredient does, tips for the softest loaf, common problems and fixes, variations, serving ideas, storage and freezing advice, and answers to frequently asked questions. Let’s bake! 👩🍳
⏱ Recipe Overview
- ⏱ Prep Time: 15 minutes
- 🕒 Rising Time: 1 hour 30 minutes
- 🔥 Baking Time: 30 to 35 minutes
- ⏳ Total Time: Approximately 2 hours 20 minutes
- 🍽 Yield: 1 loaf, about 10 to 12 slices
- 🎯 Difficulty: Easy, beginner friendly
🤔 Why You Will Love This Soft Sandwich Bread
- No kneading at all. Stir the dough together with a spoon and let time do the work. 🙌
- Soft, fluffy crumb. Milk, egg, and butter create a tender, pillowy texture that stays soft for days.
- Golden, tender crust. A brush of butter after baking keeps the crust soft rather than hard and chewy.
- No special equipment. A bowl, a spoon, and a standard loaf pan are all you need.
- Slices neatly. The sturdy but soft crumb holds up to spreads and fillings without tearing.
- Perfect for everyday use. Toast, sandwiches, school lunches, French toast, and grilled cheese all work beautifully. 🥪
- Simple ingredients. Flour, milk, yeast, sugar, butter, egg, and salt are pantry and refrigerator staples.
- Ready in about 2 hours 20 minutes. Most of that time is hands-off rising.
- Budget friendly and additive free. You control exactly what goes into your bread.
- Family approved. The mild, slightly sweet flavor appeals to both kids and adults.
🛒 Ingredients
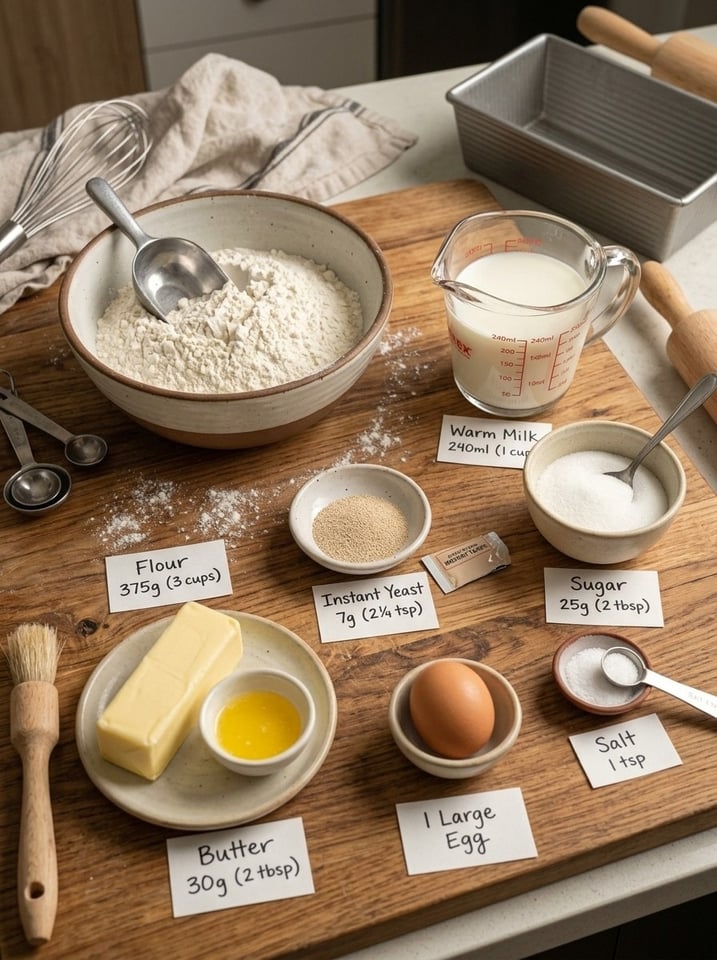
For the Soft Sandwich Bread
- 375 g (3 cups) all-purpose flour or bread flour
- 240 ml (1 cup) warm milk
- 7 g (2¼ teaspoons) instant yeast
- 25 g (2 tablespoons) sugar
- 30 g (2 tablespoons) unsalted butter, melted and cooled slightly
- 1 large egg, at room temperature
- 1 teaspoon salt
For the Golden, Soft Crust
- 1 tablespoon melted butter, for brushing
- A little extra milk, optional
🧐 A Closer Look at the Ingredients
All-purpose flour or bread flour. All-purpose flour gives a soft, tender sandwich loaf, while bread flour creates a slightly taller, chewier crumb with more structure. Both work well. Weighing the flour (375 g) is the most reliable way to get consistent results. If you use cups, spoon the flour into the cup and level it off instead of scooping, which can pack in too much flour and make the bread dry.
Warm milk. Milk is what makes this bread soft and slightly rich. The fat and sugars in milk tenderize the crumb and help the crust brown evenly. The milk should be comfortably warm, around 100 to 110°F (38 to 43°C), not hot. Hot milk can damage the yeast and prevent the dough from rising. Whole milk gives the richest flavor, but lower-fat milk also works.
Instant yeast. Instant yeast can be mixed directly into the liquid, as in this recipe. If you only have active dry yeast, use the same amount and let it sit in the warm milk with the sugar for 5 to 10 minutes until foamy before continuing.
Sugar. Two tablespoons feed the yeast, add a gentle sweetness, and help the crust turn a lovely golden color.
Unsalted butter. Melted butter enriches the dough, making the crumb softer and the loaf stay fresh longer. Let it cool slightly so it does not warm the egg or harm the yeast.
Egg. The egg adds richness, color, and structure, and contributes to a tender, fluffy interior. Using it at room temperature helps it blend more evenly into the dough.
Salt. Salt strengthens the dough and balances the flavor. Without it, the bread will taste flat and may rise too quickly.
Butter and milk for finishing. Brushing the top with milk before baking promotes a gentle golden color, while brushing with melted butter after baking gives a soft, flavorful crust with a lovely sheen.
Step-by-Step Instructions
Prepare the Wet Ingredients
In a large mixing bowl, combine the warm milk, sugar, and instant yeast. Stir gently until the sugar dissolves. Add the egg and melted butter, then whisk until everything is well combined.
Tip: The milk should be comfortably warm, not hot. Excessive heat can damage the yeast and prevent the dough from rising properly. If you have a thermometer, aim for 100 to 110°F (38 to 43°C).
Add the Flour and Salt
Add the flour and salt to the bowl. Mix with a wooden spoon or sturdy spatula until all the flour is moistened and a sticky, rough dough forms. The dough should be soft and tacky rather than firm. There is no need to knead it or work it until smooth. Just make sure there are no dry pockets of flour at the bottom of the bowl.
Let the Dough Rise
Cover the bowl with plastic wrap or a clean kitchen towel. Leave the dough in a warm place for approximately 60 to 90 minutes, or until it has doubled in size and looks airy and puffy. The exact rising time depends on your kitchen temperature. A cooler room may require a little more time. A turned-off oven with the light on, or a spot near a sunny window, makes a good warm place.
Prepare the Loaf Pan
Lightly grease a 9 × 5-inch (23 × 13 cm) loaf pan with butter or oil. You can also line it with parchment paper for easier removal. Once the dough has risen, gently stir or fold it with a spatula to release some of the larger air pockets. This helps the finished loaf have a finer, more even crumb.
Shape the Dough
Lightly flour your work surface and turn out the dough. Because this is a no-knead recipe, handle it gently and avoid adding too much extra flour. Pat the dough into a rectangle approximately as wide as your loaf pan. Roll it up tightly into a log, pinch the seam closed, and tuck the ends underneath. Place the dough seam-side down in the prepared pan.
Tip: Rolling the dough tightly creates surface tension, which helps the loaf rise upward and gives it a neat, even shape.
Let It Rise Again
Cover the loaf pan loosely and let the dough rise for another 25 to 40 minutes, until it looks puffy and has risen close to the top of the pan. Meanwhile, preheat your oven to 350°F (175°C). Avoid letting the dough rise so much that it collapses or spills over the sides of the pan.
Poke test: Gently press a floured fingertip into the side of the dough. If the dent springs back slowly and only partly, the loaf is ready to bake.
Brush the Top
For a beautifully golden finish, lightly brush the surface with milk. If you prefer a softer, richer crust, you can brush the loaf with melted butter immediately after baking instead.
Bake Until Golden
Place the loaf in the preheated oven and bake for 30 to 35 minutes, until the top is golden brown and the bread is cooked through. If the top browns too quickly, loosely cover it with aluminum foil during the final 10 minutes. The center should reach approximately 190°F (88°C) for a fully baked, soft sandwich loaf. The bread should also sound hollow when tapped on the top.
Brush with Butter
Remove the bread from the oven and immediately brush the top with melted butter. This adds a delicate buttery flavor and helps keep the crust soft and tender. Allow the loaf to rest in the pan for 5 to 10 minutes before carefully transferring it to a wire rack.
Cool, Slice, and Enjoy
Let the bread cool for at least 45 to 60 minutes before slicing. Use a serrated bread knife to cut neat, even slices. Inside, the bread should be light, fluffy, and tender, with a delicate crumb that is perfect for sandwiches and toast. 🤍🍞
Tips for Perfect No-Knead Sandwich Bread
- Measure the flour carefully. Too much flour can make the loaf dry and dense. A kitchen scale gives the most consistent results.
- Keep the dough soft. Sticky dough is normal for this recipe and helps produce a tender crumb.
- Use fresh yeast. If your yeast is old or inactive, the dough may rise slowly or not at all.
- Give it enough time. Let the dough rise until visibly puffy instead of following the clock alone.
- Do not skip the second rise. This helps create a light, even texture.
- Brush with butter after baking. This is the secret to a soft, tender crust.
- Cool before slicing. Cutting too early can compress the crumb and make the slices gummy.
- For extra softness. Replace 2 tablespoons of the milk with an equal amount of plain yogurt, adjusting the dough consistency if needed.
- Use a thermometer. Checking the milk temperature and the internal temperature of the loaf removes the guesswork.
- Use the right pan. A 9 × 5-inch pan gives a classic sandwich loaf. A smaller pan makes a taller, domed loaf.
- Let the egg come to room temperature. It blends more evenly and helps the dough rise well.
- Use a serrated knife. A bread knife slices cleanly without squashing the soft crumb.
Common Problems and How to Fix Them
The dough did not rise. The yeast may be expired, or the milk may have been too hot or too cold. Check the date on your yeast, use a thermometer for the milk, and find a warmer place for the dough.
The loaf is dense. Too much flour, not enough rising time, or old yeast can cause a dense loaf. Weigh the flour, allow the dough to rise until puffy, and use fresh yeast.
The loaf collapsed. The second rise may have gone on too long. Bake the loaf as soon as it has risen close to the top of the pan.
The crust is too dark. Loosely cover the loaf with foil for the last 10 minutes, or move the pan to a lower rack.
The crust is too pale. Make sure the oven is fully preheated and brush the top with milk before baking. Bake a few extra minutes if needed.
The center is gummy. The loaf may need more baking time, or it may have been cut while warm. Check that the center reaches 190°F (88°C) and cool the loaf completely before slicing.
The crumb is too crumbly. The dough may have been too dry. Measure the flour carefully and keep the dough soft and tacky.
The bread has large holes. Gently deflate the dough before shaping, and roll it up tightly so there are no large air pockets.
The loaf stuck to the pan. Grease the pan generously, or line it with parchment paper with an overhang to lift the loaf out.
🍞 Delicious Variations
- 🌾 Whole wheat blend. Replace up to a third of the flour with whole wheat flour for a nuttier flavor. Add a tablespoon of extra milk if the dough feels dry.
- 🍯 Honey bread. Replace the sugar with honey for a subtle floral sweetness.
- 🧀 Cheese bread. Fold shredded cheddar into the dough before the first rise.
- 🧄 Garlic herb loaf. Add garlic powder and dried Italian herbs, and brush with garlic butter after baking.
- 🌱 Seeded loaf. Brush the top with milk and sprinkle with sesame, oat, or sunflower seeds before baking.
- 🍇 Cinnamon raisin. Add cinnamon and raisins to the dough for a breakfast loaf.
- 🧈 Extra rich loaf. Add an extra tablespoon of butter for a softer, richer crumb.
- 🥛 Yogurt bread. Replace 2 tablespoons of milk with plain yogurt for extra softness.
- 🍞 Dinner rolls. Divide the dough into 12 pieces, shape into balls, and bake for 18 to 22 minutes.
- 🍫 Chocolate chip loaf. Add mini chocolate chips for a sweet treat the kids will love.
🥪 Delicious Ways to Enjoy Your Sandwich Bread
- 🧈 Toasted with butter and strawberry jam.
- 🥪 Filled with cheese, lettuce, tomatoes, and your favorite sandwich ingredients.
- 🧀 Turned into a warm grilled cheese sandwich.
- 🥜 Spread with peanut butter and sliced banana.
- 🍳 Served with scrambled eggs for breakfast.
- 🍯 Drizzled with honey for a simple afternoon snack.
- 🍞 French toast. Day-old slices soak up custard beautifully.
- 🥑 Avocado toast. Top toasted slices with avocado, salt, and pepper.
- 🍅 Tomato soup dippers. Serve alongside a warm bowl of soup. 🍲
- 🧄 Garlic bread. Spread with garlic butter and bake until golden.
- Croutons and breadcrumbs. Turn leftover slices into homemade croutons or breadcrumbs.
🧊 Storage and Freezing
- Room temperature: Store the completely cooled loaf in an airtight bag or container for up to 3 days.
- Refrigerator: Refrigeration can make bread stale faster, so room-temperature storage is usually preferable for short-term use.
- Freezer: Slice the cooled loaf and freeze in a sealed bag for up to 3 months. Place parchment between slices if you want to remove only a few at a time.
- To serve: Toast slices straight from frozen or thaw at room temperature.
- To refresh the loaf: Warm it briefly in a low oven, covered loosely with foil to prevent the crust from becoming too hard.
- Using stale bread. Turn leftover slices into French toast, bread pudding, croutons, or breadcrumbs.
📝 Nutrition Notes
Homemade sandwich bread made with milk, egg, and butter provides carbohydrates for energy, along with protein and calcium from the milk and egg. Because you make it at home, there are no preservatives or additives. To add fiber, replace part of the flour with whole wheat flour. Exact nutrition values vary with ingredients and slice thickness, so use a nutrition calculator for precise numbers.
❓ Frequently Asked Questions
Do I really not need to knead this bread? That is right. The wet, sticky dough develops structure during the rise, and the shaping step adds extra strength. No kneading is needed.
Can I use bread flour instead of all-purpose flour? Yes. Bread flour gives a slightly taller, chewier loaf, while all-purpose flour gives a softer, more tender crumb.
Can I use active dry yeast? Yes, in the same amount. Dissolve it in the warm milk with the sugar for 5 to 10 minutes until foamy before adding the other ingredients.
Can I use plant-based milk? You can try a plant-based milk, but the bread may be slightly less rich and soft. Use unsweetened varieties and warm them to the same temperature.
Why is my dough so sticky? This is a soft, no-knead dough, so it is meant to be sticky. Use floured hands and a lightly floured surface, and resist the urge to add too much flour.
Can I make the dough ahead of time? Yes. After mixing, cover the dough and refrigerate it for 8 to 12 hours. Let it come to room temperature for about 30 to 45 minutes, then shape and continue with the second rise.
What size loaf pan should I use? A 9 × 5-inch (23 × 13 cm) pan is ideal. A smaller pan will give a taller loaf and may need a few extra minutes of baking.
How do I know when the bread is done? The top should be golden brown, the loaf should sound hollow when tapped, and the center should reach about 190°F (88°C).
Can I skip the egg? You can, but the loaf will be slightly less rich and soft. Replace the egg with an extra tablespoon or two of milk.
Why did my bread collapse? It may have risen too long during the second rise. Bake it as soon as the dough looks puffy and has risen close to the top of the pan.
🏁 Final Thoughts
This Simple No-Knead Soft Sandwich Bread proves that homemade bread can be easy, reliable, and absolutely delicious. 🍞✨ With a soft, golden crust, a fluffy, tender crumb, and only a handful of simple ingredients, it is the kind of loaf you will want to bake again and again. There is no mixer, no kneading, and no special skill required, just a bowl, a spoon, and a little patience while the dough rises.
Whether you are making breakfast toast, packing school lunches, or whipping up a comforting grilled cheese, this homemade loaf will make everyday meals feel a little more special. Bake one this week and enjoy the aroma that fills your kitchen. 🤍🥪
📌 Save this simple no-knead soft sandwich bread recipe for your next baking day! Leave a comment and tell us how your loaf turned out. 🍞🤍
📋 Quick Recipe Card
Simple No-Knead Soft Sandwich Bread
⏱ Prep: 15 minutes | 🕒 Rising: 1 hour 30 minutes | 🔥 Baking: 30 to 35 minutes | ⏳ Total: Approximately 2 hours 20 minutes | 🍽 Yield: 1 loaf, about 10 to 12 slices
Bread: 375 g (3 cups) all-purpose flour or bread flour, 240 ml (1 cup) warm milk, 7 g (2¼ teaspoons) instant yeast, 25 g (2 tablespoons) sugar, 30 g (2 tablespoons) unsalted butter (melted and cooled slightly), 1 large egg (at room temperature), 1 teaspoon salt.
Crust: 1 tablespoon melted butter for brushing, a little extra milk (optional).
Instructions:
- Combine the warm milk, sugar, and yeast in a large bowl and stir until the sugar dissolves. Add the egg and melted butter and whisk until combined.
- Add the flour and salt and mix until a sticky, rough dough forms. No kneading is needed.
- Cover and let rise in a warm place for 60 to 90 minutes, until doubled.
- Grease a 9 × 5-inch (23 × 13 cm) loaf pan or line it with parchment. Gently stir or fold the risen dough to release larger air pockets.
- Turn the dough onto a lightly floured surface, pat into a rectangle as wide as the pan, roll up tightly, pinch the seam, tuck the ends under, and place seam-side down in the pan.
- Cover loosely and let rise 25 to 40 minutes until puffy and close to the top of the pan. Preheat the oven to 350°F (175°C).
- Lightly brush the top with milk, if desired.
- Bake 30 to 35 minutes until golden and cooked through, with the center at about 190°F (88°C). Cover loosely with foil in the last 10 minutes if browning too quickly.
- Brush the hot loaf with melted butter and rest in the pan for 5 to 10 minutes, then transfer to a wire rack.
- Cool at least 45 to 60 minutes before slicing with a serrated knife.

Simple No-Knead Soft Sandwich Bread
Ingredients
For the Soft Sandwich Bread
- 375 g (3 cups) all-purpose flour or bread flour
- 240 ml (1 cup) warm milk
- 7 g (2¼ teaspoons) instant yeast
- 25 g (2 tablespoons) sugar
- 30 g (2 tablespoons) unsalted butter, melted and cooled slightly
- 1 large egg, at room temperature
- 1 teaspoon salt
For the Golden, Soft Crust
- 1 tablespoon melted butter, for brushing
- A little extra milk, optional
🧐 A Closer Look at the Ingredients
All-purpose flour or bread flour. All-purpose flour gives a soft, tender sandwich loaf, while bread flour creates a slightly taller, chewier crumb with more structure. Both work well. Weighing the flour (375 g) is the most reliable way to get consistent results. If you use cups, spoon the flour into the cup and level it off instead of scooping, which can pack in too much flour and make the bread dry.
Warm milk. Milk is what makes this bread soft and slightly rich. The fat and sugars in milk tenderize the crumb and help the crust brown evenly. The milk should be comfortably warm, around 100 to 110°F (38 to 43°C), not hot. Hot milk can damage the yeast and prevent the dough from rising. Whole milk gives the richest flavor, but lower-fat milk also works.
Instant yeast. Instant yeast can be mixed directly into the liquid, as in this recipe. If you only have active dry yeast, use the same amount and let it sit in the warm milk with the sugar for 5 to 10 minutes until foamy before continuing.
Sugar. Two tablespoons feed the yeast, add a gentle sweetness, and help the crust turn a lovely golden color.
Unsalted butter. Melted butter enriches the dough, making the crumb softer and the loaf stay fresh longer. Let it cool slightly so it does not warm the egg or harm the yeast.
Egg. The egg adds richness, color, and structure, and contributes to a tender, fluffy interior. Using it at room temperature helps it blend more evenly into the dough.
Salt. Salt strengthens the dough and balances the flavor. Without it, the bread will taste flat and may rise too quickly.
Butter and milk for finishing. Brushing the top with milk before baking promotes a gentle golden color, while brushing with melted butter after baking gives a soft, flavorful crust with a lovely sheen.
Instructions
1️⃣ Prepare the Wet Ingredients
In a large mixing bowl, combine the warm milk, sugar, and instant yeast. Stir gently until the sugar dissolves. Add the egg and melted butter, then whisk until everything is well combined.
Tip: The milk should be comfortably warm, not hot. Excessive heat can damage the yeast and prevent the dough from rising properly. If you have a thermometer, aim for 100 to 110°F (38 to 43°C).
2️⃣ Add the Flour and Salt
Add the flour and salt to the bowl. Mix with a wooden spoon or sturdy spatula until all the flour is moistened and a sticky, rough dough forms. The dough should be soft and tacky rather than firm. There is no need to knead it or work it until smooth. Just make sure there are no dry pockets of flour at the bottom of the bowl.
3️⃣ Let the Dough Rise
Cover the bowl with plastic wrap or a clean kitchen towel. Leave the dough in a warm place for approximately 60 to 90 minutes, or until it has doubled in size and looks airy and puffy. The exact rising time depends on your kitchen temperature. A cooler room may require a little more time. A turned-off oven with the light on, or a spot near a sunny window, makes a good warm place.
4️⃣ Prepare the Loaf Pan
Lightly grease a 9 × 5-inch (23 × 13 cm) loaf pan with butter or oil. You can also line it with parchment paper for easier removal. Once the dough has risen, gently stir or fold it with a spatula to release some of the larger air pockets. This helps the finished loaf have a finer, more even crumb.
5️⃣ Shape the Dough
Lightly flour your work surface and turn out the dough. Because this is a no-knead recipe, handle it gently and avoid adding too much extra flour. Pat the dough into a rectangle approximately as wide as your loaf pan. Roll it up tightly into a log, pinch the seam closed, and tuck the ends underneath. Place the dough seam-side down in the prepared pan.
Tip: Rolling the dough tightly creates surface tension, which helps the loaf rise upward and gives it a neat, even shape.
6️⃣ Let It Rise Again
Cover the loaf pan loosely and let the dough rise for another 25 to 40 minutes, until it looks puffy and has risen close to the top of the pan. Meanwhile, preheat your oven to 350°F (175°C). Avoid letting the dough rise so much that it collapses or spills over the sides of the pan.
Poke test: Gently press a floured fingertip into the side of the dough. If the dent springs back slowly and only partly, the loaf is ready to bake.
7️⃣ Brush the Top
For a beautifully golden finish, lightly brush the surface with milk. If you prefer a softer, richer crust, you can brush the loaf with melted butter immediately after baking instead.
8️⃣ Bake Until Golden
Place the loaf in the preheated oven and bake for 30 to 35 minutes, until the top is golden brown and the bread is cooked through. If the top browns too quickly, loosely cover it with aluminum foil during the final 10 minutes. The center should reach approximately 190°F (88°C) for a fully baked, soft sandwich loaf. The bread should also sound hollow when tapped on the top.
9️⃣ Brush with Butter
Remove the bread from the oven and immediately brush the top with melted butter. This adds a delicate buttery flavor and helps keep the crust soft and tender. Allow the loaf to rest in the pan for 5 to 10 minutes before carefully transferring it to a wire rack.
🔟 Cool, Slice, and Enjoy
Let the bread cool for at least 45 to 60 minutes before slicing. Use a serrated bread knife to cut neat, even slices. Inside, the bread should be light, fluffy, and tender, with a delicate crumb that is perfect for sandwiches and toast. 🤍🍞
💡 Tips for Perfect No-Knead Sandwich Bread
- Measure the flour carefully. Too much flour can make the loaf dry and dense. A kitchen scale gives the most consistent results.
- Keep the dough soft. Sticky dough is normal for this recipe and helps produce a tender crumb.
- Use fresh yeast. If your yeast is old or inactive, the dough may rise slowly or not at all.
- Give it enough time. Let the dough rise until visibly puffy instead of following the clock alone.
- Do not skip the second rise. This helps create a light, even texture.
- Brush with butter after baking. This is the secret to a soft, tender crust.
- Cool before slicing. Cutting too early can compress the crumb and make the slices gummy.
- For extra softness. Replace 2 tablespoons of the milk with an equal amount of plain yogurt, adjusting the dough consistency if needed.
- Use a thermometer. Checking the milk temperature and the internal temperature of the loaf removes the guesswork.
- Use the right pan. A 9 × 5-inch pan gives a classic sandwich loaf. A smaller pan makes a taller, domed loaf.
- Let the egg come to room temperature. It blends more evenly and helps the dough rise well.
- Use a serrated knife. A bread knife slices cleanly without squashing the soft crumb.
⚠️ Common Problems and How to Fix Them
The dough did not rise. The yeast may be expired, or the milk may have been too hot or too cold. Check the date on your yeast, use a thermometer for the milk, and find a warmer place for the dough.
The loaf is dense. Too much flour, not enough rising time, or old yeast can cause a dense loaf. Weigh the flour, allow the dough to rise until puffy, and use fresh yeast.
The loaf collapsed. The second rise may have gone on too long. Bake the loaf as soon as it has risen close to the top of the pan.
The crust is too dark. Loosely cover the loaf with foil for the last 10 minutes, or move the pan to a lower rack.
The crust is too pale. Make sure the oven is fully preheated and brush the top with milk before baking. Bake a few extra minutes if needed.
The center is gummy. The loaf may need more baking time, or it may have been cut while warm. Check that the center reaches 190°F (88°C) and cool the loaf completely before slicing.
The crumb is too crumbly. The dough may have been too dry. Measure the flour carefully and keep the dough soft and tacky.
The bread has large holes. Gently deflate the dough before shaping, and roll it up tightly so there are no large air pockets.
The loaf stuck to the pan. Grease the pan generously, or line it with parchment paper with an overhang to lift the loaf out.