
Homemade Focaccia Bread
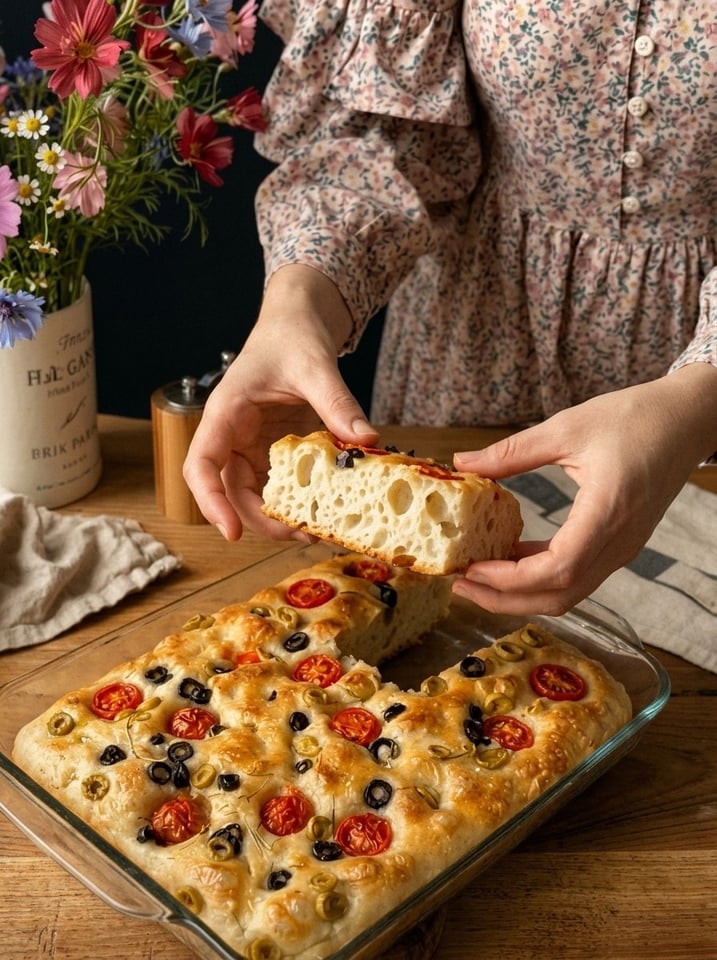
Homemade Focaccia Bread – Crispy Edges, Soft Center & Olive Oil Goodness!
This homemade focaccia bread is beautifully golden, with a lightly crispy bottom, a soft and airy center and those irresistible little dimples filled with fragrant olive oil. Topped with fresh rosemary, flaky sea salt and a drizzle of extra-virgin olive oil, this classic Italian bread is simple to make and absolutely delicious. Its fluffy texture and rich aroma make it perfect for dipping, sandwiches, family dinners or enjoying warm straight from the oven. 🇮🇹🤎
Best of all, focaccia is one of the most forgiving breads you can bake at home. There is no complicated shaping, no heavy kneading and no special equipment, just a wet, sticky dough, a generous pour of olive oil and a little patience. In this guide you will find the complete recipe, tips for getting the perfect crumb and crust, topping ideas, troubleshooting, storage and freezing advice and answers to common questions.
Why You Will Love This Focaccia
- Minimal effort. A few gentle folds replace traditional kneading.
- Crispy bottom, soft center. The olive oil in the pan fries the base to a golden crunch while the inside stays airy and tender.
- Simple ingredients. Flour, water, yeast, salt and olive oil make the dough.
- Endlessly customizable. Rosemary and sea salt are classic, but you can top it with tomatoes, olives, onions, cheese and more.
- Impressive but easy. The dimpled, golden surface looks like it came from an Italian bakery.
- Versatile. Serve it as an appetizer, a side, a sandwich bread or a snack.
- Great for beginners. The forgiving dough makes it a good first yeast bread.
Recipe Card at a Glance
- Prep time: 20 minutes
- Rising time: 1 hour 30 minutes
- Cook time: 20 to 25 minutes
- Total time: Approximately 2 hours 15 minutes
- Yield: 1 large focaccia (about 8 to 10 servings)
- Course: Bread, appetizer, side
- Cuisine: Italian
- Method: Oven-baked
What Is Focaccia?
Focaccia is a flat, oven-baked Italian bread with a soft, airy crumb and a rich, olive oil-infused flavor. It is traditionally associated with Liguria in northern Italy, where it is baked in wide pans, dimpled with fingertips and finished with olive oil and coarse salt. The bread is related to pizza dough but is typically thicker, softer and more focused on the flavor of olive oil.
What sets focaccia apart is its high hydration: the dough contains a large amount of water relative to flour, making it sticky and loose. This wet dough creates a light, open crumb with irregular air pockets, while the generous olive oil in the pan and on the surface gives the crust its golden color and crisp texture.
Ingredients
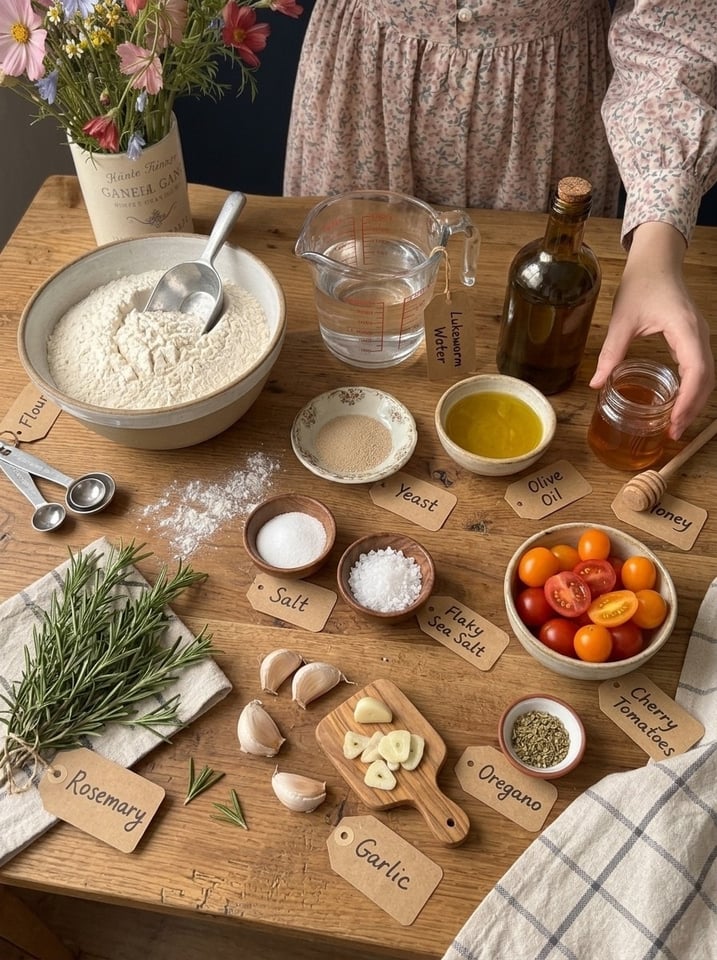
For the focaccia dough
- 4 cups (500 g) all-purpose flour or bread flour
- 1¾ cups (420 ml) lukewarm water
- 2 teaspoons instant yeast
- 1 teaspoon sugar or honey
- 2 teaspoons salt
- 2 tablespoons extra-virgin olive oil
For the topping
- 3 to 4 tablespoons extra-virgin olive oil
- 2 tablespoons fresh rosemary leaves
- 1 teaspoon flaky sea salt
- 2 to 3 garlic cloves, thinly sliced (optional)
- Cherry tomatoes, halved (optional)
- A pinch of dried oregano (optional)
Step-by-Step Instructions
Step 1: Mix the dough 🥣
In a large bowl, combine the lukewarm water, sugar or honey and instant yeast. Stir briefly. Add the flour, salt and olive oil. Mix with a wooden spoon until all the flour is incorporated and a sticky, shaggy dough forms. The dough should be wetter and stickier than traditional bread dough. This high hydration helps create focaccia’s signature airy interior.
Step 2: Develop the dough ✨
Cover the bowl and let the dough rest for 10 minutes. With wet or lightly oiled hands, stretch one side of the dough upward and fold it toward the center. Rotate the bowl and repeat on all four sides. Cover and rest for 10 minutes, then repeat the folding process once or twice more. These gentle folds help strengthen the dough without extensive kneading.
Step 3: Let the dough rise ⏳
Cover the bowl and leave the dough in a warm place for 60 to 90 minutes, or until visibly expanded and bubbly. The dough should look soft, airy and slightly wobbly when the bowl is gently moved.
Step 4: Prepare the baking pan 🫒
Generously coat a 9 × 13-inch (23 × 33 cm) baking pan with olive oil, making sure the bottom and corners are well covered. Carefully transfer the risen dough into the pan. Gently stretch it toward the edges without forcing it. If the dough resists stretching, let it rest for 10 to 15 minutes before gently stretching it again.
Step 5: Allow the second rise 🌤️
Cover the pan loosely and let the dough rise for another 25 to 35 minutes, until puffy and relaxed. Meanwhile, preheat your oven to 425°F (220°C).
Step 6: Create the signature dimples 👆
Drizzle the dough generously with olive oil. Coat your fingertips with a little oil, then press them straight down into the dough to create deep dimples across the surface. Do not be afraid to press firmly, but avoid tearing the dough. Watch as the little wells form across the fluffy surface, ready to hold the fragrant olive oil. 😍
Step 7: Add the toppings 🌿
Scatter the fresh rosemary leaves and flaky sea salt over the dough. Add sliced garlic, cherry tomatoes or dried oregano if desired. Finish with another light drizzle of olive oil to help create a flavorful, golden crust.
Step 8: Bake until golden 🔥
Bake for 20 to 25 minutes, or until the focaccia is puffed and deeply golden on top, with crisp edges and a lightly browned bottom. If the top needs more color, bake for an additional 2 to 3 minutes while watching carefully.
Step 9: Cool slightly 🤎
Remove the focaccia from the oven and let it rest in the pan for 5 to 10 minutes. Carefully transfer it to a wire rack if you prefer a crispier bottom. Brush lightly with extra olive oil if desired.
Step 10: Slice and enjoy! 🍞✨
Cut the focaccia into squares or long strips. Serve warm while the center is soft, the edges are crisp and the rosemary and olive oil smell incredible. Enjoy it on its own, dip it into balsamic vinegar and olive oil or use it to make delicious sandwiches. 🇮🇹🫒
Tips for Perfect Homemade Focaccia Bread
1. Use enough olive oil
Generous oil in the pan helps create focaccia’s signature golden, slightly crispy bottom. This is not the time to be shy. The oil essentially shallow-fries the base of the bread as it bakes. Use a good-quality extra-virgin olive oil, since its flavor shines through.
2. Do not add too much flour
Sticky dough is normal and helps produce a lighter, airier crumb. If you add too much flour while handling the dough, you will end up with a denser, drier loaf. Use wet or oiled hands instead.
3. Use wet or oiled hands
This makes handling the dough much easier. Dipping your hands in water or coating them with olive oil prevents sticking without changing the dough’s hydration.
4. Be patient with the rise
Let the dough become visibly puffy and bubbly before baking for a softer interior. Rising times vary depending on the temperature of your kitchen. In a cool kitchen, it may take longer, and in a warm kitchen, it may rise faster. Judge by the look of the dough rather than only by the clock.
5. Make deep dimples
Pressing firmly helps create the traditional focaccia appearance and gives the olive oil places to collect. Press all the way down until you feel the bottom of the pan, then spread your fingers slightly to open the dimples.
6. Choose fresh rosemary
Fresh herbs add a wonderful aroma, but dried rosemary also works in smaller quantities. Press the herbs lightly into the dough so they do not blow around or burn on the surface.
7. Customize your toppings
Try olives, caramelized onions, cherry tomatoes, roasted garlic, Parmesan or thinly sliced red onions. Add delicate toppings such as thin garlic slices carefully, since they can burn if exposed on the surface. Nestling them into the dimples and covering them with oil protects them.
8. For an extra-crispy bottom
Bake on the lower-middle rack and transfer the focaccia to a wire rack shortly after baking so steam does not soften the base. A metal pan generally gives a crisper bottom than glass or ceramic.
9. Use the right pan
A 9 × 13-inch (23 × 33 cm) pan gives a focaccia about 1 inch (2.5 cm) thick. A smaller pan makes a thicker loaf that needs a longer bake, and a larger pan makes a thinner, crispier focaccia.
10. Check that the oven is truly hot
A properly preheated oven helps the bread spring up quickly and form a crisp crust. An oven thermometer can confirm that your oven reaches the right temperature.
The Secret to Airy Focaccia: High Hydration and Gentle Folds
Focaccia gets its light, open texture from two things: a wet dough and gentle handling.
High hydration. The ratio of water to flour in this recipe is roughly 84 percent (420 ml of water to 500 g of flour). That is much wetter than most sandwich bread. The extra water turns to steam in the oven, puffing up the dough and forming large air pockets. It also keeps the crumb moist and tender.
Stretch and folds. Instead of kneading, you gently stretch and fold the dough several times during the first rest. This develops gluten structure gradually and builds strength without tearing the delicate air bubbles. The result is a dough that holds its shape but stays light.
Time. Giving the dough enough time to rise lets the yeast produce gas and flavor. A bubbly, jiggly dough is a good sign.
Overnight Method for Even Better Flavor
If you want deeper flavor, you can make the dough ahead and let it ferment slowly in the refrigerator:
- Mix the dough and do the stretch and folds as in the recipe.
- Cover the bowl tightly and refrigerate for 8 to 24 hours.
- Transfer the cold dough to the oiled pan, stretch gently and let it rest at room temperature for 1 to 2 hours until puffy.
- Dimple, top and bake as directed.
The slow, cold rise develops more complex flavor and a slightly chewier, more bakery-style crumb. It also lets you split the work, so the bread is ready to bake when you need it.
Topping Ideas
Rosemary and sea salt are classic, but focaccia is a blank canvas. Try these:
- Cherry tomatoes and basil. Press halved cherry tomatoes into the dimples and add fresh basil after baking.
- Olives. Kalamata or green olives add salty, briny flavor.
- Caramelized onions. Sweet and savory, they melt into the dough.
- Roasted garlic. Soft, mellow and aromatic.
- Parmesan. Sprinkle grated Parmesan during the last few minutes of baking for a crisp, nutty crust.
- Thinly sliced red onion. Adds mild sharpness and color.
- Lemon and thyme. Thin lemon slices with fresh thyme make a bright, fragrant topping.
- Sun-dried tomatoes and feta. A Mediterranean-inspired combination.
- Pesto swirl. Dot with pesto after baking, since pesto can burn in the oven.
- Za’atar. For a Middle Eastern twist.
- Hot honey and chili flakes. A sweet-spicy finish drizzled after baking.
- Garden focaccia. Arrange thinly sliced vegetables and herbs in a pattern, pressing them lightly into the dough for a decorative look.
Delicious Ways to Serve Focaccia
- Classic Italian style. Dip warm pieces into extra-virgin olive oil and balsamic vinegar.
- Sandwich bread. Split the slab horizontally and fill with mozzarella, tomatoes, basil and grilled vegetables.
- Garlic focaccia. Add sliced garlic, parsley and a little Parmesan.
- Cheese lover’s version. Sprinkle with Parmesan or mozzarella before baking.
- Soup companion. Serve alongside tomato soup, minestrone or creamy vegetable soup.
- Appetizer platter. Cut into strips and serve with hummus, olives, cheeses and roasted vegetables.
- Panini. Press a focaccia sandwich in a skillet or panini press for a crisp, melty lunch.
- Croutons. Cube day-old focaccia, toss with olive oil and bake for the best homemade croutons.
- Bruschetta base. Toast slices and top with tomatoes, basil and olive oil.
- Breakfast sandwich. Fill with eggs, cheese and bacon or avocado.
- Pizza-style. Top with sauce and cheese and bake again for a thick-crust pizza.
Storage, Make-Ahead and Freezing
Room temperature
Keep cooled focaccia in an airtight container or wrapped well at room temperature for up to 2 days. Focaccia is best on the day it is made, when the crust is crisp and the center is soft.
Freezer
Slice into portions, wrap well and freeze for up to 2 months. Reheat in the oven to restore its crisp edges.
Reheating
To refresh focaccia, warm it in a 350°F (175°C) oven for 8 to 10 minutes, until the crust crisps up and the center is warm. You can also toast slices in a skillet over medium heat. A microwave will soften the crust, so it is best avoided.
Make-ahead options
You can prepare the dough the night before and refrigerate it (see the overnight method above). You can also bake the focaccia in the morning and serve it at dinner, then refresh it in the oven.
Troubleshooting Common Problems
My focaccia is dense
The dough may be underproofed, may have had too much flour added or may have been handled too roughly. Let the dough rise until bubbly and airy, keep the dough wet and use oiled hands instead of extra flour.
My focaccia is pale
The oven may not be hot enough, or the dough may have too little oil on the surface. Check your oven temperature, drizzle oil generously and bake a few minutes longer if needed.
The bottom is soggy
The focaccia may have steamed in the pan after baking. Transfer it to a wire rack shortly after it comes out of the oven, and bake on a lower rack for a crisper bottom.
The dough will not stretch to the corners
The gluten is tense. Let the dough rest for 10 to 15 minutes, then stretch again gently. Oiling your hands helps.
The dough is too sticky to handle
That is normal for focaccia. Use wet or oiled hands or a bench scraper. Avoid adding extra flour, which makes the bread dense.
The dough did not rise
The yeast may be old or the water may have been too hot or too cold. Check the expiration date on the yeast and use lukewarm water. A cold kitchen may also slow the rise, so give it more time or move the bowl to a warmer spot.
The toppings burned
Delicate toppings such as garlic or herbs can burn in a hot oven. Press them into the dough, cover them with a little oil or add them partway through baking.
The crumb is gummy
The focaccia may have been underbaked or cut while too hot. Let it cool for at least 10 minutes before slicing, and check that the center is cooked through.
Common Mistakes to Avoid
- Adding too much flour. This makes the dough dense and dry.
- Skimping on olive oil. Less oil means a paler, less crisp bottom and less flavor.
- Rushing the rise. Underproofed dough bakes up heavy.
- Skipping the dimples. They add texture and trap the oil.
- Pressing too gently. Shallow dimples disappear as the dough puffs.
- Overbaking. The bread can dry out. Remove it when deep golden.
- Slicing while piping hot. The crumb can feel gummy.
- Using stale yeast. The dough will not rise properly.
- Using a pan that is too small. The bread will be too thick and may bake unevenly.
Frequently Asked Questions
Can I use active dry yeast instead of instant yeast?
Yes. Use the same amount, but dissolve it in the lukewarm water with the sugar for about 5 to 10 minutes until foamy before adding the flour.
Do I need to knead focaccia?
No. The stretch-and-fold technique replaces traditional kneading. It is gentler and keeps the dough light and airy.
Can I use bread flour?
Yes. Bread flour has more protein and produces a chewier, slightly taller focaccia. All-purpose flour gives a softer, more tender result. Both work well.
Can I use dried rosemary?
Yes, but use less, about 1 teaspoon, as dried herbs are more concentrated. Press it into the oil so it does not scorch.
What kind of pan is best?
A metal baking pan gives the crispest bottom. A glass or ceramic dish works too, but the bottom may be less crisp. A cast iron skillet makes a thicker, extra-crispy focaccia.
Why is my dough so sticky?
Focaccia dough is meant to be very wet. The stickiness is what produces the airy crumb. Use wet or oiled hands to handle it.
Can I make focaccia without a second rise?
You can, but the second rise helps the dough relax and puff up, giving a lighter result. If you are short on time, shorten it, but do not skip it entirely.
How do I get big air bubbles?
Use high hydration, handle the dough gently, allow a full rise and avoid deflating it when you transfer it to the pan.
Can I use salted butter or other oils?
Extra-virgin olive oil is the classic choice and gives the signature flavor. Other oils will work, but the taste will differ.
Can I make it vegan?
Yes. The recipe is naturally vegan as written. Just use sugar rather than honey if you avoid honey.
How thick should the focaccia be?
In a 9 × 13-inch pan, it will be about 1 inch (2.5 cm) thick after baking. A smaller pan makes a thicker loaf.
Can I freeze the dough?
Yes. After the first rise, you can shape the dough, wrap it well and freeze it. Thaw it in the refrigerator overnight, then let it come to room temperature and proceed with the second rise.
How do I know when focaccia is done?
It should be deep golden on top, with crisp edges and a lightly browned bottom. If you tap the bottom, it should sound slightly hollow.
Final Thoughts
Homemade focaccia bread proves that a bakery-quality loaf does not require expert skills. With a wet dough, gentle folds, plenty of olive oil and a little patience, you get a golden, dimpled bread with crispy edges and a soft, airy center, ready for rosemary, sea salt and any topping you love. Serve it warm with a dish of olive oil, slice it for sandwiches or set it out on a party table and watch it disappear.
If you try this recipe, leave a comment with your favorite topping, share it with a friend who loves baking and save it for your next dinner or gathering. Enjoy! 🍞🫒✨
Print
Homemade Focaccia Bread
Ingredients
For the focaccia dough
- 4 cups (500 g) all-purpose flour or bread flour
- 1¾ cups (420 ml) lukewarm water
- 2 teaspoons instant yeast
- 1 teaspoon sugar or honey
- 2 teaspoons salt
- 2 tablespoons extra-virgin olive oil
For the topping
- 3 to 4 tablespoons extra-virgin olive oil
- 2 tablespoons fresh rosemary leaves
- 1 teaspoon flaky sea salt
- 2 to 3 garlic cloves, thinly sliced (optional)
- Cherry tomatoes, halved (optional)
- A pinch of dried oregano (optional)
Instructions
In a large bowl, combine the lukewarm water, sugar or honey and instant yeast. Stir briefly. Add the flour, salt and olive oil. Mix with a wooden spoon until all the flour is incorporated and a sticky, shaggy dough forms. The dough should be wetter and stickier than traditional bread dough. This high hydration helps create focaccia’s signature airy interior.
Cover the bowl and let the dough rest for 10 minutes. With wet or lightly oiled hands, stretch one side of the dough upward and fold it toward the center. Rotate the bowl and repeat on all four sides. Cover and rest for 10 minutes, then repeat the folding process once or twice more. These gentle folds help strengthen the dough without extensive kneading.
Cover the bowl and leave the dough in a warm place for 60 to 90 minutes, or until visibly expanded and bubbly. The dough should look soft, airy and slightly wobbly when the bowl is gently moved.
Generously coat a 9 × 13-inch (23 × 33 cm) baking pan with olive oil, making sure the bottom and corners are well covered. Carefully transfer the risen dough into the pan. Gently stretch it toward the edges without forcing it. If the dough resists stretching, let it rest for 10 to 15 minutes before gently stretching it again.
Cover the pan loosely and let the dough rise for another 25 to 35 minutes, until puffy and relaxed. Meanwhile, preheat your oven to 425°F (220°C).
Drizzle the dough generously with olive oil. Coat your fingertips with a little oil, then press them straight down into the dough to create deep dimples across the surface. Do not be afraid to press firmly, but avoid tearing the dough. Watch as the little wells form across the fluffy surface, ready to hold the fragrant olive oil. 😍
Scatter the fresh rosemary leaves and flaky sea salt over the dough. Add sliced garlic, cherry tomatoes or dried oregano if desired. Finish with another light drizzle of olive oil to help create a flavorful, golden crust.
Bake for 20 to 25 minutes, or until the focaccia is puffed and deeply golden on top, with crisp edges and a lightly browned bottom. If the top needs more color, bake for an additional 2 to 3 minutes while watching carefully.
Remove the focaccia from the oven and let it rest in the pan for 5 to 10 minutes. Carefully transfer it to a wire rack if you prefer a crispier bottom. Brush lightly with extra olive oil if desired.
Cut the focaccia into squares or long strips. Serve warm while the center is soft, the edges are crisp and the rosemary and olive oil smell incredible. Enjoy it on its own, dip it into balsamic vinegar and olive oil or use it to make delicious sandwiches.