
Hot Italian Pickled Vegetable Salad
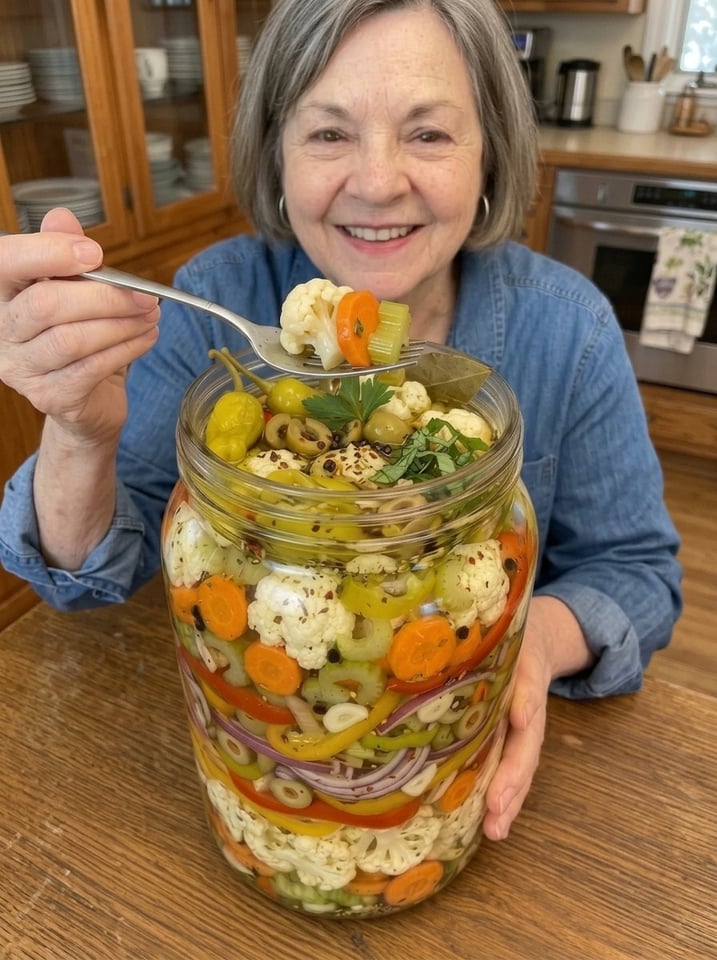
Hot Italian Pickled Vegetable Salad: Crunchy, Tangy, Spicy Giardiniera-Style Refrigerator Pickles 🌶️🥕🫑
Crunchy, tangy, spicy, and bursting with bold Italian-inspired flavor, this Hot Italian Pickled Vegetable Salad is the kind of condiment that makes everything it touches taste better. Crisp cauliflower, sweet carrots, colorful bell peppers, celery, green olives, and fiery chili peppers soak in a zesty garlic-and-herb vinegar brine until they turn into a jar of pure antipasto magic. Spoon it onto an Italian sub, pile it on a burger, scatter it over pizza, or set it out next to cured meats and cheese, and watch it disappear.
If you’ve ever enjoyed a good Italian beef sandwich or an antipasto platter and wondered how to make that spicy, vinegary vegetable mix at home, this recipe is for you. It’s a refrigerator pickle, which means there’s no canning equipment, no pressure cooker, and no special skills. You prepare the vegetables, simmer a quick brine, briefly blanch the firm vegetables, pack the jar, and let the refrigerator do the rest.
In this complete guide, you’ll find the full recipe, a closer look at every ingredient, step-by-step instructions, tips for keeping the vegetables crisp, how the flavor develops over time, food safety and storage guidance, troubleshooting help, creative variations, a long list of serving ideas, and answers to the most common pickling questions.
Why You’ll Love This Hot Italian Pickled Vegetable Salad ❤️
It’s loaded with flavor. Garlic, oregano, mustard seeds, black peppercorns, bay leaf, and chili heat build a layered, aromatic brine that every vegetable soaks up.
It stays crunchy. A very short simmer, only 2 to 3 minutes in total, softens the vegetables just enough to take up the brine while keeping that satisfying snap.
It’s colorful. Orange carrots, red and yellow bell peppers, white cauliflower, green olives, and flecks of chili make a jar that looks as good as it tastes.
It’s easy and doesn’t require canning. This is a refrigerator pickle recipe, so there’s no water bath or special equipment involved.
It’s versatile. Use it as a sandwich topping, a salad, a side dish, a burger topper, a pizza topping, an antipasto component, or a snack straight from the jar.
The heat is adjustable. Use two jalapeños for gentle warmth, or four serranos and extra red pepper flakes for real fire.
It makes a great gift. A pretty jar of homemade giardiniera-style pickles is a thoughtful present for foodies.
It’s a smart way to use up vegetables. Leftover cauliflower, carrots, peppers, and celery all find a delicious second life here.
Recipe Overview
- Prep Time: 25 minutes
- Cook Time: 5 minutes
- Pickling Time: At least 48 hours (best after 3 to 5 days)
- Yield: About 2 quarts (roughly 6 to 8 cups of vegetables)
Ingredients You’ll Need 🛒
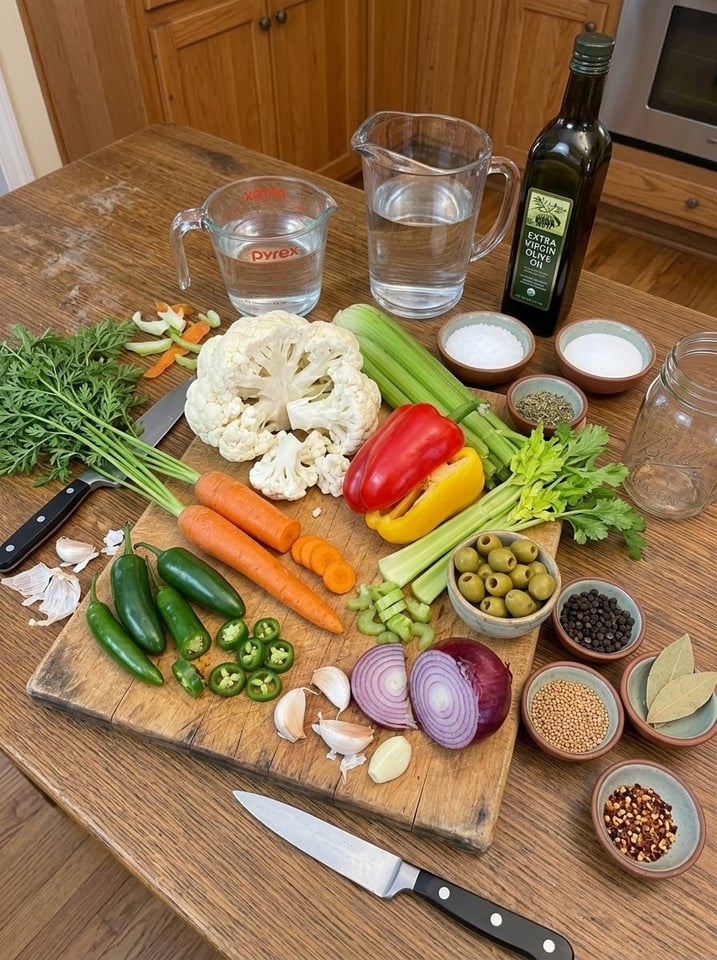
For the Vegetables
- 2 cups cauliflower florets
- 2 medium carrots, thinly sliced
- 1 red bell pepper, sliced
- 1 yellow bell pepper, sliced
- 2 celery stalks, sliced
- 2–4 fresh jalapeños or serrano peppers, sliced
- 4–6 garlic cloves, peeled
- ½ cup pitted green olives
- ¼ small red onion, thinly sliced
For the Pickling Brine
- 1 cup white vinegar (5% acidity)
- 1 cup water
- 1 tbsp pickling salt
- 1 tbsp granulated sugar
- 1 tsp dried oregano
- 1 tsp black peppercorns
- 1 tsp mustard seeds
- ½–1 tsp crushed red pepper flakes
- 1 bay leaf
- 2 tbsp extra virgin olive oil, added when serving
A Closer Look at the Ingredients
Cauliflower. Cauliflower is a classic giardiniera vegetable because it soaks up brine while staying crisp. Cut it into small, bite-size florets, about 1 inch across, so they pickle evenly and fit easily on a sandwich or fork.
Carrots. Thin slices, about ⅛ inch thick, soften just enough in the brine while keeping a pleasant snap. Their natural sweetness balances the heat.
Bell peppers. Red and yellow bell peppers add sweetness, color, and juicy crunch. Remove the stems, seeds, and white ribs before slicing.
Celery. Celery adds a fresh, slightly savory crunch and a classic antipasto flavor. Slice it on a slight diagonal for a pretty look.
Jalapeños or serranos. These bring the heat. Jalapeños are milder and fruitier, while serranos are hotter and sharper. For less heat, remove the seeds and ribs. For more heat, leave them in. Wear gloves when slicing hot peppers, and avoid touching your eyes.
Garlic. Whole peeled cloves turn mellow, sweet, and tender in the brine and are a treat to eat straight from the jar. For a stronger garlic flavor, lightly smash the cloves before adding.
Green olives. Pitted green olives add a briny, savory depth that is the hallmark of Italian-style pickled salads. Use plain, pimiento-stuffed, or Castelvetrano olives, depending on your taste.
Red onion. A little thinly sliced red onion adds sharpness, color, and sweetness as it pickles.
White vinegar (5% acidity). The vinegar is the preservative and the backbone of the brine. Make sure it’s labeled 5% acidity, which is standard. Don’t dilute it further than the recipe states, since the acidity matters for flavor and safety.
Water. Water softens the vinegar’s sharpness. This brine uses a 1-to-1 ratio, which gives a bold, tangy pickle.
Pickling salt. Pickling salt (also called canning salt) is pure sodium chloride with no additives, so it keeps the brine clear. Kosher salt works if you use the same volume, but avoid iodized table salt, which can cloud the brine.
Sugar. A tablespoon balances the acid and heat, rounding out the flavor without making the vegetables sweet.
Dried oregano. Oregano gives the brine its distinctive Italian character.
Black peppercorns and mustard seeds. These whole spices add warmth and a classic pickle aroma.
Crushed red pepper flakes. They add visible flecks and lingering heat. Adjust to taste.
Bay leaf. A single bay leaf adds subtle earthy, herbal depth.
Extra virgin olive oil. A drizzle just before serving gives the salad its classic Italian antipasto finish. It’s added when serving rather than to the jar.
Step-by-Step Instructions 👩🍳
Step 1: Prepare the Vegetables
Wash all the vegetables thoroughly. Cut the cauliflower into small florets, slice the carrots and celery, and cut the bell peppers and chili peppers into strips or rings. Try to keep the pieces a similar size so they pickle evenly and look attractive in the jar. Peel the garlic cloves, and thinly slice the red onion.
Step 2: Make the Spicy Brine
Combine the vinegar, water, salt, sugar, oregano, peppercorns, mustard seeds, red pepper flakes, and bay leaf in a medium saucepan. Bring to a gentle boil over medium-high heat, stirring until the salt and sugar dissolve completely. Use a non-reactive pan, such as stainless steel or enamel, since aluminum and cast iron can react with the vinegar and affect the flavor.
Step 3: Add the Firm Vegetables
Reduce the heat so the brine simmers gently. Add the cauliflower and carrots and simmer for 2 minutes. Add the bell peppers and celery and simmer for another minute. Keep a close eye on the clock. The goal is to take the raw edge off the vegetables and help them absorb the brine while keeping them crisp. Overcooking leads to soft pickles.
Step 4: Pack the Jar
Place the garlic, sliced chili peppers, red onion, and olives in a clean, heat-safe glass jar or two smaller jars. Use a slotted spoon to add the warm vegetables on top, then carefully pour in enough hot brine to cover everything completely, including the spices and bay leaf. Press the vegetables down gently so they’re submerged and tap the jar on the counter to release air bubbles. Leave about ½ inch of headspace at the top.
Step 5: Cool and Refrigerate
Allow the jar to cool at room temperature for a short time, then cover and refrigerate promptly. Don’t leave the jar out for hours. Keep the vegetables submerged in the brine at all times.
Step 6: Let the Flavors Develop
Refrigerate for at least 48 hours before serving. The flavor becomes bolder, more aromatic, and more balanced after 3 to 5 days. Give the jar a gentle shake or tilt once a day to redistribute the spices.
Step 7: Finish and Serve
Just before serving, drain off as much brine as you like, transfer the vegetables to a bowl, and drizzle with extra virgin olive oil. Toss gently for a classic Italian antipasto-style finish. Serve chilled or at room temperature.
How the Flavor and Texture Develop Over Time ⏱️
After 24 hours: The vegetables are tangy but still a little raw in flavor. The garlic and chili haven’t fully infused yet. It’s edible, but wait if you can.
After 48 hours: The brine begins to penetrate, the flavors mingle, and the heat spreads through the jar. This is the minimum recommended time.
After 3 to 5 days: The sweet spot. The vegetables are crisp-tender, the garlic is mellow, and the spices are fully developed.
After 1 to 2 weeks: The pickles are softer and more intensely flavored, and the heat is more pronounced. They’re still enjoyable, though best enjoyed within this window for quality.
Expert Tips for Crisp, Flavorful Pickled Vegetables 💡
Cut the vegetables uniformly. Pieces of similar size pickle at the same rate and look appealing.
Don’t overcook. Following the short simmer times keeps the vegetables crisp. When in doubt, cook less.
Use fresh, firm vegetables. Limp or old vegetables make soft pickles. Choose crisp, bright produce.
Add the tender items raw. The garlic, chilies, olives, and onion go into the jar raw. They soften enough from the hot brine alone.
Keep everything submerged. Vegetables above the brine can discolor and spoil faster. Press them down, or use a small clean weight.
Wear gloves for hot peppers. Capsaicin lingers on skin and can burn your eyes.
Adjust the heat to your taste. Remove pepper seeds for a milder jar, or leave them in and add extra red pepper flakes for more fire.
Use a clean jar. Wash jars and lids with hot, soapy water or run them through the dishwasher.
Use a non-reactive pot. Stainless steel or enamel keeps the brine tasting clean.
Add olive oil only when serving. Oil in the jar can solidify in the refrigerator and cloud the brine, and it’s best used fresh.
Use clean utensils every time. This prevents contamination and extends the life of the jar.
Label the jar. Write the date on the lid so you know when it was made.
Food Safety and Storage 🫙
This is a refrigerator pickle. It isn’t processed in a water bath and isn’t shelf-stable. Keep it refrigerated at 40°F (4°C) or below at all times, and don’t store it at room temperature.
How long it lasts: For best quality, enjoy within 1 to 2 weeks. The vegetables will gradually soften and lose their crunch over time.
Don’t can this recipe as written. Home canning requires tested recipes with specific ingredient ratios, acidity levels, and processing times to be safe. If you want shelf-stable pickles, follow a recipe tested for canning from a trusted source, such as the National Center for Home Food Preservation.
Keep vegetables submerged. Vegetables exposed to air can discolor and spoil faster.
Use clean utensils. Never eat from the jar with a used fork, and never put used utensils back into the brine.
Signs of spoilage: Discard the jar if you see mold, a slimy texture, a foul or off smell, bubbling or fizzing, or a cloudy, stringy brine.
Freezing: Freezing is not recommended. It destroys the crisp texture of the vegetables.
Garlic color changes: Garlic can turn blue or green in acidic brine. This is a harmless chemical reaction and doesn’t affect safety.
Serving outdoors: Don’t leave the jar or serving bowl out for more than 2 hours, or 1 hour in hot weather.
Troubleshooting Common Problems
My vegetables are soft. They were probably simmered too long, or they weren’t fresh. Reduce the simmer time, and use firm produce.
My pickles are too sour. Add a little more sugar next time, or use a 1-to-1.25 ratio of vinegar to water for a milder brine.
My pickles aren’t spicy enough. Add more chili peppers, leave the seeds in, or increase the red pepper flakes. Let the jar rest a few more days.
My pickles are too spicy. Remove some of the chili slices, or serve the vegetables with a little olive oil and mild cheese to balance the heat. Next time, remove the seeds.
The brine is cloudy. Iodized salt, spices, or garlic can cause haziness. If it smells and tastes fine and shows no signs of spoilage, it’s cosmetic. Use pickling salt next time.
The garlic turned blue or green. It’s a harmless reaction between the garlic and the acid.
The vegetables are floating. Pack the jar more tightly, or press them down with a clean weight.
The cauliflower turned yellow. Overcooking or long storage can discolor it. Reduce the simmer time and use within 2 weeks.
The olives taste too salty. Rinse them before adding, or use a lower-sodium variety.
The jar leaked. Make sure the lid is on tightly and store it upright.
Delicious Variations to Try 🌶️
Mild version. Skip the chilies and red pepper flakes, and use a mild banana pepper instead.
Extra-hot version. Add habanero or Fresno chilies and increase the red pepper flakes.
Classic Chicago-style giardiniera. Use a mix of celery, carrots, cauliflower, sport peppers, and serranos, and use olive oil to cover the vegetables for serving.
Herb-forward version. Add fresh basil, parsley, or thyme sprigs to the jar.
Lemon-herb version. Add strips of lemon peel and a few fresh oregano sprigs.
Briny version. Add capers and Kalamata olives for a more Mediterranean feel.
Sweet-and-spicy version. Increase the sugar to 2 tablespoons for a bread-and-butter style balance.
Fennel version. Add thinly sliced fennel and a pinch of fennel seed for an anise-like freshness.
Green bean and zucchini version. Add trimmed green beans or zucchini spears for more variety.
Apple cider vinegar version. Replace half of the white vinegar with apple cider vinegar for a fruitier, softer tang.
Smoky version. Add a pinch of smoked paprika to the brine.
Serving Ideas: What to Do with Hot Italian Pickled Vegetable Salad 🍽️
- Italian subs: Add to salami, provolone, and ham sandwiches for a spicy crunch.
- Italian beef sandwiches: A traditional pairing, piled generously on top.
- Antipasto boards: Pair with cured meats, cheeses, olives, and crusty bread.
- Burgers: Add a spicy, crunchy topping.
- Grilled meats: Serve alongside chicken, steak, or sausages.
- Pasta salads: Mix with cooked pasta, fresh parsley, and olive oil.
- Pizza: Scatter over pizza for a tangy, spicy kick, especially on white pizza or sausage pizza.
- Hot dogs and sausages: Use as a relish.
- Eggs and breakfast: Spoon over fried eggs, frittatas, or breakfast sandwiches.
- Grain bowls: Stir into rice, farro, or quinoa bowls.
- Tuna or chicken salad: Chop finely and mix in for crunch and tang.
- Bruschetta and crostini: Chop and spoon over toasted bread with ricotta.
- Cheese plates: Serve with provolone, mozzarella, or sharp cheddar.
- Baked potatoes: Use as a tangy, spicy topping.
- Straight from the jar: Many people simply snack on them.
- Brine uses: Use a splash of the leftover brine in salad dressings, marinades, or bloody Marys.
Frequently Asked Questions
How long do these pickled vegetables need before I can eat them? At least 48 hours. For the best flavor, wait 3 to 5 days.
How long do they last in the refrigerator? For best quality, enjoy within 1 to 2 weeks. Keep the vegetables submerged in the brine and use a clean utensil each time.
Can I can this recipe? Not as written. It’s designed as a refrigerator pickle, and it isn’t a tested canning recipe. For shelf-stable pickles, follow a recipe tested for canning.
Why do I blanch the vegetables? A brief simmer helps the firm vegetables absorb the brine and flavors more quickly while keeping them crisp.
Can I skip the sugar? Yes, though a small amount helps balance the acidity and heat.
What if I don’t have pickling salt? Use kosher salt in the same volume, or reduce slightly if it’s a dense, fine variety. Avoid iodized table salt.
Can I use a different vinegar? You can use apple cider vinegar or white wine vinegar if they’re 5% acidity. White vinegar gives the cleanest, brightest flavor.
Can I reduce the heat? Yes. Use fewer chilies, remove the seeds, and skip or reduce the red pepper flakes.
Why add the olive oil at serving time? Olive oil can solidify when cold and cloud the jar. Adding it at serving time keeps the flavors fresh and the texture pleasant.
Can I use other vegetables? Absolutely. Green beans, zucchini, fennel, radishes, and broccoli all work well.
Do I need to use jalapeños or serranos? No. You can use any fresh chili, or leave them out for a mild version.
Why did my garlic turn blue? It’s a harmless reaction between garlic compounds and acid, and it doesn’t affect safety.
Is this the same as giardiniera? It’s very similar. Giardiniera is the Italian word for pickled vegetables, and this recipe is a spicy, refrigerator-style version.
Can I double the recipe? Yes. Double the vegetables and brine, and use two jars or one larger jar.
Can I reuse the brine? You can use it once for a quick batch of firm vegetables, but not repeatedly, as it weakens and picks up flavor over time.
Final Thoughts 🌶️🥕🫑
This Hot Italian Pickled Vegetable Salad puts crunchy, tangy, spicy, deeply savory flavor into one colorful jar, with a short ingredient list and a method that doesn’t require canning. It’s a ready-made upgrade for sandwiches, burgers, pizza, and antipasto boards, and an easy way to turn a handful of vegetables into something special.
Prepare the vegetables, simmer the brine for just a couple of minutes, pack the jar, and let the refrigerator work its magic. In a few days, you’ll have a jar of bold, crisp, Italian-style pickled vegetables ready to elevate almost any meal.
Print
Hot Italian Pickled Vegetable Salad
Ingredients
For the Vegetables
- 2 cups cauliflower florets
- 2 medium carrots, thinly sliced
- 1 red bell pepper, sliced
- 1 yellow bell pepper, sliced
- 2 celery stalks, sliced
- 2–4 fresh jalapeños or serrano peppers, sliced
- 4–6 garlic cloves, peeled
- ½ cup pitted green olives
- ¼ small red onion, thinly sliced
For the Pickling Brine
- 1 cup white vinegar (5% acidity)
- 1 cup water
- 1 tbsp pickling salt
- 1 tbsp granulated sugar
- 1 tsp dried oregano
- 1 tsp black peppercorns
- 1 tsp mustard seeds
- ½–1 tsp crushed red pepper flakes
- 1 bay leaf
- 2 tbsp extra virgin olive oil, added when serving
A Closer Look at the Ingredients
Cauliflower. Cauliflower is a classic giardiniera vegetable because it soaks up brine while staying crisp. Cut it into small, bite-size florets, about 1 inch across, so they pickle evenly and fit easily on a sandwich or fork.
Carrots. Thin slices, about ⅛ inch thick, soften just enough in the brine while keeping a pleasant snap. Their natural sweetness balances the heat.
Bell peppers. Red and yellow bell peppers add sweetness, color, and juicy crunch. Remove the stems, seeds, and white ribs before slicing.
Celery. Celery adds a fresh, slightly savory crunch and a classic antipasto flavor. Slice it on a slight diagonal for a pretty look.
Jalapeños or serranos. These bring the heat. Jalapeños are milder and fruitier, while serranos are hotter and sharper. For less heat, remove the seeds and ribs. For more heat, leave them in. Wear gloves when slicing hot peppers, and avoid touching your eyes.
Garlic. Whole peeled cloves turn mellow, sweet, and tender in the brine and are a treat to eat straight from the jar. For a stronger garlic flavor, lightly smash the cloves before adding.
Green olives. Pitted green olives add a briny, savory depth that is the hallmark of Italian-style pickled salads. Use plain, pimiento-stuffed, or Castelvetrano olives, depending on your taste.
Red onion. A little thinly sliced red onion adds sharpness, color, and sweetness as it pickles.
White vinegar (5% acidity). The vinegar is the preservative and the backbone of the brine. Make sure it’s labeled 5% acidity, which is standard. Don’t dilute it further than the recipe states, since the acidity matters for flavor and safety.
Water. Water softens the vinegar’s sharpness. This brine uses a 1-to-1 ratio, which gives a bold, tangy pickle.
Pickling salt. Pickling salt (also called canning salt) is pure sodium chloride with no additives, so it keeps the brine clear. Kosher salt works if you use the same volume, but avoid iodized table salt, which can cloud the brine.
Sugar. A tablespoon balances the acid and heat, rounding out the flavor without making the vegetables sweet.
Dried oregano. Oregano gives the brine its distinctive Italian character.
Black peppercorns and mustard seeds. These whole spices add warmth and a classic pickle aroma.
Crushed red pepper flakes. They add visible flecks and lingering heat. Adjust to taste.
Bay leaf. A single bay leaf adds subtle earthy, herbal depth.
Extra virgin olive oil. A drizzle just before serving gives the salad its classic Italian antipasto finish. It’s added when serving rather than to the jar.
Instructions
Wash all the vegetables thoroughly. Cut the cauliflower into small florets, slice the carrots and celery, and cut the bell peppers and chili peppers into strips or rings. Try to keep the pieces a similar size so they pickle evenly and look attractive in the jar. Peel the garlic cloves, and thinly slice the red onion.
Combine the vinegar, water, salt, sugar, oregano, peppercorns, mustard seeds, red pepper flakes, and bay leaf in a medium saucepan. Bring to a gentle boil over medium-high heat, stirring until the salt and sugar dissolve completely. Use a non-reactive pan, such as stainless steel or enamel, since aluminum and cast iron can react with the vinegar and affect the flavor.
Reduce the heat so the brine simmers gently. Add the cauliflower and carrots and simmer for 2 minutes. Add the bell peppers and celery and simmer for another minute. Keep a close eye on the clock. The goal is to take the raw edge off the vegetables and help them absorb the brine while keeping them crisp. Overcooking leads to soft pickles.
Place the garlic, sliced chili peppers, red onion, and olives in a clean, heat-safe glass jar or two smaller jars. Use a slotted spoon to add the warm vegetables on top, then carefully pour in enough hot brine to cover everything completely, including the spices and bay leaf. Press the vegetables down gently so they’re submerged and tap the jar on the counter to release air bubbles. Leave about ½ inch of headspace at the top.
Allow the jar to cool at room temperature for a short time, then cover and refrigerate promptly. Don’t leave the jar out for hours. Keep the vegetables submerged in the brine at all times.
Refrigerate for at least 48 hours before serving. The flavor becomes bolder, more aromatic, and more balanced after 3 to 5 days. Give the jar a gentle shake or tilt once a day to redistribute the spices.
Just before serving, drain off as much brine as you like, transfer the vegetables to a bowl, and drizzle with extra virgin olive oil. Toss gently for a classic Italian antipasto-style finish. Serve chilled or at room temperature.
After 24 hours: The vegetables are tangy but still a little raw in flavor. The garlic and chili haven’t fully infused yet. It’s edible, but wait if you can.
After 48 hours: The brine begins to penetrate, the flavors mingle, and the heat spreads through the jar. This is the minimum recommended time.
After 3 to 5 days: The sweet spot. The vegetables are crisp-tender, the garlic is mellow, and the spices are fully developed.
After 1 to 2 weeks: The pickles are softer and more intensely flavored, and the heat is more pronounced. They’re still enjoyable, though best enjoyed within this window for quality.
Cut the vegetables uniformly. Pieces of similar size pickle at the same rate and look appealing.
Don’t overcook. Following the short simmer times keeps the vegetables crisp. When in doubt, cook less.
Use fresh, firm vegetables. Limp or old vegetables make soft pickles. Choose crisp, bright produce.
Add the tender items raw. The garlic, chilies, olives, and onion go into the jar raw. They soften enough from the hot brine alone.
Keep everything submerged. Vegetables above the brine can discolor and spoil faster. Press them down, or use a small clean weight.
Wear gloves for hot peppers. Capsaicin lingers on skin and can burn your eyes.
Adjust the heat to your taste. Remove pepper seeds for a milder jar, or leave them in and add extra red pepper flakes for more fire.
Use a clean jar. Wash jars and lids with hot, soapy water or run them through the dishwasher.
Use a non-reactive pot. Stainless steel or enamel keeps the brine tasting clean.
Add olive oil only when serving. Oil in the jar can solidify in the refrigerator and cloud the brine, and it’s best used fresh.
Use clean utensils every time. This prevents contamination and extends the life of the jar.
Label the jar. Write the date on the lid so you know when it was made.
This is a refrigerator pickle. It isn’t processed in a water bath and isn’t shelf-stable. Keep it refrigerated at 40°F (4°C) or below at all times, and don’t store it at room temperature.
How long it lasts: For best quality, enjoy within 1 to 2 weeks. The vegetables will gradually soften and lose their crunch over time.
Don’t can this recipe as written. Home canning requires tested recipes with specific ingredient ratios, acidity levels, and processing times to be safe. If you want shelf-stable pickles, follow a recipe tested for canning from a trusted source, such as the National Center for Home Food Preservation.
Keep vegetables submerged. Vegetables exposed to air can discolor and spoil faster.
Use clean utensils. Never eat from the jar with a used fork, and never put used utensils back into the brine.
Signs of spoilage: Discard the jar if you see mold, a slimy texture, a foul or off smell, bubbling or fizzing, or a cloudy, stringy brine.
Freezing: Freezing is not recommended. It destroys the crisp texture of the vegetables.
Garlic color changes: Garlic can turn blue or green in acidic brine. This is a harmless chemical reaction and doesn’t affect safety.
Serving outdoors: Don’t leave the jar or serving bowl out for more than 2 hours, or 1 hour in hot weather.
My vegetables are soft. They were probably simmered too long, or they weren’t fresh. Reduce the simmer time, and use firm produce.
My pickles are too sour. Add a little more sugar next time, or use a 1-to-1.25 ratio of vinegar to water for a milder brine.
My pickles aren’t spicy enough. Add more chili peppers, leave the seeds in, or increase the red pepper flakes. Let the jar rest a few more days.
My pickles are too spicy. Remove some of the chili slices, or serve the vegetables with a little olive oil and mild cheese to balance the heat. Next time, remove the seeds.
The brine is cloudy. Iodized salt, spices, or garlic can cause haziness. If it smells and tastes fine and shows no signs of spoilage, it’s cosmetic. Use pickling salt next time.
The garlic turned blue or green. It’s a harmless reaction between the garlic and the acid.
The vegetables are floating. Pack the jar more tightly, or press them down with a clean weight.
The cauliflower turned yellow. Overcooking or long storage can discolor it. Reduce the simmer time and use within 2 weeks.
The olives taste too salty. Rinse them before adding, or use a lower-sodium variety.
The jar leaked. Make sure the lid is on tightly and store it upright.