
Crispy Cheesy Chicken Muffin Cups

🧀🍗 Crispy Cheesy Chicken Muffin Cups: Golden, Crunchy, and Irresistibly Cheesy
Crispy Cheesy Chicken Muffin Cups – Easy Party Appetizer and Family Dinner
Meta description: Make golden, crunchy chicken muffin cups loaded with mozzarella, cheddar, and seasoned shredded chicken, topped with a crispy panko-Parmesan crust. Perfect for parties, game day, lunchboxes, and weeknight dinners. Makes 12.
Focus keywords: chicken muffin cups, cheesy chicken muffin tin recipe, crispy chicken cups, shredded chicken appetizer, muffin tin chicken recipe, game day appetizer, leftover chicken recipe, kid friendly chicken bites
These delicious Crispy Cheesy Chicken Muffin Cups are golden, crunchy on the outside, and irresistibly cheesy on the inside! Made with tender seasoned chicken, gooey melted cheese, and a flavorful mixture baked into perfectly portioned muffin cups, they are an easy and satisfying treat for the whole family. Perfect as a party appetizer, game-day snack, lunchbox favorite, or a fun weeknight dinner, these savory bites are packed with flavor in every mouthful! 🤎🔥
If you have ever stared at a container of leftover cooked chicken wondering what to do with it, this recipe is the answer. Shredded chicken is combined with mozzarella and cheddar, bound together with eggs, breadcrumbs, and a little mayonnaise, then seasoned with garlic, paprika, parsley, and green onions. The mixture is pressed into a muffin tin, topped with a golden panko and Parmesan crust, and baked until the edges are crisp and the cheese is bubbling. What comes out of the oven is a tray of perfectly portioned, hand-held chicken cups that are crunchy on the outside, tender and juicy on the inside, and impossible to stop eating. 🧀
Because each cup is a single serving, they are wonderful for entertaining. There is no slicing, no serving spoon, and no mess. You can stack them on a platter with a few dipping sauces and let everyone help themselves. They also work beautifully for family dinners, school and work lunchboxes, and meal prep, since they keep and reheat so well.
In this guide, you will find the complete recipe, a detailed step-by-step walkthrough, an explanation of what makes each ingredient important, tips for ultra-crispy cups, common problems and fixes, flavor variations, serving ideas, make-ahead and freezer instructions, and answers to frequently asked questions. Let’s get cooking! 👩🍳
⏱️ Recipe Overview
- 🍽 Yield: 12 chicken muffin cups
- 🔥 Oven temperature: 400°F (200°C)
- ⏲️ Bake time: 20 to 25 minutes, plus an optional 1 to 2 minute broil
- 😴 Resting time: 5 minutes
- 🍴 Category: Appetizer, snack, lunchbox food, or easy dinner
- 🎯 Difficulty: Easy, beginner friendly
🤔 Why You Will Love These Chicken Muffin Cups
- Crispy outside, tender inside. The panko and Parmesan topping bakes into a golden crust, while the chicken filling stays moist and flavorful. 🍗
- Packed with cheese. Mozzarella provides that gooey, stretchy melt, and sharp cheddar adds bold, savory flavor. 🧀
- A perfect use for leftover chicken. Rotisserie chicken, grilled chicken, or baked chicken breast all work wonderfully.
- Portion-controlled. Each muffin cup is a single serving, making them easy to serve, pack, and freeze.
- Great for parties. They look impressive on a platter, can be eaten with your hands, and pair with almost any dipping sauce.
- Kid friendly. The mild, cheesy flavor and fun shape make them a hit with children, and they are easy to pack in lunchboxes.
- Make-ahead friendly. Mix the filling ahead of time, then assemble and bake when you are ready.
- Freezer friendly. Bake a double batch and freeze half for busy days.
- Customizable. Swap the cheeses, add vegetables, or change the seasonings to fit your family’s tastes.
- Simple ingredients. Everything in the recipe is easy to find at a regular grocery store.
🛒 Ingredients
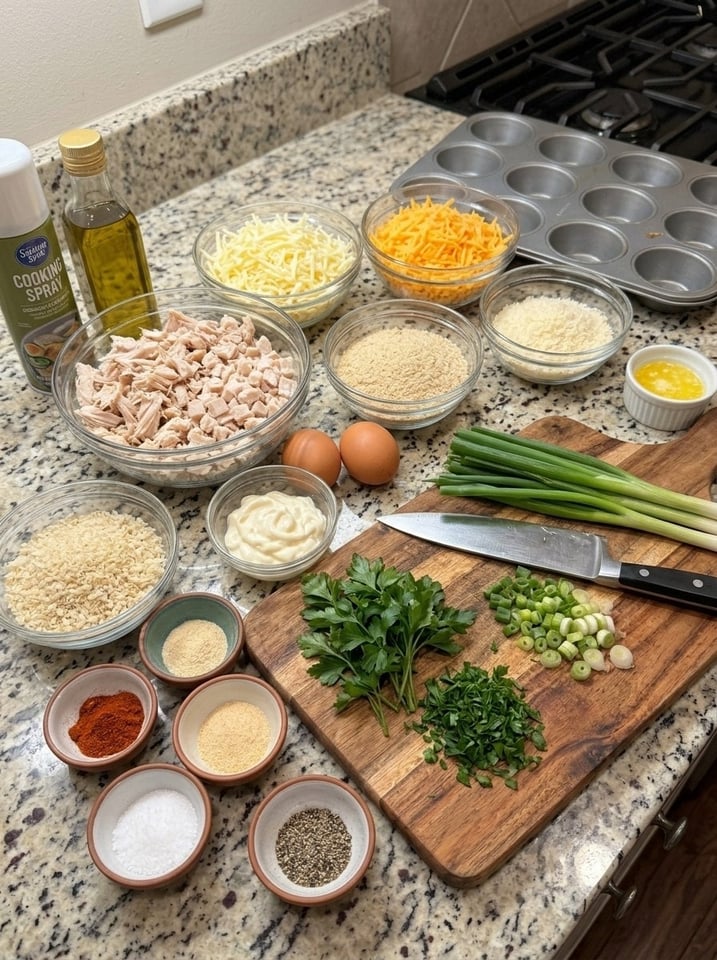
For the Chicken Mixture
- 2 cups (300 g) cooked chicken breast, shredded or finely diced
- 1 cup (100 g) shredded mozzarella cheese
- ½ cup (50 g) shredded cheddar cheese
- 2 large eggs
- ½ cup (60 g) breadcrumbs
- ¼ cup (60 g) mayonnaise
- 2 tbsp finely chopped fresh parsley
- 2 green onions, finely sliced
- 1 tsp garlic powder
- 1 tsp paprika
- ½ tsp onion powder
- ½ tsp salt, or to taste
- ¼ tsp freshly ground black pepper
For the Crispy Topping
- ½ cup (50 g) panko breadcrumbs
- 2 tbsp grated Parmesan cheese
- 1 tbsp melted butter
- ½ tsp paprika
- Cooking spray or olive oil, for greasing the muffin tin
Optional for Serving
- Extra shredded mozzarella cheese
- Fresh chopped parsley
- Garlic dipping sauce or ranch dressing
- Sweet chili sauce
🧐 A Closer Look at the Key Ingredients
Cooked chicken breast. The base of the recipe. You can use leftover roast chicken, rotisserie chicken, poached chicken, or grilled chicken. Shred it finely or dice it small so it holds together well in the cups. Chicken thighs also work and will be slightly juicier and richer. The most important rule is that the chicken should not be overly wet. Pat it dry or let it drain if it has been sitting in juices, because excess moisture prevents the cups from crisping.
Mozzarella and cheddar. Mozzarella gives you the signature melted, stretchy cheese pull, while cheddar contributes sharper flavor. Shredding the cheese yourself from a block gives the best melt, because pre-shredded cheese is often coated with anti-caking agents that can make it a little drier.
Eggs. The eggs bind the mixture, so the cups hold their shape after baking. They also add richness and help create a tender interior.
Breadcrumbs. The breadcrumbs inside the mixture absorb excess moisture and add structure. Regular dry breadcrumbs work well here.
Mayonnaise. A small amount of mayonnaise keeps the chicken juicy and tender while baking, and adds subtle tang and richness. It also helps the exterior brown nicely.
Parsley and green onions. Fresh herbs and mild onion add color, freshness, and gentle flavor that balance the richness of the cheese and mayonnaise.
Garlic powder, paprika, onion powder, salt, and pepper. This simple seasoning blend gives the cups a savory, slightly smoky flavor that goes well with chicken and cheese. Taste the mixture before baking if you like, since the cheese and cooked chicken may already be salted.
Panko breadcrumbs. Panko breadcrumbs are larger and flakier than regular breadcrumbs, so they bake into an extra crunchy, golden crust. This is the secret to the crispy exterior.
Parmesan cheese. Adds a salty, nutty flavor to the topping and helps it brown beautifully.
Melted butter. Coats the panko so it toasts evenly and gives the topping richness and color.
👩🍳 Step-by-Step Instructions
1️⃣ Preheat the Oven
Preheat your oven to 400°F (200°C). Lightly grease a 12-cup muffin tin with cooking spray or olive oil to prevent sticking and help the edges become golden and crispy. Be thorough, getting into the corners and up the sides of each cup. A nonstick tin works best, and silicone molds or paper liners can also be used, although direct contact with the metal gives the crispiest edges.
2️⃣ Prepare the Chicken
Place the cooked, shredded chicken in a large mixing bowl. Make sure the chicken is well-drained and not overly moist, as excess moisture can prevent the muffin cups from crisping properly. If your chicken seems wet, blot it with paper towels before measuring. If you are shredding a whole rotisserie chicken, remove the skin and any large pieces of fat.
3️⃣ Mix the Ingredients
Add the mozzarella, cheddar, eggs, breadcrumbs, mayonnaise, parsley, green onions, garlic powder, paprika, onion powder, salt, and black pepper to the bowl. Stir thoroughly until everything is evenly combined and the mixture holds together. Use a sturdy spoon, a spatula, or clean hands. The mixture should be thick and slightly sticky, similar to a meatball mixture. If it feels too wet, add another tablespoon of breadcrumbs. If it feels too dry, add a teaspoon of mayonnaise.
4️⃣ Fill the Muffin Tin
Divide the chicken mixture evenly among the 12 muffin cups. A large cookie scoop or a ¼ cup measure helps with consistent portions. Press it firmly into each cup, shaping the mixture into compact little nests with slightly raised edges. This helps create a crisp exterior while keeping the centers tender. Pressing firmly is important, because loosely packed mixture can crumble when you remove the cups from the pan.
5️⃣ Prepare the Crunchy Topping
In a small bowl, combine the panko breadcrumbs, grated Parmesan, melted butter, and paprika. Mix until the breadcrumbs are lightly coated, creating a flavorful topping that turns beautifully golden in the oven. The panko should look slightly damp but not soggy, like coarse, buttery sand.
6️⃣ Add the Cheesy Topping
Sprinkle the breadcrumb mixture over each chicken cup. If desired, add a little extra mozzarella for an even cheesier finish with delicious melted cheese on top. Gently press the topping so it adheres to the surface.
7️⃣ Bake Until Golden
Bake for 20 to 25 minutes, or until the edges are crispy and golden brown, the cheese is bubbling, and the centers are fully cooked. If needed, broil for an additional 1 to 2 minutes, watching carefully to prevent burning. Since the chicken is already cooked, you are mainly looking for a hot center and a golden, crunchy crust. The internal temperature should reach 165°F (74°C) to be safe.
8️⃣ Let Them Rest
Remove the muffin tin from the oven and allow the chicken cups to rest for 5 minutes. This helps them firm up, making them easier to remove without breaking.
9️⃣ Remove and Garnish
Carefully loosen each cup with a small spatula or butter knife. Run the knife around the edge, then lift gently from underneath. Transfer to a serving plate and sprinkle with fresh parsley and a little extra Parmesan if desired.
🔟 Serve and Enjoy
Serve these crispy, cheesy chicken muffin cups warm with garlic sauce, ranch dressing, or sweet chili sauce. Enjoy the crunchy golden edges, tender chicken filling, and gooey melted cheese in every bite! 🧀🍗✨
💡 Tips for Perfect Crispy Cheesy Chicken Muffin Cups
- Use well-drained chicken. Excess moisture can make the cups soft instead of crispy. If using freshly cooked chicken, let it cool slightly and drain away any liquid before mixing.
- Choose panko breadcrumbs. Panko creates a lighter, crunchier topping than regular breadcrumbs.
- Press the mixture firmly. Compacting the chicken mixture helps the muffin cups hold their shape after baking.
- Do not skip the resting time. Letting the cups rest for 5 minutes makes them easier to remove from the muffin tin.
- Customize the cheese. Try Monterey Jack, Gouda, or a combination of mozzarella and sharp cheddar for different flavors.
- Add extra flavor. Finely diced bell peppers, sweet corn, jalapeños, or crispy bacon can add color and texture. Keep additional ingredients relatively dry.
- Make them ahead. Prepare the chicken mixture in advance and refrigerate it in a covered container until ready to assemble and bake.
- Grease the tin well. A thorough coat of oil or spray is the best way to prevent sticking.
- Use a thermometer. Confirm the centers reach 165°F (74°C), especially if the mixture was cold from the refrigerator.
- Storage. Refrigerate leftovers in an airtight container for up to 3 to 4 days. Reheat in an oven or air fryer at 350°F (175°C) until hot to help restore the crispy exterior. Cooked chicken cups can also be frozen for up to 2 to 3 months; thaw safely in the refrigerator before reheating.
⚠️ Common Problems and How to Fix Them
The cups are soggy. The chicken was probably too wet, or the cups were underbaked. Drain and blot the chicken, and bake until the edges are deep golden brown. You can also bake the cups on the lower oven rack to crisp the bottoms.
The cups fall apart when removed. The mixture may not have been pressed firmly enough, or the cups were not rested. Press the mixture tightly, allow 5 minutes of resting time, and run a knife around each cup before lifting.
The cups stick to the tin. Grease more generously, or use a nonstick pan. Silicone liners also make removal easy.
The topping is not crunchy. Use panko instead of fine breadcrumbs, make sure it is lightly coated in butter, and broil for the last minute or two while watching closely.
The cups are dry. The chicken may have been very lean or overcooked before you began. Make sure to include the mayonnaise, and try using a mixture of chicken breast and thigh meat.
The cups are too salty. Cheese, mayonnaise, and breadcrumbs all contain salt. Taste before adding the full amount of salt, especially if using seasoned rotisserie chicken.
The cheese is not melted. Make sure the oven is fully preheated and bake until the cheese is bubbling. Freshly shredded cheese melts better than pre-shredded.
The tops are browning too fast. Cover loosely with foil and continue baking until the centers are hot.
🍗 Delicious Variations
- 🧀 Cheese blends. Use Monterey Jack, pepper Jack, Gouda, or provolone in place of cheddar.
- 🌶 Spicy jalapeño. Add finely diced jalapeños or a pinch of cayenne for a kick.
- 🥓 Bacon ranch. Add crumbled bacon and a teaspoon of ranch seasoning to the mixture.
- 🌽 Corn and pepper. Fold in drained sweet corn and finely diced red bell pepper, keeping the vegetables dry.
- 🍕 Pizza style. Add pizza seasoning and a spoonful of marinara in the center, and top with mozzarella and mini pepperoni.
- 🧄 Garlic parmesan. Increase the Parmesan and garlic powder and brush the finished cups with garlic butter.
- 🔥 Buffalo chicken. Mix in 2 tablespoons of buffalo sauce and serve with blue cheese or ranch dressing.
- 🥬 Veggie boost. Add finely chopped spinach, squeezed dry, or finely grated zucchini, also squeezed dry.
- 🌮 Taco style. Replace the paprika and garlic seasonings with taco seasoning and serve with salsa and sour cream.
- 🧅 Caramelized onion. Fold in caramelized onions for a sweeter, deeper flavor.
- 🍯 Honey mustard. Stir a tablespoon of honey mustard into the mixture and serve with extra on the side.
🍽 What to Serve with Chicken Muffin Cups
- Dipping sauces. Garlic sauce, ranch dressing, sweet chili sauce, barbecue sauce, honey mustard, and marinara all pair well. 🥫
- Game-day spread. Serve alongside wings, nachos, sliders, and veggie trays. 🏈
- Salads. A fresh green salad or coleslaw balances the richness of the cups. 🥗
- Weeknight dinner. Pair with roasted vegetables, steamed broccoli, or a simple side of rice or mashed potatoes. 🥦
- Soup pairing. Serve with tomato soup or a light vegetable soup for a cozy meal. 🍲
- Lunchboxes. Pack two or three cups with fruit, raw veggies, and a small container of dipping sauce. 🍎
- Party platter. Arrange on a platter with garnishes and little bowls of sauces.
- Brunch. Serve with eggs, fruit, and fresh bread for a savory brunch addition.
📦 Make-Ahead, Storage, and Reheating
- Make ahead: Mix the chicken filling up to 24 hours ahead and refrigerate in a covered container. When ready, press into the greased muffin tin, add the topping, and bake. You may need an extra few minutes since the mixture will be cold.
- Assemble ahead: You can fill the muffin tin, cover it, and refrigerate for a few hours before baking. Add the topping just before baking to keep it crisp.
- Refrigerator: Refrigerate leftovers in an airtight container for up to 3 to 4 days.
- Freezer: Cooked chicken cups can be frozen for up to 2 to 3 months. Freeze them in a single layer on a tray until solid, then transfer to a freezer bag. Thaw safely in the refrigerator before reheating.
- Reheating: Reheat in an oven or air fryer at 350°F (175°C) until hot, about 8 to 12 minutes, to help restore the crispy exterior. The microwave works in a hurry but will soften the crust.
- Meal prep tip: Bake a double batch on Sunday, freeze half, and enjoy quick lunches and snacks throughout the week.
📝 Nutrition Notes
Chicken muffin cups provide plenty of protein from the chicken, eggs, and cheese, making them a filling snack or meal. They are an indulgent comfort food, so they are best enjoyed in moderation. For a lighter version, use reduced-fat cheese, replace some of the mayonnaise with Greek yogurt, and choose whole wheat breadcrumbs. Exact nutrition values vary with ingredients and portion sizes, so use a nutrition calculator if you need precise numbers.
❓ Frequently Asked Questions
Can I use raw chicken? This recipe is designed for cooked chicken. Cook it first by baking, poaching, grilling, or pan-searing, then shred or dice it before mixing.
Can I use canned chicken? Yes. Drain it very well and press it between paper towels to remove excess moisture before using.
What is the best kind of cooked chicken to use? Rotisserie chicken is convenient and flavorful. Leftover roast chicken, grilled chicken, and poached chicken also work well.
Can I use a mini muffin tin? Yes. Use about 2 tablespoons of mixture per mini cup and bake for 12 to 15 minutes. This makes about 24 mini bites, perfect for parties.
Why are my chicken cups falling apart? They may need more binding. Make sure the mixture is pressed firmly into the tin, add a little extra breadcrumb if it seems loose, and allow the cups to rest for 5 minutes before removing.
Can I make them gluten-free? Yes. Use gluten-free breadcrumbs and gluten-free panko.
Can I make these without mayonnaise? You can substitute plain Greek yogurt or sour cream, though the flavor will be slightly different.
Can I air fry them? Yes. Use silicone molds or a muffin pan that fits your air fryer, and cook at 350°F (175°C) for 12 to 15 minutes, until golden and hot in the center.
How do I keep the tops crispy? Use panko, coat it lightly in butter, add it just before baking, and reheat leftovers in the oven or air fryer rather than the microwave.
Can I freeze unbaked muffin cups? You can shape the mixture and freeze it, but for best texture, it is easier to freeze fully baked cups and reheat them.
🏁 Final Thoughts
These Crispy Cheesy Chicken Muffin Cups are everything you want from a family-friendly recipe: easy to make, packed with flavor, and loved by kids and adults alike. 🧀🍗 With tender seasoned chicken, gooey melted cheese, and a golden, crunchy panko topping, every bite is satisfying. They shine as a party appetizer, a game-day snack, a lunchbox favorite, or a fun weeknight dinner, and they are a smart way to give leftover chicken a delicious second life.
Make a batch, pick your favorite dipping sauce, and watch them disappear. 🤎🔥
📌 Save this crispy cheesy chicken muffin cups recipe for your next party, game day, or busy weeknight! Leave a comment and tell us how yours turned out. 🧀🍗✨
📋 Quick Recipe Card
Crispy Cheesy Chicken Muffin Cups
🍽 Yield: 12 chicken muffin cups | 🔥 Oven: 400°F (200°C) | ⏲️ Bake: 20 to 25 minutes | 😴 Rest: 5 minutes
Chicken mixture: 2 cups (300 g) cooked chicken breast (shredded or finely diced), 1 cup (100 g) shredded mozzarella cheese, ½ cup (50 g) shredded cheddar cheese, 2 large eggs, ½ cup (60 g) breadcrumbs, ¼ cup (60 g) mayonnaise, 2 tbsp finely chopped fresh parsley, 2 green onions (finely sliced), 1 tsp garlic powder, 1 tsp paprika, ½ tsp onion powder, ½ tsp salt (or to taste), ¼ tsp freshly ground black pepper.
Crispy topping: ½ cup (50 g) panko breadcrumbs, 2 tbsp grated Parmesan cheese, 1 tbsp melted butter, ½ tsp paprika. Cooking spray or olive oil for greasing the muffin tin.
Optional for serving: Extra shredded mozzarella cheese, fresh chopped parsley, garlic dipping sauce or ranch dressing, sweet chili sauce.
Instructions:
- Preheat the oven to 400°F (200°C) and lightly grease a 12-cup muffin tin.
- Place the well-drained cooked chicken in a large bowl.
- Add the mozzarella, cheddar, eggs, breadcrumbs, mayonnaise, parsley, green onions, garlic powder, paprika, onion powder, salt, and pepper. Stir until evenly combined.
- Divide the mixture among the 12 cups and press firmly into compact nests with slightly raised edges.
- Combine the panko, Parmesan, melted butter, and paprika in a small bowl.
- Sprinkle the topping over each cup, adding extra mozzarella if desired.
- Bake 20 to 25 minutes until the edges are crispy and golden and the cheese is bubbling. Broil 1 to 2 minutes if needed, watching carefully.
- Rest in the tin for 5 minutes.
- Loosen each cup with a small spatula or butter knife, transfer to a plate, and garnish with parsley and Parmesan.
- Serve warm with garlic sauce, ranch dressing, or sweet chili sauce.

Crispy Cheesy Chicken Muffin Cups
Ingredients
For the Chicken Mixture
- 2 cups (300 g) cooked chicken breast, shredded or finely diced
- 1 cup (100 g) shredded mozzarella cheese
- ½ cup (50 g) shredded cheddar cheese
- 2 large eggs
- ½ cup (60 g) breadcrumbs
- ¼ cup (60 g) mayonnaise
- 2 tbsp finely chopped fresh parsley
- 2 green onions, finely sliced
- 1 tsp garlic powder
- 1 tsp paprika
- ½ tsp onion powder
- ½ tsp salt, or to taste
- ¼ tsp freshly ground black pepper
For the Crispy Topping
- ½ cup (50 g) panko breadcrumbs
- 2 tbsp grated Parmesan cheese
- 1 tbsp melted butter
- ½ tsp paprika
- Cooking spray or olive oil, for greasing the muffin tin
Optional for Serving
- Extra shredded mozzarella cheese
- Fresh chopped parsley
- Garlic dipping sauce or ranch dressing
- Sweet chili sauce
Instructions
Preheat your oven to 400°F (200°C). Lightly grease a 12-cup muffin tin with cooking spray or olive oil to prevent sticking and help the edges become golden and crispy. Be thorough, getting into the corners and up the sides of each cup. A nonstick tin works best, and silicone molds or paper liners can also be used, although direct contact with the metal gives the crispiest edges.
Place the cooked, shredded chicken in a large mixing bowl. Make sure the chicken is well-drained and not overly moist, as excess moisture can prevent the muffin cups from crisping properly. If your chicken seems wet, blot it with paper towels before measuring. If you are shredding a whole rotisserie chicken, remove the skin and any large pieces of fat.
Add the mozzarella, cheddar, eggs, breadcrumbs, mayonnaise, parsley, green onions, garlic powder, paprika, onion powder, salt, and black pepper to the bowl. Stir thoroughly until everything is evenly combined and the mixture holds together. Use a sturdy spoon, a spatula, or clean hands. The mixture should be thick and slightly sticky, similar to a meatball mixture. If it feels too wet, add another tablespoon of breadcrumbs. If it feels too dry, add a teaspoon of mayonnaise.
Divide the chicken mixture evenly among the 12 muffin cups. A large cookie scoop or a ¼ cup measure helps with consistent portions. Press it firmly into each cup, shaping the mixture into compact little nests with slightly raised edges. This helps create a crisp exterior while keeping the centers tender. Pressing firmly is important, because loosely packed mixture can crumble when you remove the cups from the pan.
In a small bowl, combine the panko breadcrumbs, grated Parmesan, melted butter, and paprika. Mix until the breadcrumbs are lightly coated, creating a flavorful topping that turns beautifully golden in the oven. The panko should look slightly damp but not soggy, like coarse, buttery sand.
Sprinkle the breadcrumb mixture over each chicken cup. If desired, add a little extra mozzarella for an even cheesier finish with delicious melted cheese on top. Gently press the topping so it adheres to the surface.
Bake for 20 to 25 minutes, or until the edges are crispy and golden brown, the cheese is bubbling, and the centers are fully cooked. If needed, broil for an additional 1 to 2 minutes, watching carefully to prevent burning. Since the chicken is already cooked, you are mainly looking for a hot center and a golden, crunchy crust. The internal temperature should reach 165°F (74°C) to be safe.
Remove the muffin tin from the oven and allow the chicken cups to rest for 5 minutes. This helps them firm up, making them easier to remove without breaking.
Carefully loosen each cup with a small spatula or butter knife. Run the knife around the edge, then lift gently from underneath. Transfer to a serving plate and sprinkle with fresh parsley and a little extra Parmesan if desired.
Serve these crispy, cheesy chicken muffin cups warm with garlic sauce, ranch dressing, or sweet chili sauce. Enjoy the crunchy golden edges, tender chicken filling, and gooey melted cheese in every bite! 🧀🍗✨