
3-Ingredient High-Protein Cannellini Bean Bread
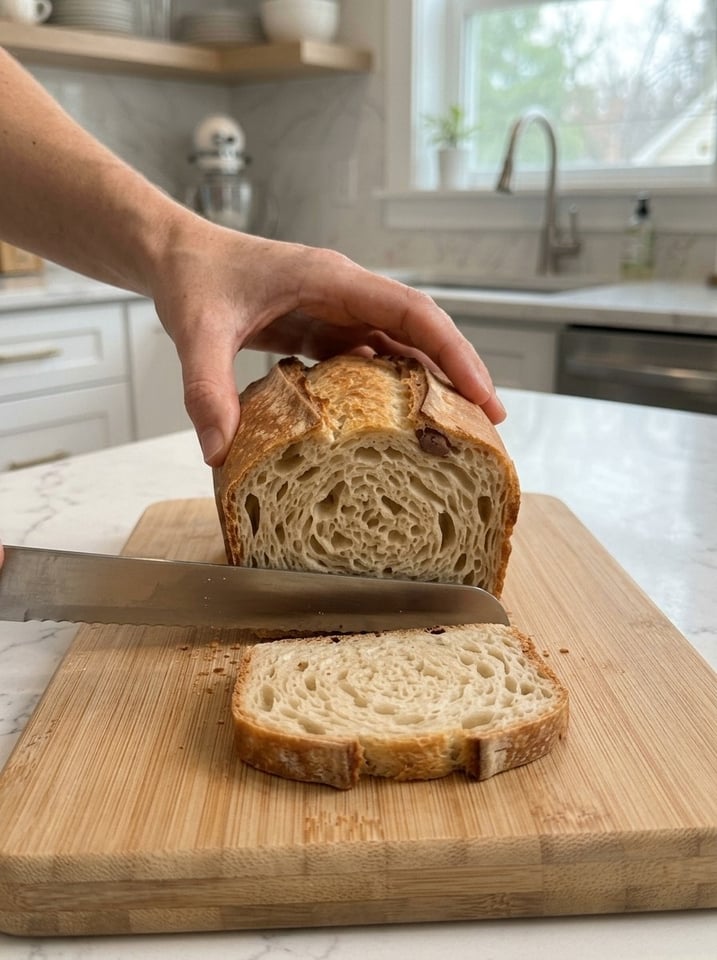
🍞 3-Ingredient High-Protein Cannellini Bean Bread
Soft, wholesome and surprisingly easy to make, this 3-ingredient high-protein cannellini bean bread transforms a simple can of white beans into a protein-rich bread alternative with no traditional flour at all. With just three basic ingredients, it is perfect for breakfast, sandwiches or a quick savory snack. There is no kneading, no yeast, no proofing and no special equipment beyond a blender or food processor.
If you are looking for a flourless loaf that is quick, budget-friendly and made from pantry staples, this recipe is a great place to start. In this guide you will find the complete recipe, an explanation of how it works, tips for getting the best texture, ways to flavor it, serving ideas, storage and freezing advice, troubleshooting and answers to the most common questions.
Why You Will Love This Bean Bread
- Just three ingredients. Cannellini beans, eggs and baking powder are all you need.
- No flour. There is no wheat flour, nut flour or starch in the base recipe.
- High in protein. Beans and eggs both contribute protein, making each slice more filling than many standard breads.
- No kneading or yeast. You blend, pour and bake. No rising time is required.
- Mild flavor. Cannellini beans are creamy and neutral, so the bread tastes savory and gentle rather than “beany.”
- Budget-friendly. A can of beans, two eggs and baking powder cost very little.
- Versatile. Toast it, make sandwiches, top it with avocado or serve it alongside soup.
- Easy to customize. Add garlic powder, herbs, spices or seeds to match your meal.
What Is Cannellini Bean Bread?
Cannellini bean bread is a dense, soft, moist loaf made by blending canned white beans with eggs and a leavening agent. The beans replace flour as the structure of the bread: when blended, they become a smooth, creamy puree full of starch and protein. Eggs bind the batter and help it set during baking, while baking powder adds a little lift.
The result is more like a soft, sandwich-style loaf or a savory “bean cake” than a fluffy, airy yeast bread. It will not behave exactly like wheat bread, but it is a satisfying, flavorful alternative, especially when toasted.
Why Cannellini Beans?
Cannellini beans, also called white kidney beans, are large, creamy beans with a mild, slightly nutty flavor and a smooth texture. They work especially well in this recipe for a few reasons:
- Neutral flavor. They taste much milder than darker beans, which makes them ideal for bread.
- Creamy texture. They blend into a smooth, uniform batter.
- Light color. The finished loaf has a pale, golden appearance similar to ordinary bread.
- Easy to find. They are available canned in almost every supermarket.
If you cannot find cannellini beans, great northern beans or navy beans are close substitutes. Chickpeas can also be used, though they will give a slightly different flavor and color.
Ingredients
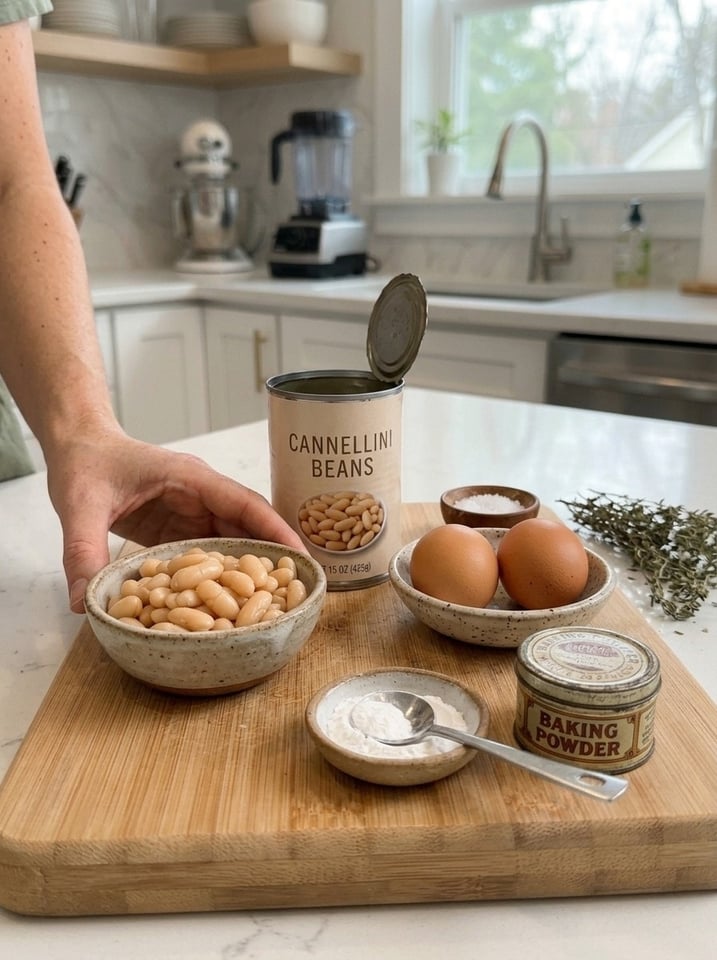
- 1 can (15 oz / 425 g) cannellini beans, drained and rinsed (about 240 g after draining)
- 2 large eggs
- 1 teaspoon baking powder
Optional: a pinch of salt, garlic powder or dried herbs for extra flavor.
Equipment You Will Need
- A blender or food processor
- A small loaf pan
- Parchment paper or cooking spray
- A spatula
- A clean kitchen towel or paper towels
- A wire rack
- A toothpick or skewer for testing
Step-by-Step Instructions
Step 1: Prepare the beans 🫘
Drain and rinse the cannellini beans thoroughly. Pat them dry with a clean kitchen towel to remove excess moisture, which gives the bread a better texture.
Step 2: Blend until smooth 🥣
Add the beans, eggs and baking powder to a blender or food processor. Blend until the mixture is smooth and creamy, scraping down the sides as needed.
Step 3: Prepare the pan 🍞
Preheat your oven to 350°F (175°C). Line a small loaf pan with parchment paper or lightly grease it.
Step 4: Pour the batter ✨
Transfer the bean mixture into the prepared pan and smooth the top with a spatula.
Step 5: Bake until set 🔥
Bake for approximately 35 to 45 minutes, until the loaf is firm, lightly golden and cooked through. A toothpick inserted in the center should come out without wet batter.
Step 6: Cool before slicing 🤎
Let the loaf cool in the pan for 10 minutes, then transfer it to a wire rack. Allow it to cool completely before slicing so it holds together.
Step 7: Toast and serve 😋
For the best texture, toast the slices in a skillet or toaster until lightly crisp. Enjoy with avocado, cottage cheese, eggs or your favorite sandwich fillings.
Recipe Card at a Glance
- Prep time: 10 minutes
- Bake time: 35 to 45 minutes
- Cooling time: 30 minutes
- Total time: Approximately 1 hour 15 minutes
- Yield: 1 small loaf, about 6 to 8 slices
- Course: Breakfast, snack, side
- Method: Oven-baked
How This Recipe Works
Understanding the role of each ingredient helps you troubleshoot and customize the loaf.
Beans (structure and body). Cooked beans contain starch and protein. Once blended, they form a thick, smooth base that takes the place of flour. The starch gives the batter body, and the protein contributes to the structure as it bakes.
Eggs (binding and setting). Eggs are the glue that holds the loaf together. As they bake, the egg proteins coagulate and set, giving the loaf its firm but tender crumb. They also add moisture and richness.
Baking powder (lift). Baking powder releases gas in the heat of the oven, creating small bubbles and a slightly lighter texture. Without it, the loaf would be denser and more like a bean custard.
Together, these three simple ingredients produce a soft, moist, sliceable loaf. It will be denser and more moist than traditional bread, which is exactly what makes it satisfying.
Tips for Better Bean Bread
1. Drain the beans very well
Excess liquid can make the loaf dense, gummy or soggy. After draining, rinse the beans, shake off excess water and pat them dry with a towel.
2. Rinse the beans
Rinsing removes the starchy canning liquid, which can taste metallic or slightly salty. It also reduces sodium and gives a cleaner, milder flavor.
3. Blend thoroughly
A smooth batter creates a more even texture. Stop and scrape the sides of the blender or food processor a few times, and blend until you see no beans pieces left. A high-powered blender gives the silkiest results, but a food processor works well if you run it long enough.
4. Use fresh baking powder
Baking powder loses its power over time. If yours has been open for more than six months, test it by stirring a little into hot water. If it fizzes vigorously, it is still good.
5. Do not overfill the pan
The batter rises slightly while baking. Use a small loaf pan and leave a little room at the top. A pan that is too large will produce a thin, flat loaf that bakes faster.
6. Let it cool completely
Bean-based bread is delicate while warm and firms up as it cools. Slicing too early can cause it to crumble or feel gummy in the center. Be patient and let it cool fully on a wire rack.
7. Toast the slices
Toasting improves the texture dramatically, drying the surface slightly and adding crispness. Toast slices in a toaster, a dry skillet or a lightly oiled pan until golden.
8. Slice carefully
Use a serrated knife and a gentle sawing motion. Slice the loaf into even pieces, about ½ inch (1.25 cm) thick, for the sturdiest slices.
9. Check the doneness in the middle
The center of a bean loaf can stay moist longer than the edges. Insert a toothpick into the center; it should come out clean or with a few dry crumbs, not wet batter. If the top is browning too fast, loosely cover the loaf with foil and keep baking.
10. Adjust the baking time to your pan
Dark metal pans bake faster than glass or ceramic. Start checking at 30 to 35 minutes if you are using a dark pan.
Flavor Variations
The base recipe is intentionally simple, so it is easy to adjust. Remember that additions mean the recipe is no longer strictly three ingredients, but they make the bread more flavorful:
- Garlic and herb. Add ½ teaspoon of garlic powder and 1 teaspoon of dried Italian herbs, rosemary or thyme.
- Cheesy bean bread. Stir in ¼ cup of grated Parmesan or sharp cheddar after blending.
- Everything bagel. Sprinkle everything bagel seasoning over the top before baking.
- Seeded loaf. Add sesame, sunflower or pumpkin seeds on top or stirred into the batter.
- Spicy version. Add a pinch of chili flakes, cayenne or smoked paprika.
- Onion and chive. Add onion powder and chopped chives for a savory, bakery-style loaf.
- Olive and sun-dried tomato. Fold in chopped olives or sun-dried tomatoes for a Mediterranean twist.
- Lemon pepper. A little lemon zest and black pepper gives a fresh, bright flavor.
- Plain and salted. A pinch of salt is often enough to bring out the beans’ natural flavor.
- Slightly sweet. For a breakfast-style loaf, add a pinch of cinnamon and a teaspoon of honey or maple syrup (this changes the savory profile).
Delicious Ways to Serve Cannellini Bean Bread
Toasted slices of this bread are a versatile base for all kinds of toppings:
Breakfast ideas
- Mashed avocado with a squeeze of lemon, salt and chili flakes
- Cottage cheese with sliced tomatoes and black pepper
- Fried or poached eggs with a sprinkle of herbs
- Greek yogurt and smoked salmon
- Ricotta with a drizzle of olive oil
- Scrambled eggs and sautéed spinach
Lunch and sandwich ideas
- Turkey, lettuce and tomato sandwich
- Tuna salad or chicken salad
- Hummus and cucumber
- Grilled cheese, toasted in a skillet with a little butter or oil
- Open-faced sandwich with roasted vegetables
- Egg salad with fresh dill
Snack and side ideas
- Cut into strips and serve with soup or a dip
- Topped with tomato, basil and mozzarella as a bruschetta-style bite
- Served with olive oil and balsamic vinegar for dipping
- Alongside chili, stew or a big green salad
- Spread with nut butter for a protein-rich snack (for a sweet option)
Is Cannellini Bean Bread Healthy?
Beans are rich in plant protein, fiber and various minerals, and eggs add high-quality protein. This makes the loaf more filling than many refined breads, which can help keep you satisfied between meals. The loaf contains no added sugar and no flour in its base form, and it is naturally lower in refined carbohydrates than standard bread.
Exact nutrition values depend on the brand of beans, the size of the eggs and how many slices you get from the loaf, so for precise numbers, use a nutrition calculator with your own ingredients. As with any recipe, it fits best as part of a varied, balanced diet.
Dietary notes:
- Gluten. The recipe contains no gluten-containing ingredients, but if you must avoid gluten strictly, check that your canned beans and baking powder are labeled gluten-free, as cross-contamination can occur.
- Eggs. The recipe contains eggs, so it is not vegan or suitable for those with egg allergies.
- Sodium. Canned beans can be high in sodium. Rinsing helps, and you can choose low-sodium or no-salt-added beans.
- Medical needs. If you follow a special diet for a medical reason, check with your healthcare provider or dietitian about whether this recipe fits your needs.
Storage, Make-Ahead and Freezing
Refrigerator
Keep the cooled loaf in an airtight container in the refrigerator for up to 3 to 4 days. Because it contains eggs and beans and is moist, refrigeration is recommended rather than leaving it at room temperature for long periods.
Freezer
For longer storage, slice the loaf, separate the slices with parchment paper and freeze them in a freezer bag. Frozen slices keep well for a couple of months. You can toast them straight from frozen, which makes this an excellent meal-prep bread.
Reheating
Toast slices in a toaster, toaster oven or skillet until warm and lightly crisp. Reheating in the microwave works but will make the slices softer.
Make ahead
Bake the loaf on the weekend, let it cool, slice it and store it for easy weekday breakfasts and sandwiches.
Troubleshooting Common Problems
My bean bread is gummy or wet in the middle
The loaf may be underbaked, the beans may not have been dried well, or it may have been sliced too early. Bake for a few more minutes, make sure a toothpick comes out clean, and let the loaf cool completely before slicing. Toasting also helps.
My loaf is dense and heavy
Bean bread is naturally denser than wheat bread. For a slightly lighter texture, make sure your baking powder is fresh and blend the batter until very smooth. A loaf that is too thick in a pan that is too small can also be dense, so use the right size pan.
The loaf did not rise much
This recipe rises only slightly. Old baking powder, an overly large pan or underblended batter can limit rise. Use fresh baking powder and make sure the oven is fully preheated.
The loaf tastes “beany”
Rinse the beans thoroughly, add garlic powder, herbs or a pinch of salt and toast the slices. A little acidity, such as lemon zest, can also help.
The bread falls apart when I slice it
Cool the loaf completely before slicing and use a sharp serrated knife. Cutting while warm often causes crumbling. Thicker slices are also sturdier.
The top browns too much before the middle is done
Cover the loaf loosely with foil and continue baking. Check that your oven temperature is accurate with an oven thermometer.
It sticks to the pan
Line the pan with parchment paper, leaving overhang on the sides to lift the loaf out. Greasing alone can sometimes be insufficient for a delicate loaf.
Common Mistakes to Avoid
- Not draining the beans well. Extra moisture makes the loaf soggy.
- Skipping the rinse. Canning liquid can affect the flavor.
- Underblending. Leftover bean pieces create an uneven texture.
- Using old baking powder. The loaf will be flatter and denser.
- Slicing while warm. The loaf will be fragile and may collapse.
- Underbaking. The center may be wet or gummy.
- Expecting it to behave like yeast bread. It is a different kind of loaf, soft, moist and best when toasted.
- Using a pan that is too big. The loaf will be thin and bake too fast.
Frequently Asked Questions
Can I use dried beans instead of canned?
Yes. Soak and cook dried cannellini beans until very tender, then drain and cool them. You will need about 1½ cups of cooked beans, which is roughly equivalent to one 15 oz (425 g) can. Make sure they are well drained and patted dry.
Can I use other types of beans?
Great northern beans, navy beans and white kidney beans work well. Chickpeas also work, though they have a stronger flavor. Darker beans such as black beans will make the loaf darker and more strongly flavored.
Can I make it without eggs?
The eggs are essential for binding in this recipe. Egg substitutes such as flax eggs may work in some bean breads, but results vary and the texture may be more fragile. This base recipe is designed with eggs.
Is this bread gluten-free?
The ingredients are naturally gluten-free, but check the labels on your canned beans and baking powder if you need to avoid gluten strictly.
Is it keto-friendly?
Beans contain carbohydrates, so this loaf is lower in refined carbs than regular bread but is not typically considered keto. If you follow a strict low-carb plan, check the numbers with your own tracker.
Can I double the recipe?
Yes. Use a standard-size loaf pan and increase the baking time as needed, checking for doneness with a toothpick. You can also bake two small loaves.
What size loaf pan should I use?
A small loaf pan, such as 8 × 4 inches (20 × 10 cm) or a smaller ‘mini’ loaf pan, works best. A standard 9 × 5 inch pan will yield a thinner loaf, which may bake faster.
Can I add flour to make it fluffier?
You can, but it would change the recipe from flourless. If you want a lighter texture, try adding a tablespoon or two of a flour you tolerate, but note this alters the nutrition and character of the loaf.
Does it taste like regular bread?
It does not taste exactly like wheat bread. It is mild, savory and soft, with a slightly creamy texture. Toasting and adding flavorings such as garlic, herbs or cheese helps it feel more bread-like.
Can I make it into buns or rolls?
You can try spooning the batter into a muffin tin or onto a lined baking sheet in rounds, then baking until set. Baking times will be shorter, around 20 to 25 minutes, so check often.
Can I use a stand mixer or whisk instead of a blender?
Beans need to be pureed until smooth, so a blender or food processor is best. You could mash the beans extremely well with a potato masher and whisk in the eggs, but the texture will be rougher.
How long does it take to cool?
About 30 minutes to cool enough for slicing, though a full hour is even better for the firmest texture.
Final Thoughts
3-ingredient high-protein cannellini bean bread is a smart, simple, wholesome way to enjoy a bread-like loaf without flour, kneading or yeast. With just beans, eggs and baking powder, you can have a soft, savory loaf ready to toast, top and enjoy at any meal. It is perfect for meal prep, easy to flavor and friendly on the budget.
If you try it, leave a comment with your favorite topping, share the recipe with a friend who is looking for a protein-rich bread alternative and save it for your next breakfast or snack. Enjoy! 🫘🍞✨
Print
3-Ingredient High-Protein Cannellini Bean Bread
Ingredients
- 1 can (15 oz / 425 g) cannellini beans, drained and rinsed (about 240 g after draining)
- 2 large eggs
- 1 teaspoon baking powder
Optional: a pinch of salt, garlic powder or dried herbs for extra flavor.
Equipment You Will Need
- A blender or food processor
- A small loaf pan
- Parchment paper or cooking spray
- A spatula
- A clean kitchen towel or paper towels
- A wire rack
- A toothpick or skewer for testing
Instructions
Step 1: Prepare the beans 🫘
Drain and rinse the cannellini beans thoroughly. Pat them dry with a clean kitchen towel to remove excess moisture, which gives the bread a better texture.
Step 2: Blend until smooth 🥣
Add the beans, eggs and baking powder to a blender or food processor. Blend until the mixture is smooth and creamy, scraping down the sides as needed.
Step 3: Prepare the pan 🍞
Preheat your oven to 350°F (175°C). Line a small loaf pan with parchment paper or lightly grease it.
Step 4: Pour the batter ✨
Transfer the bean mixture into the prepared pan and smooth the top with a spatula.
Step 5: Bake until set 🔥
Bake for approximately 35 to 45 minutes, until the loaf is firm, lightly golden and cooked through. A toothpick inserted in the center should come out without wet batter.
Step 6: Cool before slicing 🤎
Let the loaf cool in the pan for 10 minutes, then transfer it to a wire rack. Allow it to cool completely before slicing so it holds together.
Step 7: Toast and serve 😋
For the best texture, toast the slices in a skillet or toaster until lightly crisp. Enjoy with avocado, cottage cheese, eggs or your favorite sandwich fillings.
Recipe Card at a Glance
- Prep time: 10 minutes
- Bake time: 35 to 45 minutes
- Cooling time: 30 minutes
- Total time: Approximately 1 hour 15 minutes
- Yield: 1 small loaf, about 6 to 8 slices
- Course: Breakfast, snack, side
- Method: Oven-baked
How This Recipe Works
Understanding the role of each ingredient helps you troubleshoot and customize the loaf.
Beans (structure and body). Cooked beans contain starch and protein. Once blended, they form a thick, smooth base that takes the place of flour. The starch gives the batter body, and the protein contributes to the structure as it bakes.
Eggs (binding and setting). Eggs are the glue that holds the loaf together. As they bake, the egg proteins coagulate and set, giving the loaf its firm but tender crumb. They also add moisture and richness.
Baking powder (lift). Baking powder releases gas in the heat of the oven, creating small bubbles and a slightly lighter texture. Without it, the loaf would be denser and more like a bean custard.
Together, these three simple ingredients produce a soft, moist, sliceable loaf. It will be denser and more moist than traditional bread, which is exactly what makes it satisfying.
Tips for Better Bean Bread
1. Drain the beans very well
Excess liquid can make the loaf dense, gummy or soggy. After draining, rinse the beans, shake off excess water and pat them dry with a towel.
2. Rinse the beans
Rinsing removes the starchy canning liquid, which can taste metallic or slightly salty. It also reduces sodium and gives a cleaner, milder flavor.
3. Blend thoroughly
A smooth batter creates a more even texture. Stop and scrape the sides of the blender or food processor a few times, and blend until you see no beans pieces left. A high-powered blender gives the silkiest results, but a food processor works well if you run it long enough.
4. Use fresh baking powder
Baking powder loses its power over time. If yours has been open for more than six months, test it by stirring a little into hot water. If it fizzes vigorously, it is still good.
5. Do not overfill the pan
The batter rises slightly while baking. Use a small loaf pan and leave a little room at the top. A pan that is too large will produce a thin, flat loaf that bakes faster.
6. Let it cool completely
Bean-based bread is delicate while warm and firms up as it cools. Slicing too early can cause it to crumble or feel gummy in the center. Be patient and let it cool fully on a wire rack.
7. Toast the slices
Toasting improves the texture dramatically, drying the surface slightly and adding crispness. Toast slices in a toaster, a dry skillet or a lightly oiled pan until golden.
8. Slice carefully
Use a serrated knife and a gentle sawing motion. Slice the loaf into even pieces, about ½ inch (1.25 cm) thick, for the sturdiest slices.
9. Check the doneness in the middle
The center of a bean loaf can stay moist longer than the edges. Insert a toothpick into the center; it should come out clean or with a few dry crumbs, not wet batter. If the top is browning too fast, loosely cover the loaf with foil and keep baking.
10. Adjust the baking time to your pan
Dark metal pans bake faster than glass or ceramic. Start checking at 30 to 35 minutes if you are using a dark pan.